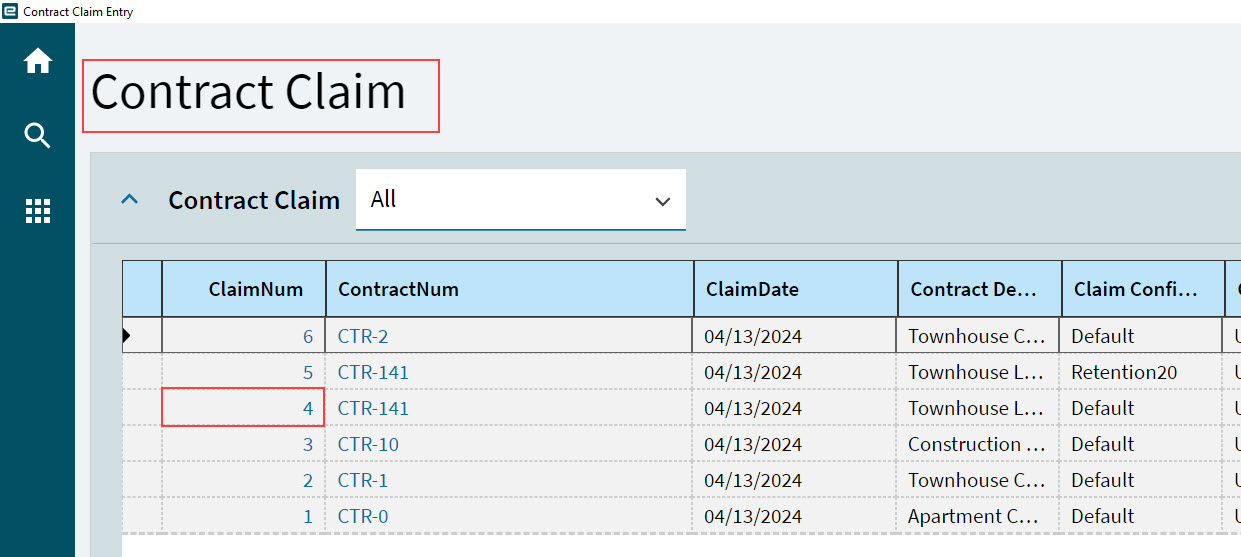
General Operations
Navigate to Advanced Project Management > Contract Management > General Operations. All the operations, trackers, and workbenches in the Contract Management module are accessed from here.
APM AR Invoice Entry
Use APM AR Invoice Entry to enter Accounts Receivable Invoices.
|
All other features and functionality of APM AR Invoice Entry are the same as the standard AR Invoice Entry, accessible from other menu paths in Kinetic. For further information on capturing an AR Invoice, refer to the standard Kinetic Help topic Entering AR Invoices in the Accounts Receivable module (Invoices). |
Creating and Posting APM AR Invoices
The instructions below show how to create a miscellaneous invoice with lines. Use the same approach when capturing other types, such as Advance Billing, Credit Memos, and so on.
-
Create a new Invoice Group: see Capturing an Invoice Group.
-
Capture an APM AR Invoice: see Capturing an APM AR Invoice.
-
Post the invoice.
You can also use APM AR Invoice Entry to post an existing, unposted APM AR Invoice. For example, a Contract Claim invoice that was not auto posted. (Auto posting of Contract Claim Invoices and Credit Memos are controlled by the setting AutoPostClaimARInvoices in APM Configuration – see Configuration Details).
To post a Contract Claim Invoice:
-
Select the invoice. See Selecting an APM AR Invoice.
-
Post the invoice group.
Capturing an Invoice Group
-
Navigate to Advanced Project Management > Project Accounting > General Operations > APM AR Invoice Entry OR
Navigate to Advanced Project Management > Contract Management > General Operations > APM AR Invoice Entry.
-
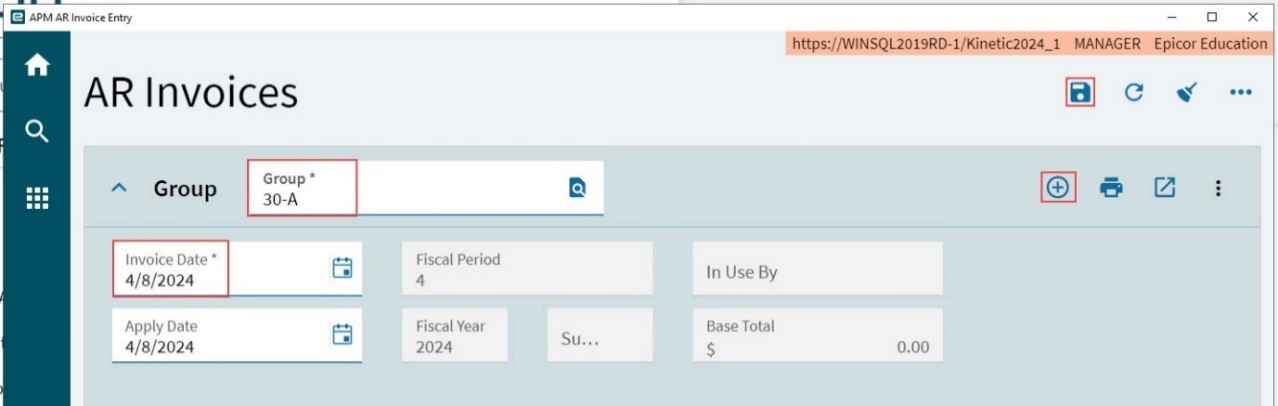
Add a new invoice group.
-
Click New Group
 on the Group card menu bar to add a new invoice group.
 -
Type a group identifier into the Group edit box.
-
Select an Invoice Date.
-
Select Save Group
 on the Standard toolbar.
-
Capturing an APM AR Invoice
-
Enter or select a Group on the Group card or add a new invoice group.
-
Add a new invoice. Select New Miscellaneous Invoice
on the Invoices section menu.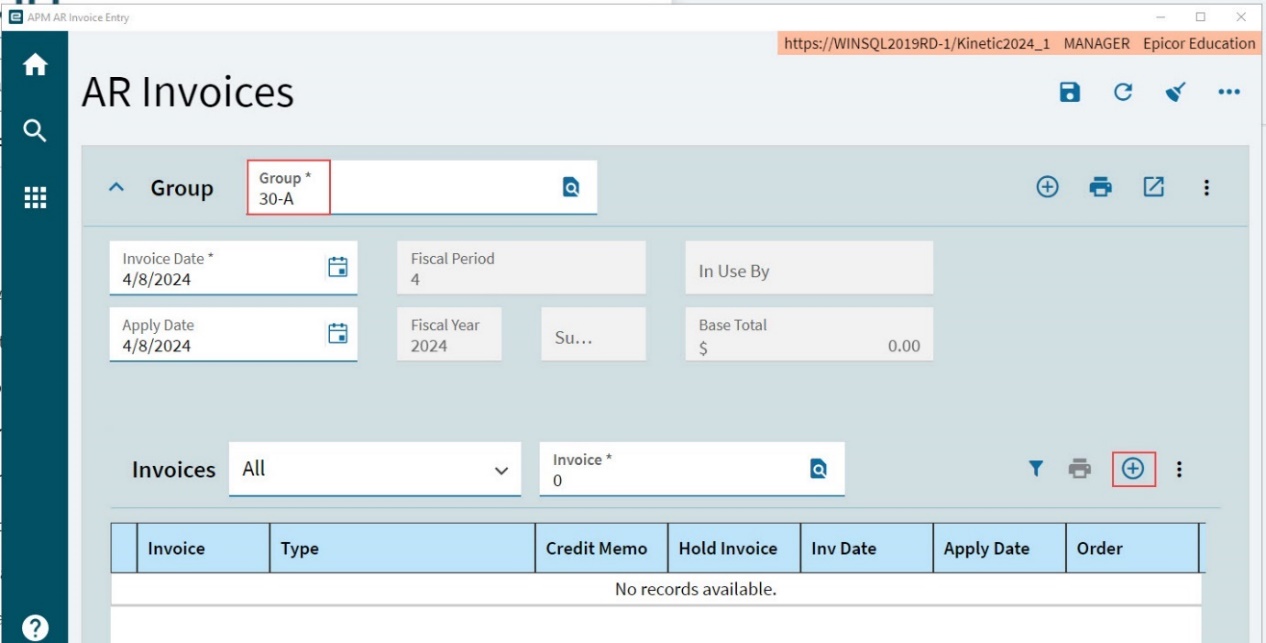
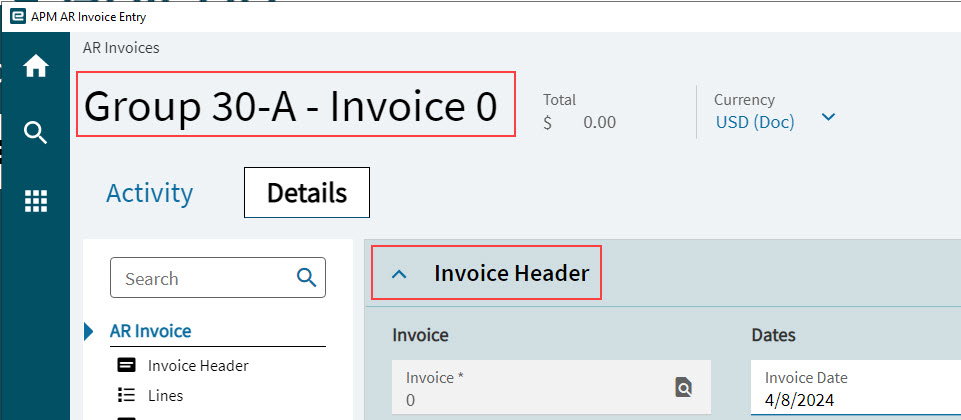
A new invoice is created and displayed, with the Invoice Header card expanded.
-
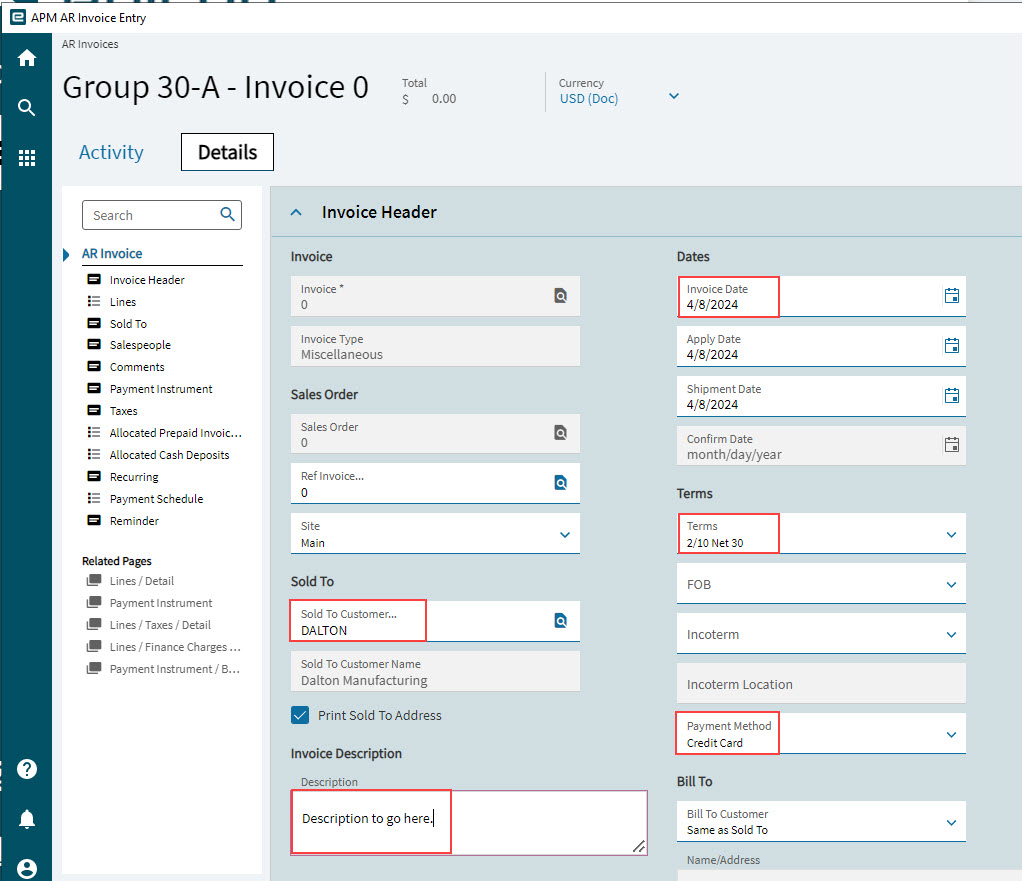
Update the Invoice Header.
-
Select the Sold To Customer.
-
Enter a Description.
-
Select an Invoice Date.
-
Select Terms.
-
Select a Payment Method.
-
-
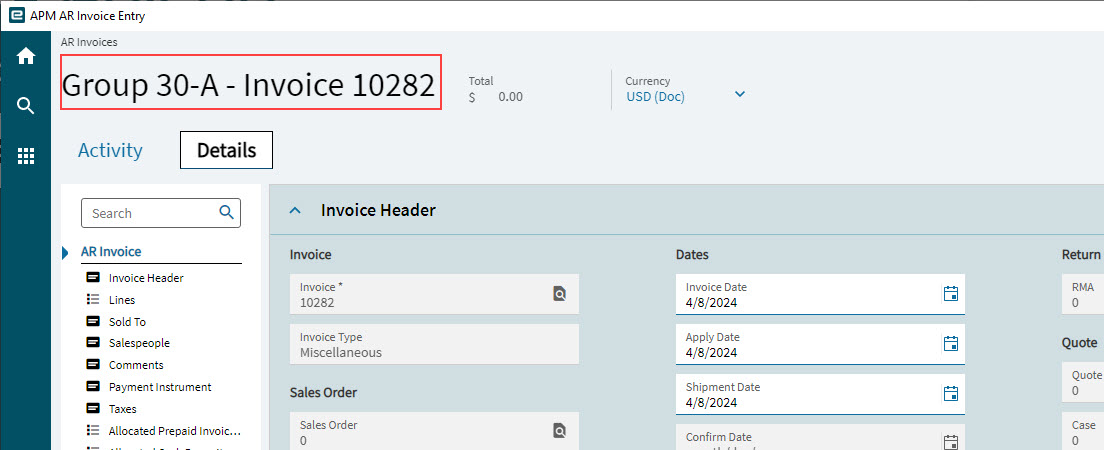
Select Save
on the Standard toolbar.The new invoice is saved.
-
Add an Invoice Line.
-
Select Lines on the Navigation Tree.
-
Select New Line
on the Lines menu bar.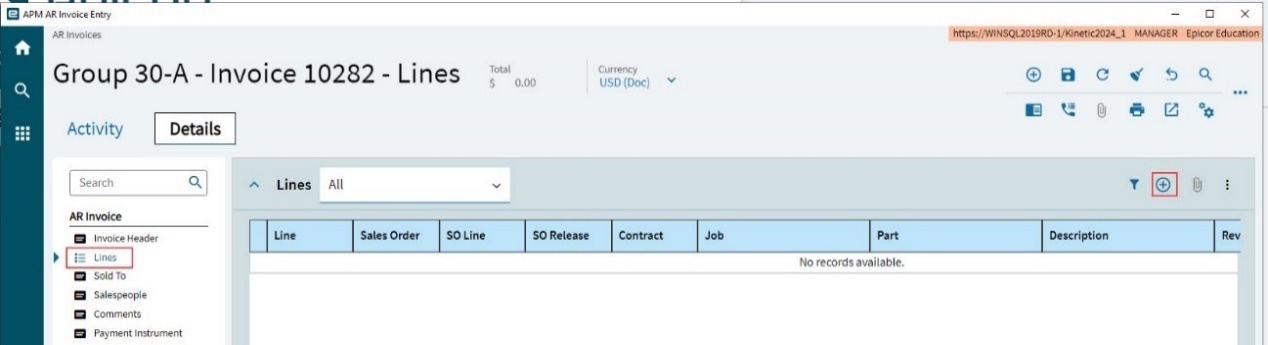
A new invoice line is created.
-
-
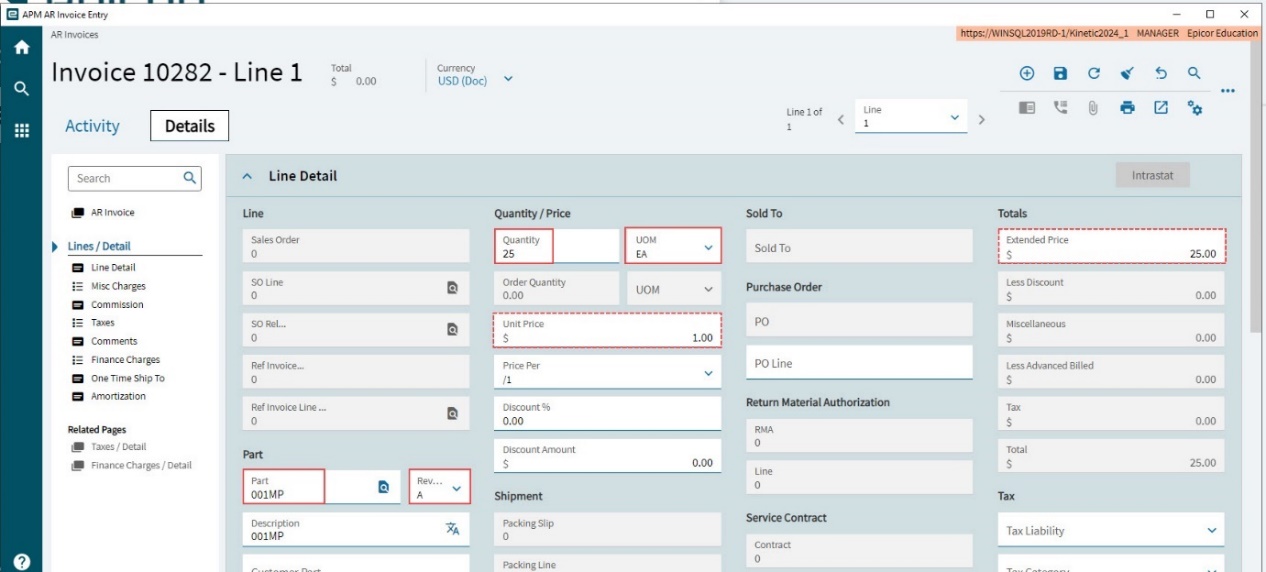
Update the Line Detail.
-
Select a Part and Revision.
-
Enter a Quantity and UOM.
-
Update the Unit Cost if necessary.
-
Keep all other defaults.
-
Save the line.
The Extended Price in the Line Totals section is updated.
-
-
Enter more lines if required.
-
Check the Line Amounts on the Invoice Header card. This should match the sum of the Extended Price from all Lines.
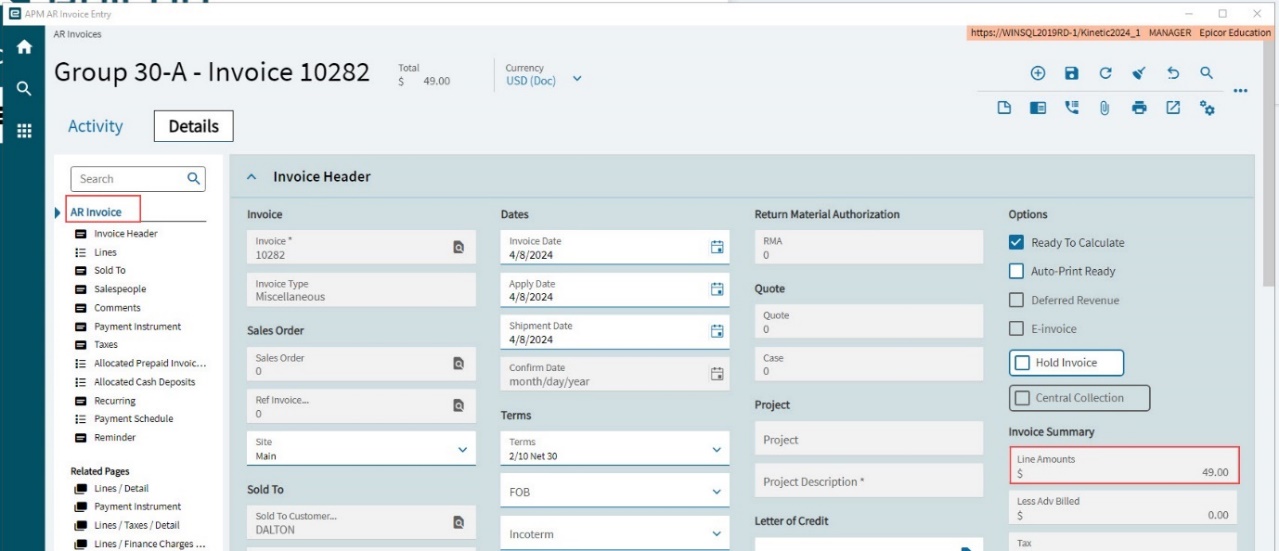
-
Select Save
on the Standard toolbar.
Selecting an APM AR Invoice
-
Navigate to Advanced Project Management > Project Accounting > General Operations > APM AR Invoice Entry OR
Navigate to Advanced Project Management > Contract Management > General Operations > APM AR Invoice Entry.
-
Enter or an Invoice number and tab out, or search
 and select an invoice number.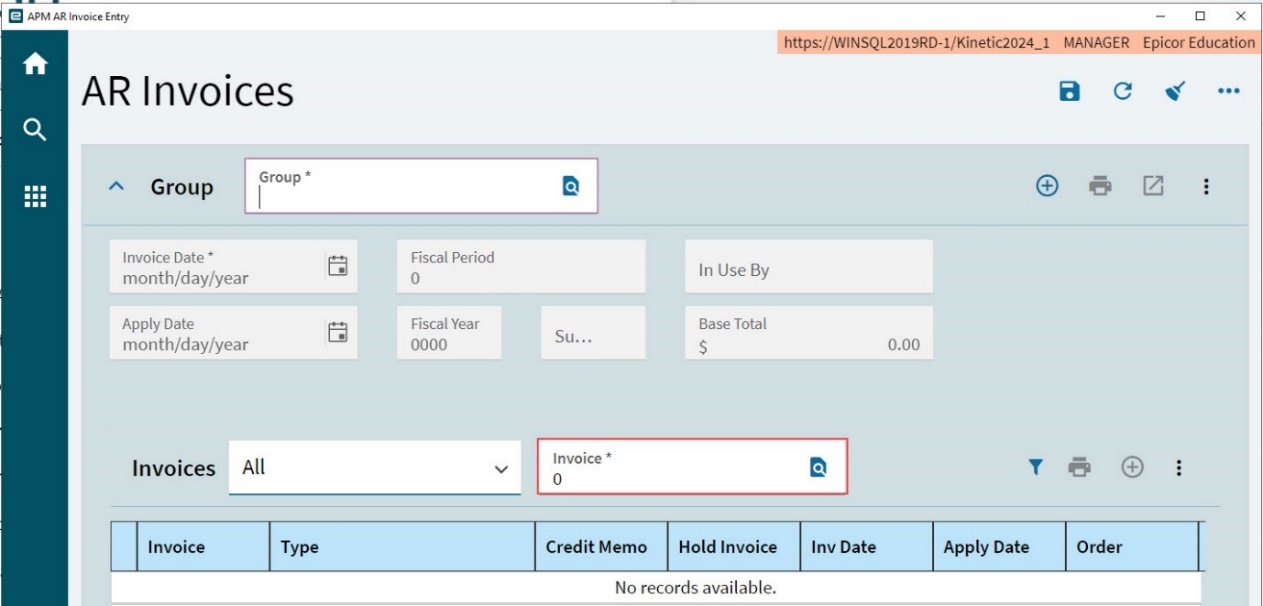
The selected invoice or credit memo appears on the Invoice Header card.
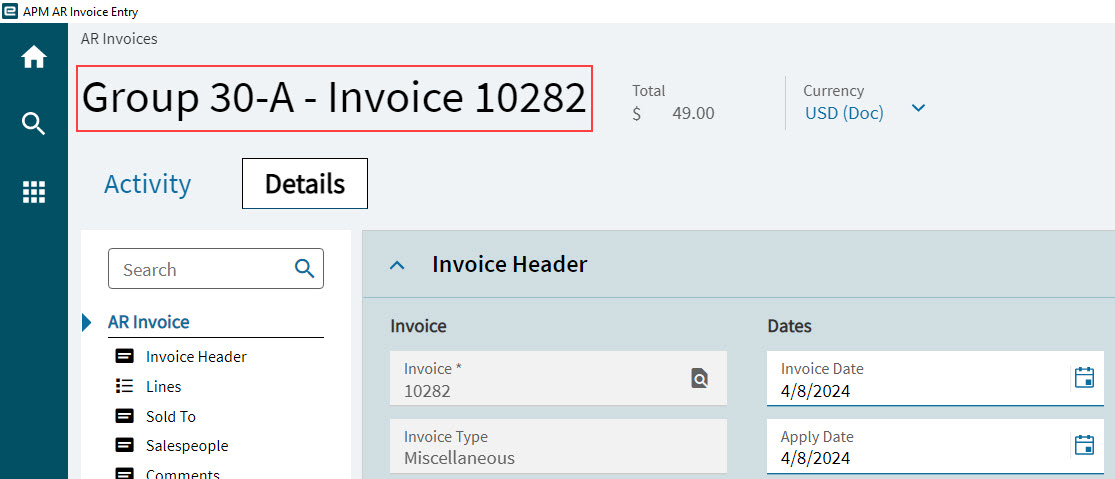
-
Review the invoice.
Posting an APM AR Invoice Group
Post the invoice group captured in the section above:
-
Select Invoice Header on the Navigation Tree to display the Invoice Header card.
-
Select Group Post
 on the standard menu.
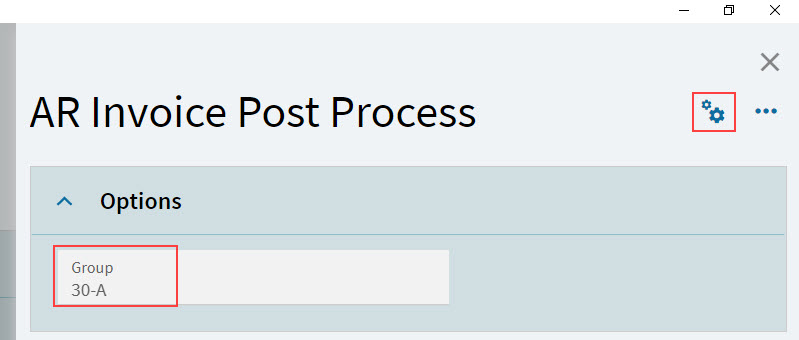
The AR invoice Post Process panel slides out, with the invoice group selected.
-
Select Process
.
The process is submitted, and the AR Invoice is posted.
Contract Claims Workbench
Contract Claims are described in the section Contract Claiming.
Use the Contract Claims Workbench to perform bulk actions or reviews on current/last contract claims for all or selected contract-claim configuration combinations, for active contract revisions.
To navigate to Contract Claims Workbench:
-
Advanced Project Management > Contract Management > General Operations > Contract Claims Workbench.
To review or process multiple contract claims:
-
Navigate to Contract Claims Workbench (Advanced Project Management > Contract Management > General Operations > Contract Claims Workbench).
-
Filter the contract claims by selecting from the Contract Claims drop-down list.
The options are:
-
Active Contracts & Revisions
-
WIP Claims - All
-
WIP Claims - Pending Release
-
WIP Claims - Pending Approval
-
WIP Claims - Pending Invoice Generation
-
WIP Claims - Pending Invoice Posting
Filter depending on the action you want to take. For example, select Active Contracts & Revisions if you want to review contract claims. Select WIP Claims – Pending Release if you want to release a batch of claims.
-
-
Select all results by selecting the check box in the grid header OR
Select one or more results by selecting the check box for the row.
-
Select a button on the menu bar to perform a bulk action against all of the selected contract claims. The menu buttons, from right to left, follow the stages of the claims process, from creating the claim to posting an AR Invoice.
Where actions cannot be completed, a message is displayed.
-
Select Generate Claims
 to generate claims from the selected Contract-Claim Configurations. New claims are generated for those contract > claim configuration > line-item combinations (for Progress and Quantity billing) or contract > claim configuration > line-item-transaction-line combinations (for Rates billing) that do not already have an open contract claim.
 -
Click Delete Claims
 to delete the selected contract claims. The selected
contract claims are deleted. See Deleting an Open Contract Claim.
to delete the selected contract claims. The selected
contract claims are deleted. See Deleting an Open Contract Claim. -
To review a contract claim, select a single row, then click Load Claims
 to load the selected contract claim in Contract Claim Entry. While reviewing the claim,
you can adjust claim amounts, as described in the section Contract Claiming.
to load the selected contract claim in Contract Claim Entry. While reviewing the claim,
you can adjust claim amounts, as described in the section Contract Claiming. -
Click Approve
 to approve the selected contract claims.
 -
Click Generate AR Invoices
 to generate AR Invoices from the selected Contract Claim Configurations. The contract claim must be approved and released before
you can generate an AR Invoice.
to generate AR Invoices from the selected Contract Claim Configurations. The contract claim must be approved and released before
you can generate an AR Invoice.The AP Invoice Generation slide-out panel opens. Click Add to New Group OR select an AR Group ID and click Add to Existing Group.
The AR Invoice is generated.
-
Click Post AR Invoices
to post AR Invoices from the selected Contract-Claim Configurations.
-
APM Quote Entry
To navigate to APM Quote Entry:
-
Advanced Project Management > Project Accounting > General Operations > APM Quote Entry OR
-
Advanced Project Management > Contract Management > General Operations > APM Quote Entry
Use APM Quote Entry to enter Quotes to link to APM Projects.
In APM Quote Entry, a Quote can be flagged as an APM Template. An APM Quote Template has some restrictions that limit transactions and changes to the Quote. For example, the Quote cannot be set as Quoted.
All other features and functionality remain the same as the Opportunity/Quote Entry accessed from other menu paths in Epicor.
To flag a Quote as an APM Template Quote:
-
Navigate to APM Quote Entry (Advanced Project Management > Project Accounting Management > General Operations > APM Quote Entry).
-
Select a Quote in the grid to open it.
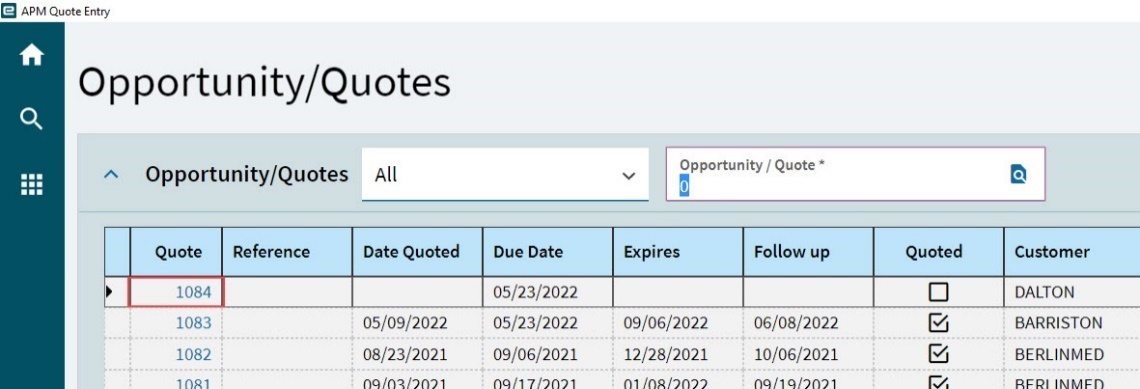
The quote opens on the Details page, with the Quote Header card expanded.
-
Select the Is Template check box, under the Options.
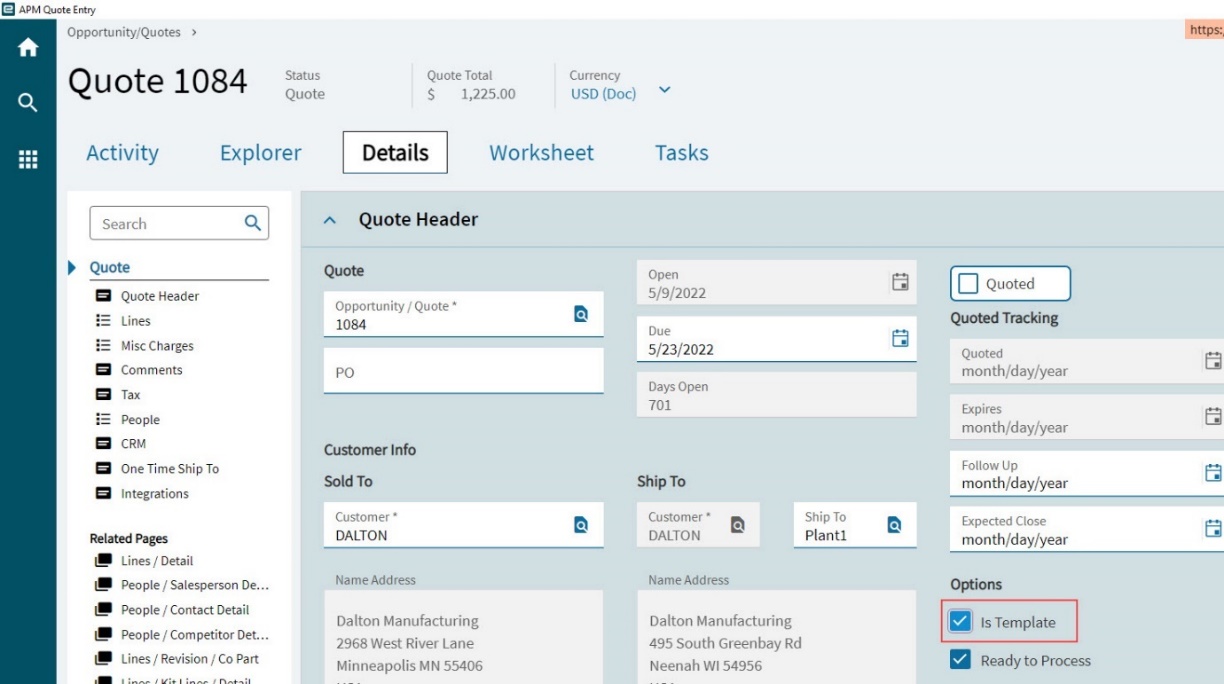
-
Select Save
on the Standard toolbar.
The selected Is Template check box indicates that this Quote is an APM Quote Template.
| For further information on Quotes Entry, refer to the standard Kinetic Help topic Entering Quotes. |
Quotes in Advanced Project Management
In APM, you can create and link a Quote to a Contract (see Creating a Quote from a Contract).
APM AR Invoice Tracker
Use the APM AR Invoice Tracker to view APM AR Invoices and their statuses.
You can access the APM AR Invoice Tracker from the menu (Advanced Project Management > Contract Management > General Operations > APM AR Invoice Tracker or Advanced Project Management > Project Accounting > General Operations > APM AR Invoice Tracker), or by right-clicking on an Invoice number in one of the APM applications, for example Contract Claim Entry.
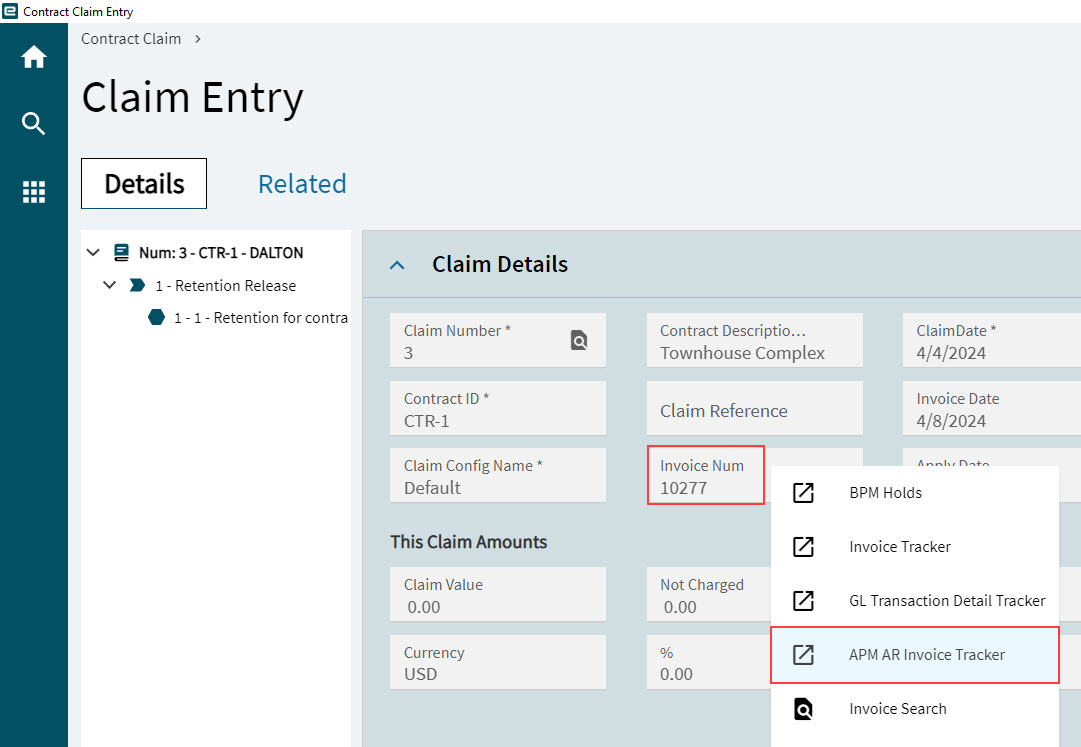
The APM AR Invoice Tracker displays all information relating to the invoice, such as Invoice number, Type, Invoice Dates, Sold To details, Terms, and Invoice Totals.
The Status section displays Credit Memo information (a credit memo is created for cancelled/reversed Contract Claims), and whether the invoice has been posted. (The example shown below is not a Credit Memo.)
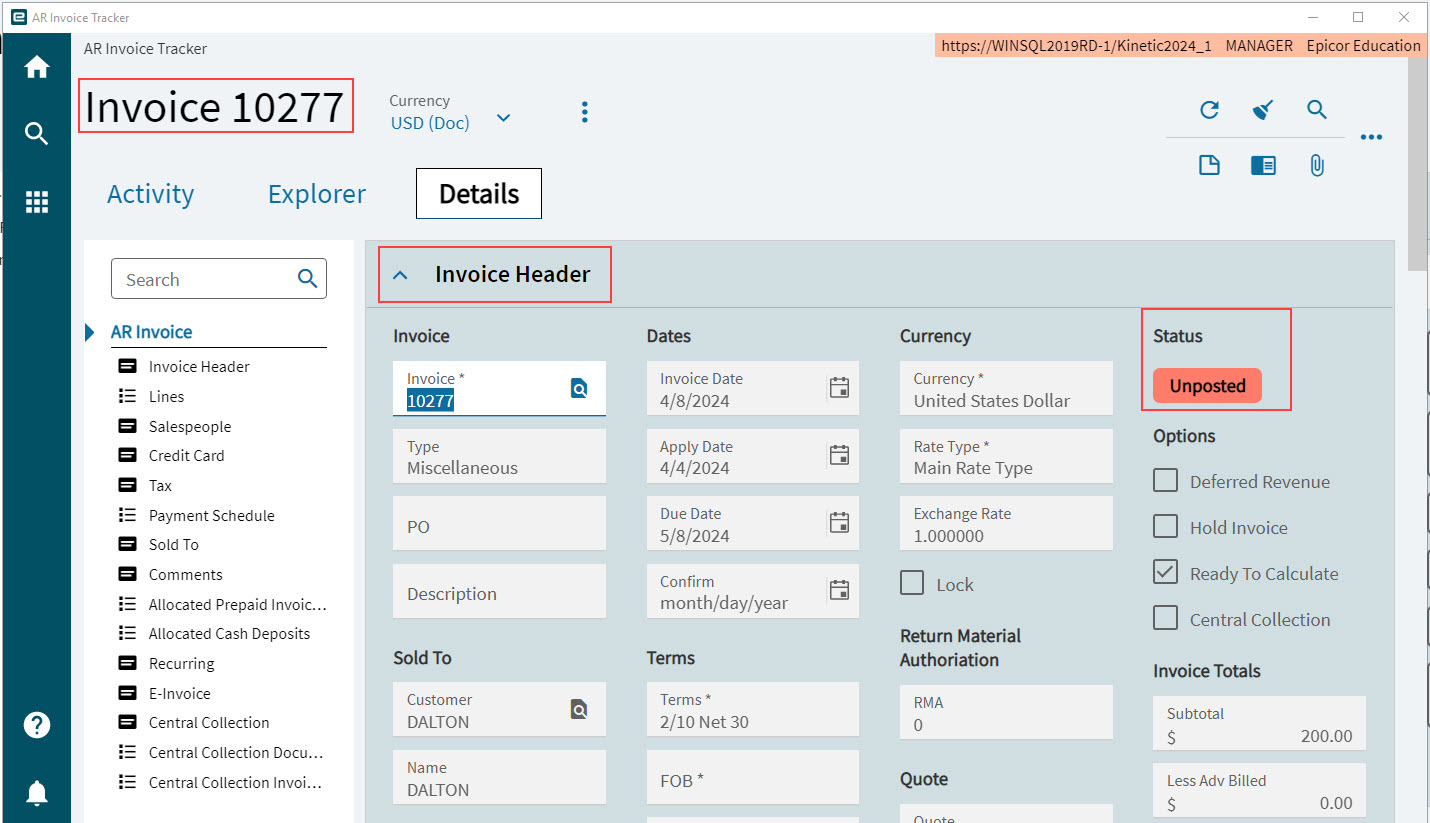
Note that an unposted invoice/credit memo can be posted using the APM AR Invoice Entry application. See APM AR Invoice Entry.
| For further information on the APM AR Invoice Tracker, refer to the standard Kinetic Help topic Tracking AR Invoices in the Accounts Receivable module (Trackers). |
Contract Claim Tracker
- Path
-
Advanced Project Management > Contract Management > General Operations > Contract Claim Tracker
Use the Contract Claim Tracker to view contract claims in read-only mode.
-
Navigate to and open Contract Claim Tracker.
-
Filter contract claims by All or Recent Records.
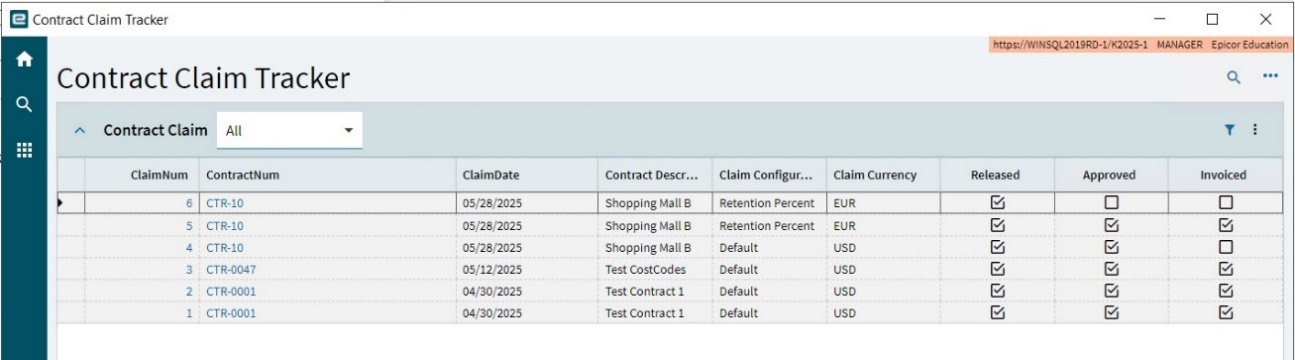
You can see in the summary grid which claims are released, approved, and invoiced.
-
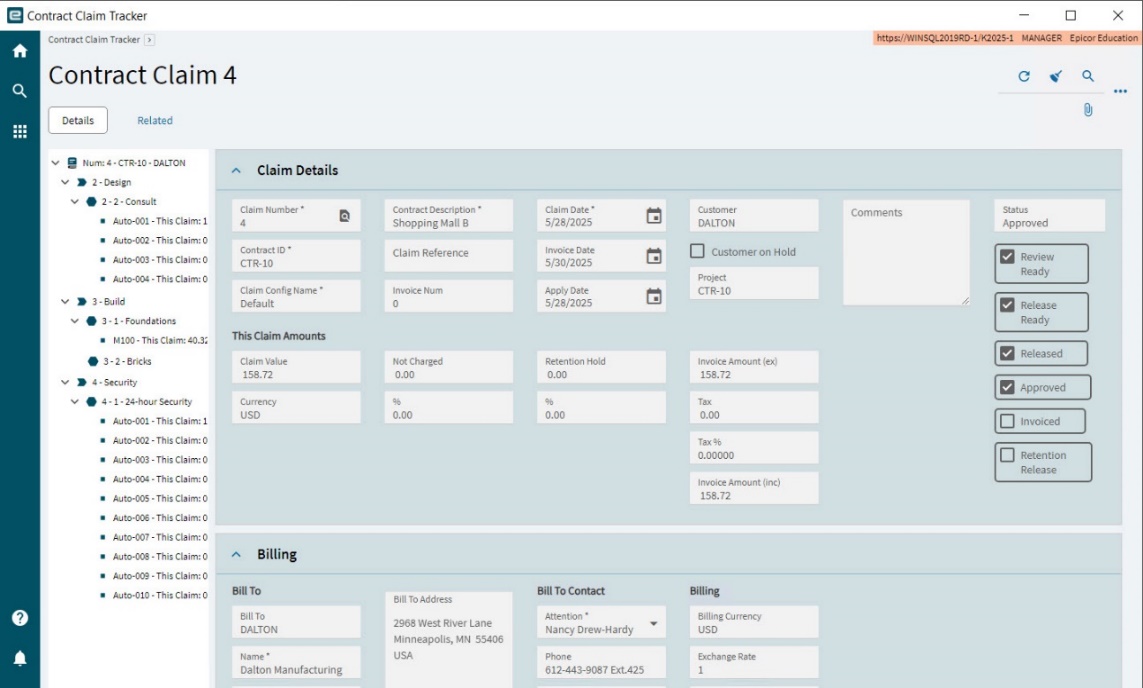
To view a contract claim, select the Claim Num or the Contract Num in the grid.
This opens the Contract Claim in read-only mode.
-
Navigate through the Details, Line Item Details and Milestones/Rates using the navigation tree, to view claim details.
Generating Claims
- Path
-
Advanced Project Management > Contract Management > General Operations > Generating Claims
Use this application to generate multiple claims at once.
Select Contracts for Contract Claims
Start by selecting one or more Billing Types.
Next, select the contracts for which you want to generate claims. There is no validation around duplicate claims – a claim will not be generated if one already exists for that contract number/contract configuration/contract line item combination (or contract number/contract configuration/contract line item/transaction-details combination for rates billing). Contracts with more than one claim configuration will have a separate claim generated for each claim configuration.
Select Filters against the Contracts
After selecting which contracts to generate claims for, you can filter out by any of the following aspects of the chosen contracts:
-
Contract Type
-
Territory
-
Contract Manager
-
Customer
For any of the above filters, leave the selection blank if you choose not to use the filter, otherwise select one or more to include only those. For example, select customer “Dalton” to only include from the selected contracts where the customer is “Dalton”. Leave the customer selection blank to include all contracts regardless of the customer.
Optionally Select a Claim Date
If you select a Claim Date from the date picker, then this is the Claim Date used for each of the generated claims. Otherwise, the current date is used as the Claim Date in the Contract Claim.
To Set a Schedule
To generate the claims now, keep the default in the Advanced section. To set a schedule, refer to the instructions in Scheduling Process Set.
Generating Claims for Specific Contracts
To generate contract claims for specific contracts, select one or more Billing Types, select just
those contracts in the Search panel results, then select Process on the standard menu.
You can filter out some of these contracts by choosing secondary filters such as Customer or Contract Type.
Generating Claims for All Contracts
To generate contract claims for all contracts, select one or more Billing Types, select all contracts
by selecting the header check box in the Search panel results, then select Process on the standard menu.
You can filter out some of these contracts by choosing secondary filters such as Customer or Contract Type.
Processing Generated Claims
After the claims are generated, you can access and process them in the usual way. Search for and open a claim in Contract Claim Entry, then process. See Processing Contract Claims and Retentions.