Rates Billing Exercise with Price List
This example features a contract with a Rates billing type contract line item. The project relating to the rates billing contract line item has a job with materials which are acquired through a purchase order and receipt. These costs are then charged to the customer. The charge rate for materials is calculated using contract price lists. If there are no contract price lists, there are other price lists that are used.
Follow the steps to work through the example.
Create a New Contract that Uses Rates Billing
-
Add a new contract and include a contract line item that uses the Rates billing type (see Adding a New Contract). Give the Rates billing contract line item a Description and a Gross Value. Ensure the Labor Markup check box is selected. The Gross Value is the amount that will be invoiced to the customer over time, as agreed on the contract terms.
-
Activate the contract revision (see Activating a Revision).
-
Change the contract status to Active (see Changing the Contract Status).
Add a Price List to the Contract Line
-
Add a Price List to the contract line (see Adding Contract Price Lists). Ensure the Price List has a Start Date before and an End Date after the dates used for the Purchase Order used in this example, and that it includes the Part that will be used in the Purchase Order.
Add a Markup Set to the Contract Line
-
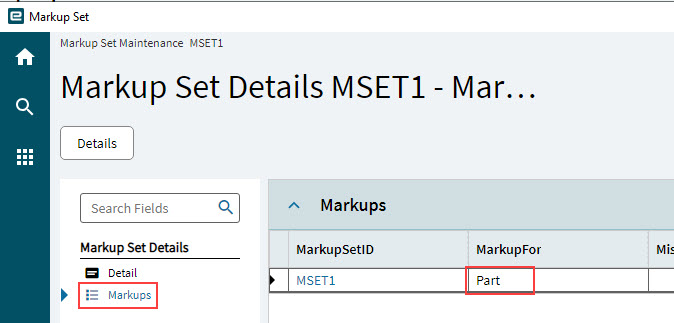
Add a Markup Set to the contract line. See Adding Markup Sets. Note that if you don’t add a markup set here, you can still add a markup when processing the contract claim later. Ensure that the Markup Set includes a detail with Markup For a Part.
Create Project from Contract
-
Create a project from the contract. (See Create Project from Contract). The Project Entry application opens with the new project selected.
Add Cost Code and Jobs to the Project
In the Project Entry application:
-
On the Project sheet, create the project job (see Create Project Job). Release the Job.
-
Navigate to the WBS Phase that maps to the Contract Line Item with Rates billing type.
-
Add a new Cost Code for the Material in the job (MAT, in our example). See Adding Cost Codes to WBS Phases. For the cost code:
-
Enter a total value for the Budget.
-
Approve the Budget.
-
-
Give the WBS Phase a Start Date and a Due Date and create a job. See Updating WBS Phase - Details.
On the WBS Phase Detail card:
-
Select a Start Date.
-
Select a Due Date.
-
Create the WBS Phase job (see Create WBS Phase Job).
-
Right-click on the job and select APM Job Entry.
-
| Make a note of the job number to use in the Purchase Order. |
Update the WBS Phase Job
For this example, add a single material to this job.
In Job Entry:
-
Click on Assemblies to open the Assemblies page.
-
Right-click on Materials in the tree on the left and select New Material.
-
Select Save
 on the Standard toolbar.
 -
Click on the material sequence number (Mtl Seq) in the grid. This opens the new material on the Material card.
-
On the Material card:
-
Search for and select the Part to use (001MP in our example). After you select the part, defaults such as Description, Revision, and UOM are retrieved from the part record and entered here.
-
In the Details section, enter a quantity in the Qty/Parent edit box.
-
In the Additional section, select an Analysis Code. The Analysis Code must be linked to a Cost Code for the WBS Phase so that the job cost can be linked to the cost code and its budget, in later steps. In our example, this is Steel, which is linked to the MAT Cost Code.
-
In the Purchasing section, select Purchase Direct. On the Purchasing tab, the Supplier ID defaults to the primary supplier for this part. Otherwise, select a Supplier.
-
On the Costs tab, check that there is a Unit Cost in the Material Burden section. Add the cost if necessary.
-
-
On the Details page, select Released.
-
On the Schedule Job pop-up screen, check the schedule dates and select Ok.
| For further help with capturing job details, refer to the standard Kinetic Help on Job Entry. |
Recalculate Analysis
In this step, we will bring the planned job costs into the project. These will appear in the Quote and Job Details for the affected WBS Phase > Cost Code.
-
Open the project in APM Project Entry.
-
Run Recalculate Analysis (see Running Recalculate Analysis).
-
Refresh
 the project.
 -
Note the planned job costs from the added materials showing in the following area:
-
Planned Job Costs, Released Job Costs, Cost to Complete, and Estimated at Complete on the Quote and Job Details card on the Details page. (See Quote and Job Details.)
-
Create a Purchase Order
-
Navigate to APM Purchase Order Entry (Advanced Project Management > General Operations > APM Purchase Order Entry). See also: APM Purchase Order Entry.
-
Create a new Purchase Order, selecting the Supplier used in the job entry (Job Details > Materials > Detail), and adjusting the PO Date if necessary.
-
Select Save
on the Standard toolbar.The Purchase Order is saved, in the Open status, and a PO Number is allocated. Note down the PO Number.
-
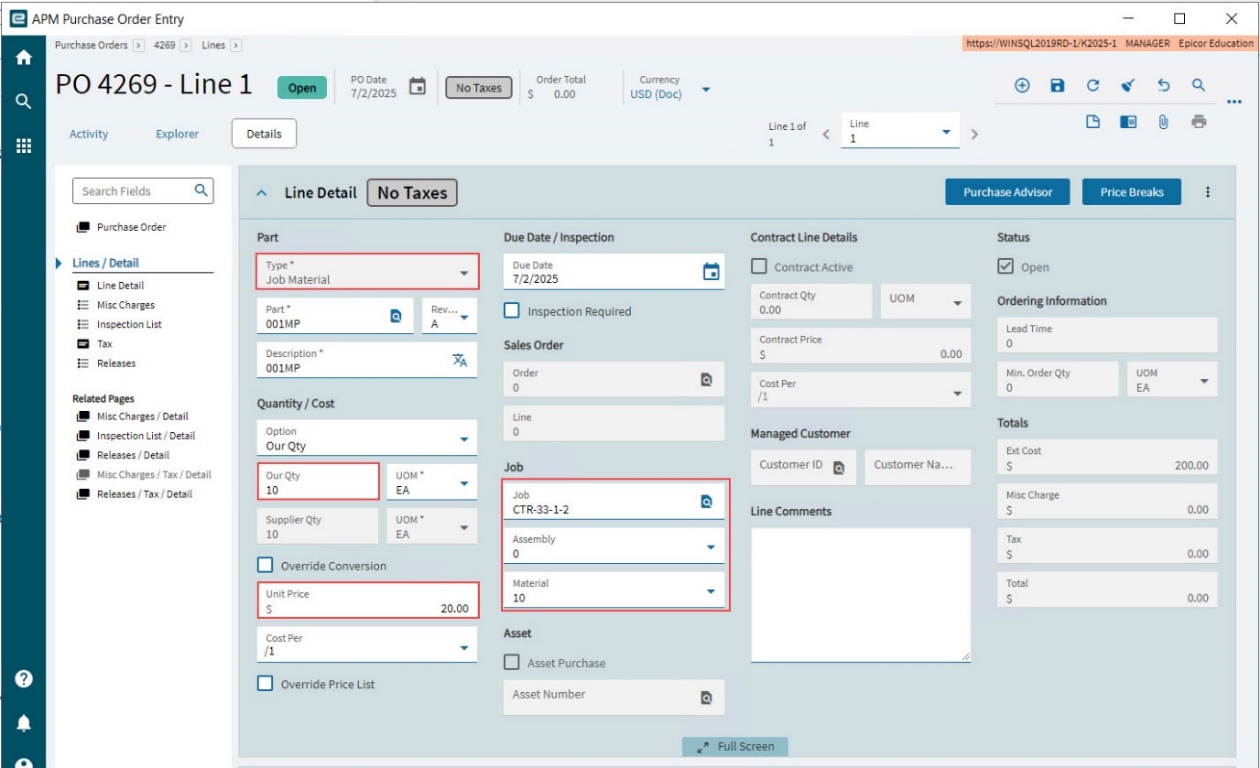
Capture a new Purchase Order line.
-
Select Job Material from the Type drop-down list.
-
Enter or select the Job number. (This is the job number for the WBS Phase that we are working with in our example.)
-
Select the Assembly from the drop-down list.
-
Select the Material from the drop-down list.
The Part and Description fields are filled in from the Job selection, showing the Project ID and Description respectively.
-
Adjust the quantity ordered, in Our Qty, if ordering less than what is required for the job.
-
Update the Unit Price if necessary.
-
-
Check the Releases sheet and update Our Qty if only releasing part of the purchase order line. In the Project section, check that the correct Project, Phase and Cost Code are selected.
-
On the (PO Header) card:
-
Select Approved.
-
Select Unconfirmed to set to Confirmed.
-
Select Save
on the toolbar.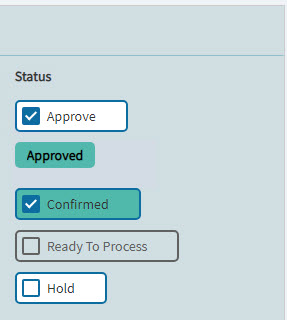
The purchase order is now ready to receive. Make a note of the PO Number.
-
| For further help on capturing job details, refer to the standard Kinetic Help on Purchase Order Entry. |
Recalculate Analysis
In this step, we will bring the purchase order details into the project. These will appear as Committed (Total) for the affected WBS Phase > Cost Code.
Open the project in APM Project Entry.
-
Run Recalculate Analysis (see Running Recalculate Analysis).
-
Refresh
the project. -
Note the purchase order showing in the following areas:
-
Committed (Total) on the Budget card on the Details page. (See Budget for a Cost Code.)
-
Planned Job Costs, Released Job Costs, Cost to Complete, and Estimated at Complete on the Quote and Job Details card on the Details page. (See Quote and Job Details.)
-
Receive the Purchase Order
-
Navigate to Receipt Entry (Material Management > Shipping / Receiving > General Operations > Receipt Entry).
-
From the New menu, select New Receipt.
-
On the Summary sheet:
-
Select the PO (purchase order number). The supplier details are brought in.
-
Enter a number in the Packing Slip edit box (for example [PO number]-1).
-
-
Go to the Lines sheet:
-
Select New on the toolbar.
-
In the Part / Supplier Part section, select Line/Rel to search for and select the PO line captured in the previous step.
-
Select Received.
-
Select Save
on the Standard toolbar.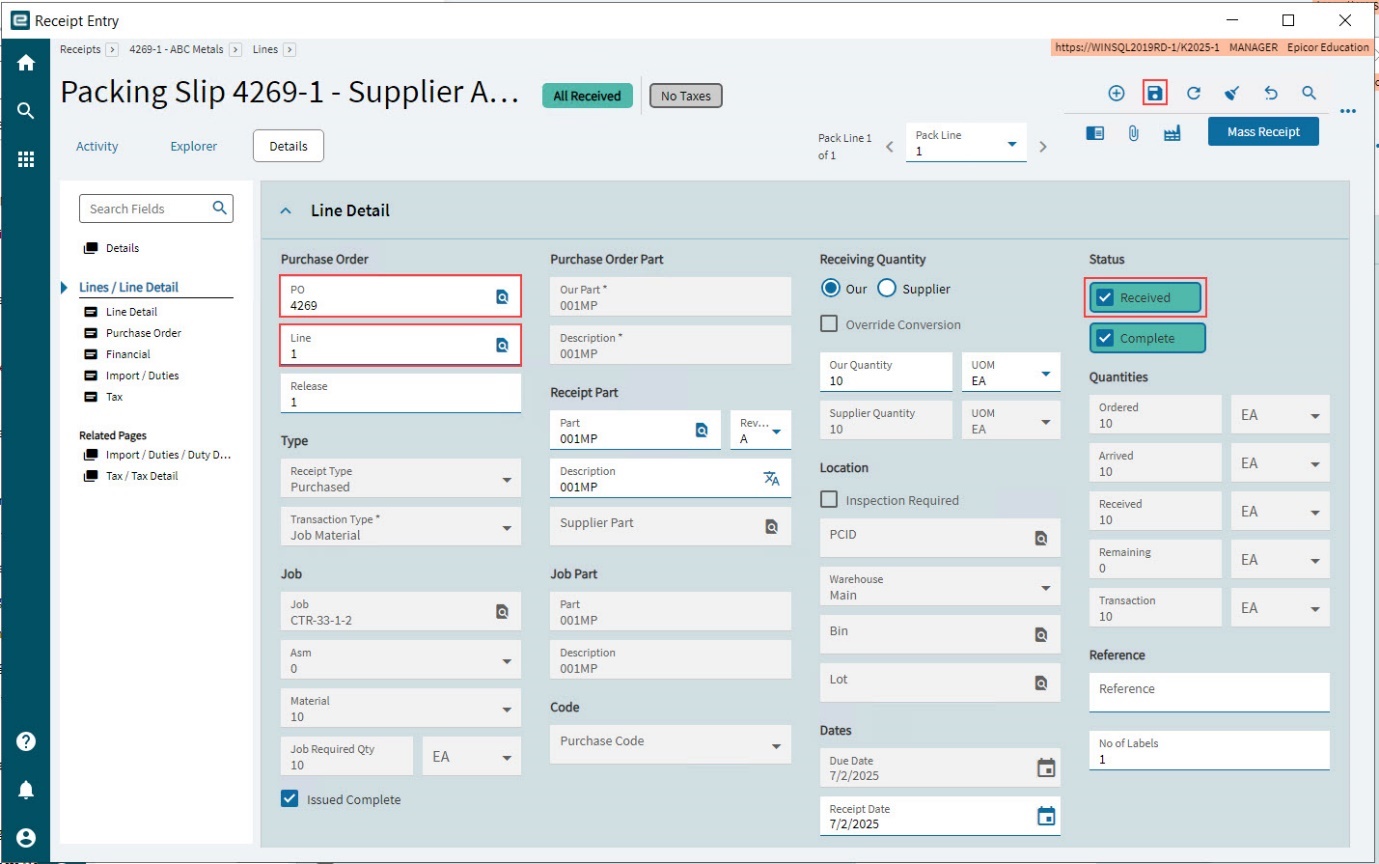
For further help on receipt entry, refer to the standard Kinetic Help on Receipt Entry. -
Capture COS/WIP Activity
Run the Capture COS/WIP Activity process with Post Cost of Sales / MFG Variance selected. This will move the receipted purchase order into a Costed value for the Project, after which the cost can be claimed from the customer.
Recalculate Analysis
-
Return to the Project.
-
Run Recalculate Analysis to bring in the new transactions. See Running Recalculate Analysis.
-
Refresh
the project. -
Note the Costed field on the following tabs:
-
Costed on the Budget card on the Details page. The amount has been deducted from Committed (Total). (See Budget for a Cost Code.)
-
Actual Job Costs on the Quote and Job Details card on the Details page.
-
Cost Type Summary card on the Transaction Summaries page shows the Costed value.
-
Cost Type Transaction Detail page shows the COST WIP.
-
On the Activity page, the Purchase Order appears on the POs card. The Purchase Order remains open until it has been received in full, after which it is closed.
-
Add a Contract Claim
In this step we will add a contract claim, to claim for the cost of the materials for job in the affected WBS Phase.
-
Add a contract claim for the contract (see Entering a Contract Claim).
Review the contract claim line items. Navigate to the relevant Line Item, using the Navigation Tree.
-
The claim line item details appear on the Rates: Parts card. See Rates: Parts.
-
Expand the Rates: Parts card.
-
Click on the Project Ledger Num in the grid, to open the relevant transaction.
-
Check the Part Transaction card.
-
Check the Project and Job sections.
-
Check the Project Ledger Details.
-
-
Expand the Billing Details card.
-
Select a Base Rate. In our example, we select the Contract Price List which we originally added to the contract line. Other available options are the Project Ledger Cost Rate, or a Manual Rate.
-
Optionally select a Mark Up. In our example, we use the Contract Markup Set, where the Markup Set we added to our contract line is applied to the Contract Price List amount for the part. Other available options are no mark up (None) or a manual markup.
-
Optionally select an Additional amount or mark up (Manual %, which is also applied to the price list amount, or a Manual Amount).
-
Optionally add an Additional charge.
-
Optionally enter a No Charge Quantity with No Charge Reason.
-
Apply a Retention if applicable and adjust this if necessary.
-
-
Select the check boxes in the Billing Claim Status section: select Review Ready, Reviewed and Approved.
-
-
Submit and Approve the Contract Claim (see Submission and Approval) and generate an A/R Invoice (see Generate an AR Invoice).
Recalculate Analysis
Run Recalculate Analysis, to bring the posted transactions into the Project Ledger (see Running Recalculate Analysis).
The posted transactions appear on the Transaction Summaries page on the Summary card, in the A/R Analysis fields (see Summary).