General Operations
Navigate to Advanced Project Management > Project Accounting > General Operations. All the operations, trackers, and workbenches in the Project Accounting module are accessed from here.
APM AP Invoice Entry
Use APM AP Invoice Entry to enter Accounts Payable Invoices which are to be charged directly to Project/Phase and Cost Code in APM Projects. The instructions below show how to create a miscellaneous invoice with lines. Use the same approach when capturing other types, such as Advance Billing, Credit Memos, and so on.
| After an APM AP Invoice is entered, you can View the APM AP Invoice Transaction in the APM Project. |
|
All other features and functionality of APM AP Invoice Entry are the same as the standard AP Invoice Entry accessible from other menu paths in Kinetic. For further information on capturing an AP Invoice, refer to the standard Kinetic Help topic Entering AP Invoices in the Accounts Payable module (Invoices). |
To capture an APM AP Invoice for a Project:
-
Navigate to Advanced Project Management > Project Accounting > General Operations > APM AP Invoice Entry. Open APM AP Invoice Entry.
-
Add a new invoice group.
-
Select New Group
 on the Group card menu bar to add a new invoice group.
 -
Type a group identifier into the Group edit box.
-
Select an Apply Date.
-
Select Save Group
 on the Standard toolbar.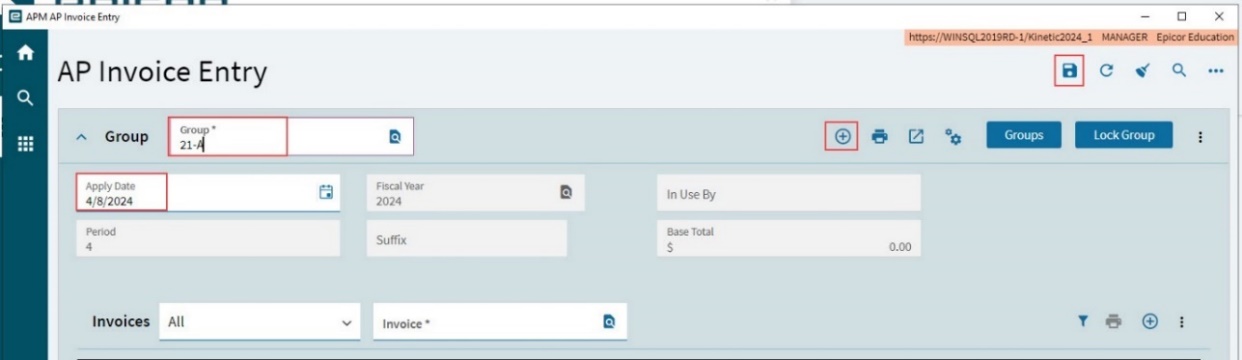
-
-
Add a new invoice.
-
Select Invoice
on the Invoices section menu.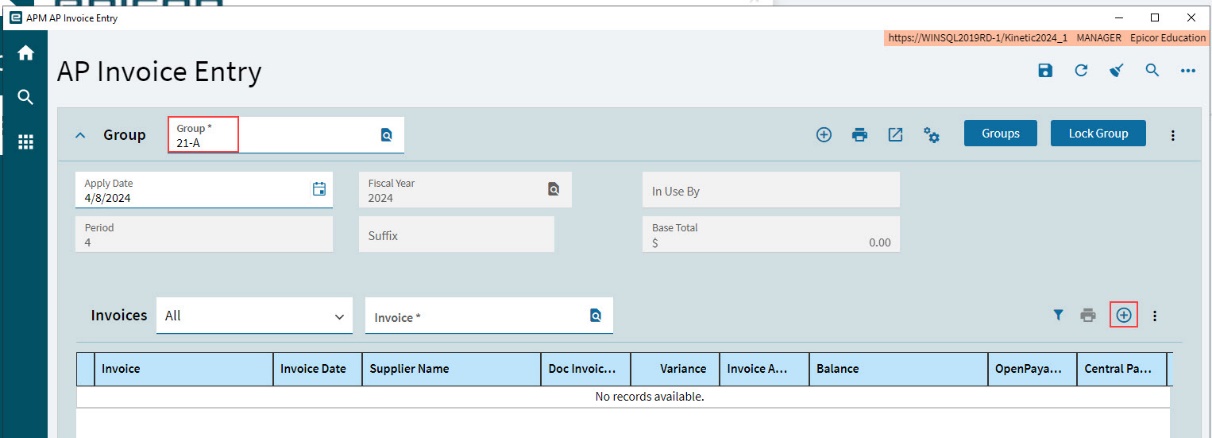
A new invoice is created and displayed, with the Invoice Header card expanded.
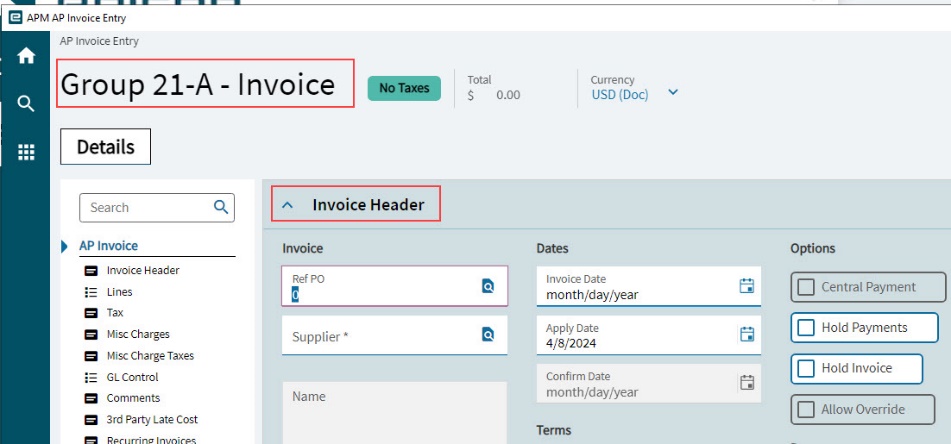
-
-
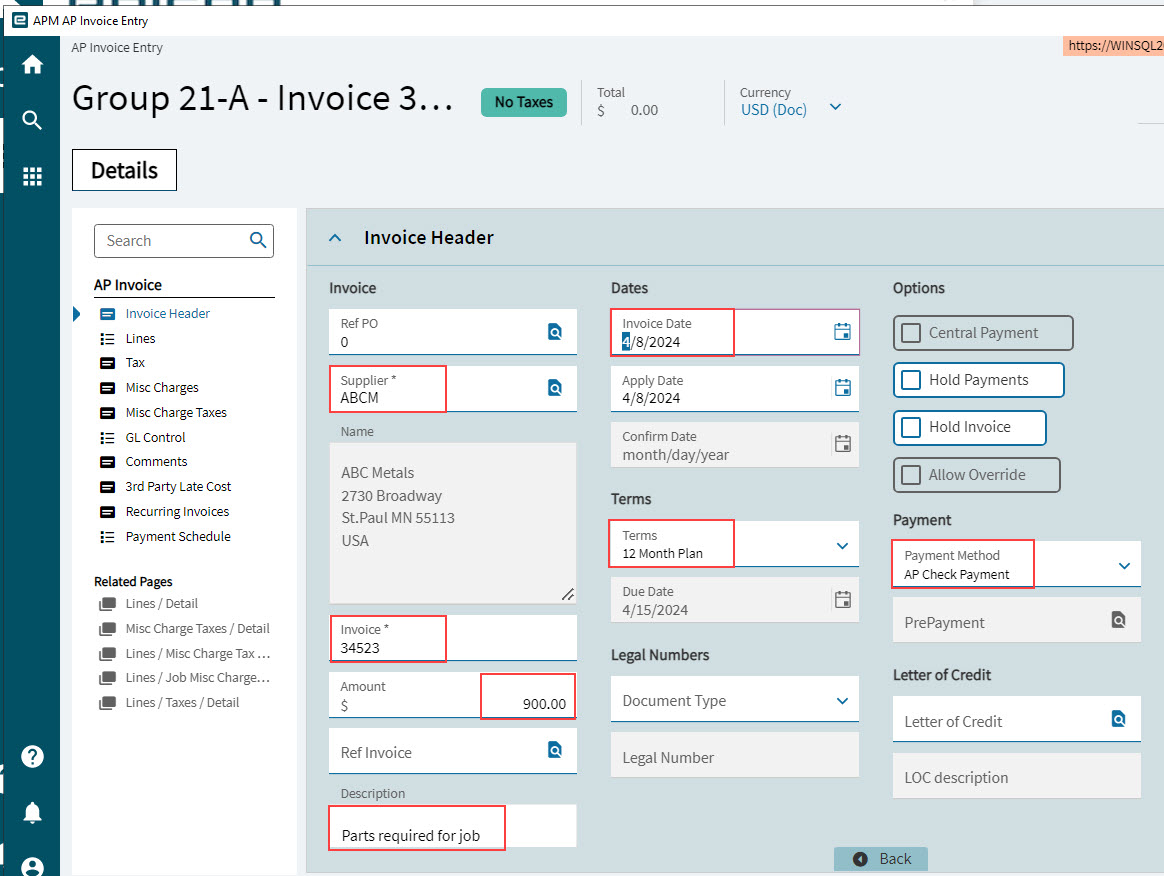
Complete the Invoice Header.
-
Select a Supplier. This could be an employee, for example if you were reimbursing them for project expenses.
-
Enter an Invoice number. This will be the invoice number from the supplier.
-
Enter the invoice Amount.
-
Select an Invoice Date.
-
Enter a Description.
-
Select Terms.
-
Select a Payment Method.
-
Select all other defaults.
-
Save.
-
-
Select Save
on the Standard toolbar.The new invoice is saved.
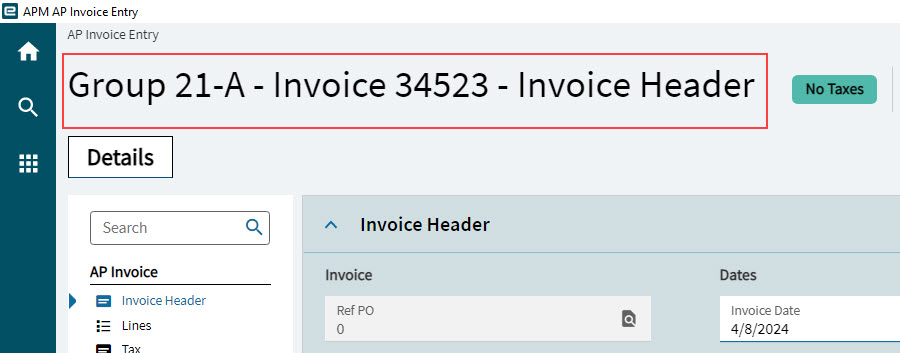
-
Add an Invoice Line.
-
Select Lines on the Navigation Tree.
-
Select Misc Line
on the Lines menu bar.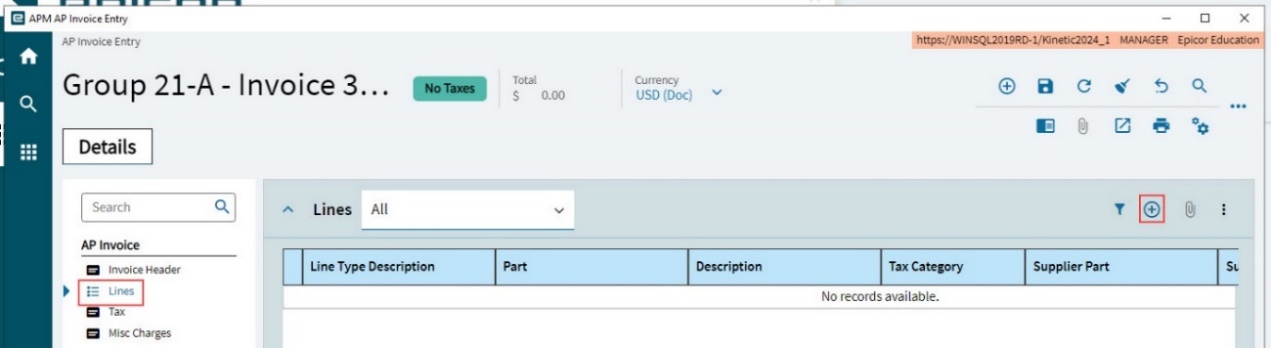
A new invoice line is created.
-
-
Select the Line Type Description to edit the Line.
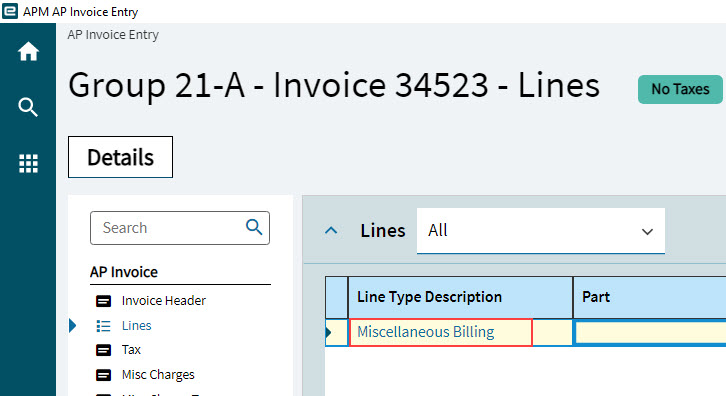
The Lines/Detail appears on the Navigation Tree, with the Line Detail card expanded.
-
In the Project Details section, select a Project ID, Phase ID, and Cost Code Detail ID.
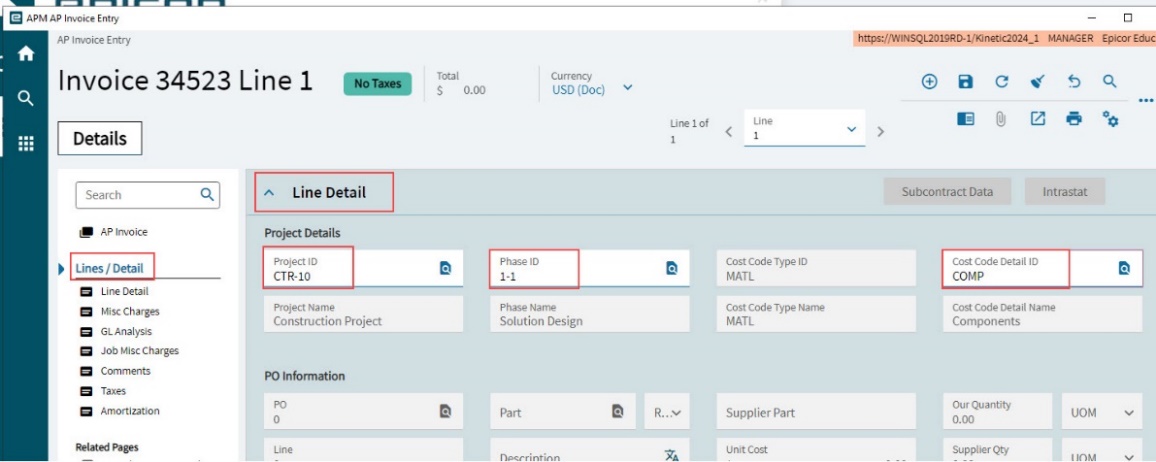
-
Scroll down to the Invoice Information section on the lower half of the card.
-
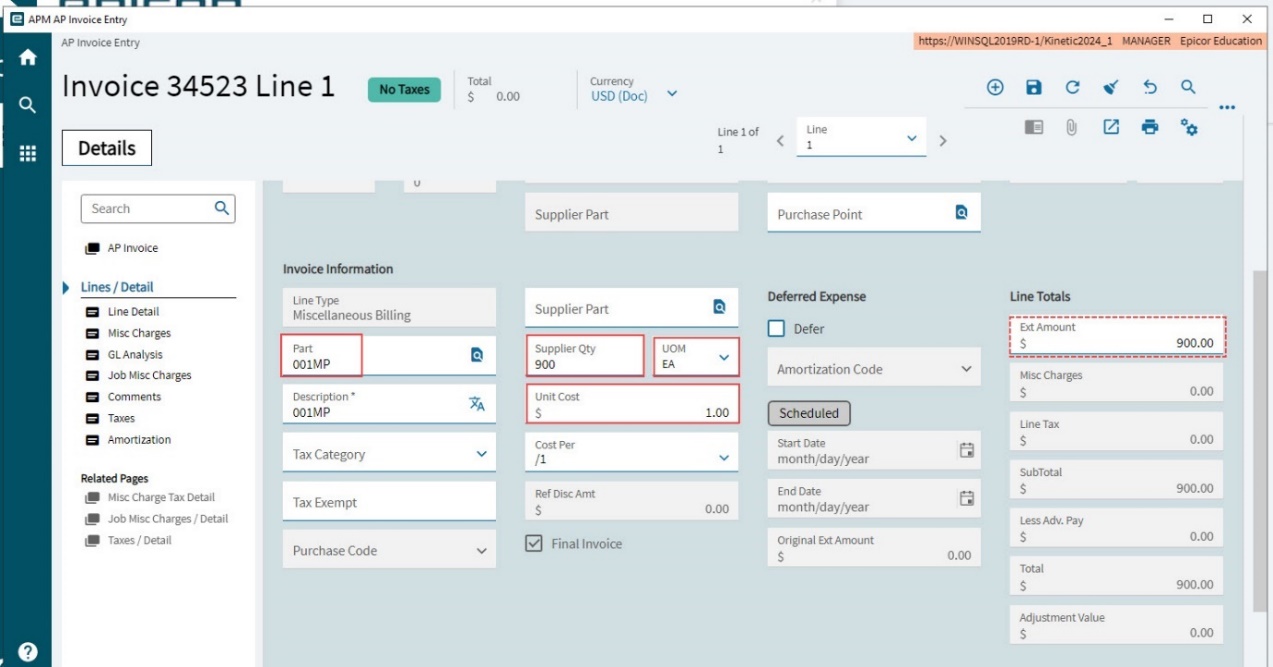
Select a Part.
-
Enter a Supplier Qty and UOM.
-
Update the Unit Cost if necessary.
The Ext Amount in the Line Totals section is updated.
-
-
Select Save
on the Standard toolbar. -
Continue to add invoice lines, as required.
-
Continue to add invoices to the group, as required.
-
Check the invoice header.
-
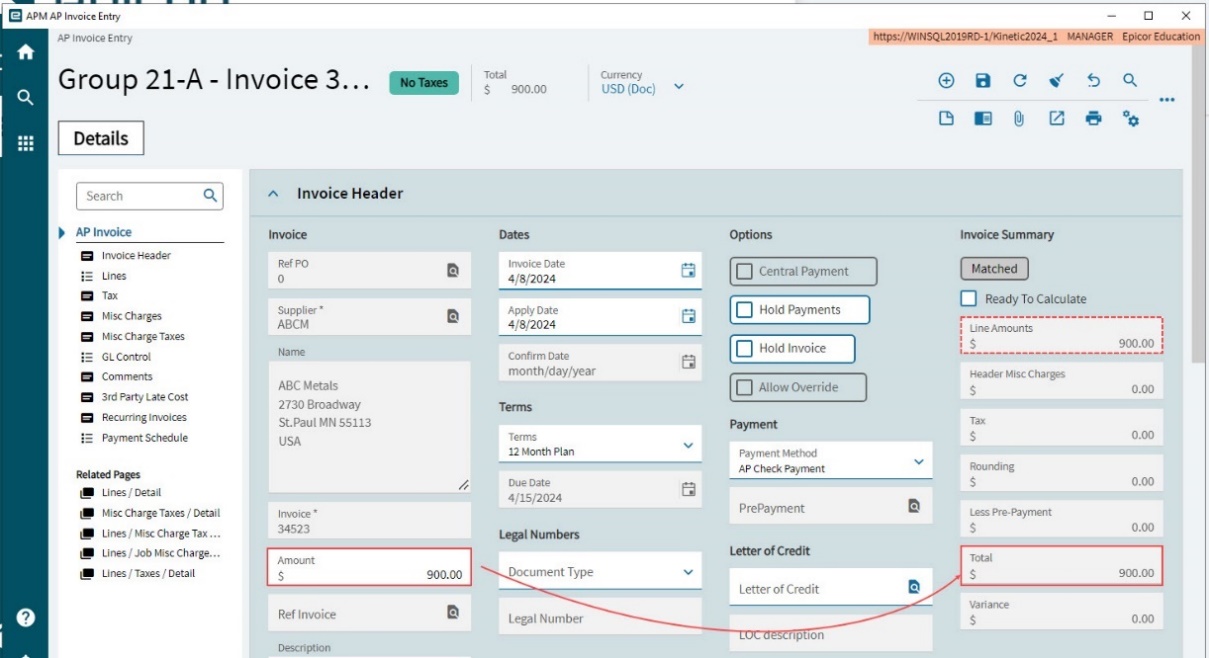
Select AP Invoice on the Navigation Tree.
The Line Amounts is the sum of the Ext Amount for the invoice lines.
-
Check that the Total is equal to the Amount.
-
-
Post the Group.
-
Select Group Post
 on the standard menu.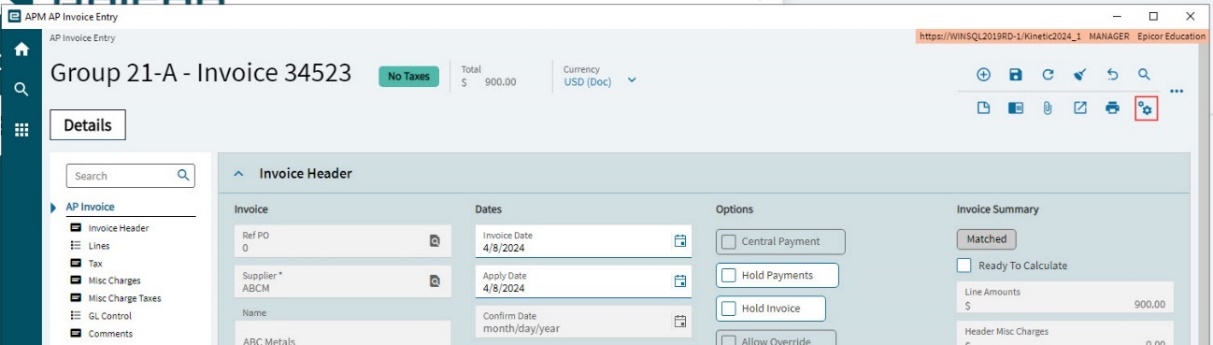
-
Select Process
on the AP Invoice Post Process slide-out panel.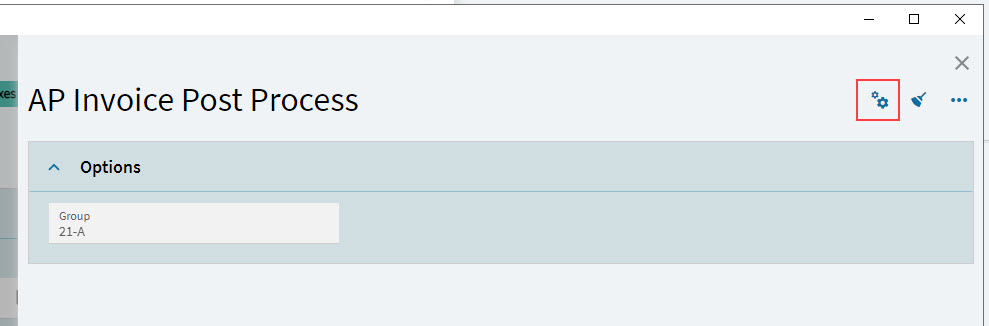
The process is submitted.
-
Close the AP Invoice Post Process slide-out panel.
-
Viewing the APM AP Invoice Transaction in the APM Project
| Because this is a direct AP expense (not an expense against a Job), there is no requirement to run the Capture COS/WIP Activity to see the AP Invoice. |
-
Open the project used in an invoice line.
-
Run Recalculate Analysis.
You will see the effect of the APM AP Invoice on the Budget for the Project > Phase > Cost Code (see Budget for a Cost Code).
-
The Costed value increases by the AP Invoice amount.
-
The Remaining value decreases by the AP Invoice amount.
In the Project Ledger Transaction List:
-
The transaction appears in the Project Ledger Transaction List (see Viewing Ledger). The values appear in the Cost and Spent columns.
In the Transaction Summaries:
-
The Invoiced (excl. Tax) and the Total in A/P Analysis increase by the AP Invoice amount.
-
The transaction appears in the Cost Type Transaction Detail.
-
The List (Accounts Payable) shows the AP Invoice transaction.
APM AR Invoice Entry
See APM AR Invoice Entry in the Contract Management section.
APM Expense Entry
Use APM Expense Entry to capture expenses for an APM Project against a selected phase and cost code.
| After an APM Expense is entered, you can View the Expense in the APM Project. |
|
All other features and functionality in APM Expense Entry can be found in Kinetic’s standard Expense Entry (Service Management > Expense Management > General Operations > Expense Entry). For further information, refer to the standard Kinetic Help topic Entering Expenses in the Kinetic > Service Management > Expense Management help section. |
-
Navigate to Advanced Project Management > Project Accounting > General Operations > APM Expense Entry.
APM Expense Entry opens with an employee selected. Expenses can be captured for any employee with Expense Approval (where the Enter Expenses check box is selected for the Employee record).
-
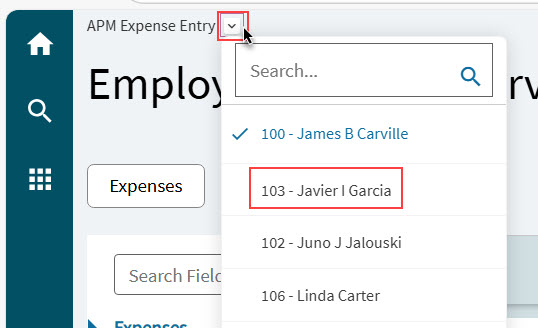
To select a different employee, click the down-arrow next to APM Expense Entry on the breadcrumb at the top of the application, then search for and select an employee from the list.
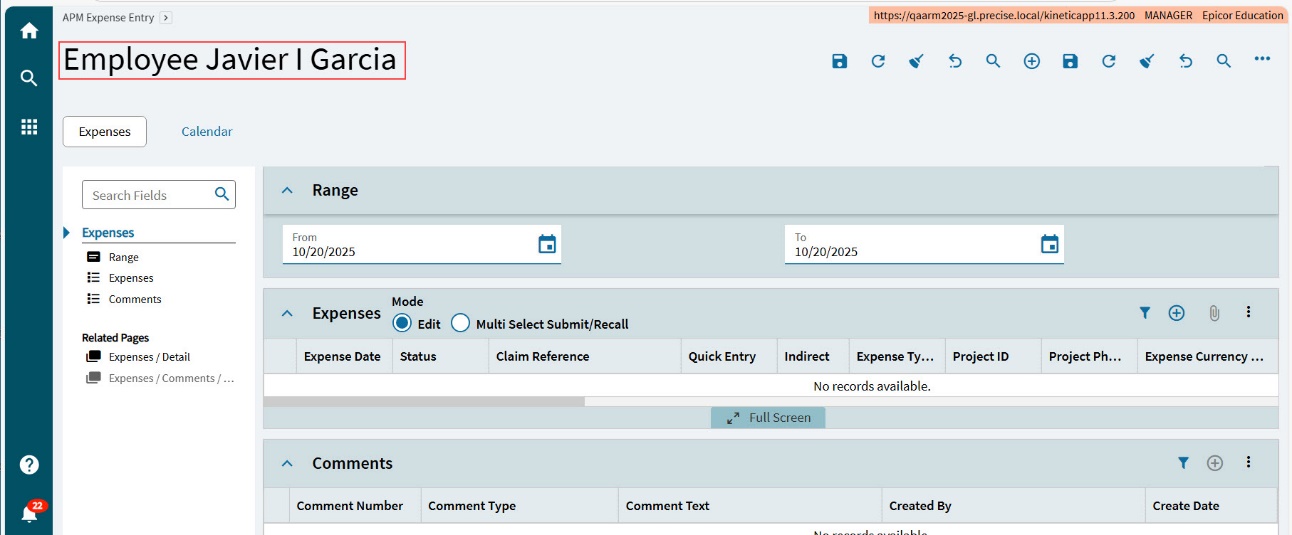
The selected employee name appears in the header for a new expense record.
-
Complete the expense details as you would for a standard Kinetic expense. For an APM Expense, ensure you capture the following fields:
-
Select an Expense Date.
-
Select a Project.
-
Select a WBS Phase. Note that this phase must have an associated released job.
-
Select an Expense Type.
-
Select a Cost Code Detail ID.
-
Enter an Expense Amount.
-
Select a Tax Liability.
-
Select a Payment Method. Depending on the Payment Method, the Reimbursable flag is either selected or cleared. For expenses that are reimbursable, you will need to process an AP Invoice for the expense (using the Generate AP Invoices for Expenses app), and post this (using APM AP Invoice Entry), before the expense can be captured against the project.
-
Select Submit on Save.
-
Select Save
on the Standard toolbar.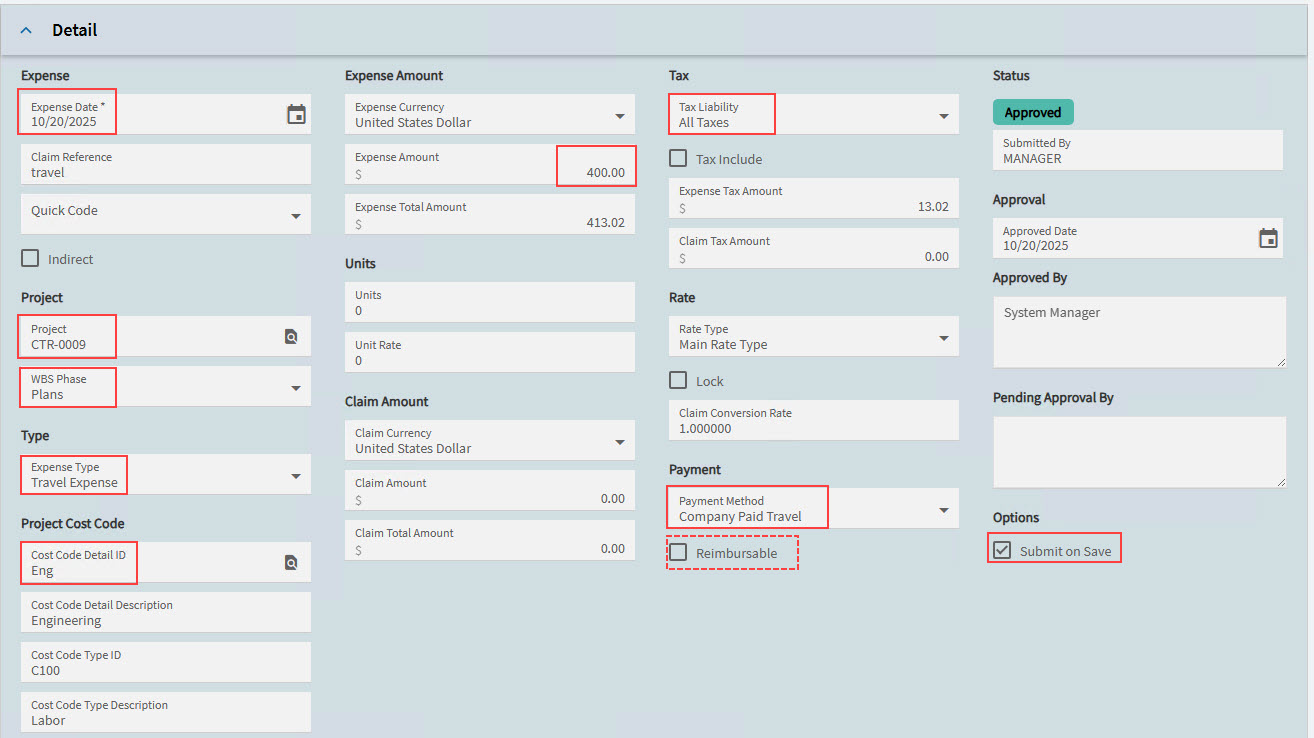
The expense is submitted. If the Employee record has Auto Approve Expenses selected, the expense is approved automatically.
-
Viewing the Expense in the APM Project
To see the expense in the Project:
-
If the expense is reimbursable, process the AP Invoice for the expense, and post the AP Invoice.
-
Run the Capture COS/WIP Activity process for the period (see Capture COS/WIP Activity).
-
In the Project, run Recalculate Analysis.
The expense is added to the Costed value for the Project > Phase > Cost Code.
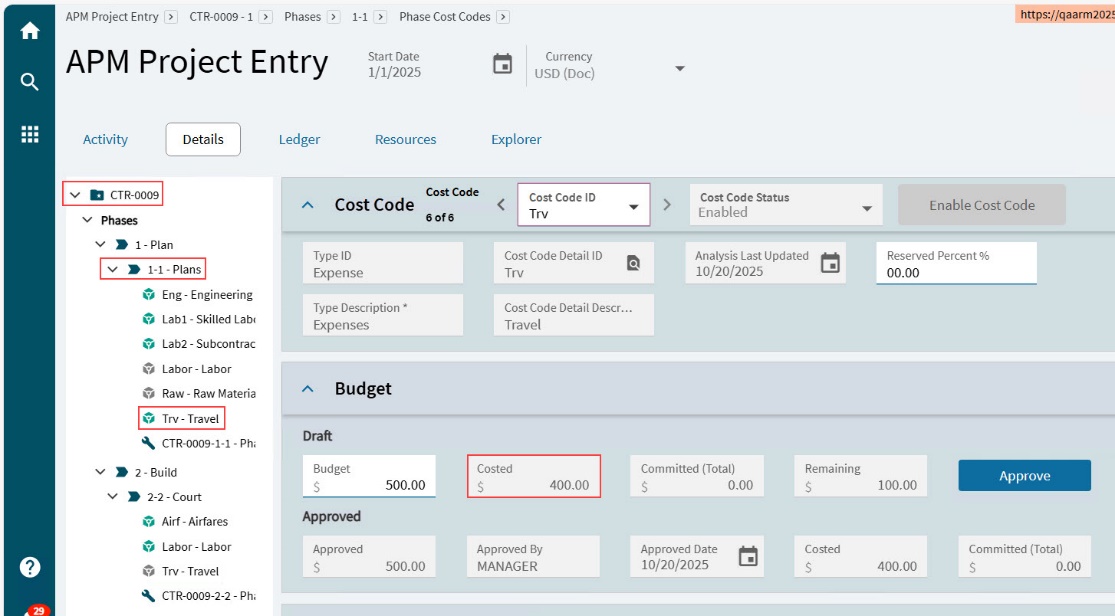
You can also see the Costed and CostWIP values in the Transaction Summaries on the Ledger page for the project.
For reimbursed expenses, the AP Invoice amounts are included in the A/P Analysis section on the Transaction Summaries.
APM Case Entry
Use APM Case Entry to enter Cases which can relate directly to Project/Phase/Job/Assembly Sequence/Operation in APM Projects. You can also enter Contract and Contract Claim information in the APM Case, and also Related Information, which is available in standard Case Entry.
Standard Case Entry allows you to capture related information for any of the following, for example:
-
Sales Order
-
Quote
-
RMA
-
Invoice
-
Part
-
Marketing
| For further information, refer to the standard Kinetic Help topic Creating Cases in the Case Management module. |
Opening Existing Cases
-
Navigate to Advanced Project Management > Project Accounting > General Operations > APM Case Entry.
APM Case Entry opens.
-
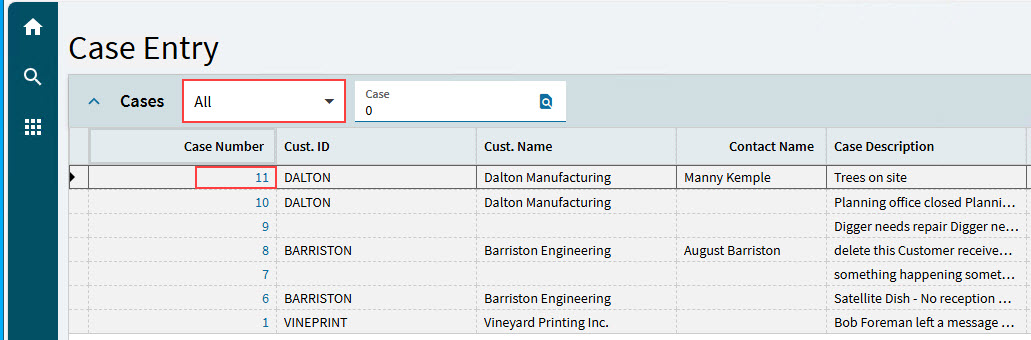
Filter the cases by choosing from the drop-down on the menu bar. Choose:
-
All
-
Open
-
Closed
-
Or Recent Records
-
-
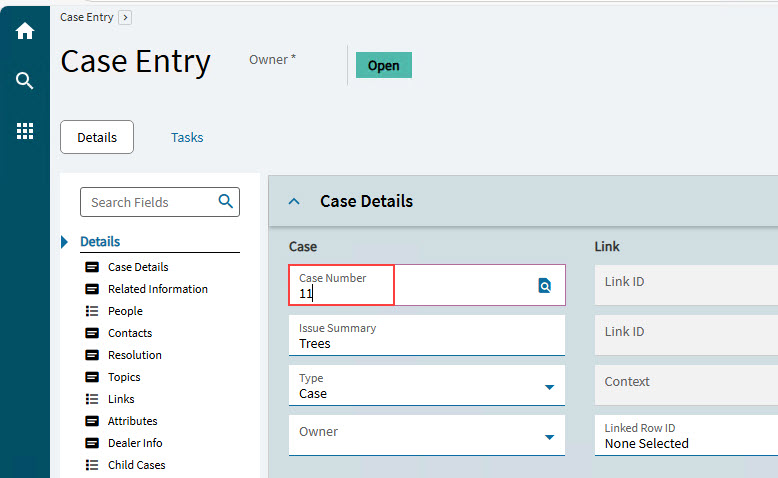
Select a Case Number to open the case.
The selected case appears in Case Entry.
Adding New Cases
-
Navigate to Advanced Project Management > Project Accounting > General Operations > APM Case Entry.
-
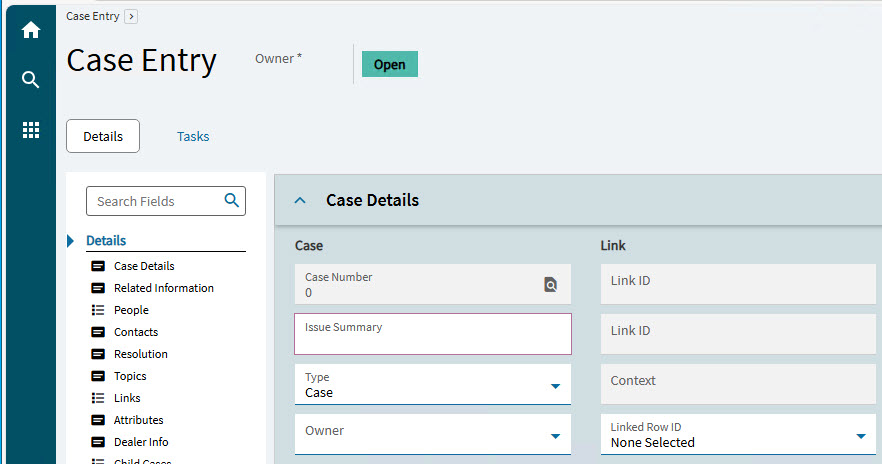
Select New
on the Standard toolbar.Case Entry opens for a new case.
-
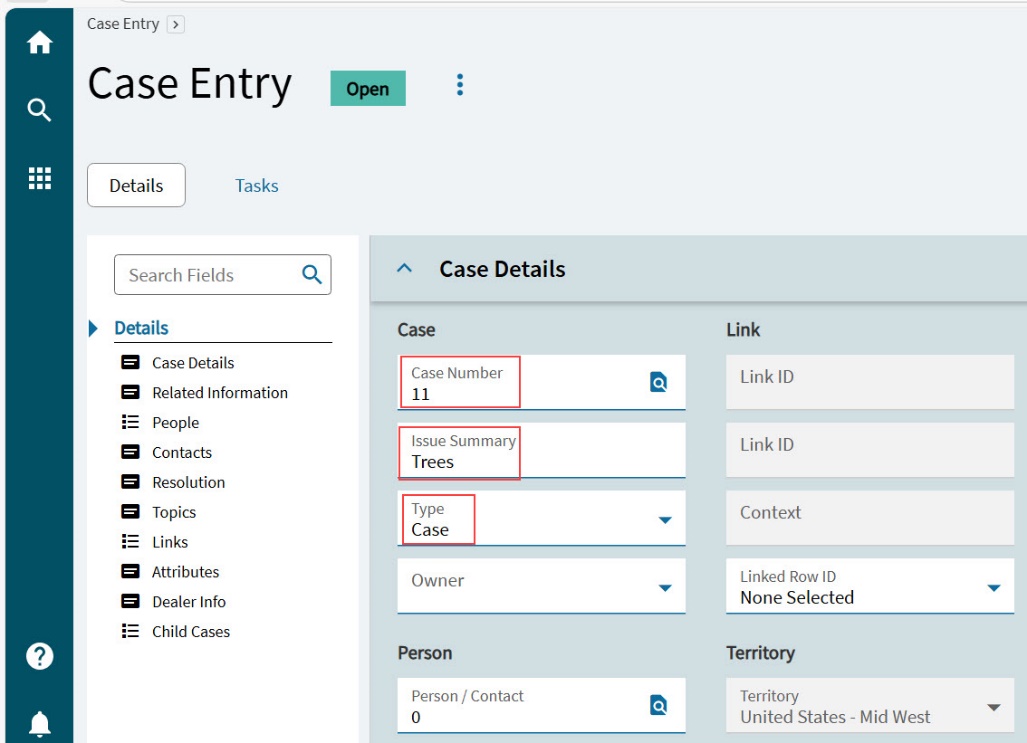
On the Case Details card, enter the case details:
-
Enter an Issue Summary, summarizing what the case is about.
-
Select a Type from the drop-down list. The default here is Case.
ECO - Select this case type, then choose an ECO Workflow Group.
Case - Select this case type, then choose a Case Management Workflow Group.
CRM - Select this case type to enter a CRM case. When selected, the Customer field is mandatory and the Workflow Group option is not available.
-
Optionally select an Owner for the case.
-
Optionally select a Contact Person. This fills in the Link details.
-
Optionally enter a Priority.
-
If this case is part of another case, select the other case as the Parent.
-
Enter a Full Description for the case, outlining the issue as well as any actions to be taken before the case can be closed.
-
Select a Workflow Group if this case is of type ECO or Case. Active Workflow Groups for the selected Type are available. (These are maintained in Workflow Group Maintenance in standard Kinetic.)
-
Select a Task Set. Tasks Sets for the select Type are available. (These are maintained in Task Set Maintenance in standard Kinetic.)
-
-
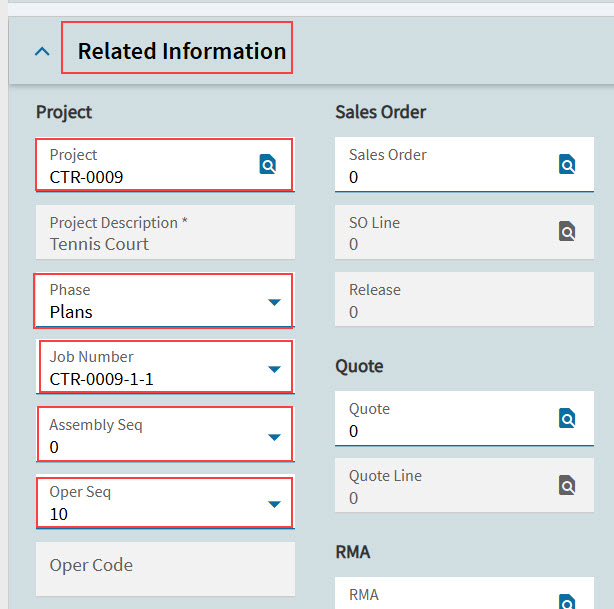
Expand the Related Information card and complete all relevant information. For Advanced Project Management, fill in information relating to Projects and/or Contracts and Contract Claims.
-
To capture Project information, enter the following:
-
Select a Project.
-
Select a Phase for the selected Project from the drop-down list.
-
Select a Job Number from the drop-down list.
-
Select an Assembly Seq from the drop-down list.
-
Select an Oper Seq (Operating Sequence) from the drop-down list.
-
-
Save.
The case appears on the Help Desk card of the selected Project.
-
-
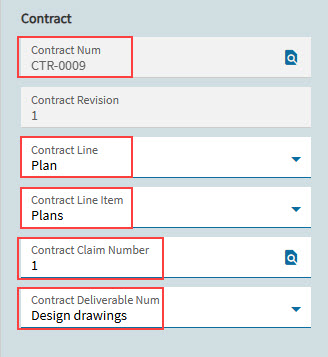
Optionally enter Contract and Claim details.
-
Select a Contract Num.
-
Select a Contract Line.
-
Select a Contract Line Item.
If the case also relates to a specific contract claim, then select the details here:
-
If the case also relates to a specific contract claim, select a Contract Claim Number.
-
Optionally select a Contract Deliverable Number.
-
-
Next, complete the definitions for the Tasks for the case.
Tasks are inserted automatically, depending on which Task Set you select for the case. Each Milestone from the Task Set is entered as a Task for the Case.
You should update the task details when first setting up the case and then continue to make adjustments as you work through each task. For example, set up the Assigned To, Start Date and End Date initially, then update % Complete as you work through the task. To update the task definitions:
-
Open the Tasks page.
-
Select the first task on the Navigation Tree.
-
Update the Task Detail card:
-
Optionally update the Description.
-
Optionally update the Task Type.
-
Select Send Alert at Completion to send a global alert when the task is marked as Complete.
-
Select Mandatory for tasks that must be completed.
-
When the Task is complete, select Complete and optionally select a Reason.
-
-
Update the General tab on the Task Details card:
-
Select an Assigned To. This is the person the task is assigned to.
-
Optionally select an Internal Contact. This is the person that needs to be contacted to complete the task.
-
Optionally give the task a Status (for example, select High Priority, or In Process).
-
Update the Start and End dates and times.
-
Optionally enter a Priority and % Complete.
-
-
Update the Customer tab on the Task Details card:
-
The Sold To Customer and Ship To default to the selected Customer in Contacts.
-
-
Update the Supplier tab on the Task Details card:
-
Update the Comments tab on the Task Details card. Enter and save any comments relevant to the task.
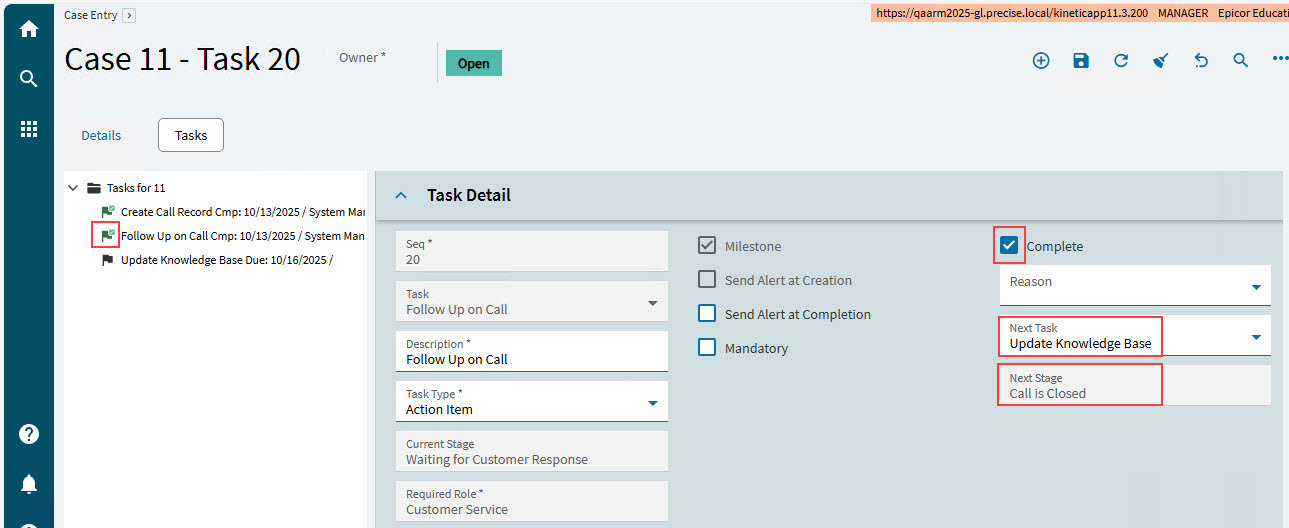
As each task is completed, the flag icon on the Navigation Tree turns dark green, with a light green tick. The Next Task and Next Stage in Task Detail update to the next task and in the Navigation Tree and its stage, as defined in the Task Set.
-
APM Job Entry
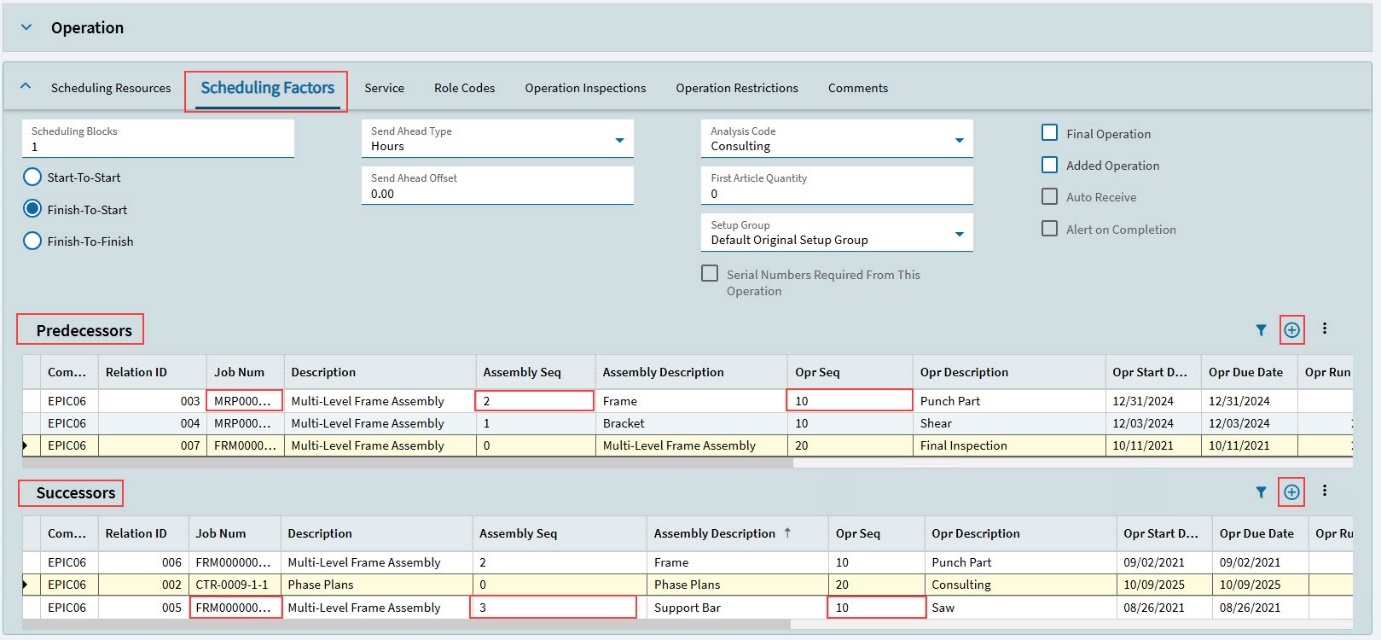
Use APM Job Entry to capture Predecessors and Successors in the Operation card for a Job. All other features and functionality in APM Job Entry can be found in Kinetic’s standard Job Entry (Product Management > Job Management > General Operations > Job Entry).
| For further information, refer to the standard Kinetic Help topic Creating Jobs in the Job Management module. |
-
Open APM Job Entry (Advanced Project Management > Project Accounting > General Operations > APM Job Entry).
-
To add a new job, select New Job
. Complete the job details as you would for a
standard Kinetic job.OR
-
To open an existing job, select a Job in the search results grid. Alternatively, you can open an APM Job directly from APM Project (right-click on the Job in the project or one of the project phases and select APM Job Entry from the context menu).
-
Select the Assemblies tab to open the Assemblies page.
-
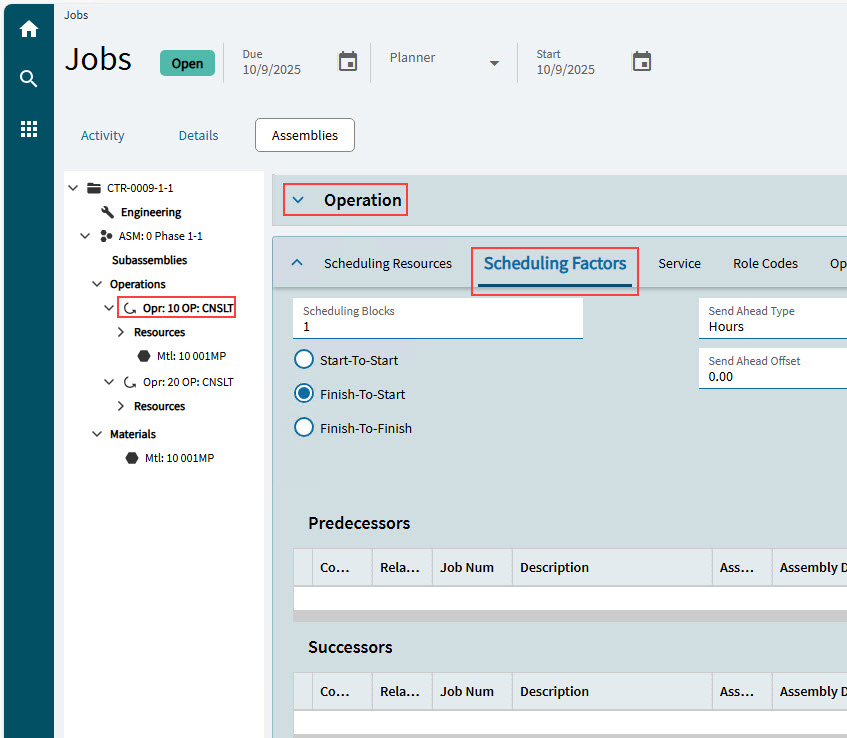
Locate the relevant operation from the Navigation Tree and select it to open the Operation card.
-
To view or edit the Scheduling Factors, select the Scheduling Factors tab in the tabbed cards below the Operation Card.
-
To add a Predecessor for this job:
-
Select New
on the Predecessors menu bar. -
Search for and select a job to be scheduled in before this job operation.
-
Select an Assembly Seq from the drop-down in the grid.
-
Select an Opr Seq from the drop-down in the grid.
-
Continue to add Predecessors.
-
-
To add a Successor for this job:
-
Select New
on the Successors menu bar. -
Search for and select a job to be scheduled in after this job operation.
-
Select an Assembly Seq from the drop-down in the grid.
-
Select an Opr Seq from the drop-down in the grid.
-
Continue to add Successors.
-
-
Save.
APM Project Journal Entry
Use Advanced Project Journal Entry to enter GL journals charged directly to Advanced Project Project/Phase and/or Cost Code or to transfer costs between projects, phases and or cost codes or GL accounts. Note that a journal entry does not auto reverse.
Some examples are:
| APM Project Journal Entry | In APM Project (after running Recalculate Analysis): |
|---|---|
Transfer costs between Projects |
|
Transfer costs between Phases within a Project |
|
Transfer costs between Cost Codes within a Project > WBS Phase |
|
| All other features and functionality remain the same as the Journal Entry in other menu paths in Kinetic. Read more about Setting Up GL Journals in the Standard Kinetic online help, and GL Journal Entry in the application help. |
Accrued Flag and Classification
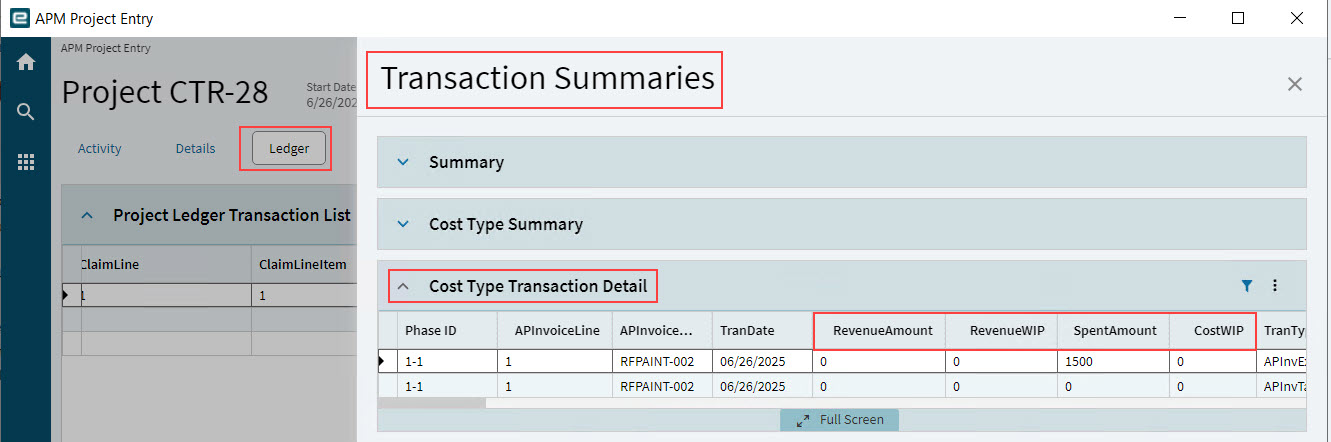
The Accrued flag and the Classification work together to define how the General Journal transaction is classified in the APM Project Ledger when Project Analysis is run.
The transaction amount (debit or credit) populates different columns in the project’s Ledger page, as follows:
| Accrued flag | Classification | Ledger column populated with the Transaction amount: |
|---|---|---|
True |
Revenue |
Revenue |
False |
Revenue |
RevenueWIP |
True |
Cost |
SpentAmount |
False |
Cost |
CostWIP |
The General Journal transactions appear in the Cost Type Transaction Detail card (see Cost Type Transaction Detail), for the Cost Code used in the Journal entry.
Capturing an APM Project Journal
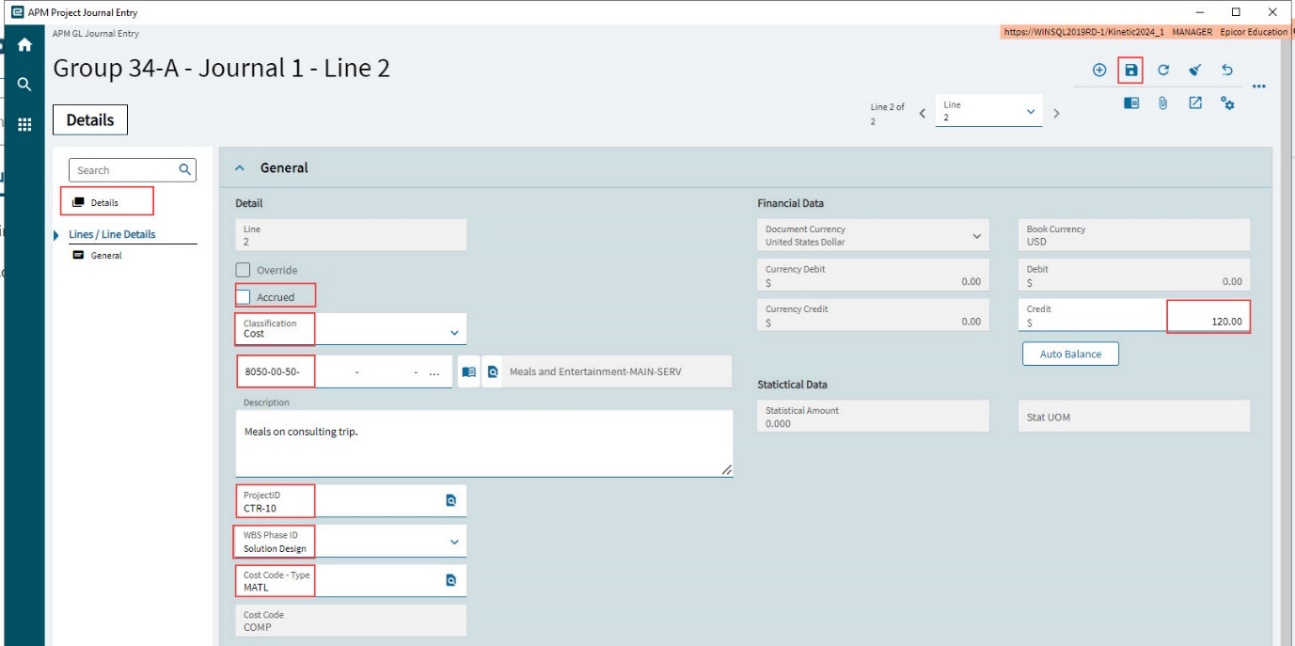
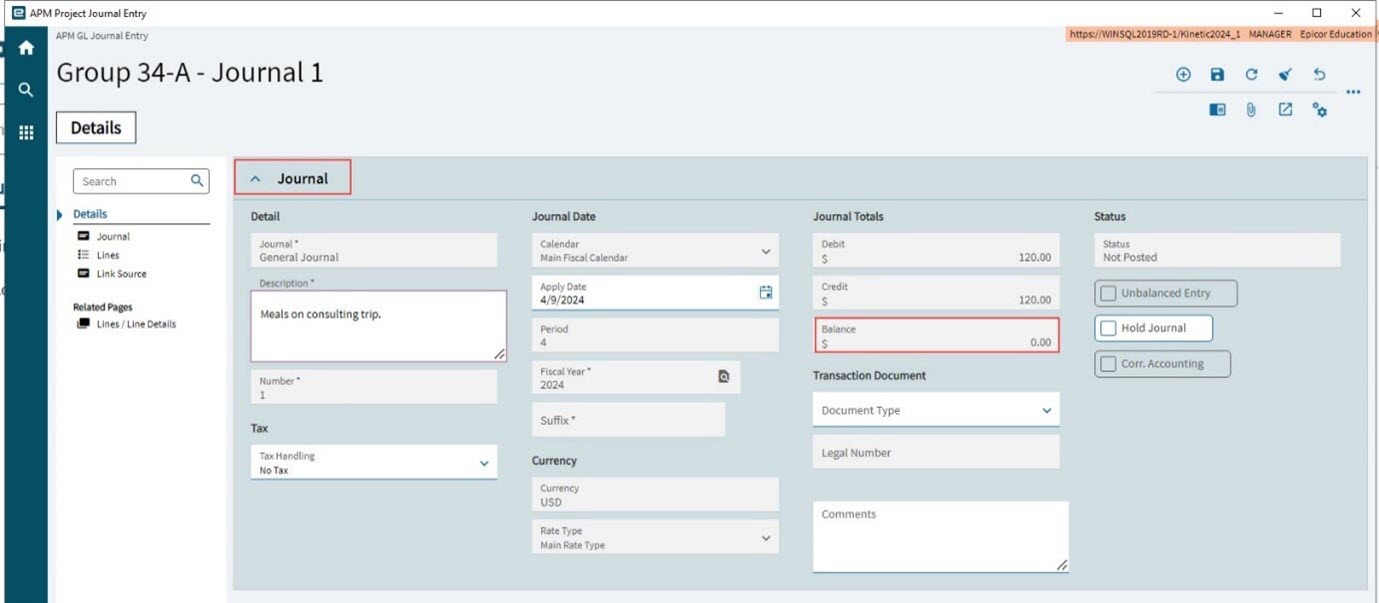
The example below demonstrates how to transfer costs between Projects, using APM Project Journal. There are two journal lines (a debit of 120.00 against G/L Account 8050|00|50, for Project CTR-1 and a credit of 120.00 against G/L Account Code 8050|00|50 for Project CTR-10) for a journal entry 'Meals on Consulting Trip'.
The steps are:
Step 1. Capture a Journal Group
-
Navigate to Advanced Project Management > Project Accounting > General Operations > APM Project Journal Entry.
-
Select New Group
on the Standard toolbar.-
Enter a value into the Group field.
-
Accept all defaults.
-
-
Select Save
on the Standard toolbar.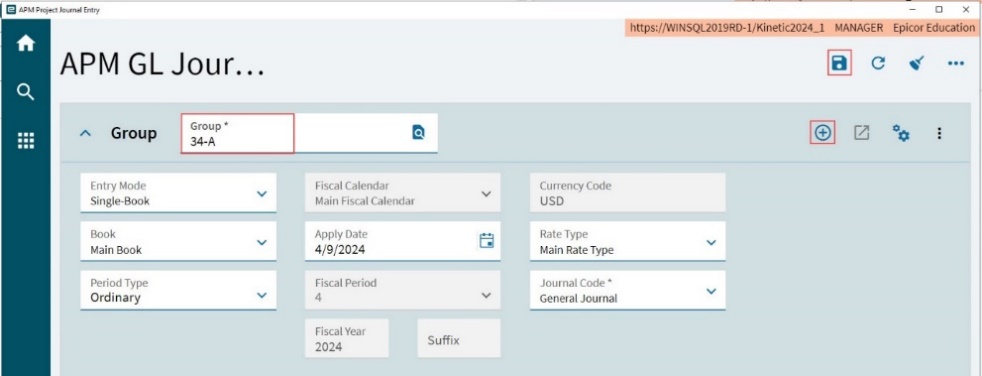
Step 2. Capture a Journal
The example below demonstrates how to transfer a cost between two different projects, using journal entries.
-
Select New Journal
on the Journal Entries in Process toolbar.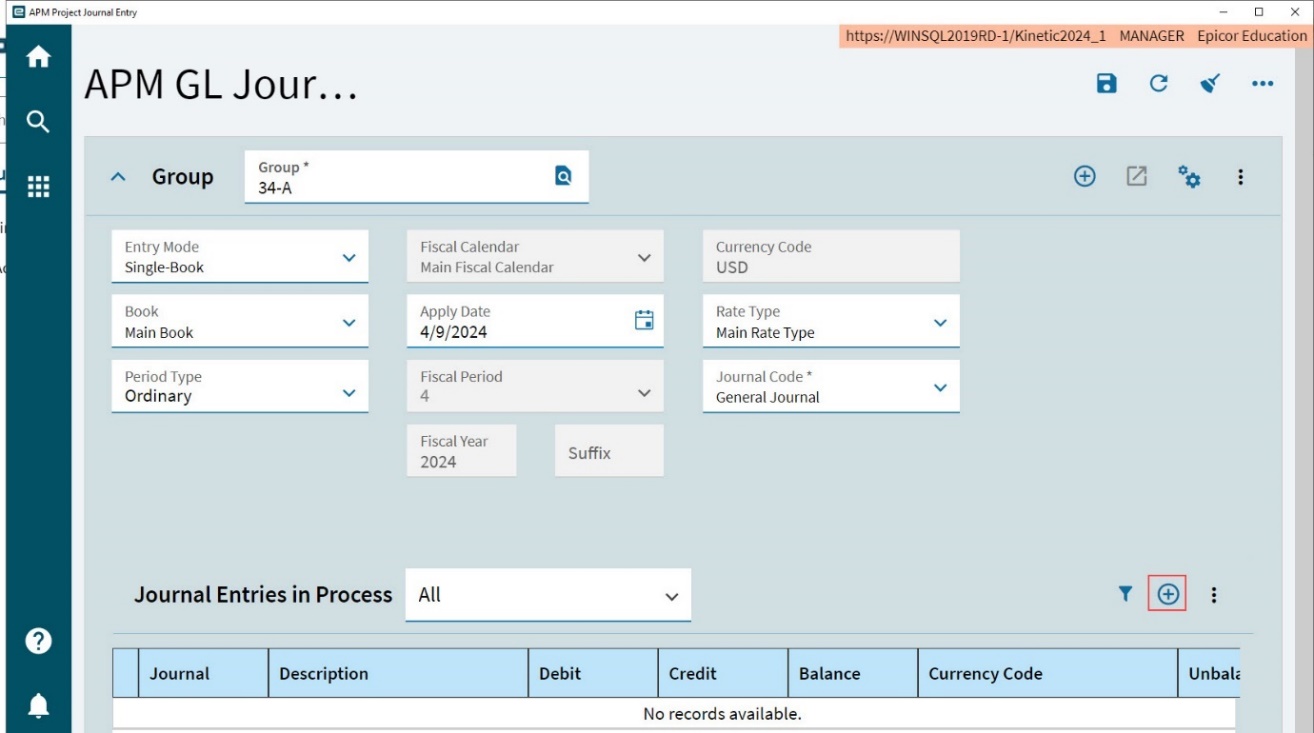
A new journal opens for the group.
-
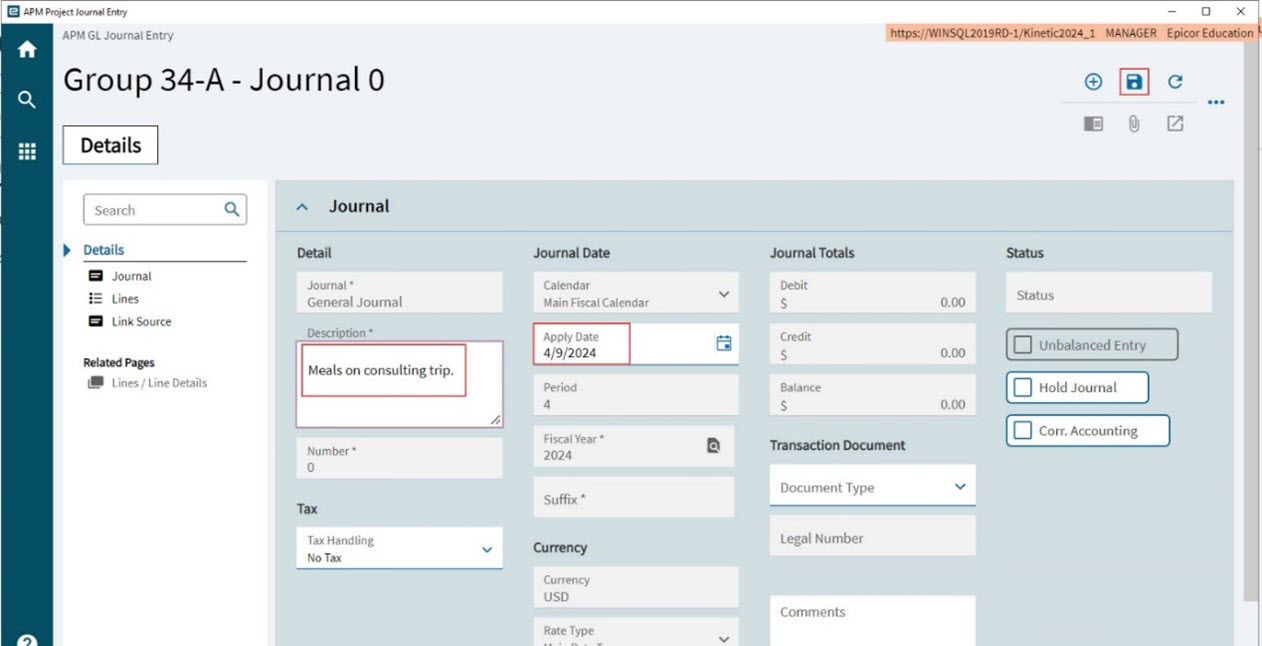
Capture the journal details.
-
In the Description field, type in a description for the journal, for example 'Meals on Consulting Trip'.
-
Select the Apply Date.
The Apply Date must fall within the Fiscal Year and Fiscal Period of the current date. -
Keep all other defaults.
-
-
Select Save
on the Standard toolbar.The new journal is saved.
Step 3. Capture a Journal Line for Debit
Create a Debit journal line for the cost.
-
Select Lines on the Navigation Tree.
The Lines card appears.
-
Select New Journal Line
on the Lines menu bar.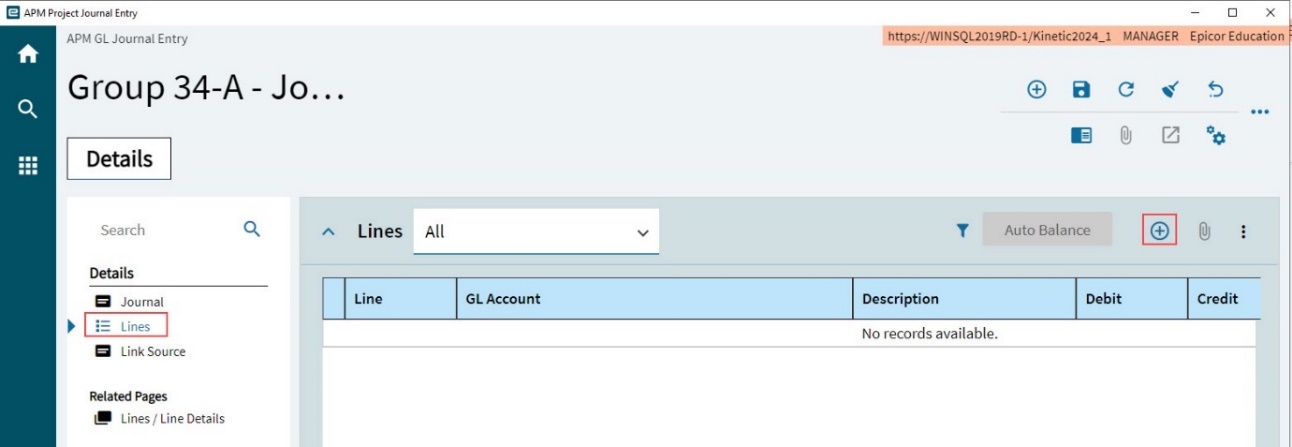
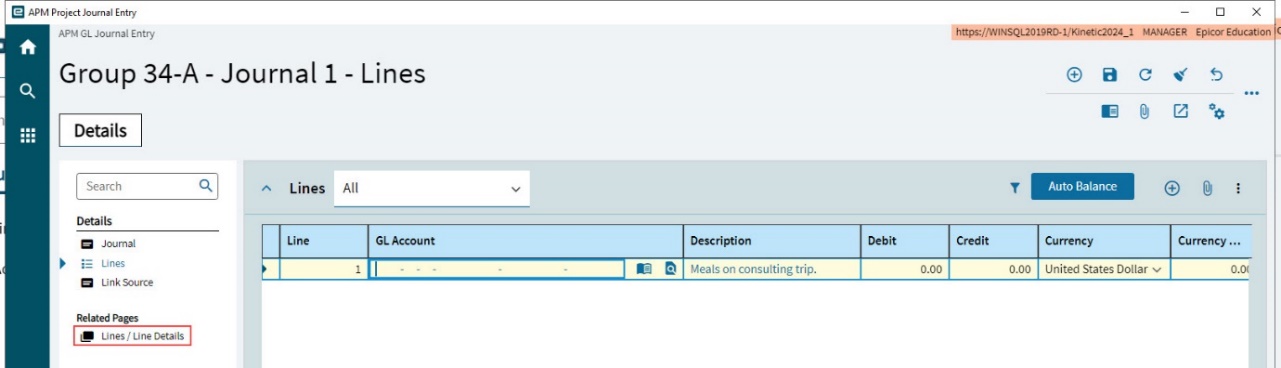
A new line is added.
-
Select Lines / Line Details under the Related Pages node on the Navigation Tree.
This displays the General card for the new line.
-
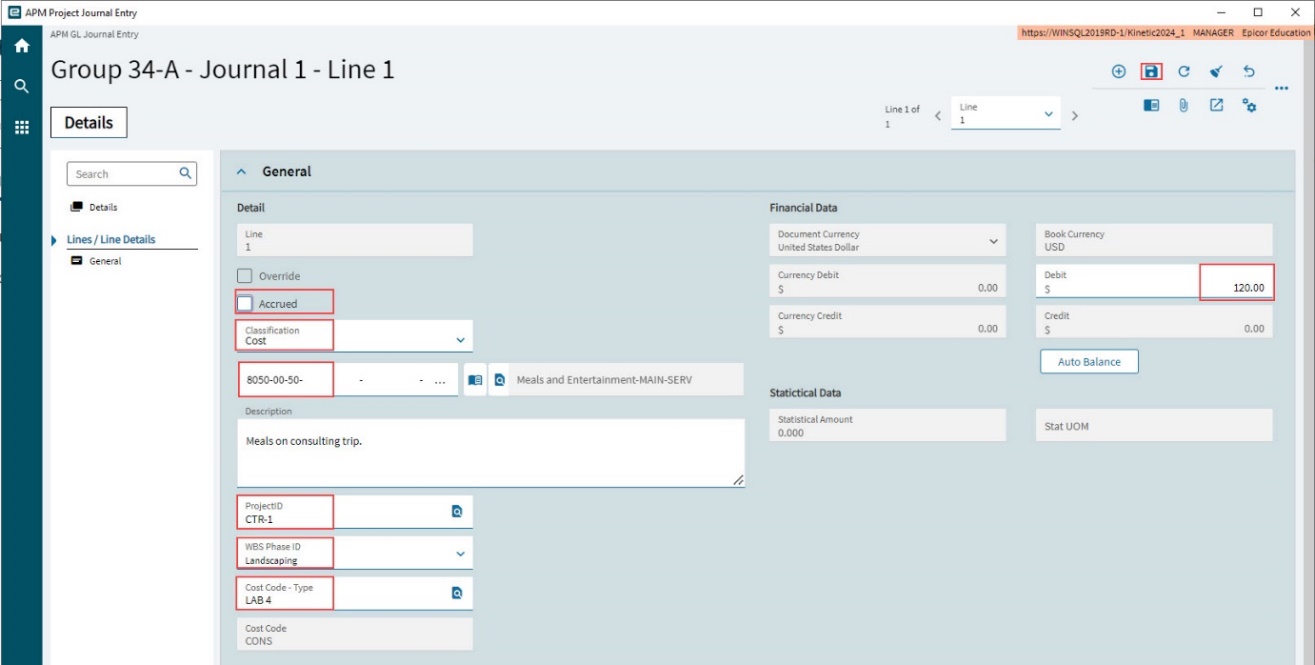
Update the details for the Debit journal line.
-
Clear the Accrued check box. Accrued is used by the system for posting project journal accruals.
-
Select Cost from the Classification drop-down list. The Cost is for journal entries relating to transfer or reallocation of costs. Cost classification is required for the correct classification in the Project Ledger.
Accrued and Classification work together to determine if the transaction is an accrual (deferral) transaction for APM Project Ledger classification purposed when Project Analysis is run. See Accrued Flag and Classification. -
In the G/L Account field, type in or select a G/L Account Code appropriate for the journal transaction. In this example, G/L Account number 8050-00-50 is used, which is the Meals and Entertainment cost code, for the Main branch, in the Services division.
-
Enter the Project ID. In this example: CTR-1.
-
In the WBS Phase ID drop-down list, choose a WBS Phase ID from the project.
-
In the Cost Code drop-down list, choose a Cost Code from the Project > WBS Phase.
Type displays the Cost Code Type for the selected Cost Code.
-
Enter a value (120.00) in the Debit field.
-
Select Save
on the Standard toolbar to save the journal line.
-
Step 4. Capture a Journal Line for Credit
-
Now create a new journal line, using the same G/L Account, but for a different Project, in this example: CTR-10. Clear the Accrued check box. Select the same G/L Account Code. Select a WBS Phase and Cost Code belonging to the Project. Enter a Credit amount (120.00).
-
Save.
Posting an APM Project Journal
To post a journal entry:
-
Select Post Asynchronous from the
 Overflow menu.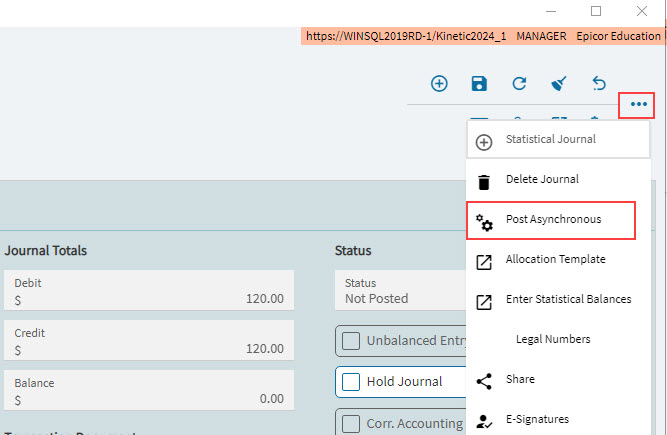
-
Select Process
image on the Journal Entry Post Process slide-out panel.The transaction is posted to the General Ledger.
Viewing the Posted Journals on the Project
Captured and posted journals can be viewed on several of the project pages.
-
Run Recalculate Analysis for the project to bring the journal transactions in.
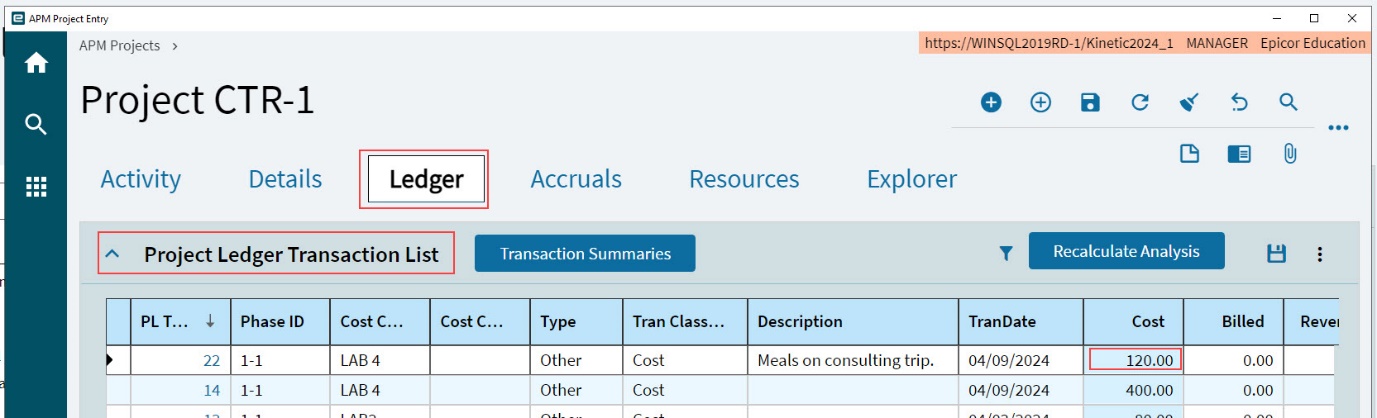
The Transaction Summaries show the transaction in Cost Type Summary, Cost Type Transaction Detail.
For the credit journal transaction (project CTR-10) this is a negative value (-120.00).
For the debit journal transaction (project CTR-1) this is a positive value (120.00).
The budget for the affected Cost Code is also affected.
The transaction amount (120.00) is included in the Costed amount, and Remaining is reduced by that amount.
The project that the amount was transferred to has a change to its General Ledger also, and the affected Cost Code Detail Costed goes down, while the Remaining goes up.
APM Purchase Order Entry
Use APM Purchase Order Entry to enter Purchase Orders.
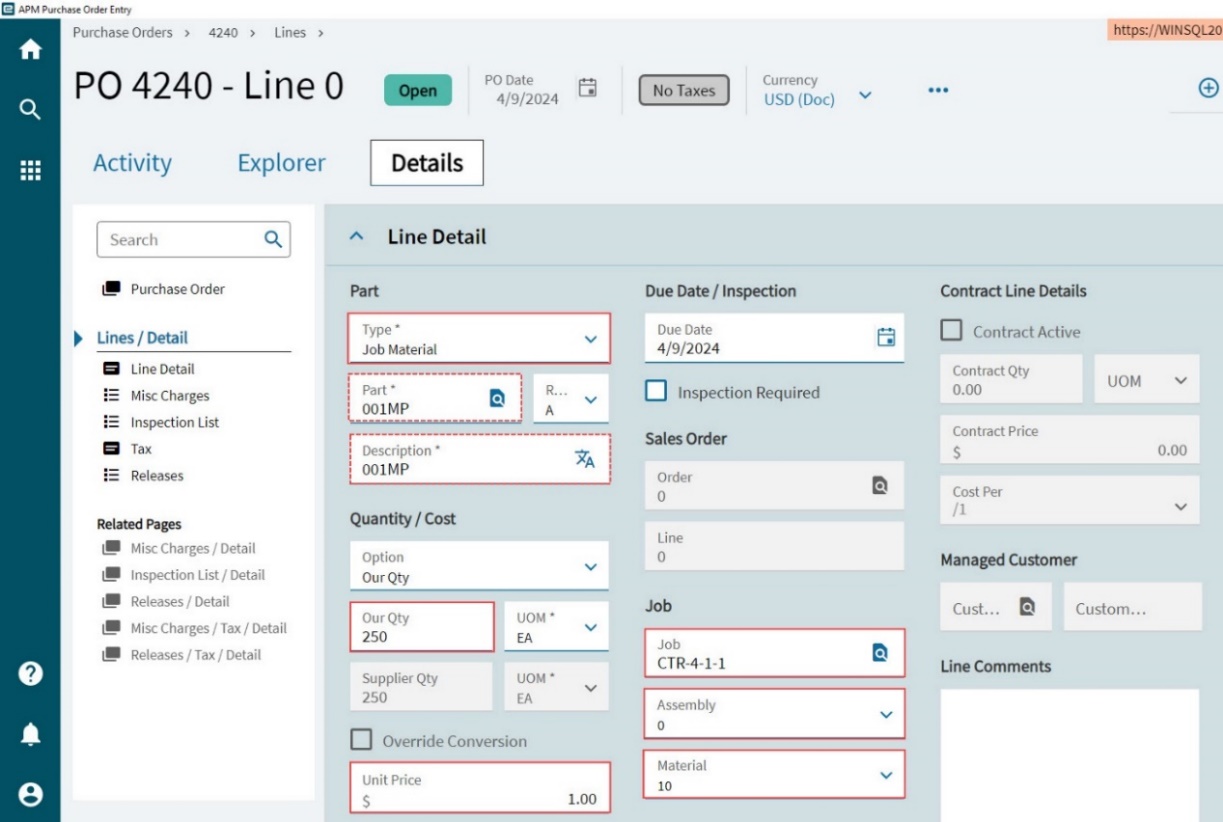
On the Line Detail card for a purchase order, you can select the enter the Job, Assembly, and Material matching a Project > Phase > Cost Code. (The Material has an Analysis Code matched to the Cost Code.)
|
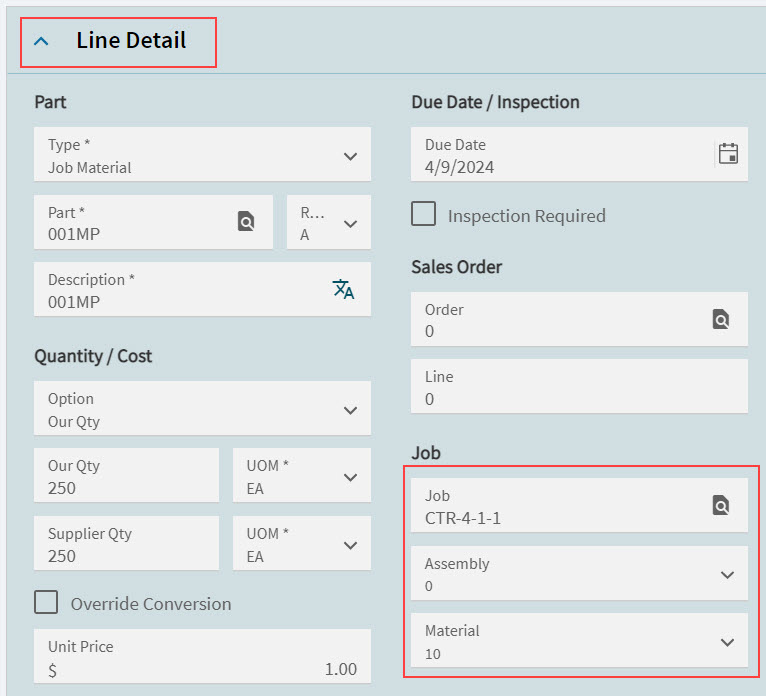
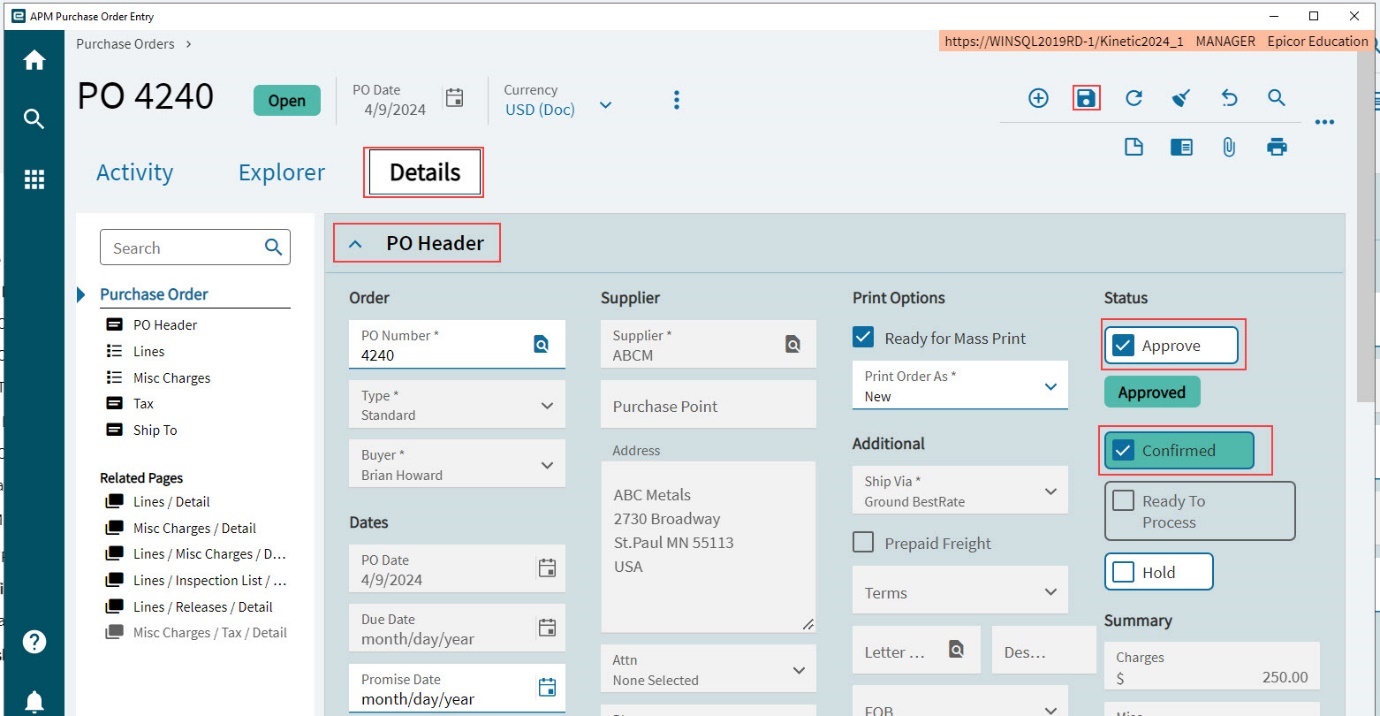
Once the APM Purchase Order is Approved and Confirmed, the Purchase Order Total is included in the Committed (Total) for the Project > Phase > Cost Code Budget, and the PO appears on the Activity page on the POs card.
| All other features and functionality remain the same as the Purchase Order Entry in other menu paths in Kinetic. Read more about Purchase Order Entry in the Standard Kinetic help. |
Capturing an APM Purchase Order
This scenario describes how to capture an APM Purchase Order for a project, using Job Material. Ensure you have a Project, WBS Phase, and Job Number (for the WBS Phase) ready. The Job must be released.
The Job must have a Material with an Analysis Code that is linked to a Cost Code used by the Project > Phase if you want to purchase against that Project > Phase > Cost Code.
The steps in this example are:
Step 1. Capture a Purchase Order
-
Navigate to Advanced Project Management > Project Accounting > General Operations > APM Purchase Order Entry.
-
Select New PO
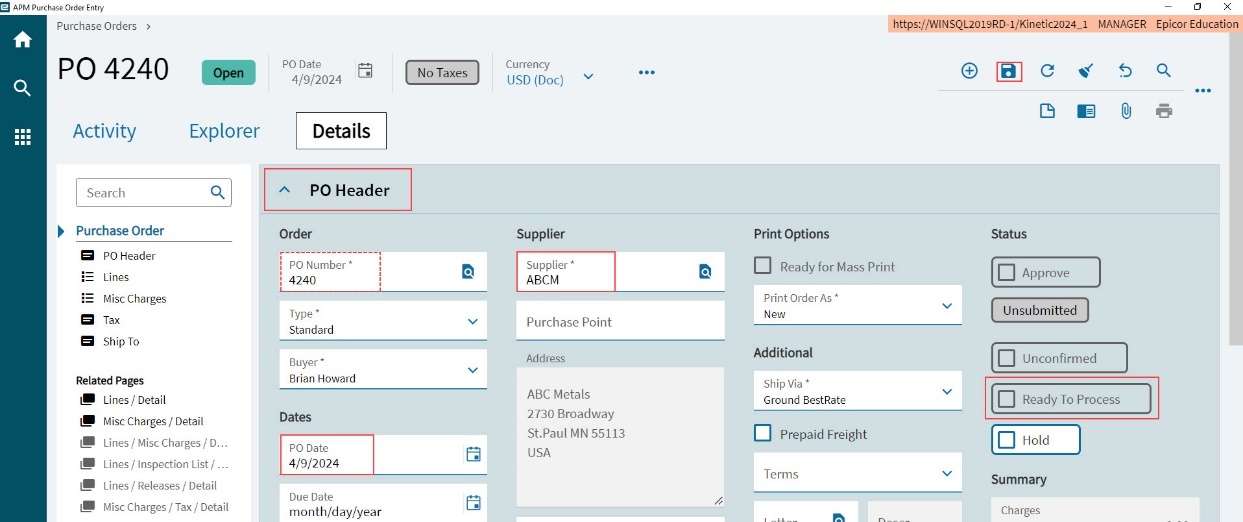
on the Standard toolbar.This opens the Details page for a new Purchase Order with the PO Header card expanded.
-
Capture the PO details.
-
Select a Supplier.
-
Ensure the Ready to Process check box is cleared.
-
Update the PO Date if necessary.
-
-
Select Save
on the Standard toolbar.The Purchase Order is saved, in the Open status, and a PO Number is allocated. Note down the PO Number.
Step 2. Capture a Purchase Order Line
-
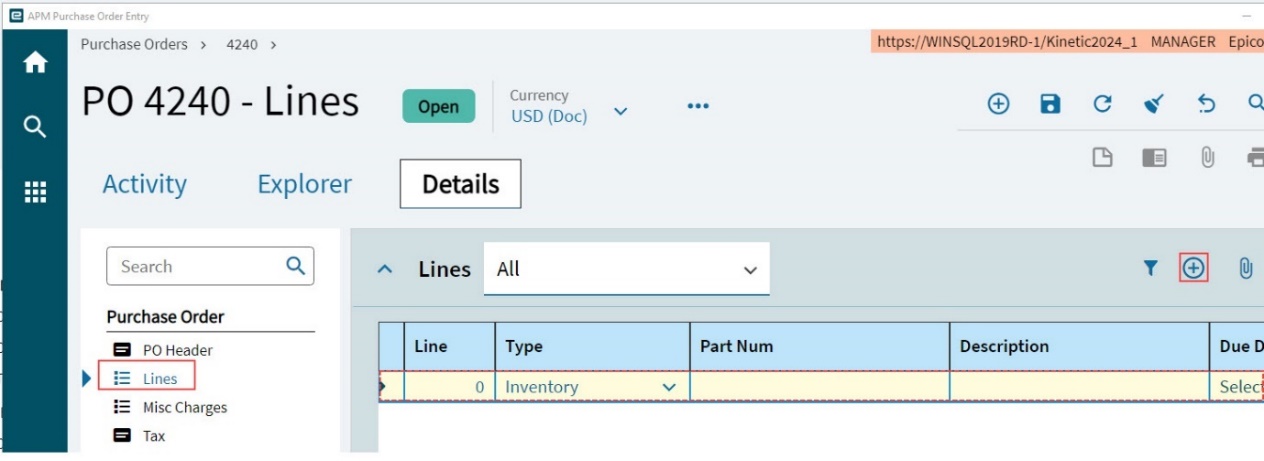
Select Lines on the Navigation Tree.
-
Select New lines
on the Lines menu bar.A new PO line is created.
-
Select the Line to edit it.
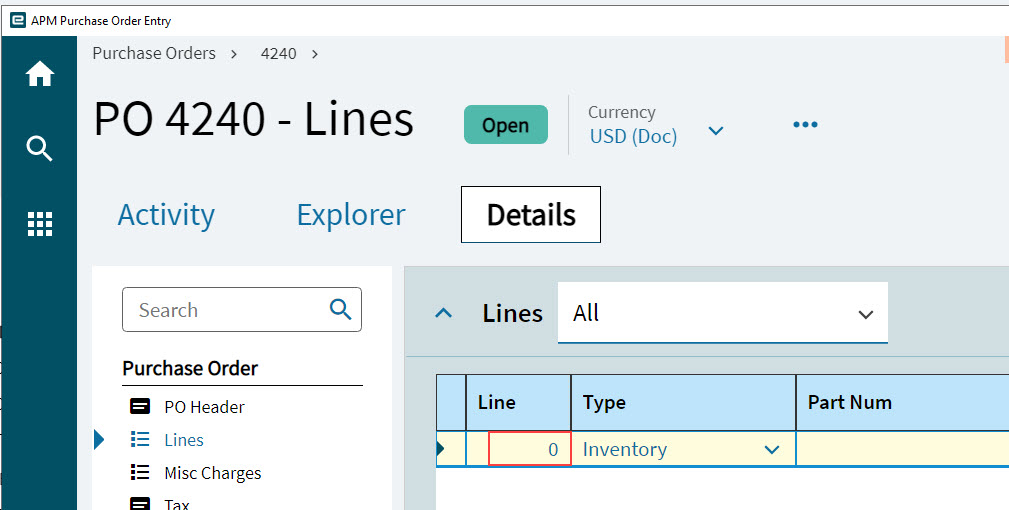
This opens the Line Detail card.
-
Enter the Line Detail fields.
-
Select Job Material from the Type drop-down list.
-
Enter or select the Job number.
-
Select the Assembly from the drop-down list.
-
Select the Material from the drop-down list.
The Part and Description fields are filled in from the Job selection.
-
Adjust the quantity ordered, in Our Qty, if ordering less than what is required for the job.
-
Update the Unit Price.
-
-
Select Save
on the Standard toolbar.
Step 3. Approve and Confirm the Purchase Order
In APM Purchase Order Entry:
-
Select the Purchase Order node at the top of the Navigation Tree.
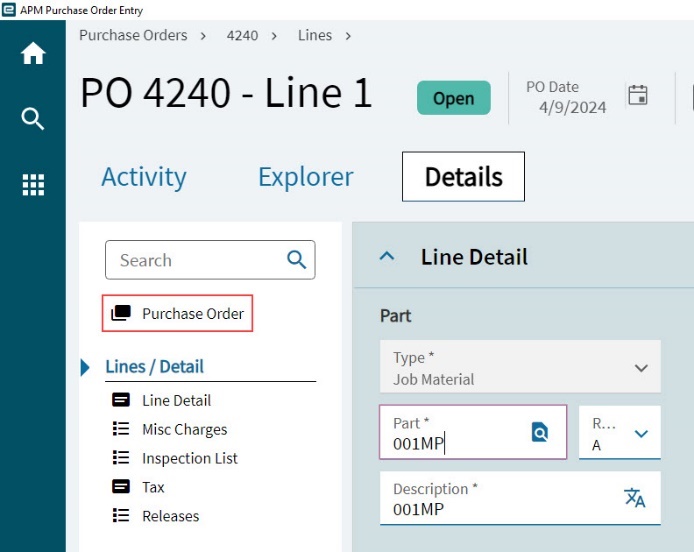
This opens the PO Header card.
-
On the PO Header card:
-
Select the Unapproved check box to Approve.
-
Select the Unconfirmed check box to Confirm.
-
Select Save
on the Standard toolbar.The Purchase Order is Approved and Confirmed.
-
Step 4. View Purchase Order Effect on the Project
Open the project in APM Project Entry, run Recalculate Analysis and refresh the project to see the following changes:
-
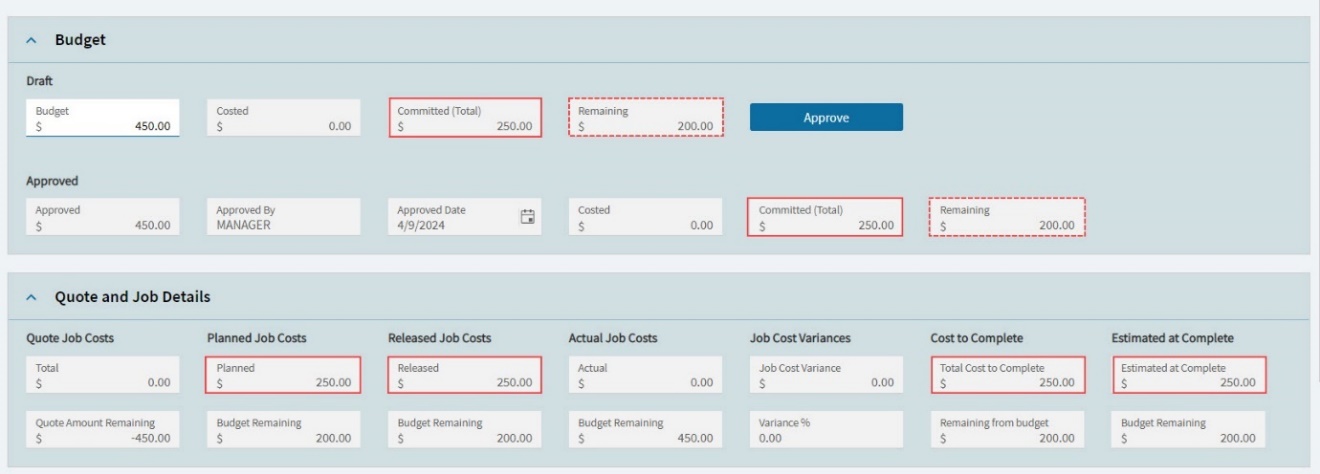
The Purchase Order Total is included in the Committed (Total) field on the Budget card for the Project > Phase > Cost Code (see Budget for a Cost Code). The Remaining for the Project > Phase > Cost Code is reduced by that amount.
-
The Purchase Order Total is included in the Planned Job Costs, Released Job Costs, Cost To Complete and Estimated at Complete on the Quote and Job Details card for the WBS Phase > Cost Code (see Quote and Job Details for a Cost Code).
-
On the Activity page, the Purchase Order appears on the POs card. The Purchase Order is still Open at this stage. See POs.
APM Quote Entry
This topic is covered in the Contract Management (General Operations) section APM Quote Entry.
APM Quote Engineering Entry
The Quote Engineering Integration feature enhances the APM Contract Line Item functionality by introducing direct access to engineering data from related CRM Quotes. This enables easier entry and maintenance of tenders and quotes with engineering components taken directly from Contract Entry.
Within the new user interface APM Quote Engineering Entry, you can review how the cost elements as currently configured map to the cost codes configured within the system. This can be particularly valuable for comparing the summary cost code figures between similar quotes and completed jobs to help identify potential aspects for further review or consideration.
- Path
-
Advanced Project Management > Project Accounting > General Operations > APM Quote Engineering Entry.
Use APM Quote Engineering Entry to add the Method of Manufacture (MOM) to quotes. Using the search filters, you can search through the different Quote Line Assemblies, for each Quote and Line.
For a Quote Line Assembly, you can add:
-
Subassemblies
-
Operations
-
Materials
For the Assembly Plan, you can add Inspections and view Comments and Reference Designators.
| For further information, refer to the standard Kinetic Help topic Engineering Quotes in the Quote Management > Quotes module. |
APM Project Job Cost
On the Worksheet page is an additional section called APM Project Job Cost.
The values shown here are derived from all elements of the engineered job.
Whilst there are system processes to automatically create the jobs, cost codes, and budgets required, having access to the costs for the engineering stage is useful for comparing and evaluating the current quote cost estimates.
There are three tabs on APM Project Job Cost:
- Material Cost Details
-
Material Costs for this engineering quote are displayed in the grid under this tab.
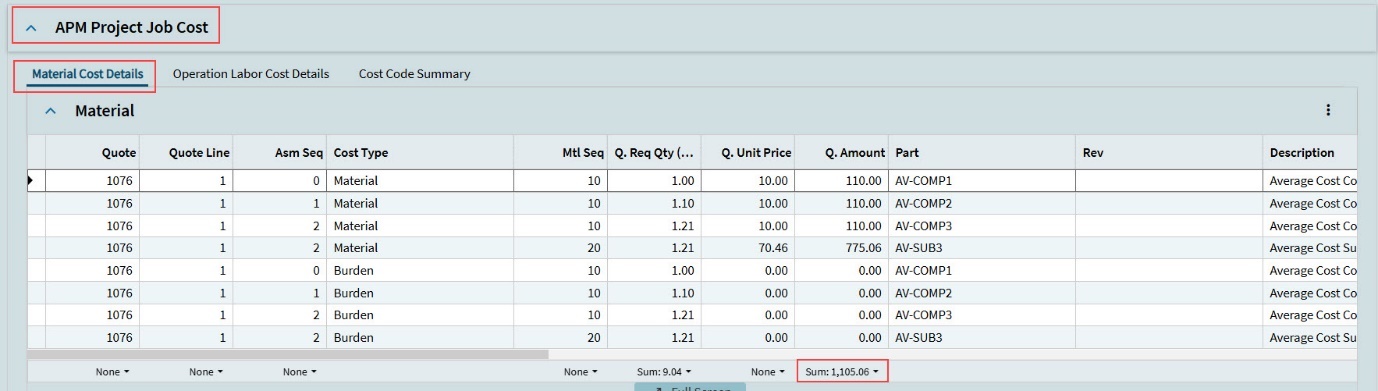
- Operation Labor Cost details
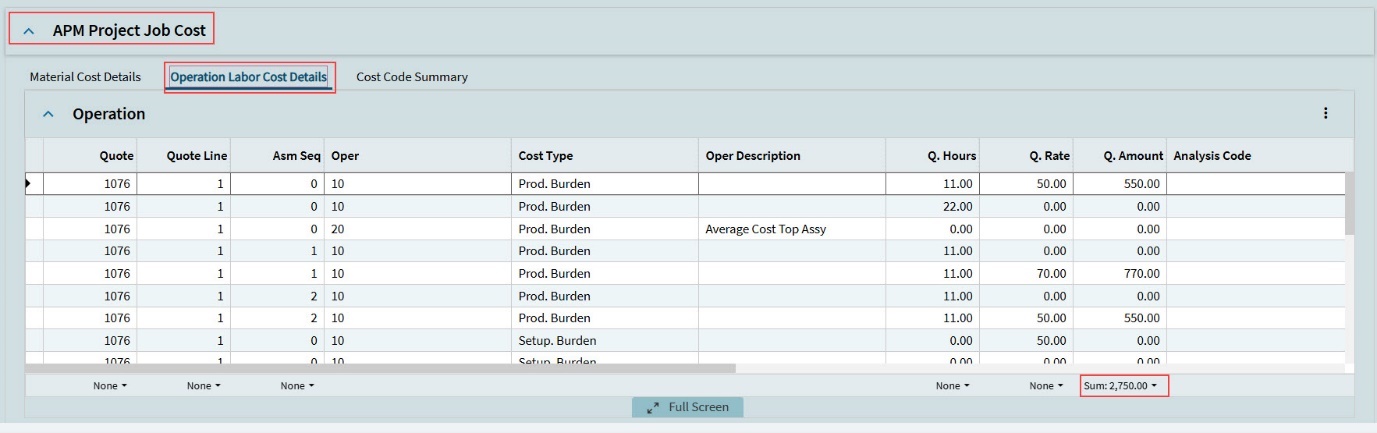
-
Operation costs for this engineering quote are displayed in the grid under this tab.
- Cost Code Summary
-
The Cost Code Summary for this engineering quote is displayed in the grid under this tab.

APM Time Entry
Use APM Time Entry to add a new APM Time Entry for a project job Operation.
- Path
-
Advanced Project Management > Project Accounting > General Operations > APM Time Entry
| For further information, refer to the standard Kinetic Help topic Entering Time in the Service Management module (Time Management). |
-
Navigate to Advanced Project Management > Project Accounting > General Operations > APM Time Entry.
APM Time Entry opens with an employee selected.
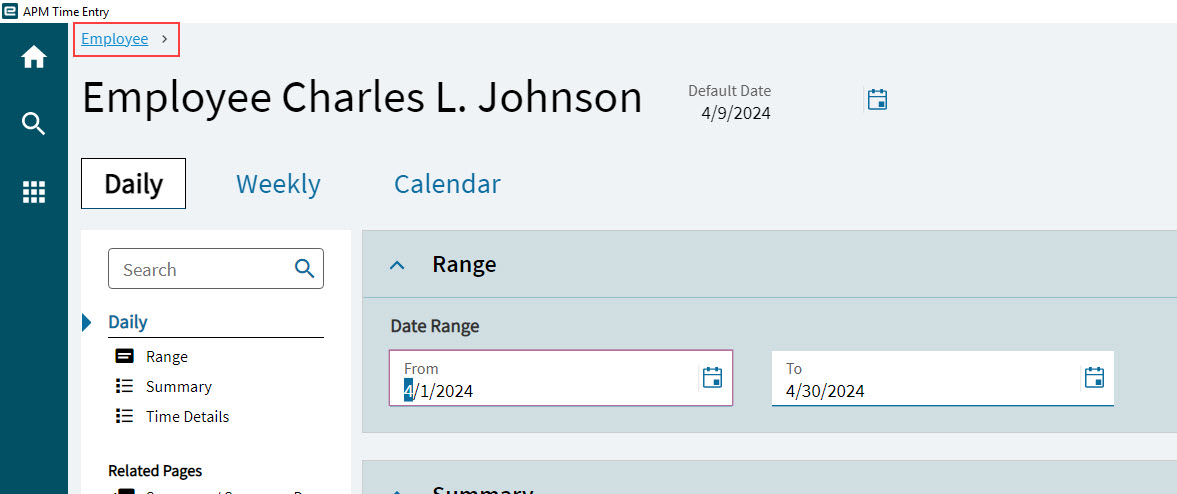
-
To select a different employee, select Employee on the breadcrumb at the top of the application.
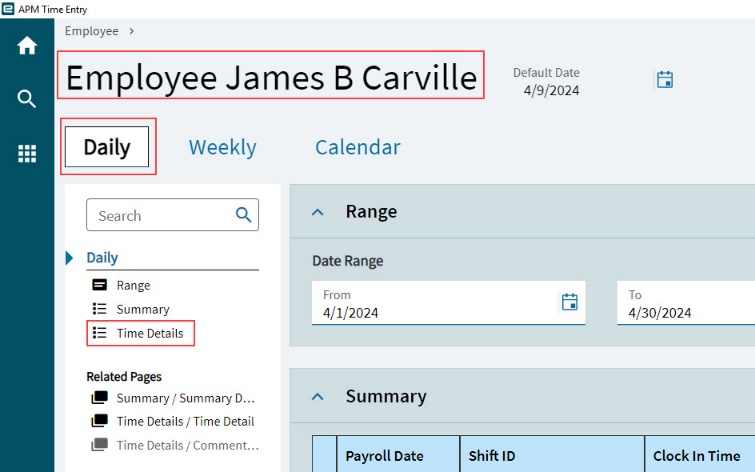
-
Search for and select an Employee.
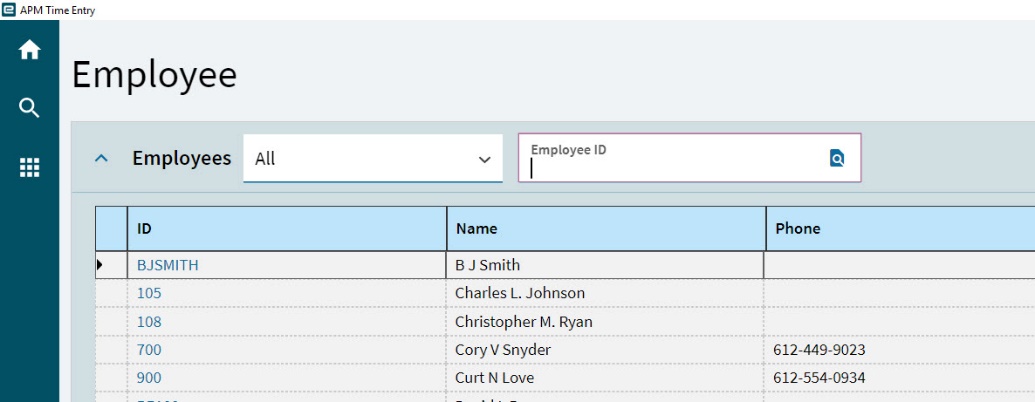
The selected employee name appears in the header, and the Daily page is selected.
-
Select Time Details on the Navigation Tree.
The Time Details card expands.
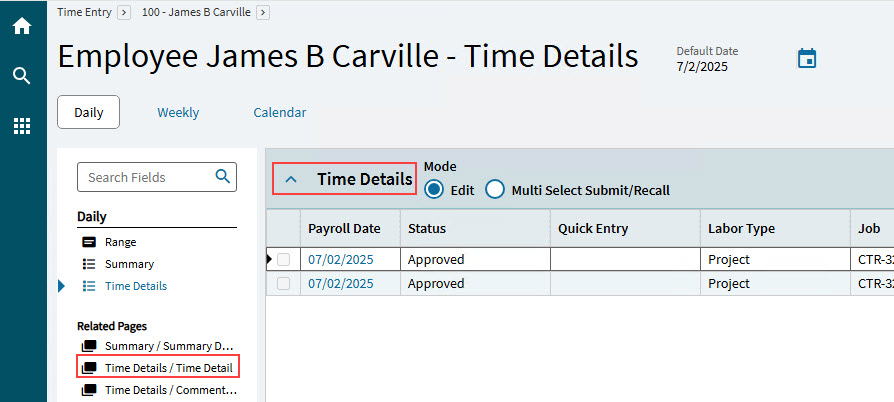
-
Select New Time Detail
on the Time Details card toolbar.This creates a new Time Details record for the employee.
-
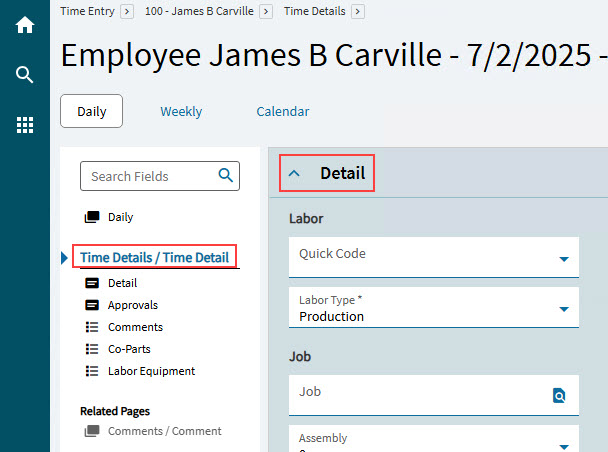
Select Time Details / Time Detail on the Navigation Tree.
-
Select New Time Detail
on the Standard toolbar.This opens the Detail card.
-
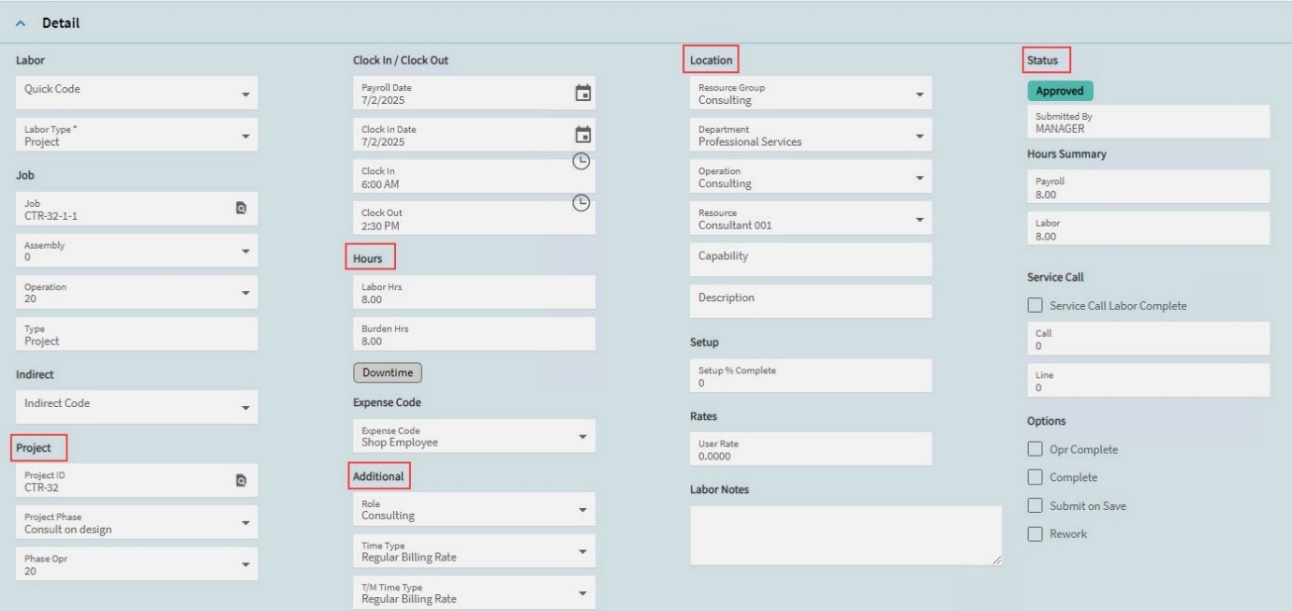
Complete the Detail card:
-
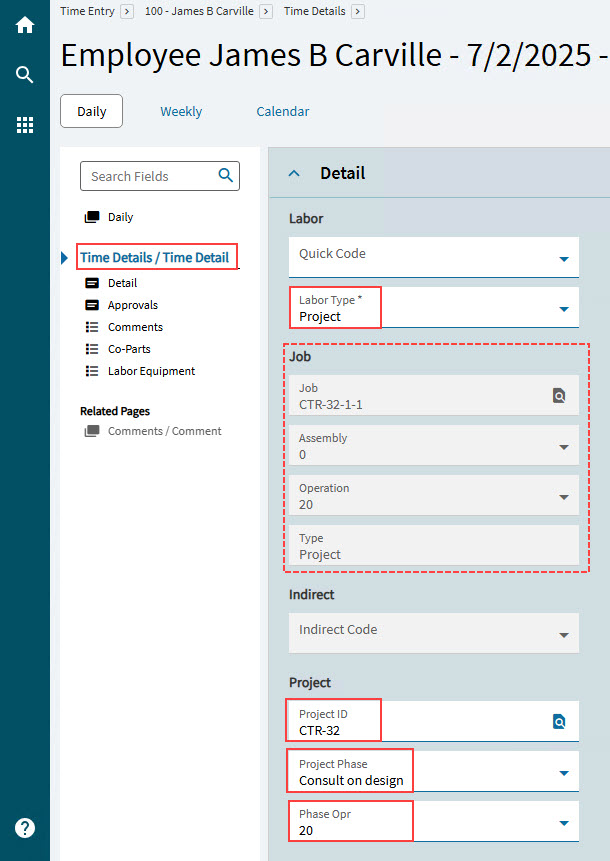
Select Project from the Labor Type drop-down list.
-
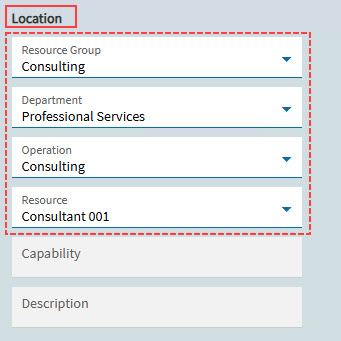
Select a Project ID, Project Phase and Phase Opr relevant to the Project, WBS Phase and Job operation you are capturing time against.
The selected Project Phase populates the Job field with the job for the selected phase. The selected Phase Opr populates the Resource Group, Department, Operation and Resource in the Location section.
-
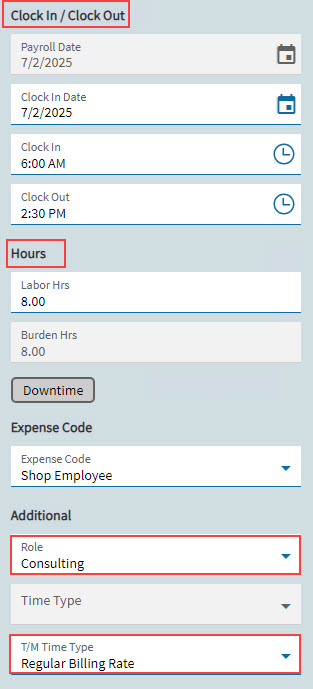
Check the Clock In / Clock Out details and update if necessary.
-
Check the Hours.
-
In the Additional section select a Role and select a time type from the T/M Time Type drop-down list, for example Regular Billing Type.
These should match the Time Type in the Labor Rate for the related contract, and the Role Code relating to the Operation.
-
-
Select Save
then select Submit on the Standard toolbar. -
Ensure the Status is Approved if you want to see the results in the project. (If Auto Approve Time is selected on the Employee record, then their time is auto approved on submission).
APM AP Invoice Tracker
Use the APM AP Invoice Tracker to view APM AP Invoices and their status.
You can access the APM AP Invoice Tracker from the menu (Advanced Project Management > Project Accounting > General Operations > APM AP Invoice Tracker).
The APM AP Invoice Tracker displays all information relating to the invoice.
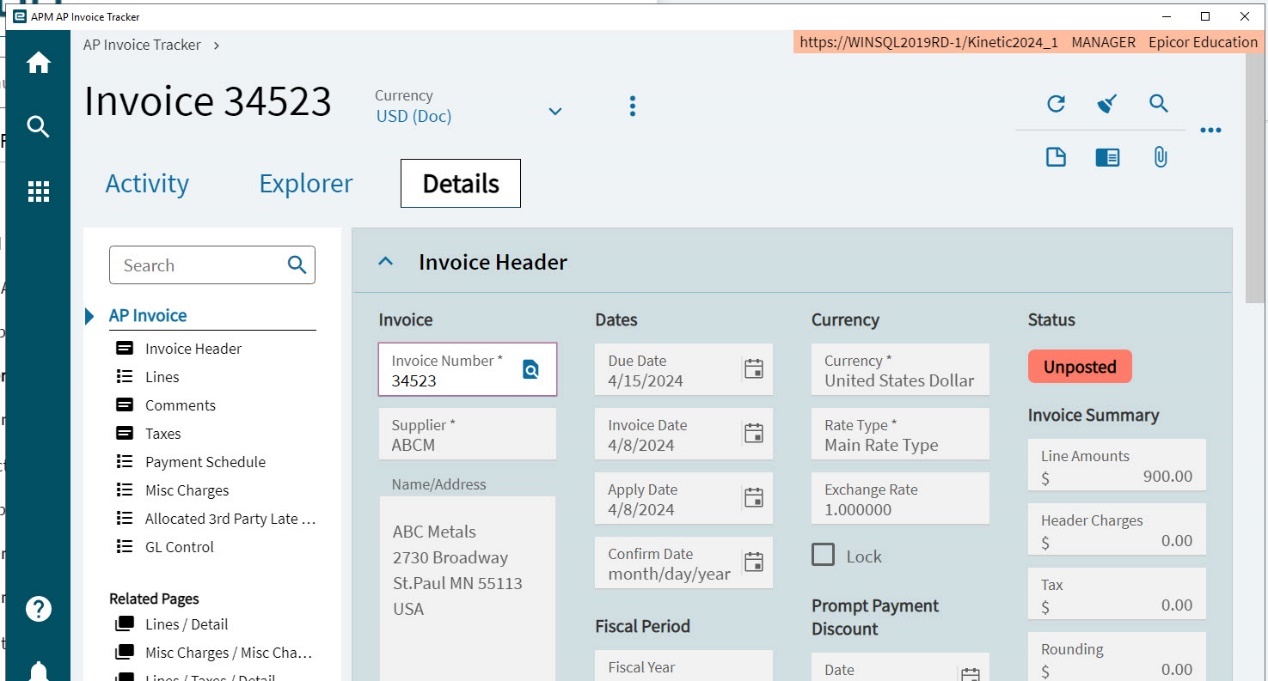
Note that an unposted invoice/debit memo can be posted using the APM AP Invoice Entry application. See APM AP Invoice Entry.
| For further information on the APM AP Invoice Tracker, refer to the standard Kinetic Help topic Tracking AP Invoices in the Accounts Payable module (Trackers). |
APM AR Invoice Tracker
This topic is covered in the Contract Management (General Operations) section APM AR Invoice Tracker.
Purchase Order Tracker
The menu item here provides quick access to the Purchase Order Tracker for standard Kinetic.
- Navigation Path
-
Advanced Project Management > Project Accounting > General Operations > Purchase Order Tracker.
| For more information regarding the Purchase Order Tracker, refer to the standard Kinetic help topic Tracking Purchase Orders. |
Mass Processing in Advanced Project Management
There are several mass processing options that allow you to perform a process against multiple selected projects.
With each menu option, you can trigger the relevant process to run immediately, or you can add it to a schedule.
Mass Project Budget Spread
Before creating a Budget Spread, ensure that you have Cost Codes with Budgets that are Approved, and that WBS phases have Start and End dates. For more information, read about Creating Budget Spread for an individual project.
To schedule a Mass Project Budget Spread:
-
Navigate to Mass Project Budget Spread (Advanced Project Management > General Operations > Mass Project Budget Spread).
-
Optionally filter by Project Id, Project Description, Cost Code Id, Phase Id, Project Start Date and Project End Date on the Filter card.
-
Set the schedule on the Advanced card. See Scheduling Process Set.
-
Select Process
.
The Budget Spread is created for the filtered Projects > WBS Phases > Cost Codes and can now be approved. See Approving Budget Spread.
Mass Calculate Spread Actuals
When a Budget Spread is approved, there may be a period before the next Budget Spread is created. During that period, the Actuals may change for the current Fiscal Period before the next Budget Spread is generated. Use the Mass Calculate Spread Actuals process to update the Actuals.
To schedule Mass Calculate Spread Actuals:
-
Navigate to Mass Calculate Spread Actuals (Advanced Project Management > General Operations > Mass Calculate Spread Actuals).
-
Optionally filter by Project Id, Project Description, Cost Code, Phase Id, Project Start Date and Project End Date on the Filter card.
-
Select which actuals to calculate (Actual Cost, Subcontract Order, Purchase Order).
-
Set the schedule on the Advanced card. See Scheduling Process Set.
-
Select Process
.
Mass Project Recalculate Analysis
Use the Mass Project Recalculate Analysis process to run the recalculate analysis for multiple projects. See also: Running Recalculate Analysis.
To schedule Mass Project Recalculate Analysis:
-
Navigate to Mass Project Recalculate Analysis (Advanced Project Management > General Operations > Mass Project Recalculate Analysis).
-
Optionally filter by Project Id, Project Description, Project Start Date, Project End Date, and Recalculate Mode on the Filter card.
-
Set the schedule on the Advanced card. See Scheduling Process Set.
-
Select Process
.
Scheduling Process Set
To set the process schedule for any of the mass processes, fill in the details on the Advanced card in the application:
-
Select a Schedule. Select Now if you want to run the process immediately.
To schedule the process for a different time, select a different Schedule from the drop-down list. Schedules are maintained in the System Agent Maintenance screen in Standard Kinetic.
-
For a scheduled process, select Recurring for the task to recur. This check box is available for any Schedule other than Now.

| For further information on Schedules, refer to the standard Kinetic Help topics System Agent Maintenance > Schedules. |