Creating Projects using APM Project Entry
Use the APM Project Entry program to create or update a Project. Then assign Jobs, Purchase Orders and Subcontract Orders to the project.
APM Project Entry has a Project Ledger that reconciles with Kinetic’s Financial Module. A detailed project level analysis of Purchase Orders, Subcontract Orders, amounts spent, and Project Cost Codes is available in APM Project Entry.
When your project is ready, you can generate accrual sets in the APM Project Accruals Workbench, to capture and calculate cost and revenue recognition.
Adding New Projects
You can add a project from APM Projects. You can also create a project from a contract. This method uses Contract Lines and Contract Line Items for the project’s WBS Phases. See Creating a Project from Contract.
Adding a New Project
-
Open APM Projects (Advanced Project Management > Project Accounting > General Operations > APM Project Entry).
-
To add a new project from APM Projects, select New Project.
-
To add a new project with options, select New Project with Options. See Adding a New Project with Options.
A new project is added, with the Active status set.
| Read more about Project Entry in standard Kinetic help. |
Adding a New Project with Options
-
Select New Project with Options
 .
.The New Project with Options panel slides out.
-
Enter the New Project Details (Project ID, Description, Start Date and End Date).
-
Optionally select Template Details.
-
Search for and select a Project Template. This is the template structure to use for the new project.
-
Select a Mapping Parent Phase. This is used for mapping Sales order Lines or Quote Lines under the specified phase within the project template. For example, map sales order lines and jobs to a top level “Order Delivery” phase within a project template structure.
-
-
Optionally select a Linked Sales Order with Create Mapped Project Phases (read-only) selected. Project Phases are created for each of the Sales Order Line Releases that are Make Direct. The Phase ID is automatically set to [OrderLine]:[OrderRel]. The Phase Description is automatically set to [OrderLine]:[OrderRel] – [OrderDtlLineDesc]. For example: “3:1 – Custom Widget” (trimmed up to 30 characters).
The following references are automatically updated/mapped:
-
Sales Order line Project
-
Sales Order Line Release Phase ID
-
Job Project Link
-
Job Project Phase Link
-
Quote Line Project Link
-
-
Select the Project Configuration settings.
-
If you select Create Project Job, a project job is automatically created after the project is created.
-
If you select Create Phase Jobs, project phase jobs based are automatically created (for the project phases based off the template’s project phases).
-
If you select Setup Cost Codes, the system automatically adds Cost Codes based on the Order, Quote, and Job details with draft budgets set to the highest of the following values: Quote Job Cost, Planned Job Cost, or Calculated Job EAC (estimated at completion).
Run Recalculate Analysis after the project is created, to get the draft budget values. -
-
Select Create Project.
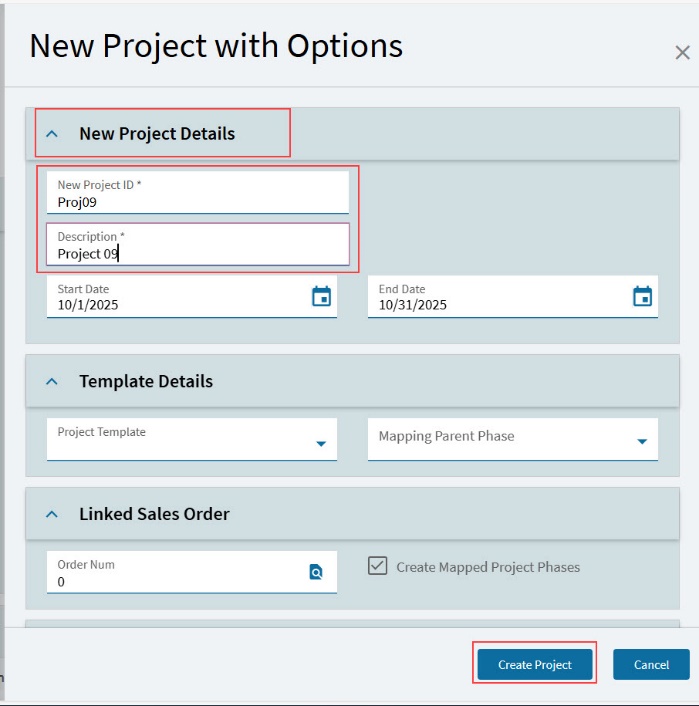
The new project is created.
-
Now update the new project to suit your specifications, as you would with any new project (see Adding New Projects).
Adding a Project from a Template
If you are going to work with several similar projects over time, it may help to use Project Templates.
To add a new project using a project template:
-
Open APM Project Entry (Advanced Project Management > Project Accounting > General Operations > APM Project Entry).
-
Add a new project with options. See Adding a New Project with Options, ensuring you select Template Details.
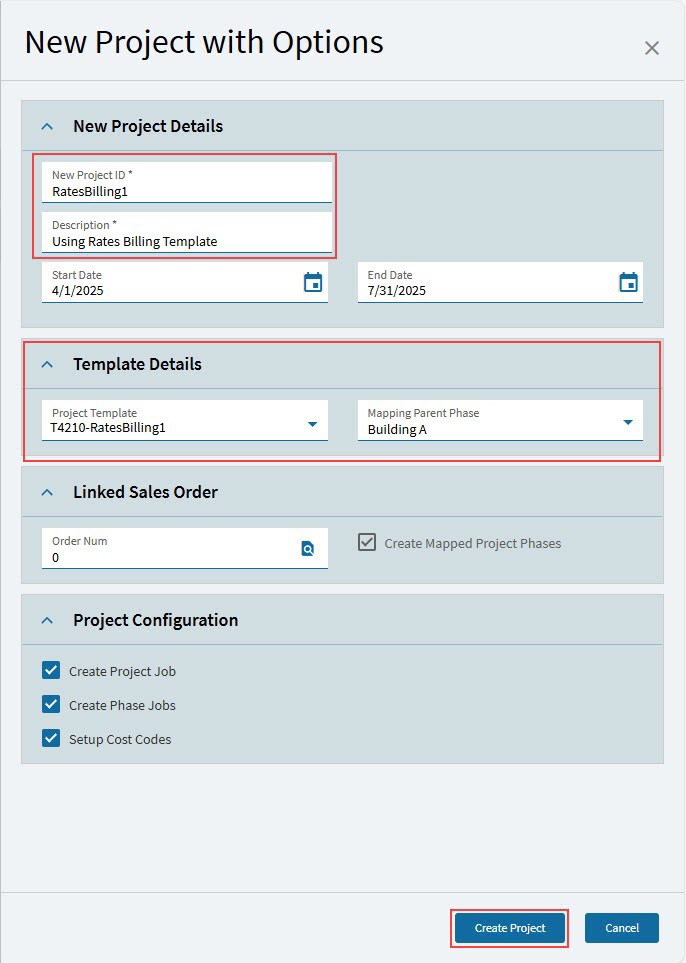
The new project is created, using the selected template.
-
Now update the new project to suit your specifications, as you would with any new project (see Adding New Projects).
Setting up a Project Template
To use a project as a template:
-
Define all the details that you want to reuse in other projects.
-
Select the Not Template check box in the Project > Detail card. This changes the check box label to Template.
-
Now save the project. It will be added to the list of available Project Templates.
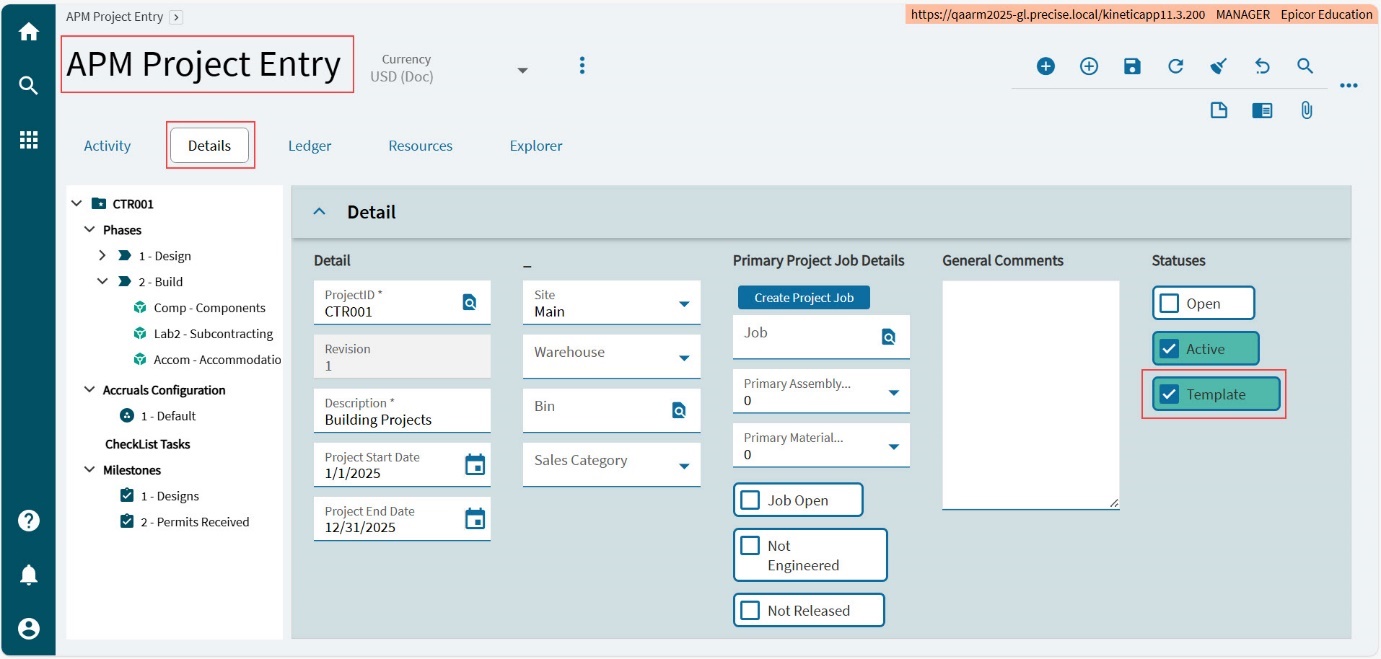
Duplicating a Project
To duplicate a project, set the project up as a template (see Setting up a Project Template), then create a new project from the template (see Adding a Project from a Template).
Updating Project - Details
-
Open APM Projects (Advanced Project Management > Project Accounting > General Operations > APM Project Entry).
-
Select the project to update.
-
Select the Details tab to open the Details page.
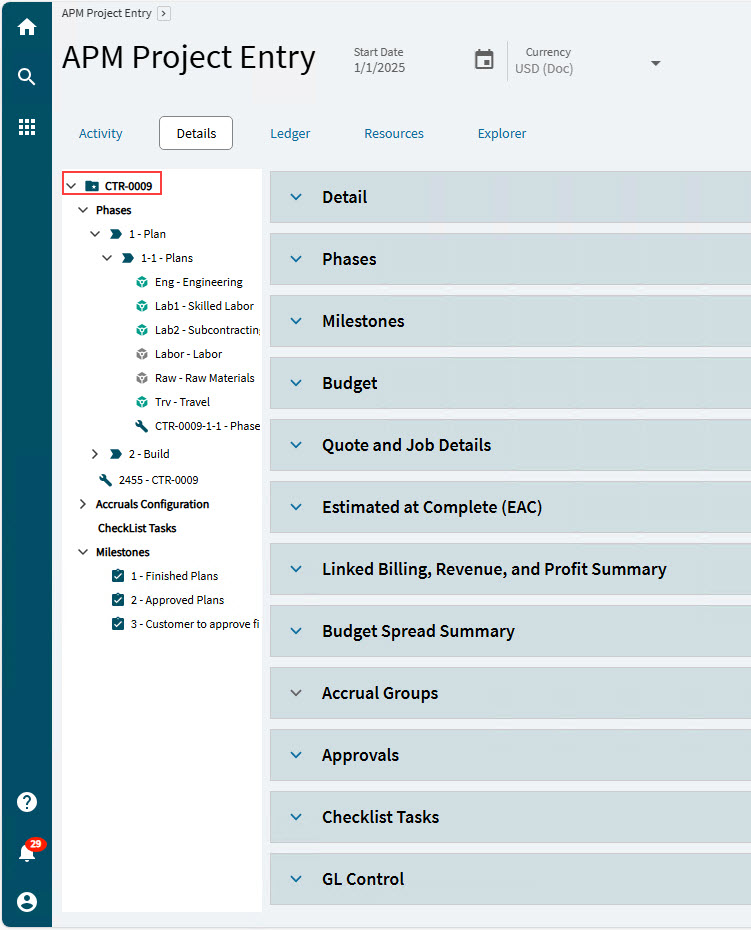
|
Example of Project selected on the Navigation Tree |
Updating Project Detail
Use the Detail card on the Project Details page to update/view general details of the project: Project ID, Revision, Description, Project Start Date and Project End Date.
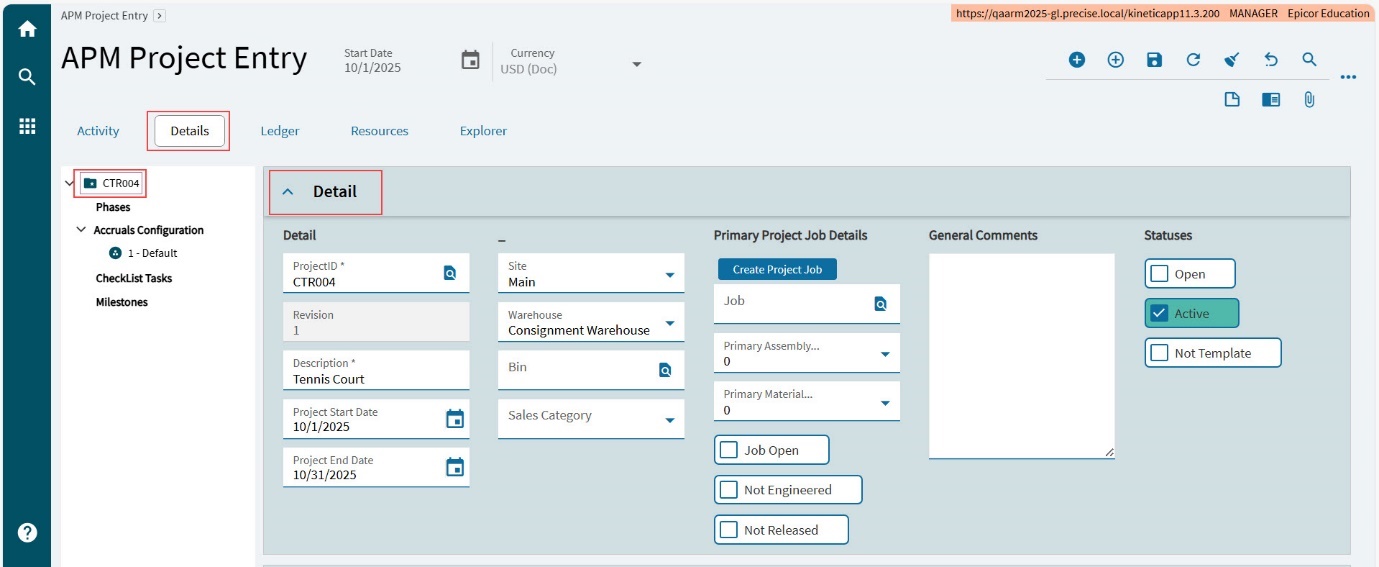
You can add and view the Project Primary Job Details, add General Comments, and view/update the Statuses.
-
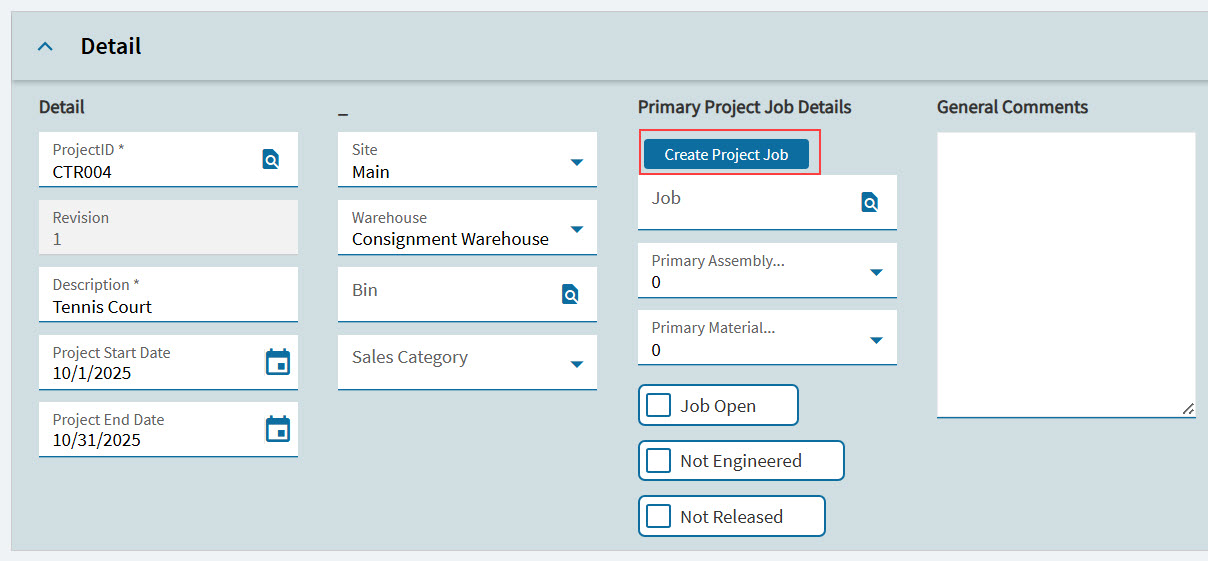
To create the Primary Project Job, select Create Project Job.
-
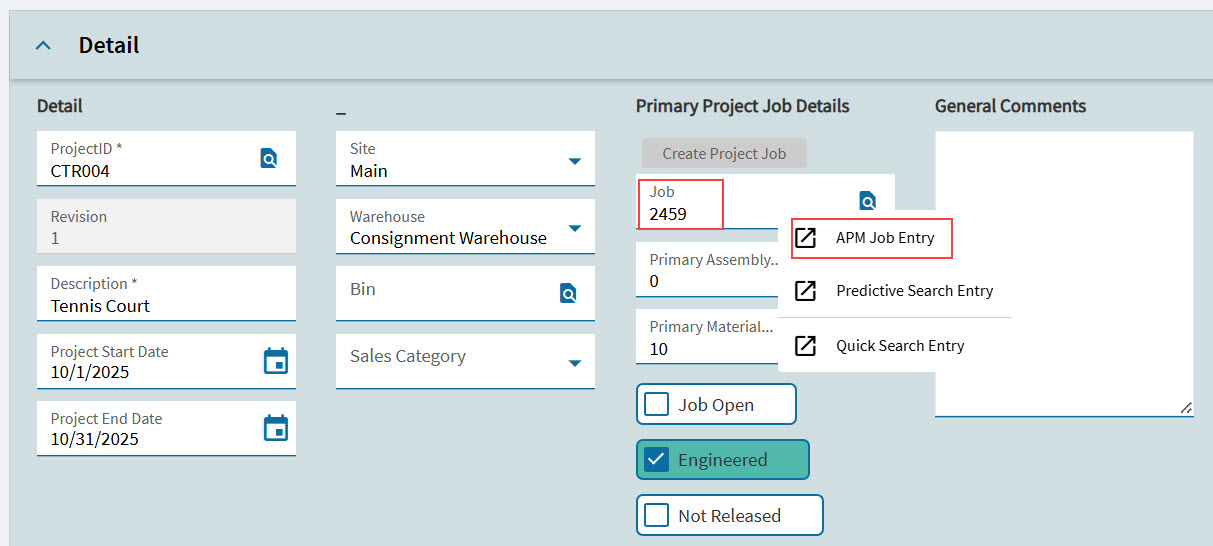
To view the Primary Project Job, right-click on Job and select APM Job Entry from the context menu.
Adding WBS Phases
A project is broken down into a series of Work Breakdown Structure (WBS) phases, which can be ordered and hierarchical.
Adding WBS Phases from a Contract
If you create a project from a contract, the WBS Phases are added automatically and synced to the respective Contract Lines and Line Items.
New Contract Line Items can be synced to the project, which creates new matching and linked WBS Phases. See Creating a Project from Contract.
You can also add a WBS Phase to a project in APM Projects.
Adding WBS Phases to a Project
To add a WBS Phase:
-
Select Phases on the Navigation Tree.
-
Select New WBS Phase
on the Standard toolbar. -
Expand the WBS Phase Detail card.
-
Capture the WBS Phase fields: WBS Phase ID, Description, Phase Status, Start Date, Due Date, Duration. Select a Parent WBS Phase if applicable.
-
Select Save
 on the Standard toolbar.
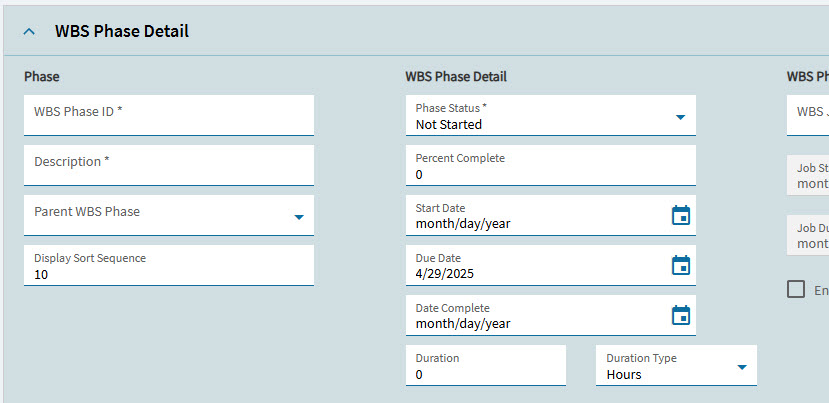
The new WBS Phase appears on the Navigation Tree, under Phases.
| Read more about Project Entry in standard Kinetic help. |
Adding Milestones
Use the Milestones cards to enter and update the various milestones needed to complete the project. This is especially useful when you add APM projects that are not already linked to contracts, which can have their own milestones.
For instructions, please refer to the section Entering and Updating Milestones in the standard Kinetic help article Creating Projects using Project Entry in the Project Management module.
| To include Billing with Milestones, you need to select a Linked Order. A linked order is selected for the project upon creation. This option is available when you add a new project with options. See Adding a New Project with Options. |
Budget for a Project
Budgets can be captured and approved at three different levels:
-
Project level (described in this section) for a high-level approach.
-
WBS Phase level. See Budget for a WBS Phase.
-
Cost Code level, for detailed figures, or if importing the budget from a quote. See Budget for a Cost Code.
| You may choose to only capture the budget at the Project level, if you don’t require budgets at the lower levels. |
To add or review a budget at the project level:
-
Open the Details page.
-
Select the project on the Navigation Tree.
-
Expand the Budget card.
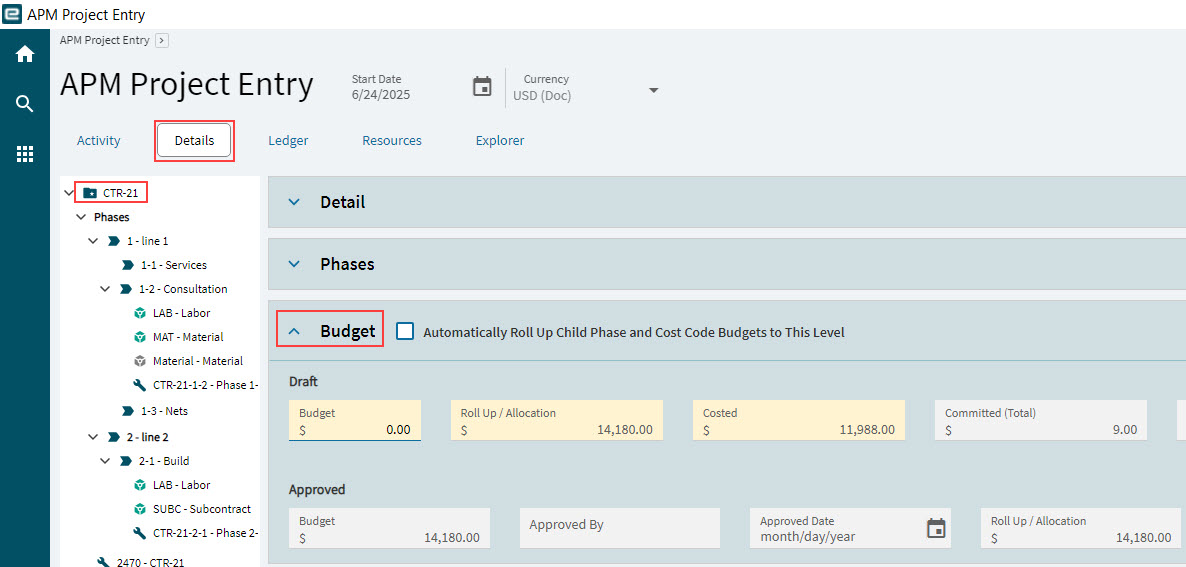
When the Roll Up Check box is Selected
If the Automatically Roll Up Child Phase and Cost Code Budgets to This Level check box is selected, the project Budget is automatically updated to the sum of all the WBS Phase Budget values.
-
Select the Automatically Roll Up Child Phase and Cost Code Budgets to This Level check box.
-
Select Save
on the Standard toolbar.The Budget field updates to the Roll Up / Allocation values, in the Draft and the Approved sections respectively.

When the Roll Up Check box is Not Selected
If the Automatically Roll Up Child Phase and Cost Code Budgets to This Level check box is cleared, you can enter a value in the Budget field.
-
Clear the Automatically Roll Up Child Phase and Cost Code Budgets to This Level check box.
-
Enter a value in the Budget field.
-
Select Save
on the Standard toolbar.If the Budget value is lower than the Roll Up / Allocation value, then both these fields are highlighted in yellow.

-
If there is a difference, you can review the separate WBS Phase budgets, then adjust if necessary.
Draft and Approved Sections
For the Draft section and the Approved section, the figures displayed show the Budget, Roll Up / Allocation, Costed, Committed (Total) and Remaining.
Remaining displays Budget less Costed less Committed (Total).
Approving a Project Budget
To approve a Project Budget:
-
Open the Detail page.
-
Select the project on the Navigation Tree.
-
Expand the Budget card.
-
Adjust the Draft Budget value if necessary.
-
Select Approve to approve the draft budget.
-
To approve the budget at this level and the child node budgets, select Approve This and Child Node Budgets.
The values in the Approved section are updated.
Approved now holds the Draft Budget value. The Approved By and Approved Date are updated to the logged-in user name and the current date.

Quote and Job Details for a Project
The Quote and Job Details card at the project level displays a roll-up of quote and job values from the WBS Phase levels, which in turn are a roll-up of quote and job values from each phase’s respective Cost Codes. For details on the quote and job values, see Quote and Job Details for a Cost Code.
-
Open the Detail page.
-
Select the project on the Navigation Tree.
-
Expand the Quote and Job Details card.
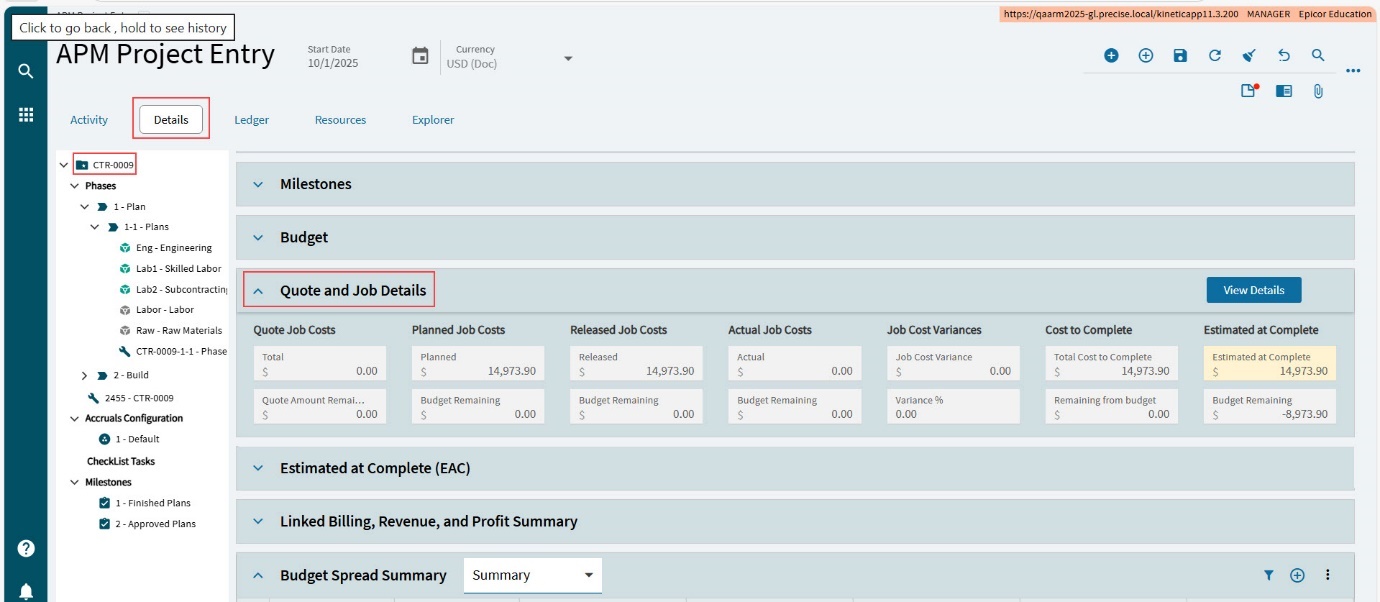
Estimated at Complete for a Project
Estimated at Complete can be captured and viewed at three different levels.
-
Project level (described in this section) for a high-level approach.
-
WBS Phase Level, for a medium-level approach. See Estimated at Complete for a WBS Phase.
-
Cost Code Level (described in this section) for a detailed approach. See Estimated at Complete for a Cost Code.
The Estimated at Complete card shows the EAC Base Amount using the default Approved Budget figure. This can be updated.

You can configure a different EAC Amount by choosing a different EAC Primary Source, and also by entering an EAC Adjustment value. Any notes relating to how and why the new EAC figure was derived can be entered in the EAC Notes text box.
-
Open the Details page.
-
Select the project on the Navigation Tree.
-
Expand the Estimate at Complete (EAC) card.
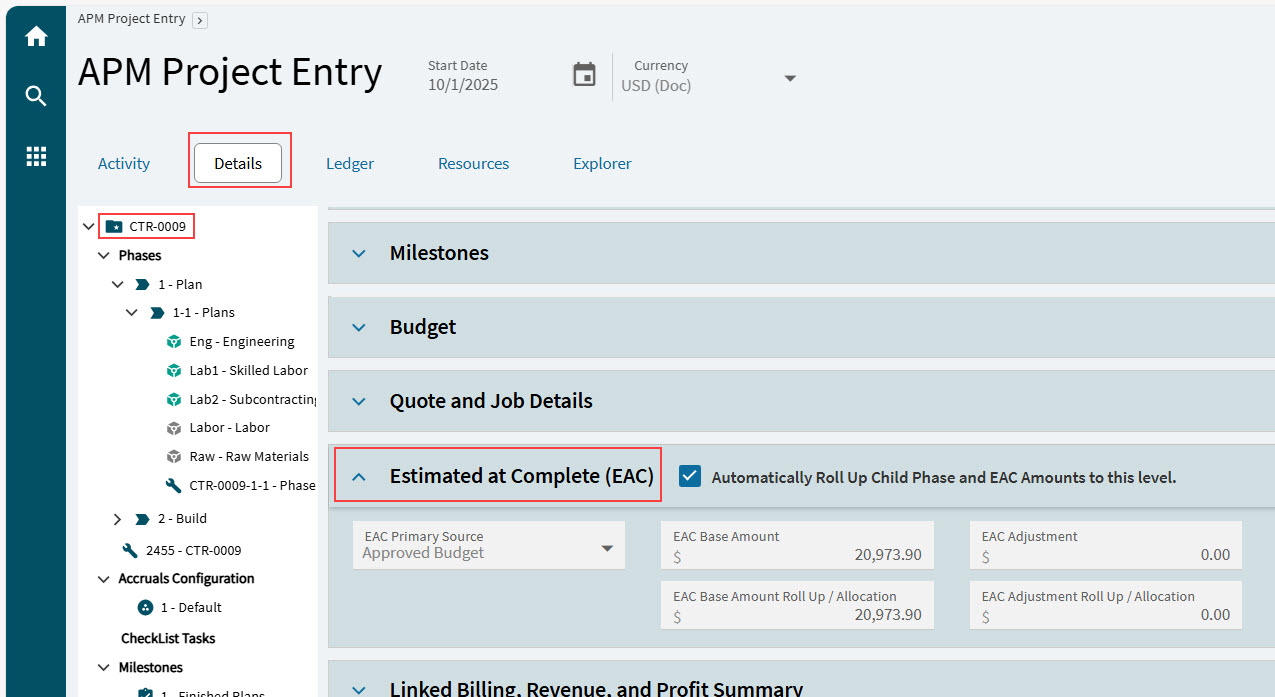
-
Make any changes and notes.
-
Clear Automatically Roll Up Child Phase and EAC Amounts to this level.
If this check box is selected, the values and selections will be rolled up from the child phases, and you won’t be able to make selections at this level.
-
Select an EAC Primary Source from the drop-down list:
-
Approved Budget
-
Job EAC
-
Greater of Job EAC and Approved Budget
-
Manual
-
The EAC Base Amount updates according to the selected EAC Primary Source.
-
If EAC Primary Source is Manual, enter an EAC Base Amount.
-
Enter an EAC Adjustment amount if EAC Base Amount needs adjusting, up or down.
The EAC Amount is the sum of EAC Base Amount and EAC Adjustment (this could be less than EAC Base Amount if EAC Adjustment is negative, or more than EAC Base Amount if EAC Adjustment is positive, otherwise equal to EAC Base Amount).
-
Enter EAC Notes to justify the selection and adjustment, and anything else relevant to Estimated at Complete.
-
-
Select Save
on the Standard toolbar.
Linked Billing, Revenue, and Profit Summary
The Linked Billing, Revenue, and Profit Summary card shows a summary of billing amounts, budgeted profit, expected profit, EAC values, and accrual values that are linked to the project.
First run the Recalculate Analysis process to update the billing details.
-
Open the Details page.
-
Select the project on the Navigation Tree.
-
Expand the Linked Billing, Revenue, and Profit Summary card.
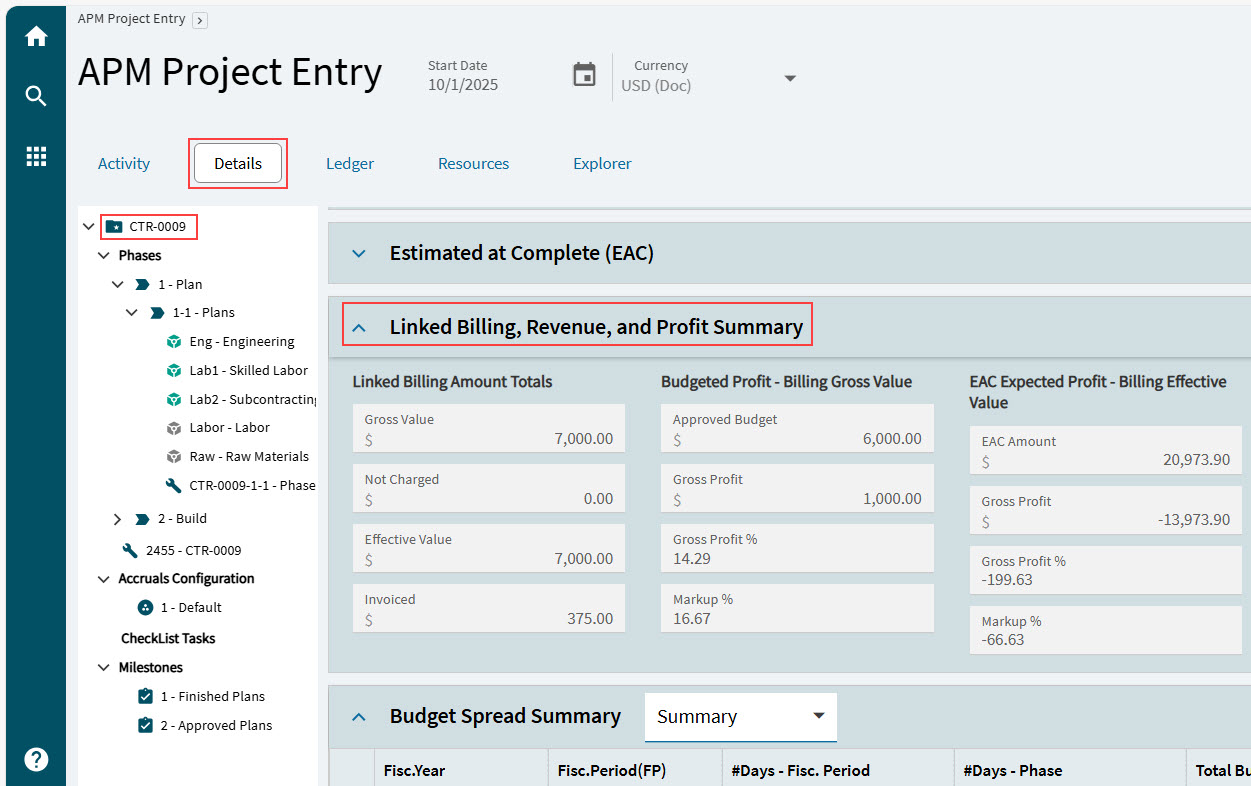
Separate sections relate to the different groups of values linked to the project.
- Linked Billing Amount Totals
-
Billing figures as found on the related contract are displayed in this section.
- Gross Value
-
The agreed contract value, after discounts are deducted.
- Not Charged
-
The current value not charged to the customer.
- Effective Value
-
The Gross Value less Not Charged value.
- Invoiced
-
The amount to date invoiced to the customer.
- Budgeted Profit – Billing Gross Value
-
Budget figures are displayed in this section.
- Approved Budget
-
The Approved Budget at project level.
- Gross Profit
-
The Gross Value less the Approved Budget.
- Gross Profit %
-
The Gross Profit expressed as a percentage of the Gross Value.
- Markup %
-
The markup applied to the Approved Budget to get the Gross Value.
- EAC Expected Profit – Billing Effective Value
-
The profits and values based on the estimated at complete (EAC) amounts.
- EAC Amount
-
The EAC Amount to be used for analysis and project accruals.
- Gross Profit
-
The Effective Value less the EAC Amount.
- Gross Profit %
-
The Gross Profit expressed as a percentage of the EAC Amount.
- Markup %
-
The markup applied to the EAC Amount to get the Billing Effective Value.
- Latest Posted Accrual Details
-
The latest posted accrual details relating to the project are displayed here.
- Percent Costed Complete
-
The Current/New Percent Complete for the accrual set.
- Cost Recognized
-
The Current/New Cost Recognised for the accrual set.
- Accrual Set ID
-
The accrual set ID is displayed here. Open the Accrual set with this ID to view more details.
- Gross Profit
-
Latest Accruals Contract Earned less Latest Accruals Costs Recognised.
- Gross Profit %
-
The Gross Profit expressed as a percentage of the Latest Accruals Contract Earned.
- Markup %
-
The markup applied to the Latest Accruals Costs Recognised to get the Latest Accruals Contract Earned.
Budget Spread Summary for a Project
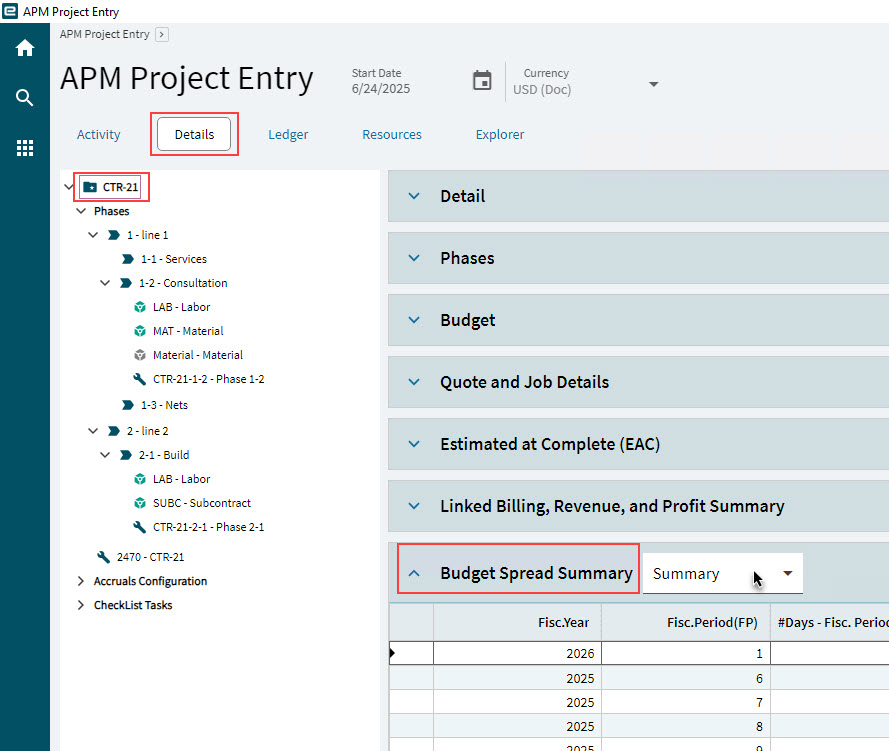
The Budget Spread Summary card at the project level displays a roll-up of budget spread values from the WBS Phase levels.
-
Open the Detail page.
-
Select the project on the Navigation Tree.
-
Expand the Budget Spread Summary card.
-
To see more detail, selected Detailed from the drop-down in the Budget Spread Summary card header.
Adding Accrual Groups
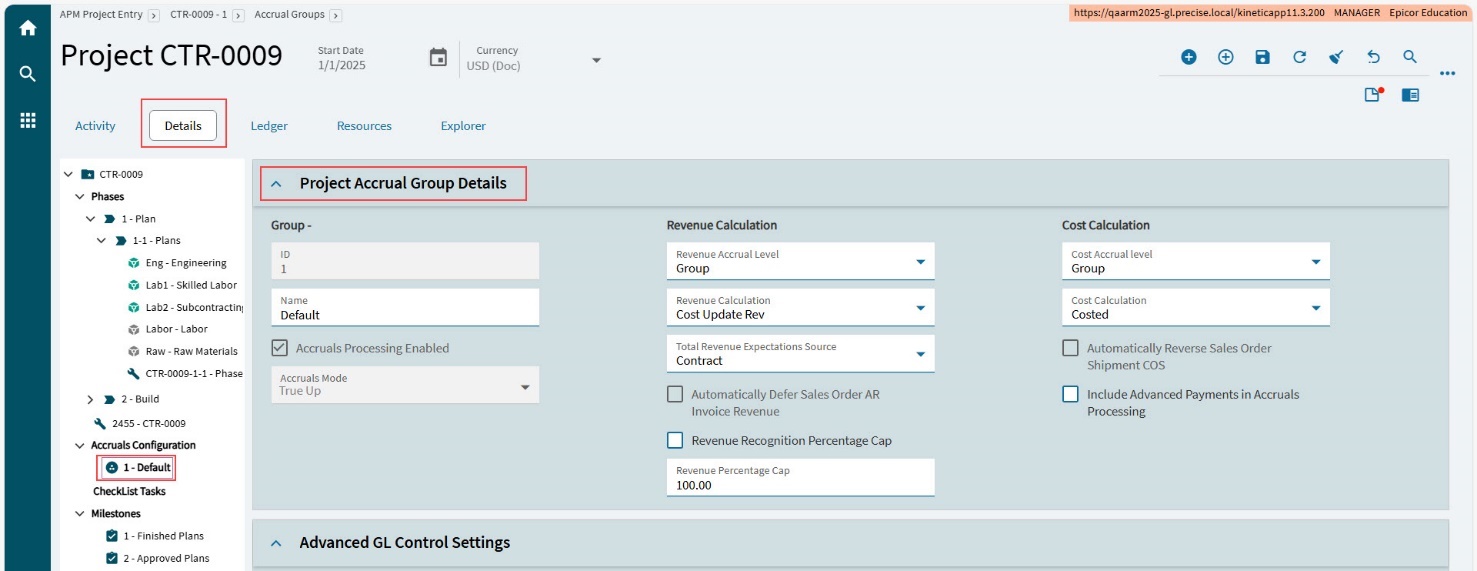
Accrual Groups allow flexibility within the Project for how Project Accruals are calculated for the different WBS Phases. You can add Accrual Groups to the Project that are set up differently from the Default Accrual Group, and then select the most suitable one for a WBS Phase.
| A Financial Consultant can supply further information on defining Accrual settings. |
To add an Accrual Group to a Project:
-
Open the Details page.
-
Select the Accruals Configuration node on the Navigation Tree.
-
Expand the Project Accrual Group Details card.
-
Select New Accrual Group
on the Standard toolbar. -
Select Save
on the Standard toolbar.The new Accruals Group is added to the list in Accrual Groups.
-
Update the Project Accrual Group Details. See Updating Accruals Configuration - Details.
Adding Project GL Controls
The GL Controls selected on the GL Control card on the Details page for the Project define the accounts and journal codes to use when posting transactions.
You can add a GL Control at the Project header level. Read about GL Controls in the Project.
To add a new GL Control to a project:
-
Open the Details page.
-
Select the Project on the Navigation Tree.
-
Open the GL Control card.
-
Select New Project GL Control
on the GL Control toolbar. -
Enter or search for
 a GL Control Type.
 -
Enter or search for
a GL Control Code. -
Select Save
on the Standard toolbar.
Updating WBS Phase - Details
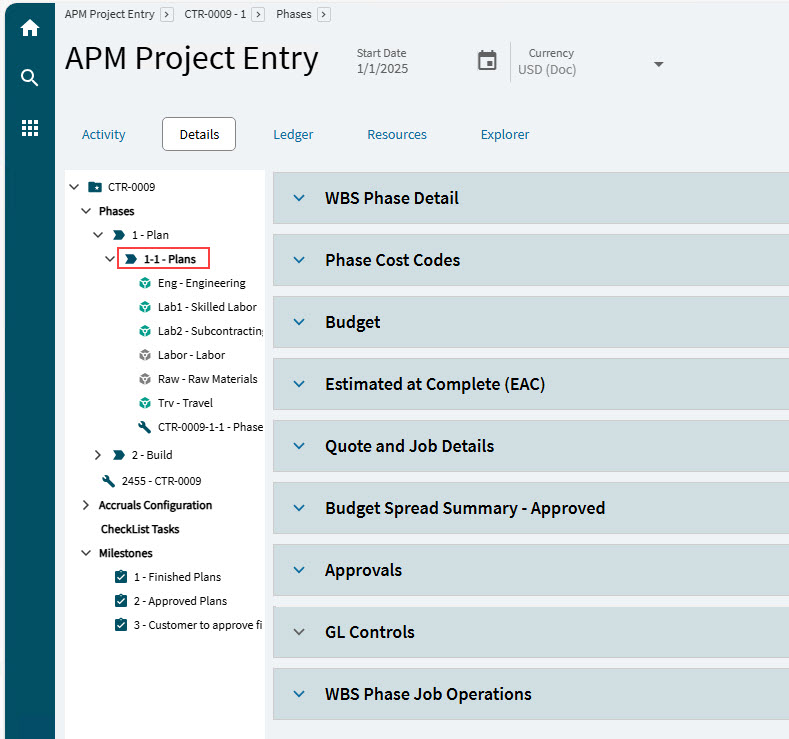
Each WBS Phase can have a Job attached, and Cost Codes with budgets and costs. The WBS Phase’s selected Accrual Configuration determines how that WBS Phase is handled during Accruals generation.
|
Example of a phase selected on the Navigation Tree |
WBS Phase Detail
To view the detail for a WBS Phase:
-
Open the Details page.
-
Select a WBS Phase on the Navigation Tree, from under the Phases node.
-
Expand the WBS Phase Details card.
The details for the selected WBS Phase appear on the card.
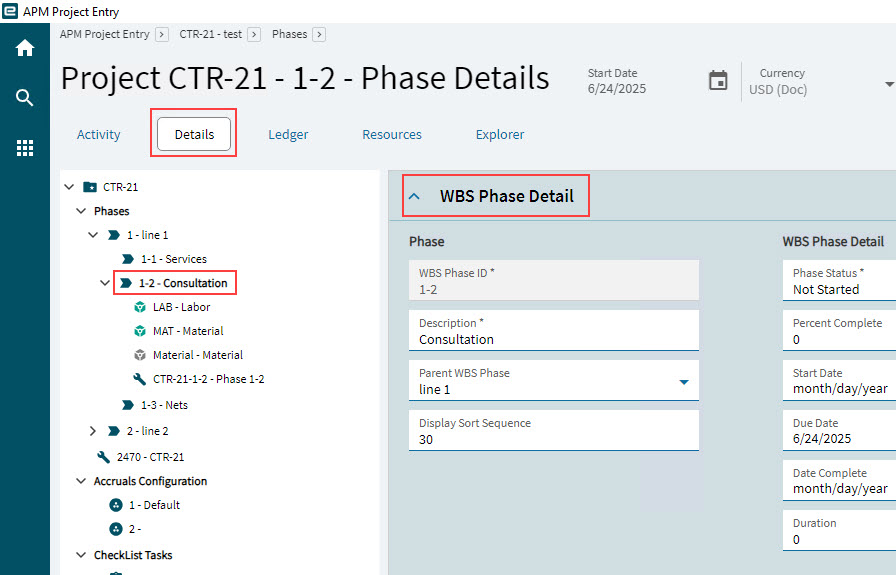
For a description of the WBS Phase Details card, see Adding WBS Phases.
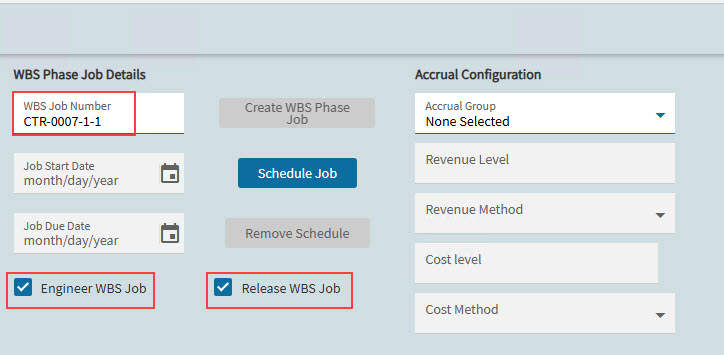
Creating Job Details
-
To create a primary job for the WBS Phase, select Create WBS Phase Job.
-
To view the primary job, right-click on WBS Phase Job Number and select APM Job Entry from the menu.
-
To mark the job as released and engineered, either do this in APM Job Entry, on the Details page, OR select the Engineer WBS Job and Release WBS Job check boxes on the WBS Phase Detail card.
Selecting the Accrual Configuration
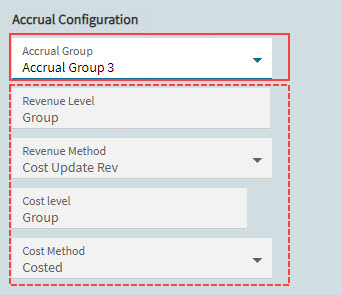
If using an Accrual Configuration other than the Default, first ensure that this has been added to the Accrual Groups (see Updating Accruals Configuration - Details).
-
Select an Accrual Group from the drop-down list. The remaining details are filled in according to what has been specified for the Accrual Group.
WBS Phase Cost Codes
Cost Codes are used to break down the WBS Phases into cost groupings. This allows for more flexibility and scope than the fixed structure of Project Costs provided in standard Kinetic.
| The Cost Codes used here are added and maintained in Cost Code Maintenance. See Cost Code Maintenance. |
Add as many Cost Codes to the WBS Phase as will be required to group the different operations and materials required for the WBS Phase Job, then allocate and approve a Budget for each one.
| You could also add a budget after working out the operations and materials costs. |
In the WBS Phase Details view, you can see all the Cost Codes for the selected WBS Phase, as well as their respective Budget, Approved, Costed and Remaining amounts.
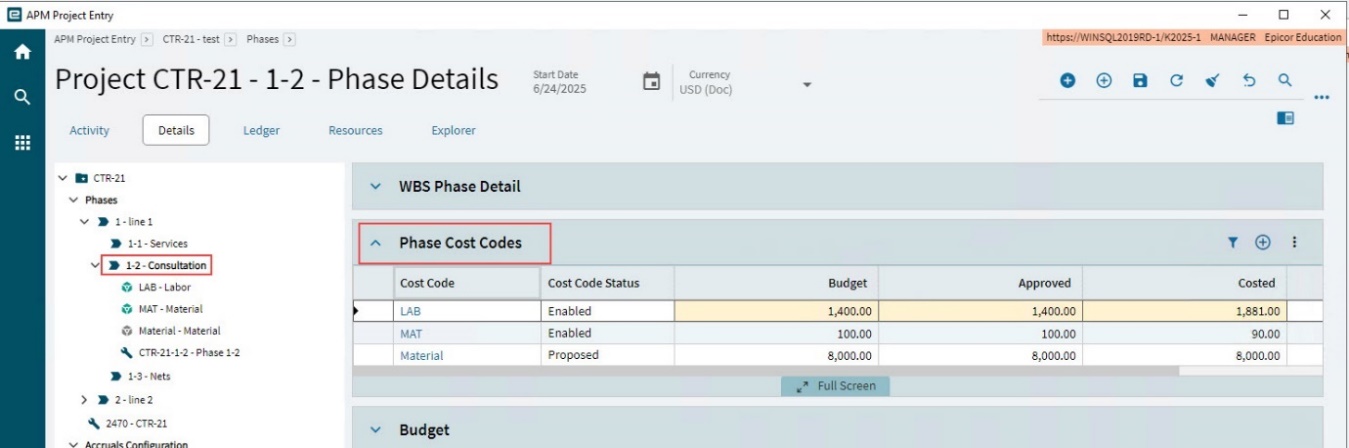
| After you insert Cost Codes to a WBS Phase, these appear on the related Contract’s corresponding line item. See Reviewing Project Phase Cost Code Amounts. |
Adding Cost Codes to WBS Phases
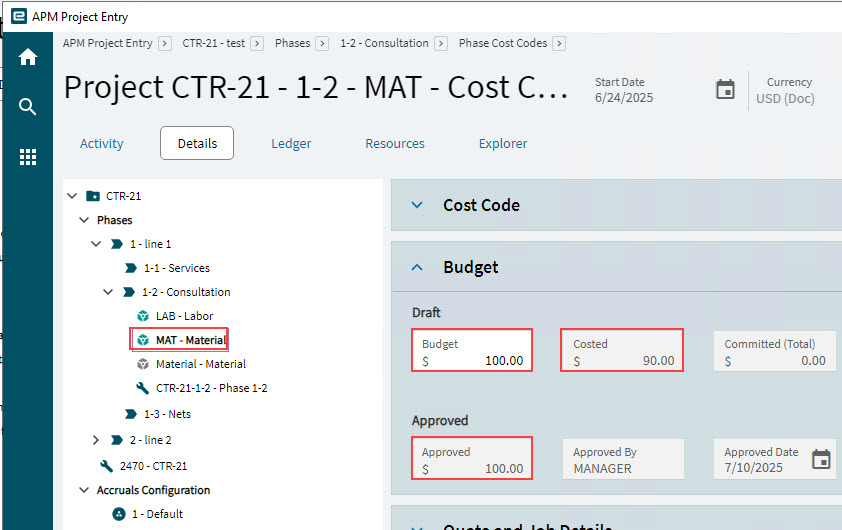
Any costs applied to a project should be linked to one of the WBS Phase Cost Codes, where they will appear as the Costed amount, along with the Budget and Approved amounts, as shown in the example below:
| An alternative to inserting the different Cost Codes and assigning a Budget to each of these is to import a Budget. Create or generate a CSV for a Budget Import (see Importing Budgets and Importing Budgets from Quote). |
To add a Cost Code with a Budget to a WBS Phase:
-
Open the Details page.
-
Select the relevant WBS Phase on the Navigation Tree.
-
Select New
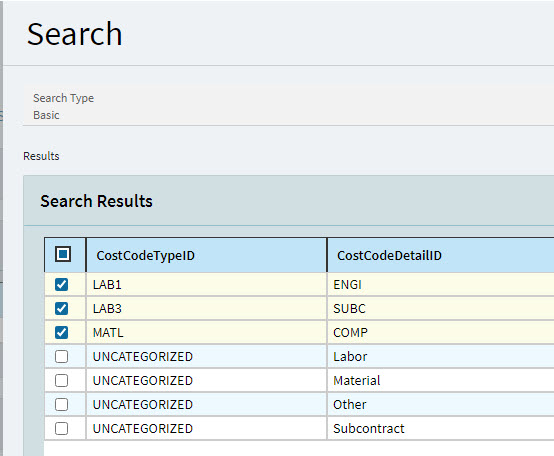
on the Cost Codes card.The Search panel slides out.
-
Search for and select one or more Cost Codes.
-
Select Ok.
The Cost Code Detail card for a Cost Code of the WBS Phase appears.
-
-
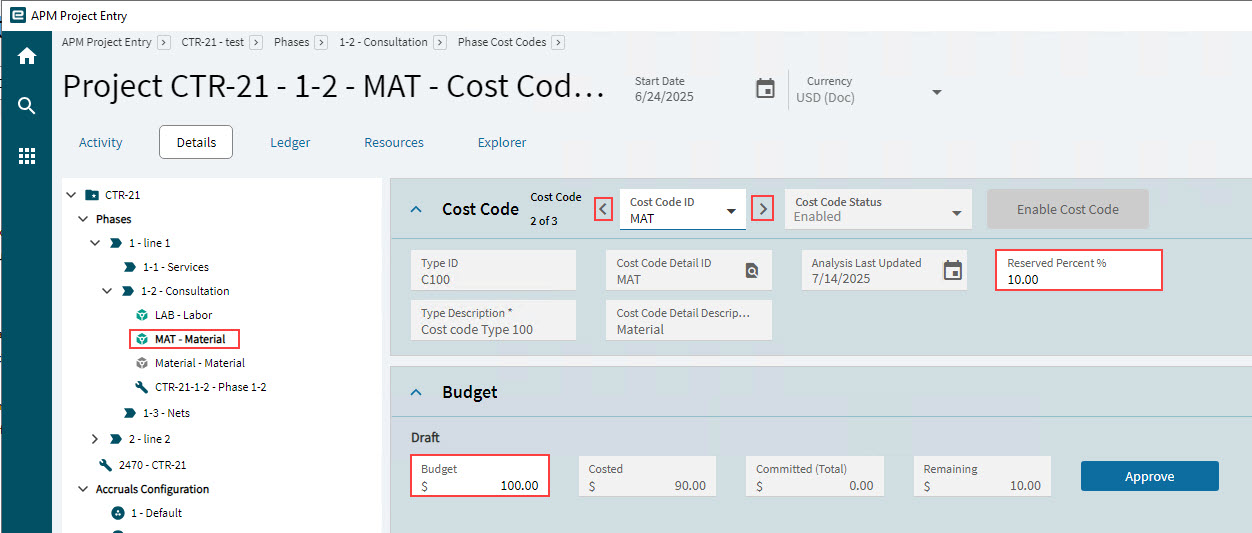
Update the Cost Code fields for each of the selected Cost Codes.
The Cost Code Type and Description are brought in from the Cost Code.
-
Update the Reserved Percent if necessary. This defaults to the Reserved Percent of the Cost Code (see Cost Codes), if this is not zero, otherwise to the Reserved Percent in Advanced Project Management Configuration (see Configuration Details).
-
Enter a Budget amount. Alternatively, update the Budget in the list view (see below).
-
Select Save
on the Standard toolbar. -
Use the right arrow
 or the Cost Code drop-down list to navigate to the next Cost
Code. You can also use the Navigation Tree to navigate through the Cost Codes.
or the Cost Code drop-down list to navigate to the next Cost
Code. You can also use the Navigation Tree to navigate through the Cost Codes.
-
Deleting Cost Codes from a WBS Phase
WBS Phase Cost Codes may only be deleted if the Budget is zero.
To delete a Cost Code from a WBS Phase:
-
Select the WBS Phase on the Navigation Tree.
-
Select a Cost Code from the list.
-
Select
 Delete on the Cost Codes Overflow Menu and select YES in the Confirmation dialog.
Cost Codes Inserted Automatically
APM will insert a Cost Code if there are costs associated with a WBS Phase Job that do not have an Analysis Code that can be mapped to existing Cost Codes for the Phase. The Cost Code used will belong to the Uncategorized Cost Code Type. See Uncategorized Cost Codes.
The rules around how APM inserts Cost Codes are defined in the section APM Configuration, in the Recalculate Analysis section.
Below is an example of a Cost Code that was inserted by APM.
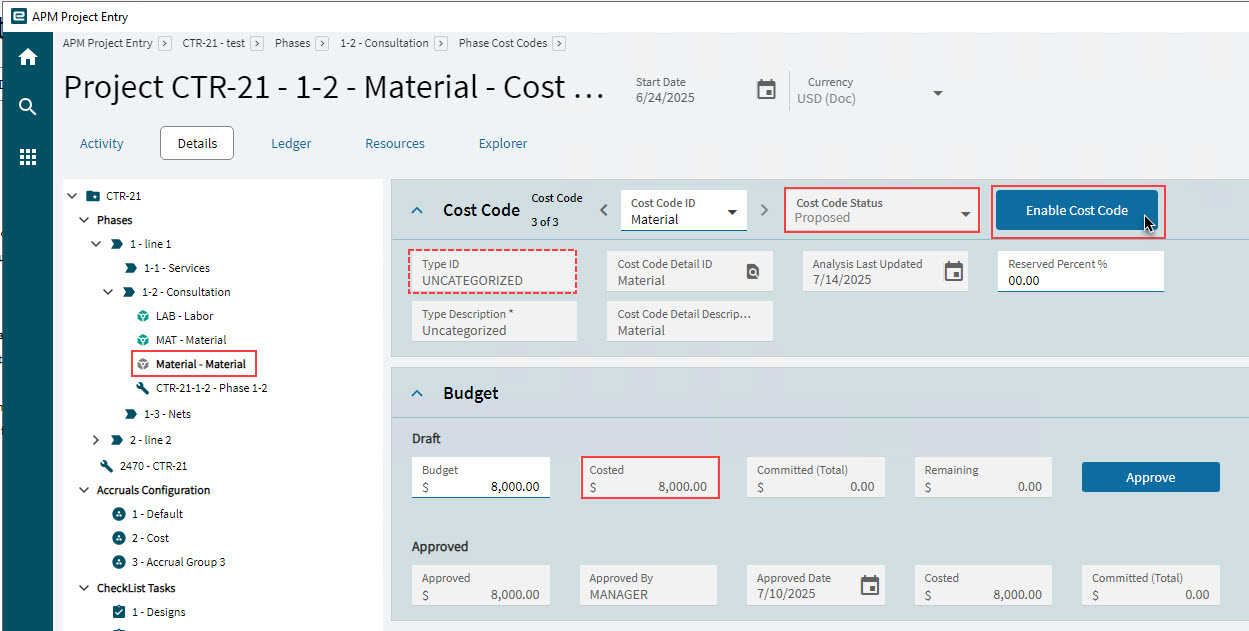
Note that the Budget contains the Costed amount from the transaction that necessitated this Cost Code’s creation.
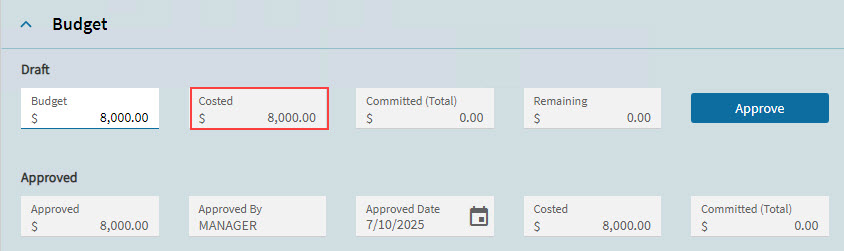
In this example, the Material was added to the job without an Analysis Code and therefore could not be mapped to a Cost Code.
-
For automatically inserted WBS Phase Cost Codes, you will still need to update and approve Budget amounts. See Budget for a Cost Code.
Enabling a Proposed Cost Code
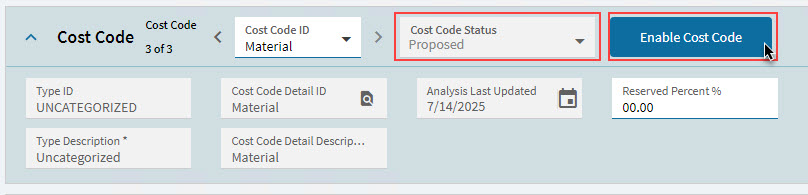
When APM inserts a Cost Code, the Cost Code Status is Proposed.
To enable a proposed cost code:
-
Locate the Proposed cost code.
-
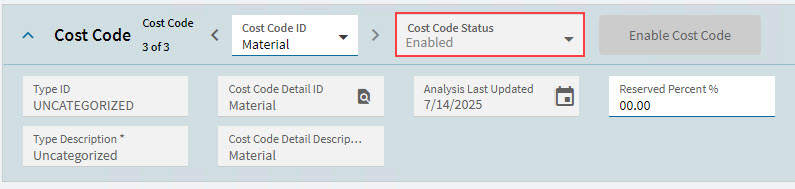
Click Enable Cost Code to enable the cost code.
The Cost Code Status updates to Enabled.
Budget for a WBS Phase
Budgets can be captured and approved at three different levels:
-
Budget for Project. See Budget for a Project.
-
WBS Phase Level (described in this section) for a medium-level approach.
-
Cost Code Level for detailed figures. See Budget for a Cost Code.
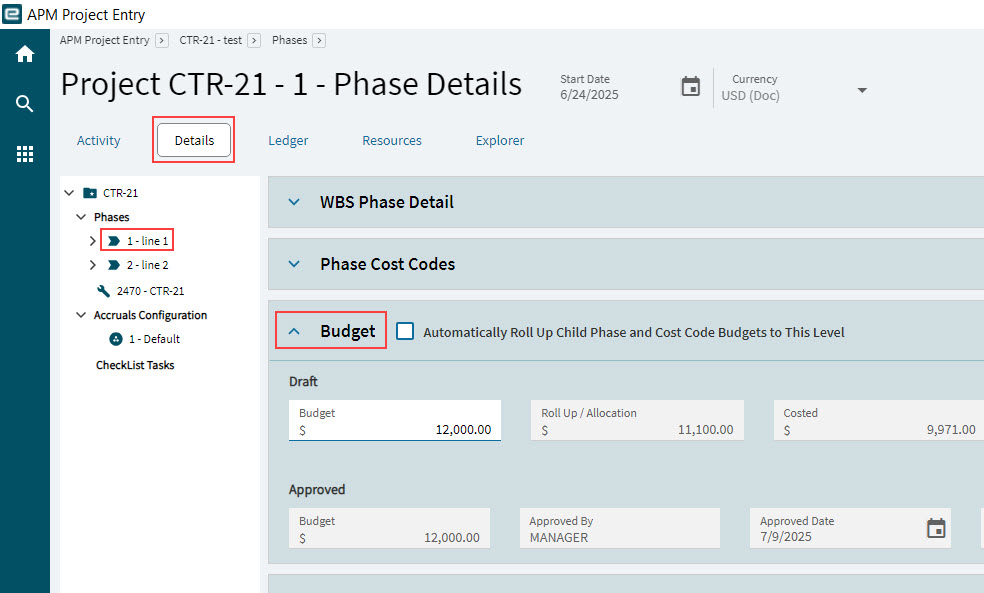
To capture a Budget at WBS Phase level:
-
Open the Details page.
-
Select the relevant Phase on the Navigation Tree.
-
Expand the Budget card.
When the Rollup Checkbox is Selected
If the Automatically Roll Up Child Phase and Cost Code Budgets to This Level check box is selected, the WBS Phase Budget is automatically updated to the sum of its child Phases and Cost Code Budget values.
-
Select the Automatically Roll Up Child Phase and Cost Code Budgets to This Level check box.
-
Select Save
on the Standard toolbar.The Budget field updates to the Roll Up / Allocation values, in the Draft and the Approved sections respectively.

When the Rollup Checkbox is Not Selected
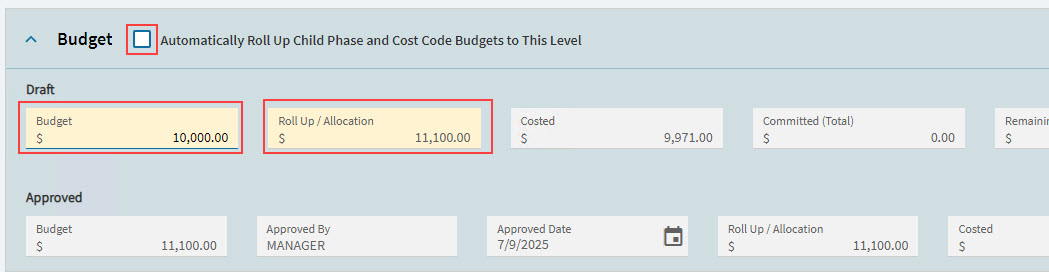
If the Automatically Roll Up Child Phase and Cost Code Budgets to This Level check box is cleared, you can enter a value in the Budget field.
-
Clear the Automatically Roll Up Child Phase and Cost Code Budgets to This Level check box.
-
Enter a value in the Budget field.
-
Select Save
on the Standard toolbar.If the Roll Up / Allocation is different from the Budget, then both these fields are highlighted in yellow.
-
If there is a difference, you can review the separate underlying WBS Phase budgets and Cost Code budgets and adjust if necessary.
Draft and Approved Sections
For the Draft section and the Approved section, the figures displayed show the Budget, Roll Up /Allocation, Costed, Committed (Total) and Remaining.
Remaining displays Budget less Costed less Committed (Total).
Approving a WBS Phase Budget
To approve a WBS Phase Budget:
-
Open the Detail page.
-
Select the WBS Phase on the Navigation Tree.
-
Expand the Budget card.
-
Adjust the Draft Budget value if necessary.
-
Select Approve to approve the draft budget.
If the check box Automatically Roll Up Child Phase and Cost Code Budgets to This Level is selected, then a confirmation question appears:
“Approving the current budget will automatically approve child phase and cost code budgets rolled up into this budget. Continue?”
-
Select Yes to continue.
The values in the Approved section are updated, for the WBS Phase and the budgets for its child phases and Cost Codes.
If the check box Automatically Roll Up Child Phase and Cost Code Budgets to This Level is unchecked, then a confirmation question appears:
“Do you want to overwrite the previous approved budget?”
-
Select Yes to continue.
The values in the Approved section are updated, for the WBS Phase. Approved now holds the Draft Budget value. The Approved By and Approved Date are updated to the logged-in user name and the current date.

-
To approve the WBS Phase budget and all of its child node budgets:
-
Keep Automatically Roll Up Child Phase and Cost Code Budgets to This Level unchecked.
-
Select Approve This and Child Node Budgets.
Estimated at Complete for a WBS Phase
Estimated at Complete can be captured and viewed at three different levels.
-
Project level for a high-level approach. See Estimated at Complete for a Project.
-
WBS Phase Level (described in this section), for a medium-level approach.
-
Cost Code Level for a detailed approach. See Estimated at Complete for a Cost Code.
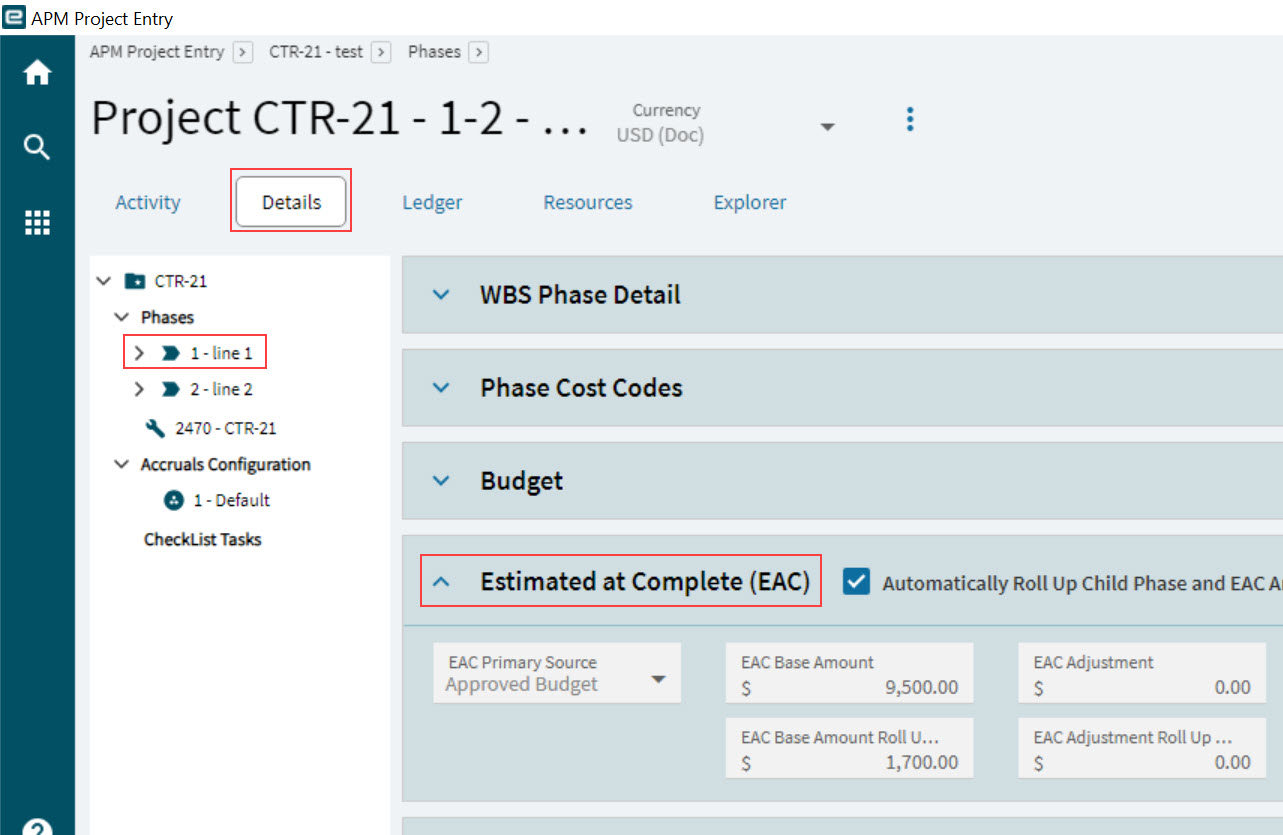
The Estimated at Complete card shows the EAC Base Amount using the default Approved Budget figure. This can be updated.

You can configure a different EAC Amount by choosing a different EAC Primary Source, and also by entering an EAC Adjustment value. Any notes relating to how and why the new EAC figure was derived can be entered in the EAC Notes text box.
-
Navigate to the relevant WBS Phase on the Navigation Tree.
-
Select a Cost Code below the WBS Phase on the Navigation Tree.
-
Expand the Estimate at Complete (EAC) card.
-
Make any changes and notes.
-
Clear the Automatically Roll Up Child Phase and EAC Amounts to this level check box.
If this check box is selected, the values and selections will be rolled up from the child phases, and you won’t be able to make selections at this level.
-
Select an EAC Primary Source from the drop-down list:
-
Approved Budget
-
Job EAC
-
Greater of Job EAC and Approved Budget
-
Manual
The EAC Base Amount updates according to the selected EAC Primary Source.
-
-
If EAC Primary Source is Manual, enter an EAC Base Amount.
-
Enter an EAC Adjustment amount if EAC Base Amount needs adjusting, up or down.
The EAC Amount is the sum of EAC Base Amount and EAC Adjustment (this could be less than EAC Base Amount if EAC Adjustment is negative, or more than EAC Base Amount if EAC Adjustment is positive, otherwise equal to EAC Base Amount).
-
Enter EAC Notes to justify the selection and adjustment, and anything else relevant to Estimated at Complete.
-
-
Select Save
on the Standard toolbar.
Job Operations
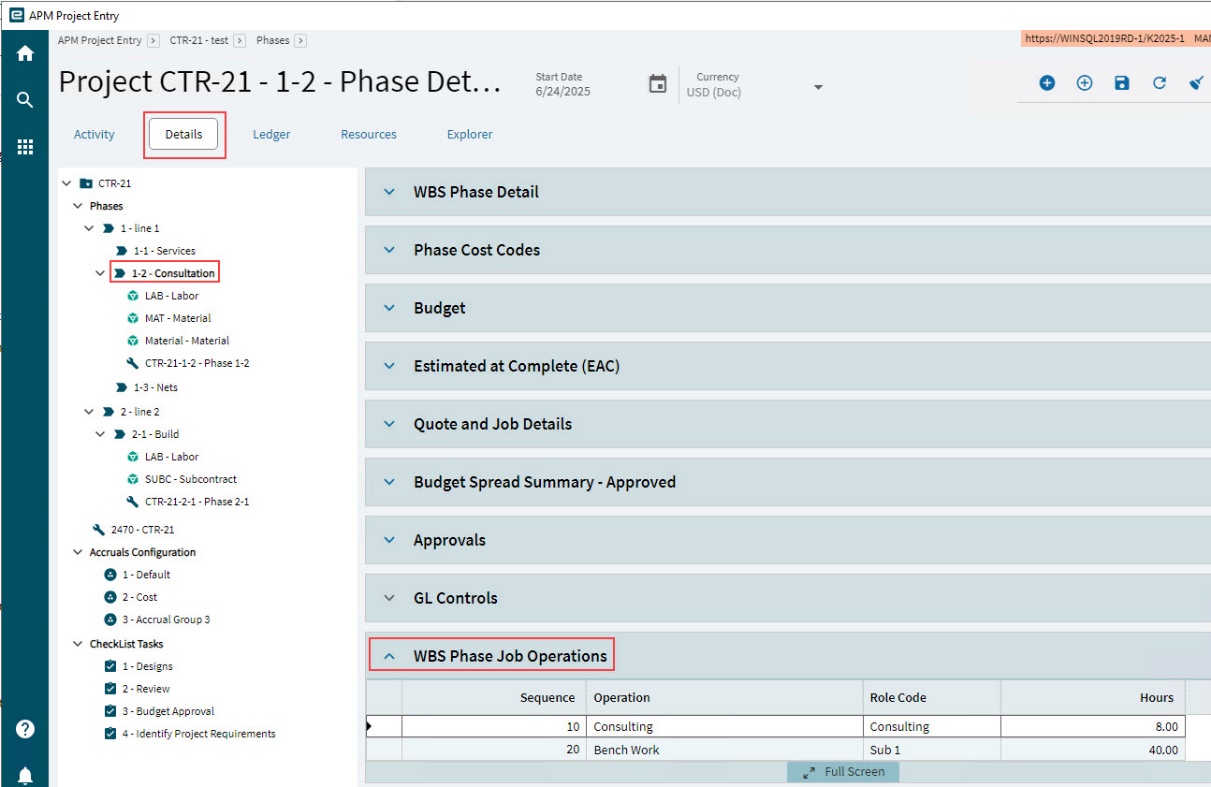
This card shows all the job operations for the job created for the WBS Phase.
-
Open the Detail page.
-
Select a WBS Phase on the Navigation Tree.
-
Expand the WBS Phase Job Operations card. The Job Operations in the Job Details for the selected WBS Phase appear on the card.
Quote and Job Details for a WBS Phase
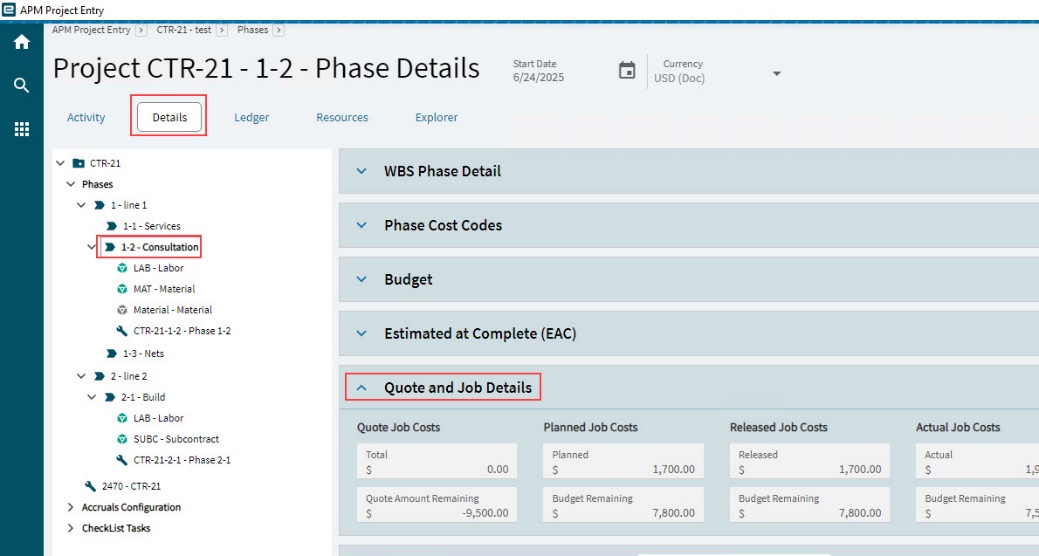
The Quote and Job Details card at the WBS Phase level displays a roll-up of quote and job values from that phase’s Cost Codes. For details on the quote and job values, see Quote and Job Details for a Cost Code.
-
Open the Detail page.
-
Select a WBS Phase on the Navigation Tree.
-
Expand the Quote and Job Details card.
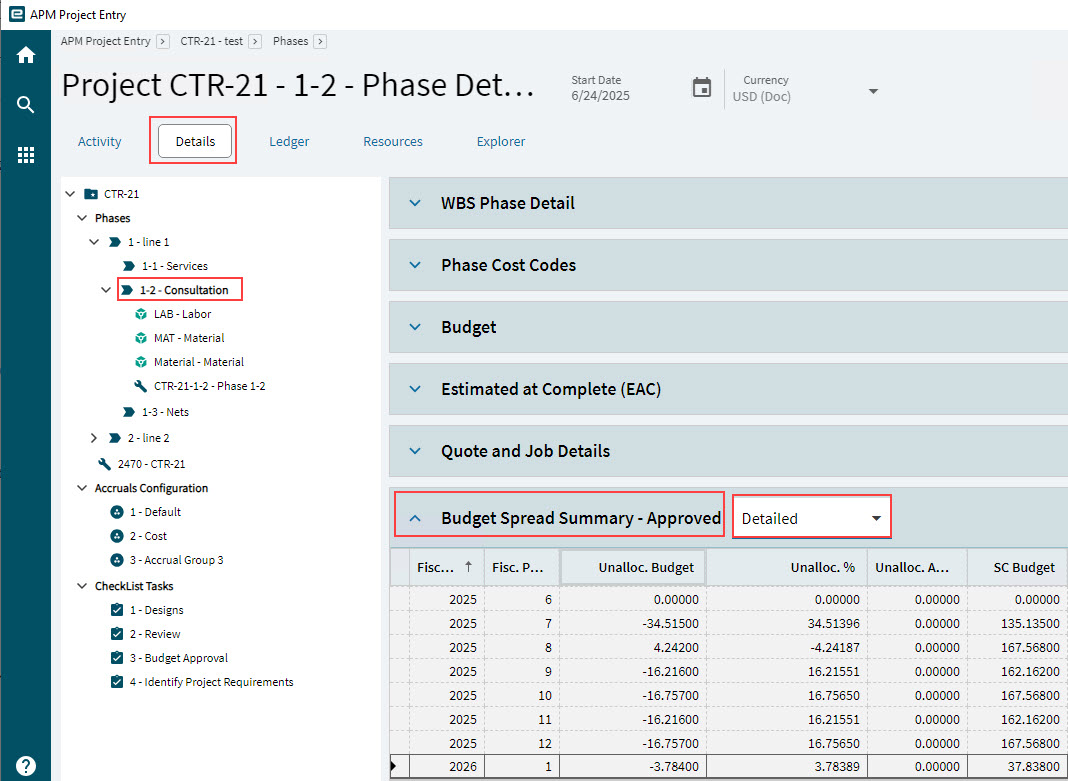
Budget Spread Summary - Approved
The Budget Spread Summary – Approved card displays the total Approved Budget figures per Fiscal Year and Period for the selected WBS Phase.
This is made up of all the approved Budget Spread details within the selected WBS Phase, summed and grouped by Fiscal Year and Period.
The Budget Spread Summary – Approved card displays all the budget spread figures.
-
Open the Detail page.
-
Select a WBS Phase on the Navigation Tree.
-
Expand the Budget Spread Summary – Approved card.
-
To see more detail, selected Detailed from the drop-down in the Budget Spread Summary card header.
GL Controls for a WBS Phase
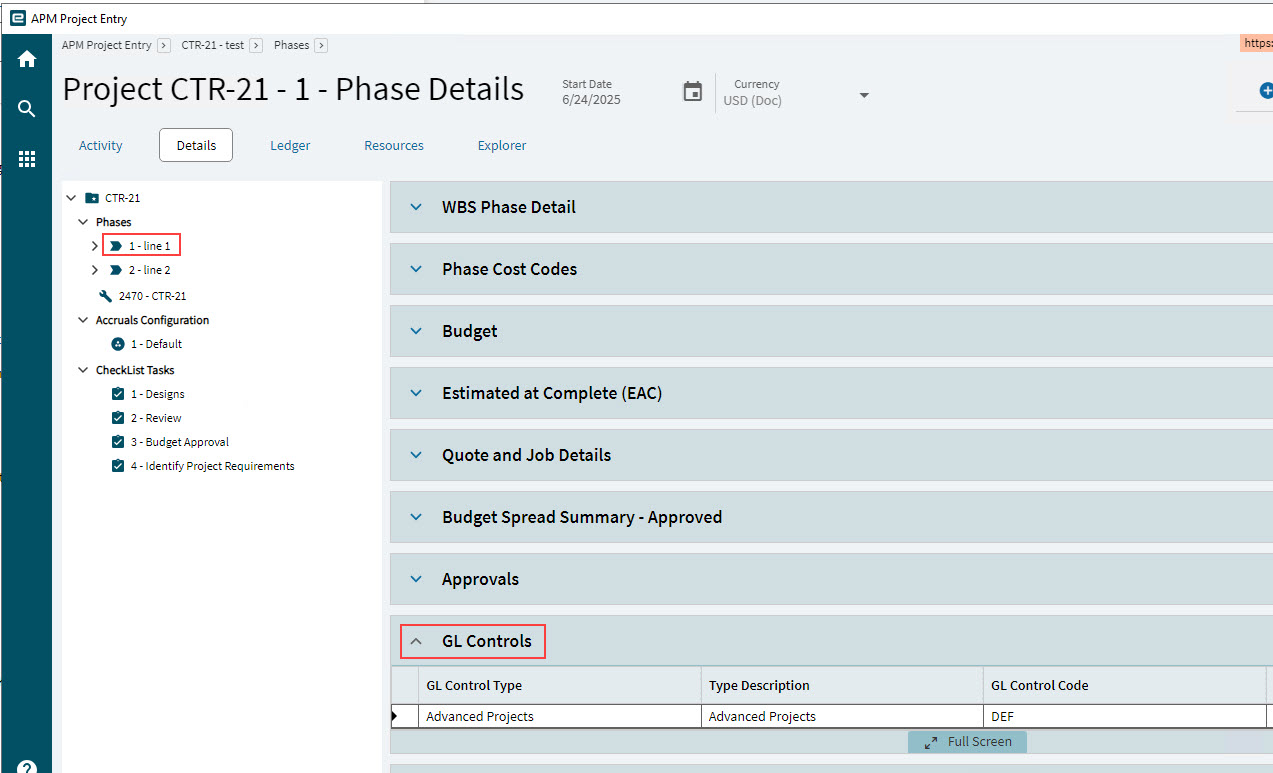
You can add a GL Control at the WBS Phase level. Read about GL Controls in the Project.
To add GL Controls to a WBS Phase:
-
Navigate to the relevant WBS Phase on the Navigation Tree and select this.
-
Expand the GL Controls card.
-
Select New
on the GL Controls card menu bar. -
Search for and select a GL Control Code and GL Control Type from the Search slide-out panel.
The GL Control Type and GL Control Code are added to the WBS Phase.
-
Select Save
on the Standard toolbar.
Updating Cost Code - Details
The WBS Phase Cost Codes appear on the Navigation Tree, under the respective WBS Phases.
|
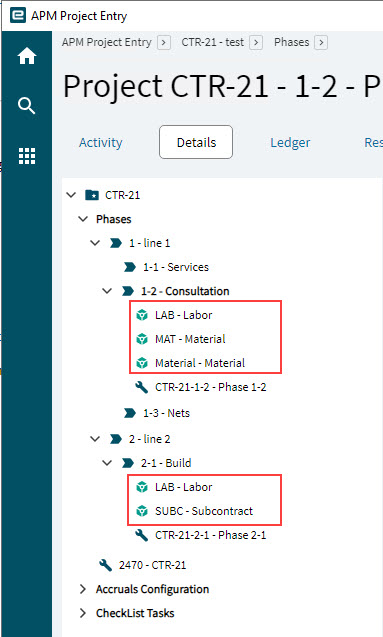
All costs values relating to this WBS Phase Cost Code are displayed in the Cost Code cards.
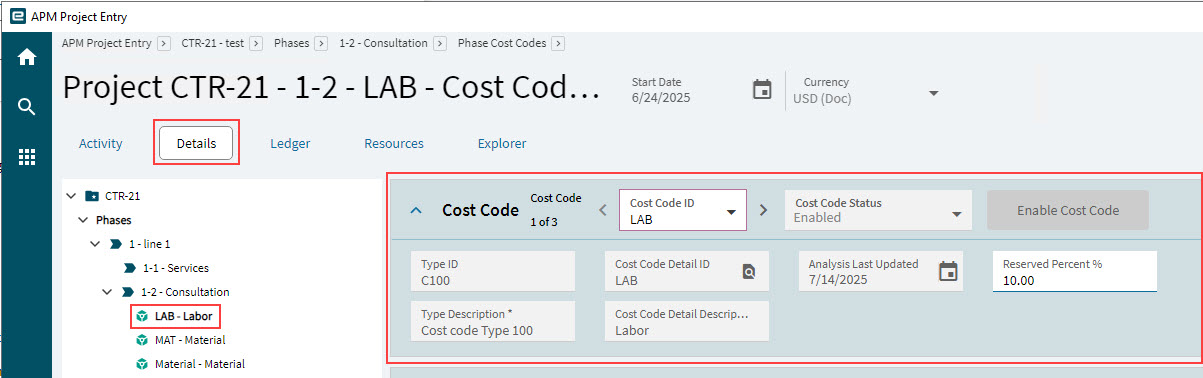
Cost Code
Use the Cost Code card to enter and approve Budgets against each Cost Code. Cost Codes and Budgets can also be imported (see Importing Budgets and Importing Budgets from Quote).
-
Navigate to the relevant WBS Phase on the Navigation Tree.
-
Select a Cost Code below the WBS Phase, on the Navigation Tree.
-
Expand the Cost Code card.
Cost Code ID |
The ID of the selected Cost Code |
Cost Code Status |
Either Proposed or Enabled |
Enable Cost Code |
This button is enabled when the Cost Code Status is Proposed. Click to change the Cost Code Status to Enabled. |
Type ID |
The Cost Code Type that this cost code belongs to. |
Type Description |
The description for the Cost Code Type. |
CostCodeDetailID |
Displays the Cost Code Detail ID. |
Cost Code Detail Description |
The description for the Cost Code. |
Analysis Last Updated |
The date that Project Analysis was last run. See Running Recalculate Analysis. |
Reserved Percent % |
The Reserved Percent for this WBS Phase Cost Code. This is the amount that is excluded from the Budget Spread. This field can be updated. |
Budget for a Cost Code
Budgets can be captured and approved at three different levels:
-
Budget for Project. See Budget for a Project.
-
WBS Phase Level, for a medium-level approach. See Budget for a WBS Phase.
-
Cost Code Level (described in this section) for a detailed approach.
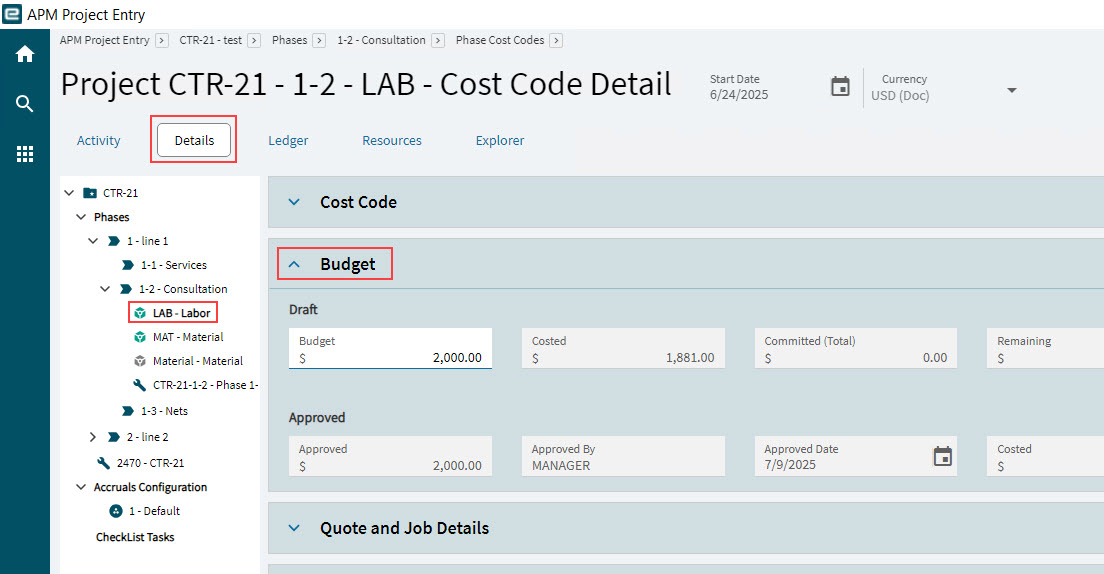
Use the Budget card to enter and approve Budgets against each Cost Code for the WBS Phase. Cost Codes and Budgets can also be imported (see Importing Budgets and Importing Budgets from Quote).
-
Navigate to the relevant WBS Phase on the Navigation Tree.
-
Select a Cost Code below the WBS Phase on the Navigation Tree.
-
Expand the Budget card.
-
Enter a Budget in the Draft section.
-
Select Save
on the Standard toolbar.
Approving a Cost Code Budget
To approve a Cost Code Budget:
-
Open the Project in APM Project Entry.
-
Navigate to the relevant WBS Phase on the Navigation Tree.
-
Select the Cost Code below the WBS Phase, on the Navigation Tree.
-
Expand the Budget card.
-
Adjust the Draft Budget value if necessary.
-
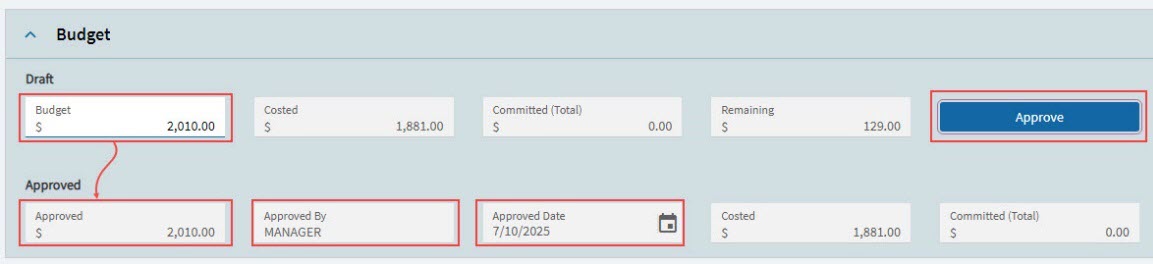
Select Approve to approve the draft budget.

An Information panel appears with the question:
“Do you want to overwrite the previous approved budget?”
-
On the Information panel, select Yes.
The values in the Approved section are updated.
-
Approved now holds the draft Budget value.
-
The Approved By and Approved Date are updated to the logged-in user name and the current date.
-
Quote and Job Details for a Cost Code
The project analysis functionality includes reporting against material and labour transactions prior to the Capture COS/WIP process. Cost tracking and remaining budgets are included here. Actual values are displayed dynamically without running Capture COS/WIP.
-
Open the Detail page.
-
Select a WBS Phase on the Navigation Tree.
-
Select a Cost Code underneath the Phase node.
-
Expand the Quote and Job Details card.
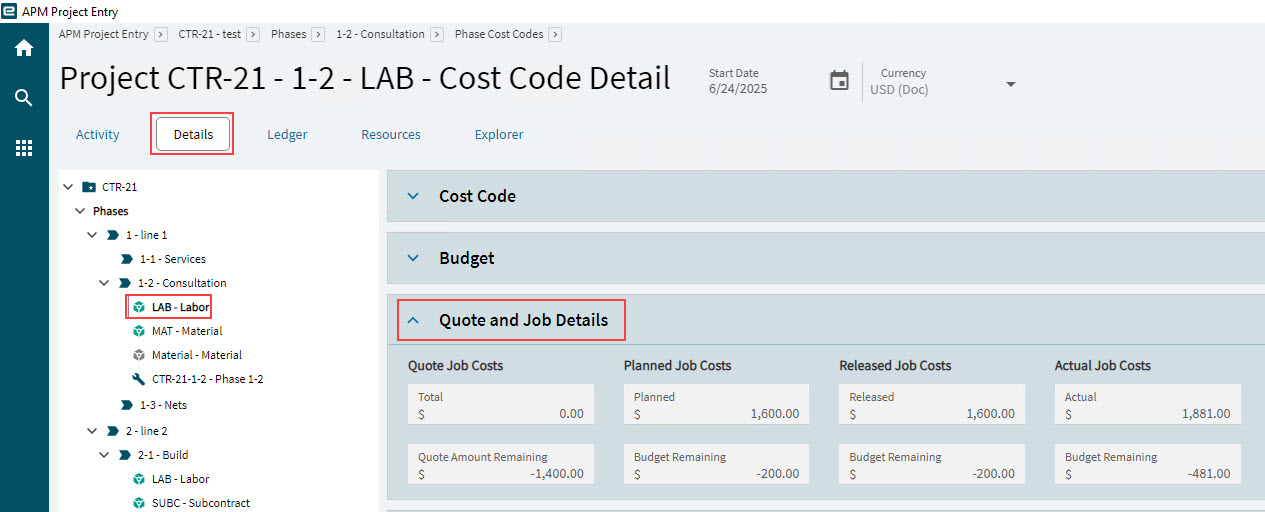

Use the values shown in Job Cost Variance and Estimated at Complete to identify current budget variances and overruns.
Quoted Job Costs |
|
Total |
Total cost for the Cost Code as shown in the Quote line Worksheet. (Total Cost field is the value picked up here). Quote that is linked to the project and phase where the Quote line has Engineered = TRUE and the Quote has been ‘Quoted’. |
Quote Amount Remaining |
Budget less Quoted Job Cost |
Planned Job Costs |
|
Planned |
The total planned costs for the Cost Code |
Budget Remaining |
Budget less Planned Job Cost |
Released Job Costs |
|
Released |
Budget less Released Job Cost |
Budget Remaining |
Budget less Released Job Costs |
Actual Job Costs |
|
Actual |
Any cost booked to a Job (material issues, labor, or subcontract operation). Whether COS/WIP is processed or not, these costs will be captured and shown. Note: This should match the total cost for the job on the Job Tracker. |
Budget Remaining |
Budget less Actual Job Cost |
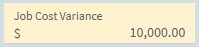
Job Cost Variances Use this to immediately identify any current budget variances. If Job Cost Variances is over the Planned Job Costs it is highlighted in yellow.
|
|
Job Cost Variance |
Estimated at Complete less Planned Job Costs |
Variance % |
Budget approved totals less Job Cost Variance |
Cost to Complete |
|
Total Cost to Complete |
Released Job Costs less Actual Job Costs. |
Remaining from budget |
Budget approved totals less Job Cost to Complete |
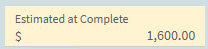
Estimated at Complete Use this to immediately identify any expected budget overruns. If Estimated at Complete is over the Approved Budget, it is highlighted in yellow.
|
|
Estimated at Complete |
Planned job costs plus Job cost variances |
Budget Remaining |
Budget less Estimated at Complete |
Estimated at Complete for a Cost Code
Estimated at Complete can be captured and viewed at three different levels.
-
Project level for a high-level approach. See Estimated at Complete for a Project.
-
WBS Phase Level, for a medium-level approach. See Estimated at Complete for a WBS Phase.
-
Cost Code Level (described in this section) for a detailed approach.
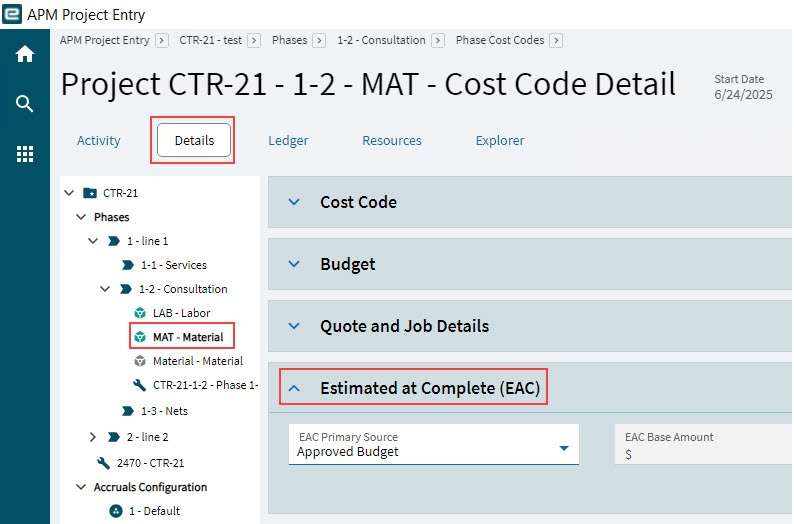
The Estimated at Complete card shows the EAC Base Amount using the default Approved Budget figure. This can be updated.

You can configure a different EAC Amount by choosing a different EAC Primary Source, and also by entering an EAC Adjustment value. Any notes relating to how and why the new EAC figure was derived can be entered in the EAC Notes text box.
-
Navigate to the relevant WBS Phase on the Navigation Tree.
-
Select a Cost Code below the WBS Phase on the Navigation Tree.
-
Expand the Estimate at Complete (EAC) card.
-
Make any changes and notes.
-
Select an EAC Primary Source from the drop-down list:
-
Approved Budget
-
Job EAC
-
Greater of Job EAC and Approved Budget
-
Manual
The EAC Base Amount updates according to the selected EAC Primary Source.
-
-
If EAC Primary Source is Manual enter an EAC Base Amount.
-
Enter an EAC Adjustment amount if EAC Base Amount needs adjusting, up or down.
The EAC Amount is the sum of EAC Base Amount and EAC Adjustment (this could be less than EAC Base Amount if EAC Adjustment is negative, or more than EAC Base Amount if EAC Adjustment is positive, otherwise equal to EAC Base Amount).
-
Enter EAC Notes to justify the selection and adjustment, and anything else relevant to Estimated at Complete.
-
-
Select Save
on the Standard toolbar.
Creating Budget Spread
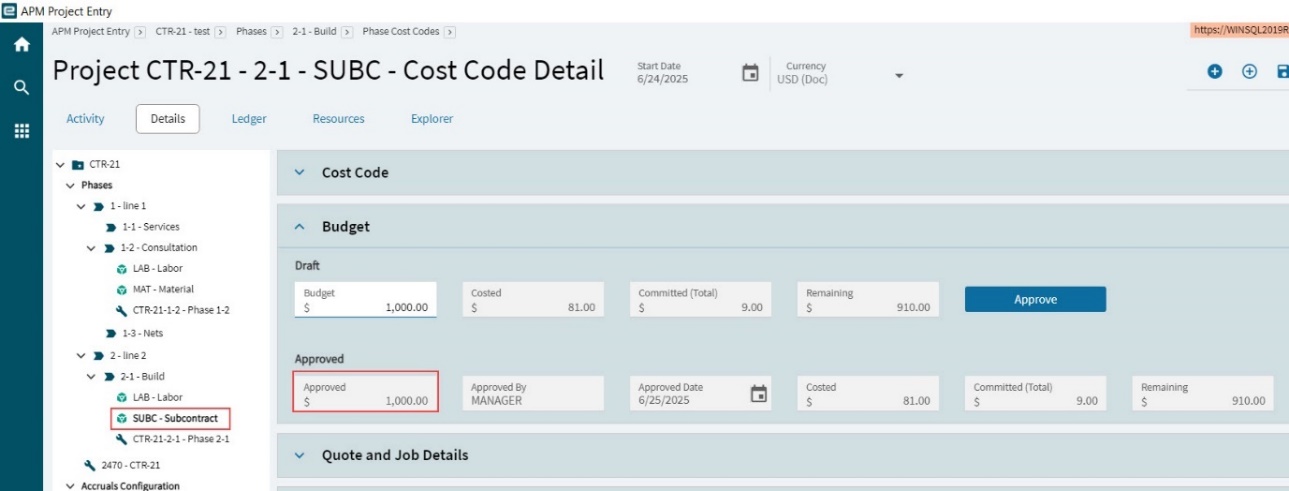
Before creating a Budget Spread for a Cost Code, ensure that the Cost Code has an Approved Budget.
Also check that the WBS Phase has a Start Date and a Due Date.
|
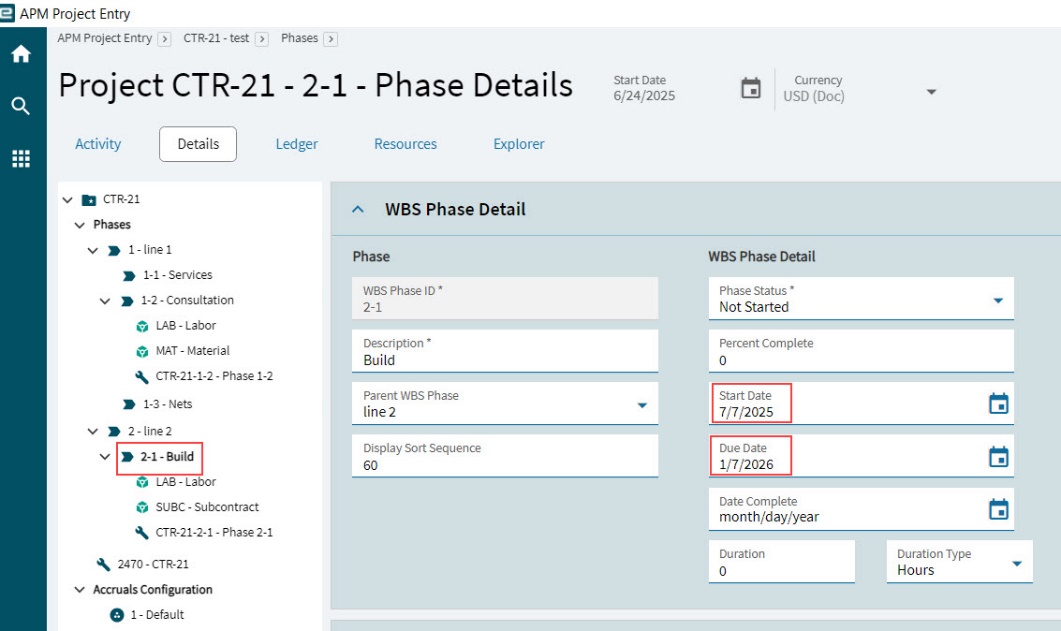
The Budget Spread function divides the Cost Code budget into Fiscal Periods over the WBS Phase. See Budget Spread.
-
Navigate to the relevant WBS Phase on the Navigation Tree.
-
Select the Cost Code below the WBS Phase on the Navigation Tree.
-
Expand the Budget Spread card.
-
Select Generate Budget Spread
 .
.
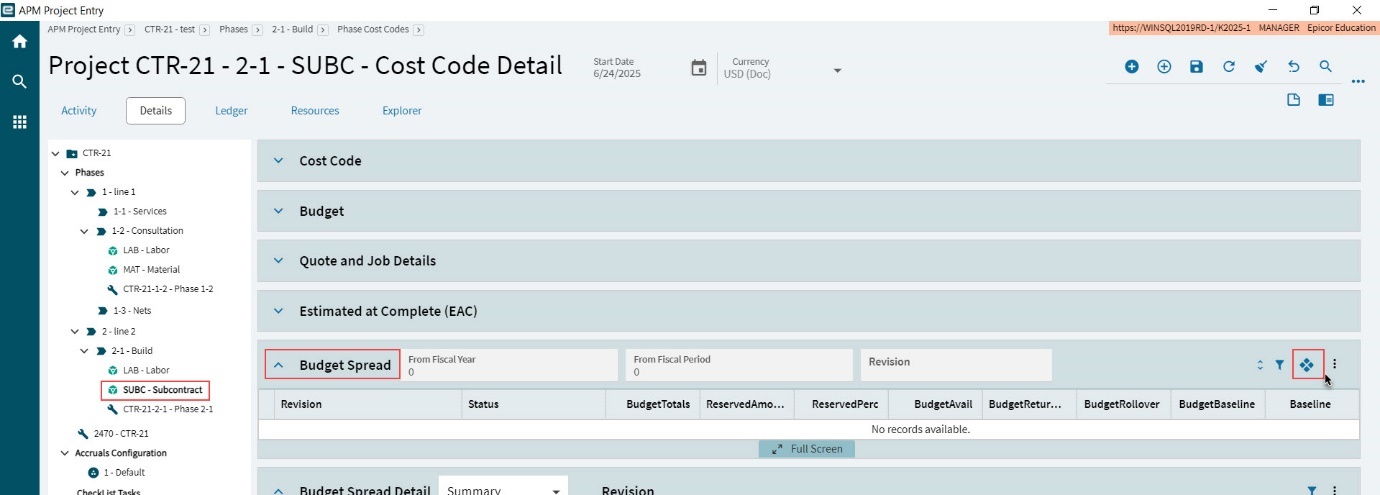
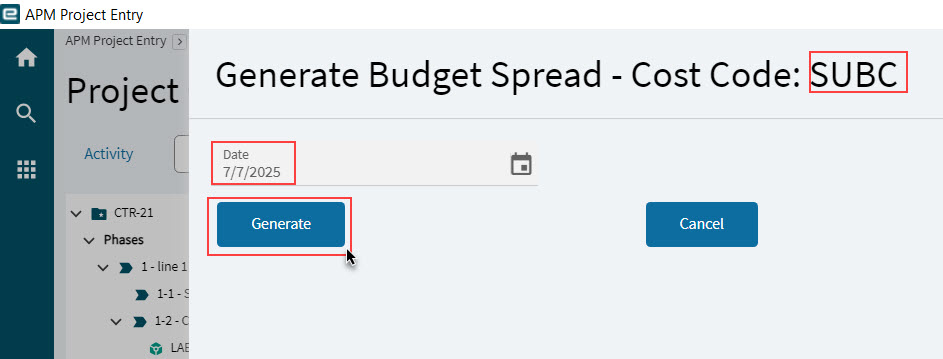
The Generate Budget Spread panel slides out. This is just for the selected Cost Code.
|
-
Review the Date, which is the Start Date for the Phase.
-
Select Generate.
The Budget Spread is generated for the Date and Cost Code.
Budget Spread
The Budget Spread card is updated with the budget spread Revision, Status, and Totals.

Revision |
This is updated each time a new budget spread is created for this WBS Phase and Cost Code. |
Status |
For a new Budget Spread, the Status is Draft. When the Budget Spread is approved, the Status moves to Approved. |
Budget Totals |
This is the Approved Budget amount. |
Reserved Amount |
The Approved Budget amount less the percentage value using Reserved Percent. |
Reserved Percent |
The percentage of the budget that is excluded from the Budget Spread. The reserved amount calculated from this is kept aside for unknowns. |
Budget Available |
This is calculated as the Budget Total less the Reserved Amount. It is the amount available to be distributed across the Fiscal periods in the Budget Spread. |
Budget Spread Details
The Budget Spread Detail card contains the Fiscal Periods for the selected Budget Spread revision.
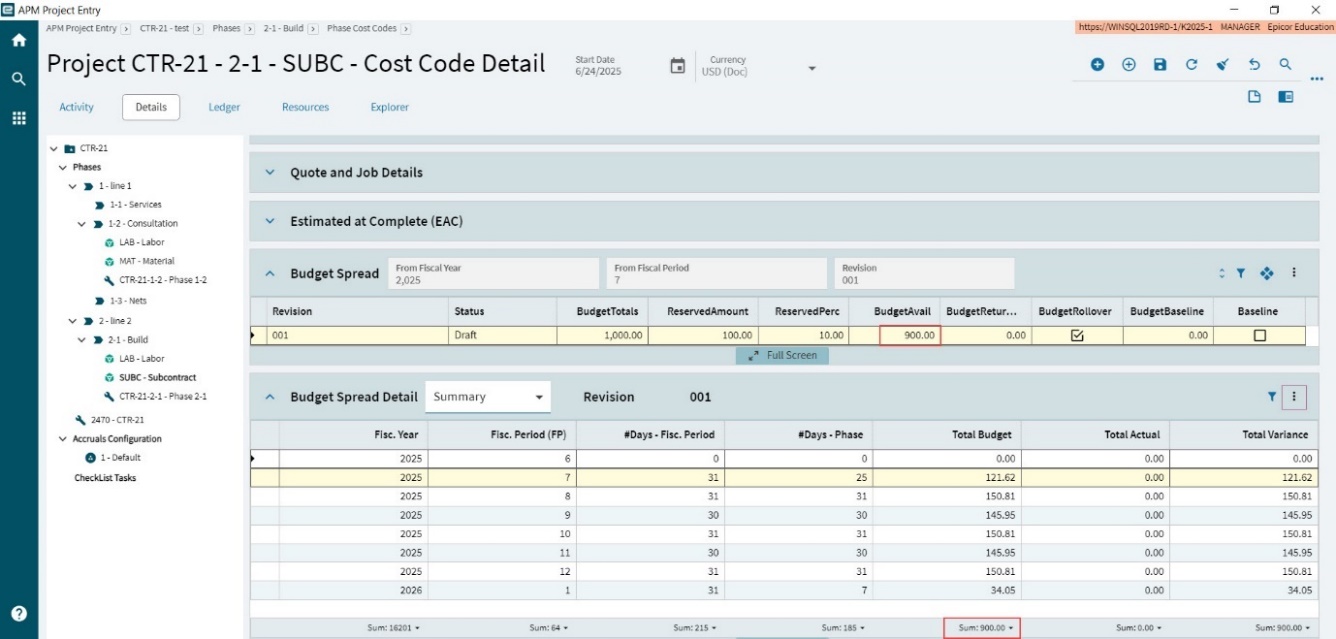
The Total Budget is divided across the period defined by Phase Start Date and Phase Due Date.
The different Fiscal Periods that fall within the Phase Start Date and Phase Due Date are tabled: each forms a Budget Spread row. The Budget Available is apportioned to each Budget Spread row, using the days of the fiscal period to calculate the amount for that row.
Note that the number of days in the first and last Budget Spread periods may be less than the total days for those Fiscal periods, if the Start Date is after the Fiscal Period start and/or the Due Date is before the Fiscal Period end date.
Updating Budget Spread Details
You can adjust the Total Budget in the different Budget Spread Detail rows, if you anticipate that some rows (Fiscal Periods) need a higher budget, while others need a lower one. Keep the sum of Total Budget as before.
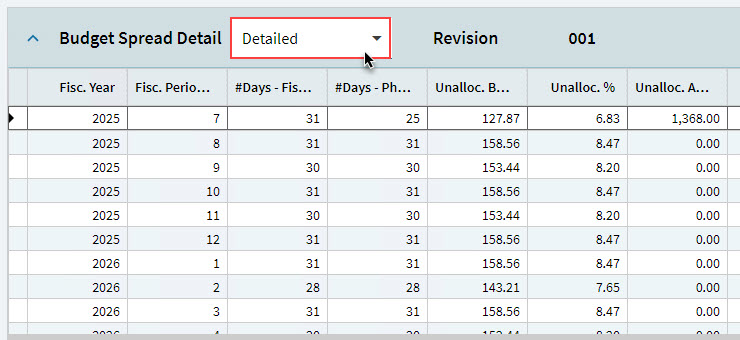
Viewing Detailed Budget Spread
To view a detailed breakdown of the budget spread, select Detailed from the drop-down in the Budget Spread Detail card header bar.
Approving Budget Spread
After reviewing the Budget Spread, you need to approve it.
-
To approve a Budget Spread: Select the Draft check box.
This changes the Status to Approved. The Draft check box is replaced by an Approved check box.

-
To revert to the Draft status, select the Approved check box.
Budget Spread Revisions
To create a new revision of the Budget Spread, create a new Budget Spread (see Creating Budget Spread).
The new Budget Spread is created with the Draft status, and a new revision number: 00[n].
-
Previous Draft revisions remain in the Draft status.
-
Previous Approved revisions remain Approved but have a Status of Closed.
GL Controls for a Cost Code
You can add a GL Control at the WBS Phase > Phase Cost Code level. Read about GL Controls in the Project.
To add GL Controls to a WBS Phase Cost Code:
-
Navigate to the relevant WBS Phase on the Navigation Tree.
-
Select a Cost Code from the below the node on the Navigation Tree.
-
Expand the GL Controls card.
-
Select New
on the GL Controls card menu. -
Search for and select a GL Control Code and GL Control Type from the Search slide-out panel.
The GL Control Type and GL Control Code are added to the WBS Phase Cost Code.
-
Select Save
on the Standard toolbar.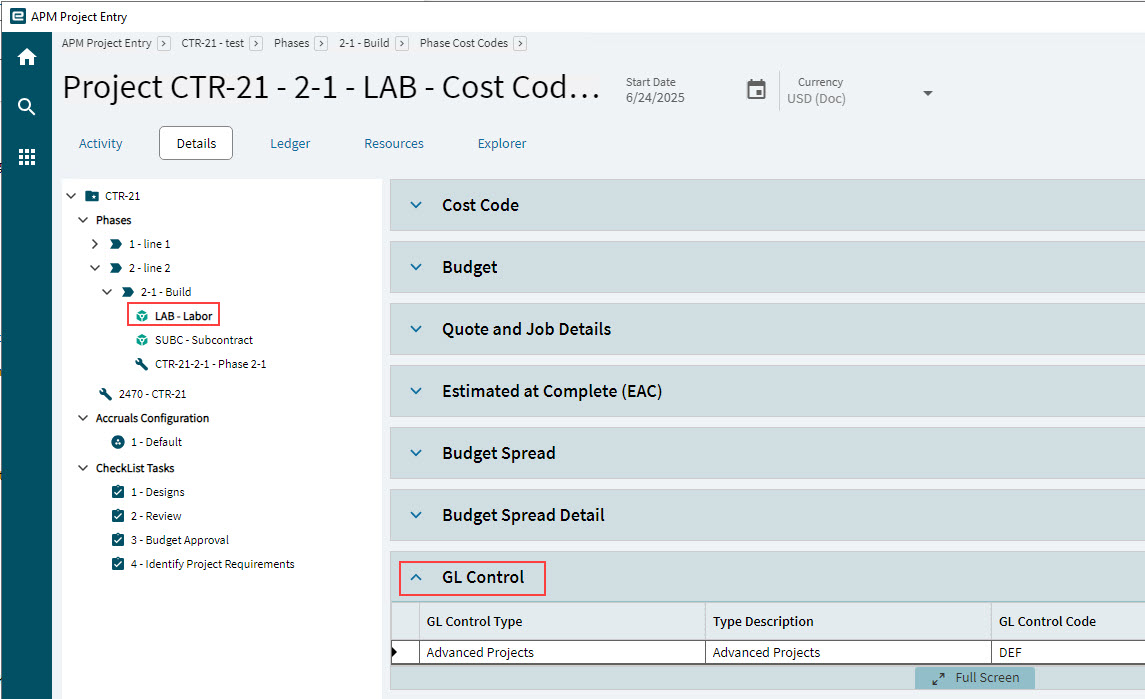
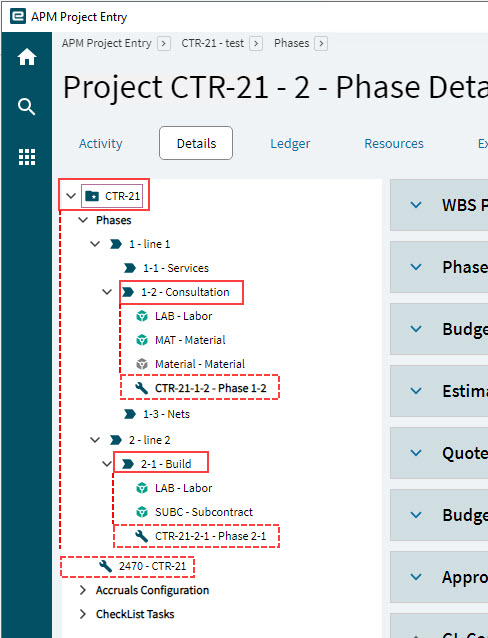
Viewing Jobs on the Navigation Tree
Jobs are listed on the Navigation Tree, below the project node, and under the respective WBS Phase Nodes.
|
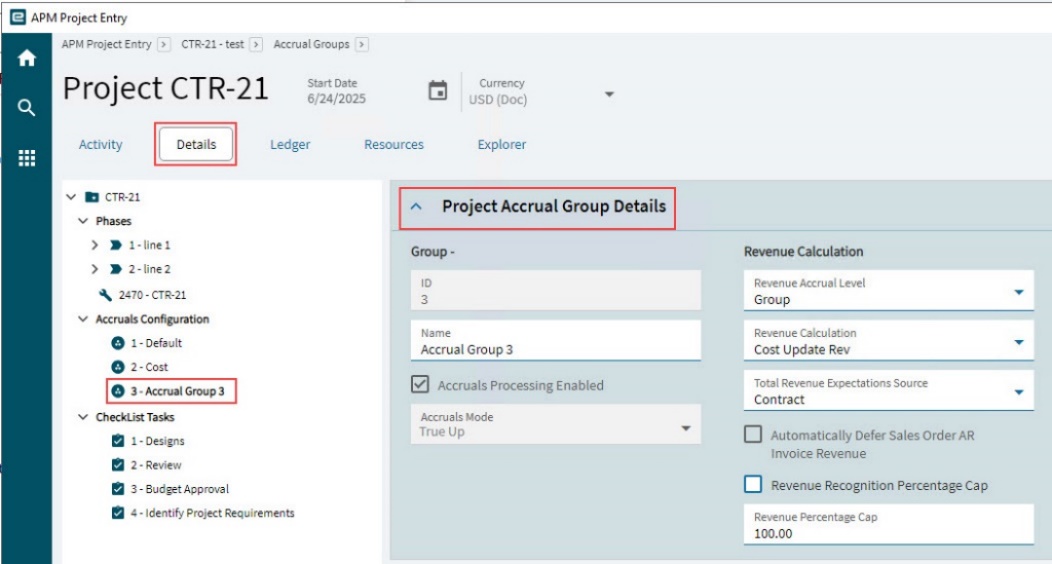
Updating Accruals Configuration - Details
| If you need to update an Accrual Group, add a new Accrual Group and edit that, instead of editing the Default Accrual group which gets its settings from the Advanced Project Management Configuration settings for Accruals. |
To update a new Accrual Group:
-
Open the Details page.
-
Select an Accruals Configuration under Accruals Configuration on the Navigation Tree.
-
Expand the Project Accruals Group Details card. Update as required.
-
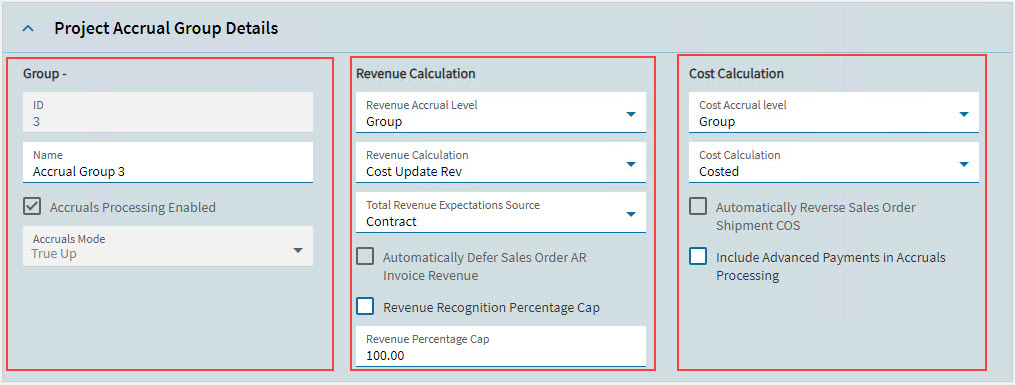
Update the Name.
-
Update the Revenue Calculation settings.
-
Update the Cost Calculation settings.
The settings (except for Include Advanced Payments in Accruals Processing) are derived from the settings in Advanced Project Management Configuration. For a definition of the Accrual Settings, see Project Accrual Defaults.
When Include Advanced Payments in Accruals Processing is selected, the APM Project Accruals generation process will automatically add a node for Advanced Payments under cost code nodes where an advanced payment has been processed against a related job material. The advanced payment amount will then be included within the relevant accrual processing.
-
Select Accruals Processing Enabled.
-
Select Save
.
Advanced GL Control Settings
The Advanced GL Control Settings cannot be updated. These settings apply when the Cost Accrual Level is Project_WBSPhase_CostCode_GLC.
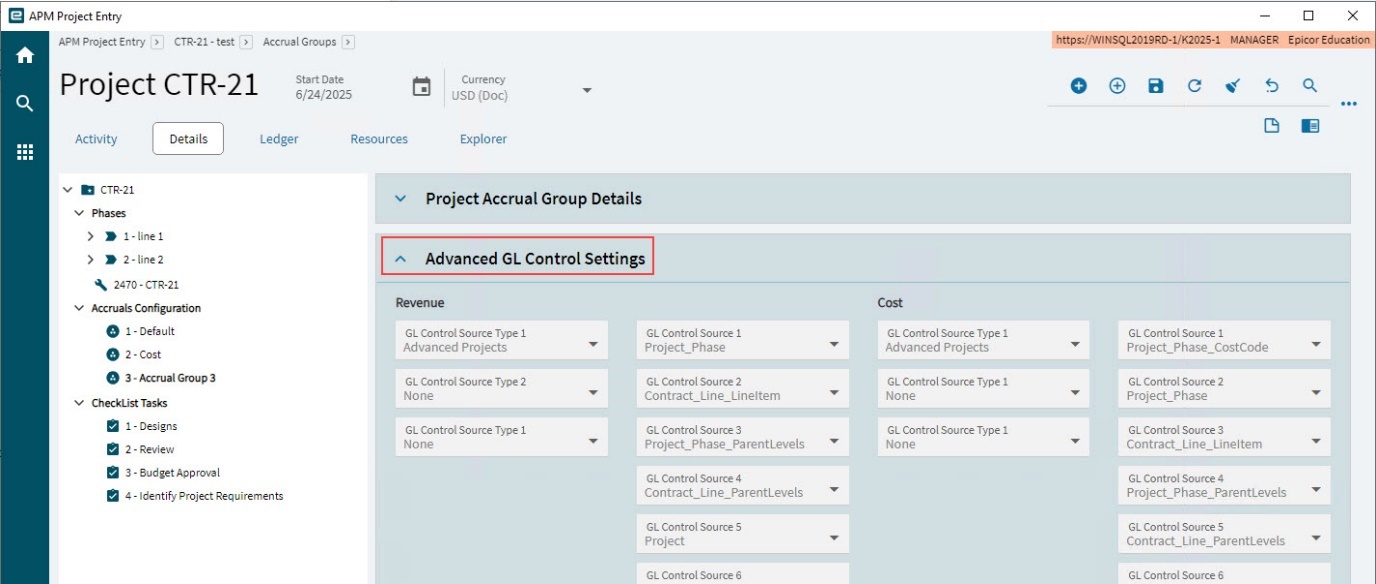
To see an explanation of the Advanced GL Control Settings, refer to the section: Advanced GL Control Settings.
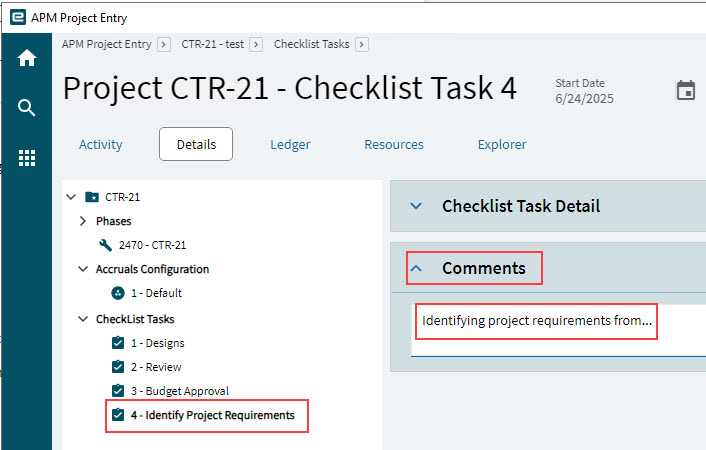
Updating Checklist Tasks
Use Checklist Tasks to create a checklist for the Project.
|
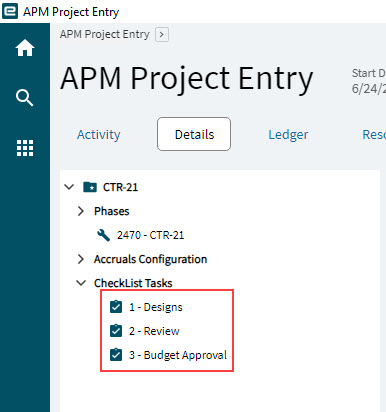
Depending on the checklist task type, the tasks within relate to:
-
Customer Approval
-
Approval
-
To Do
Adding a New Checklist Task
To add a new checklist task:
-
Select Checklist Tasks on the Navigation Tree.
-
Click New Task
on the Standard toolbar. -
A new Checklist Task appears on the Checklist Task Detail card.
-
Capture the details for the task.
This includes a Checklist Task ID and Description, which will show in the list on the Navigation Tree.
-
Set the Status and optionally Percent Complete, Start Date and Due Date.
-
Select the Checklist Task Type, then set a Duration (in Hours or Days), and optionally a Person accountable for the task, and the Project WBS Phase it relates to.
-
Finally, select the People responsible for completing the task.
-
-
Select Save
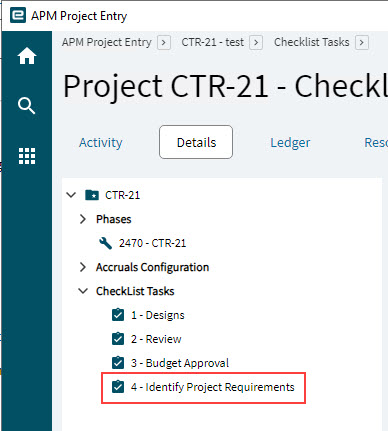
on the Standard toolbar.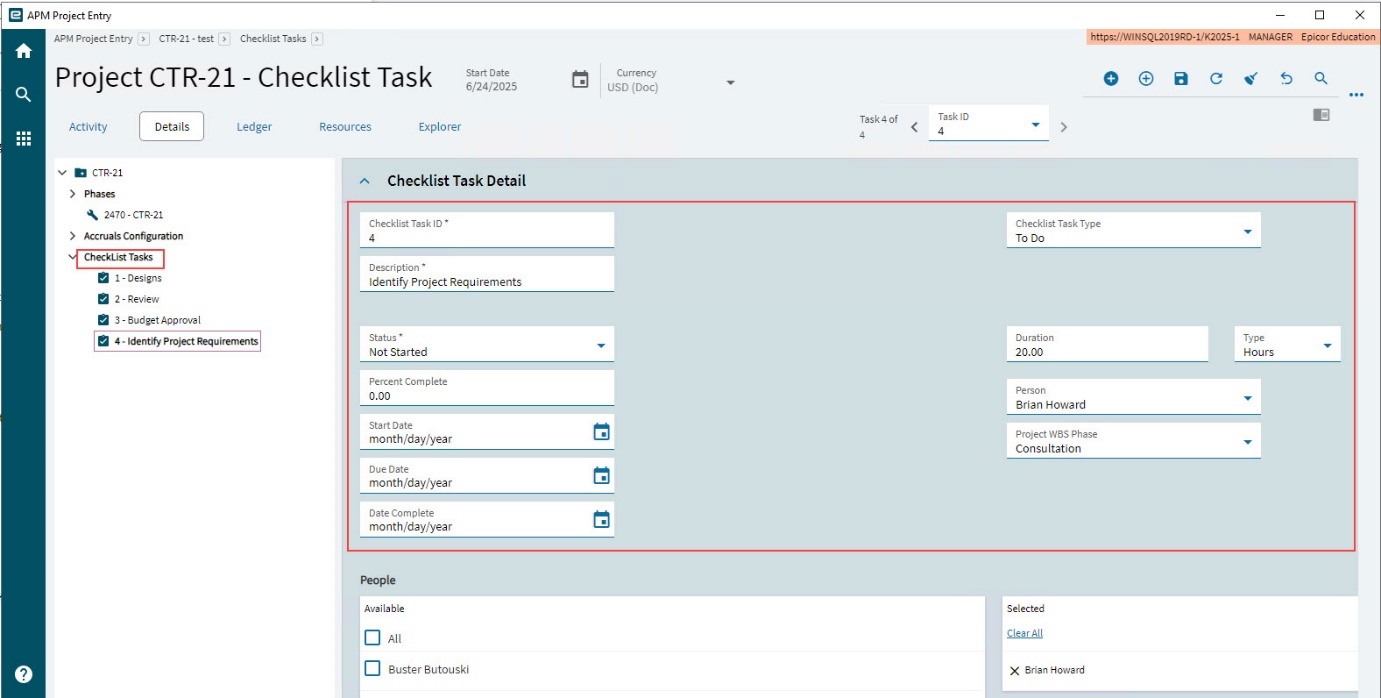
The new task is added to Checklist Tasks and appears on the Navigation Tree.
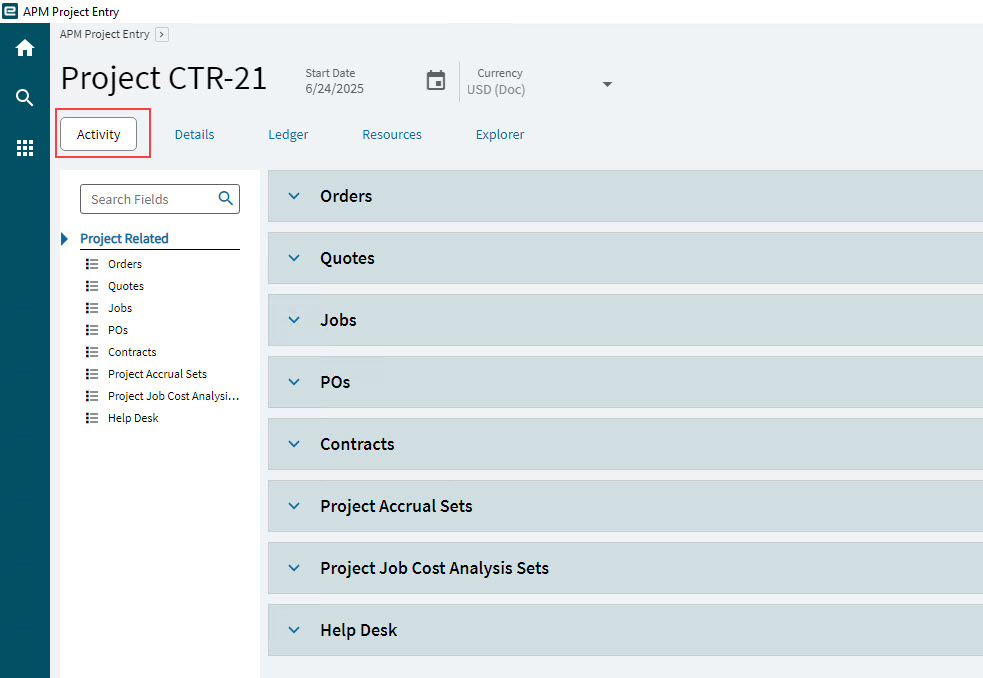
Viewing Activity
Open the Activity page to view the different relationships between the Project and other parts of the system.
|
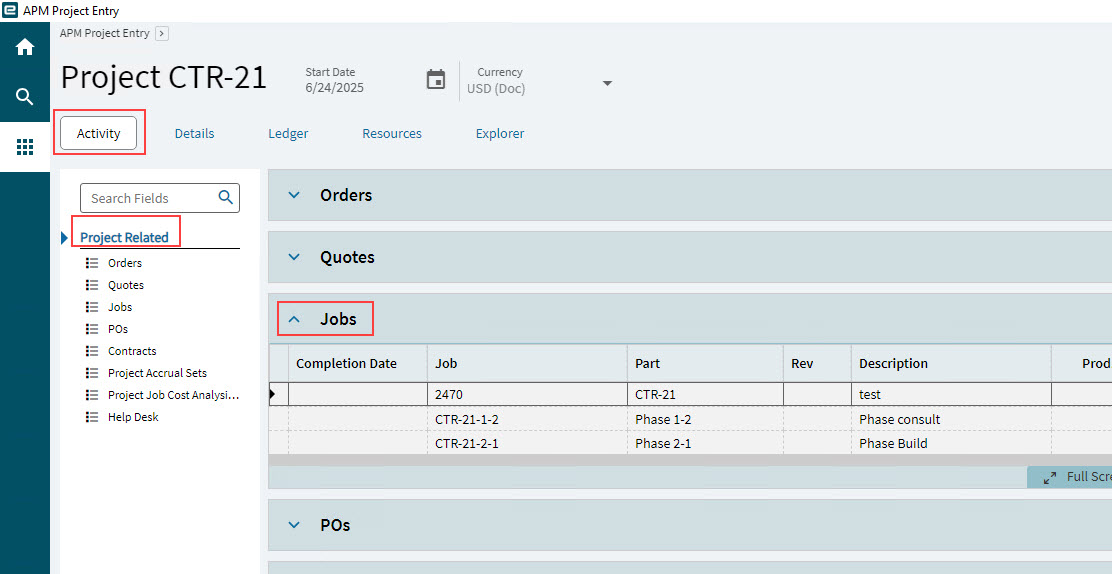
Jobs
Expand the Jobs card to view all jobs relating to a Project WBS Phases. Right-click on a Job to Open With > Job Entry.
|
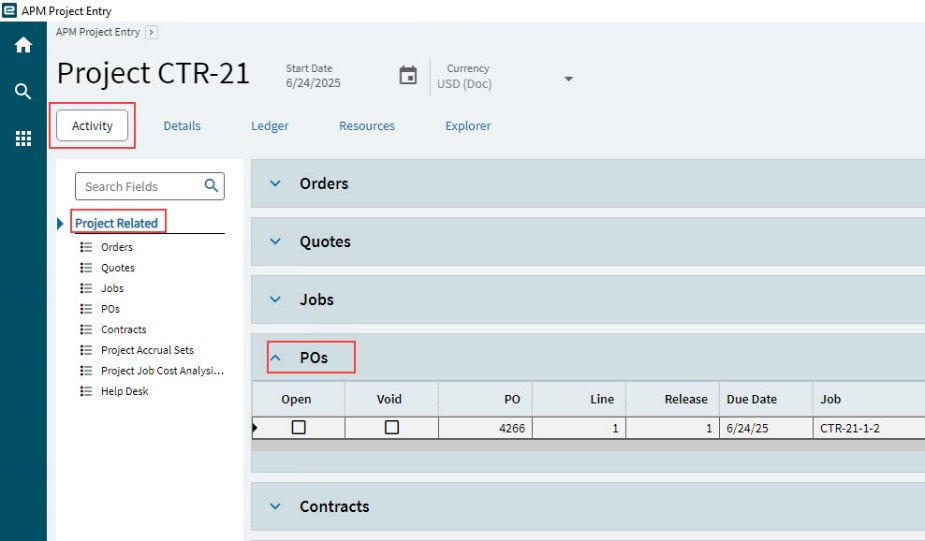
POs
Expand the POs card to view all Purchase Orders relating to Project Jobs. To view Open Purchase Orders only, filter on Open.
The Job column displays the job that the PO relates to, while the Project Phase column displays the WBS Phase for that Job.
|
For each WBS Phase:
-
The total value of all Open Purchase Orders is included in the Committed (Total) value in the Budget (see Budget for a WBS Phase).
-
The total value of all Receipted Purchase Orders is included in the Costed value in the Budget (see Budget for a WBS Phase), but only after the Capture COS/WIP Activity process is run for the period (see Capture COS/WIP Activity).
For the Project, the total value of all Open Purchase Orders is included in the Committed (Total) value, while the total value of all Receipted Purchase Orders is included in the Costed value.
| Use APM Purchase Order to capture, approve and confirm Purchase Orders for APM Project jobs. See APM Purchase Order Entry. |
Contracts
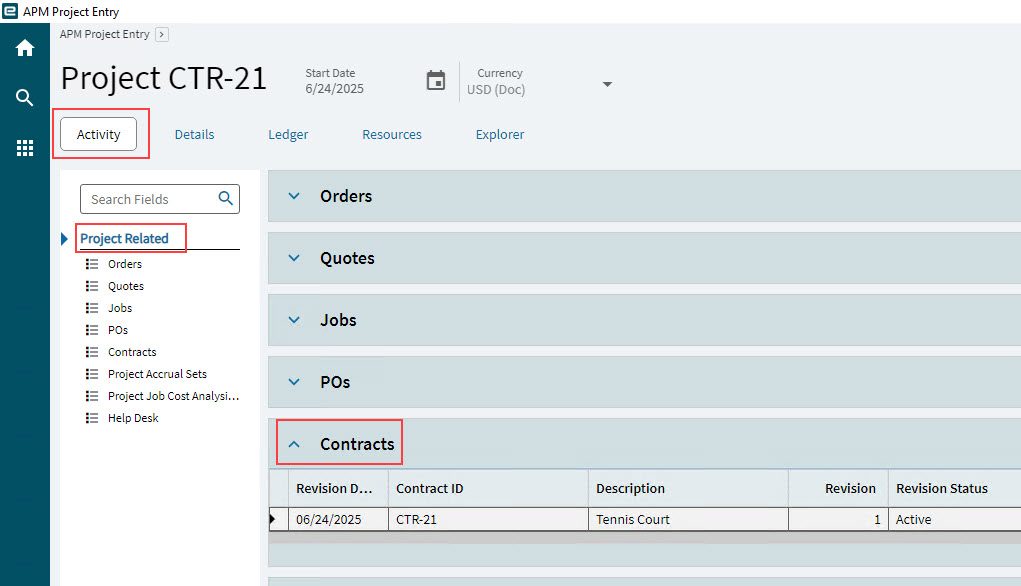
Expand the Contracts card to view all contracts relating to the Project.
If the project was created from a contract, this appears in the list of related contracts. If a project was added to a contract, this will also appear in the list.
The contract row displays contract header information such as the Customer ID, Contract Number, Description, Start and End Dates, and the Total Value of the contract.
|
-
To open a contract, right click on the Contract Id, then select APM Contract Entry.
Project Accrual Sets
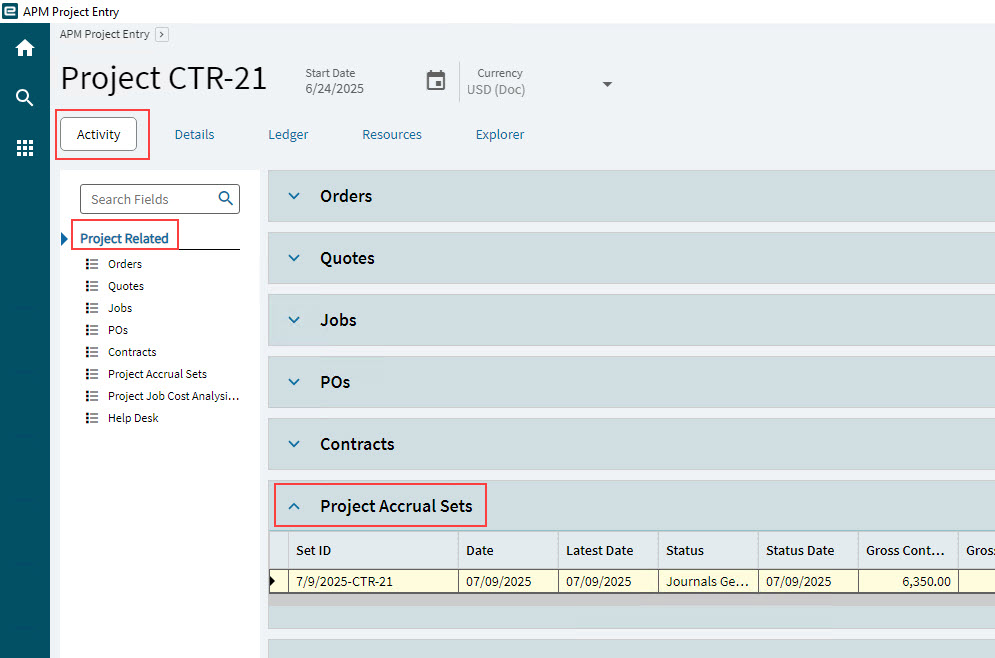
Expand the Project Accrual Sets card to view all project accrual sets for the Project. See APM Project Accruals Workbench.
|
Help Desk
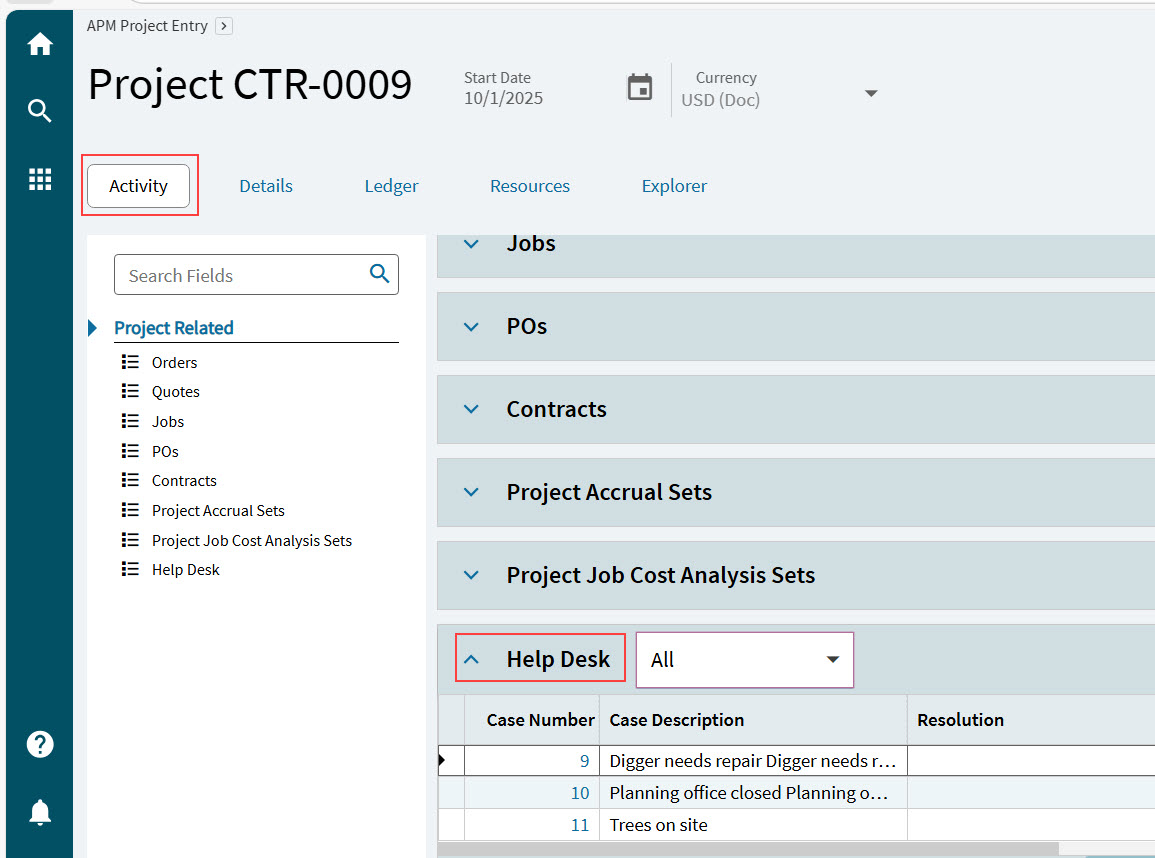
Expand the Help Desk card to view all cases relating to the Project.
A case that has this project selected in its Related Information will appear here. See APM Case Entry.
|
Viewing Ledger
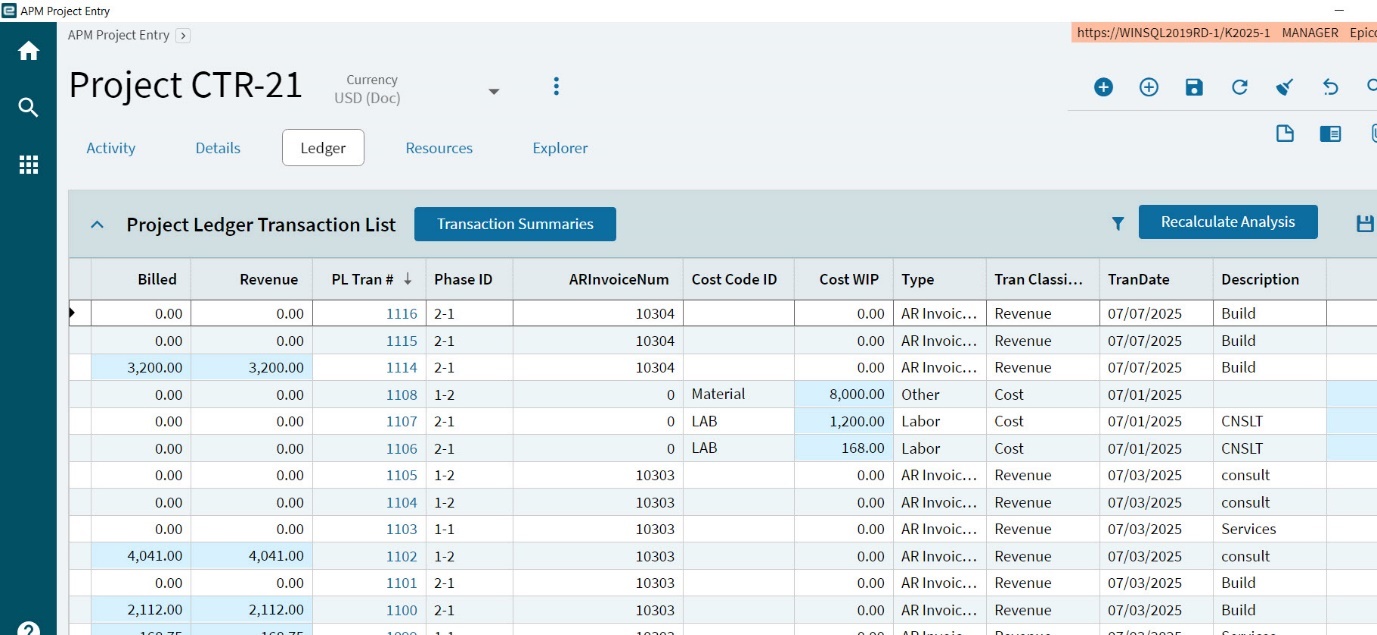
The Project Ledger Transaction List card displays the project costs and revenue which have been posted into the General Ledger under the Financial Module.
|
For transactions that require Capture COS/WIP, cost amounts only appear after the process is run.
|
-
Select Transaction Summaries to open the Transaction Summaries slide-out panel, which contains several cards showing more detail on the transactions.
Transaction Summaries
-
Select Refresh Summary to refresh the totals displayed in A/R Analysis and A/P Analysis.
Expand the cards on this slide-out panel to view additional details.
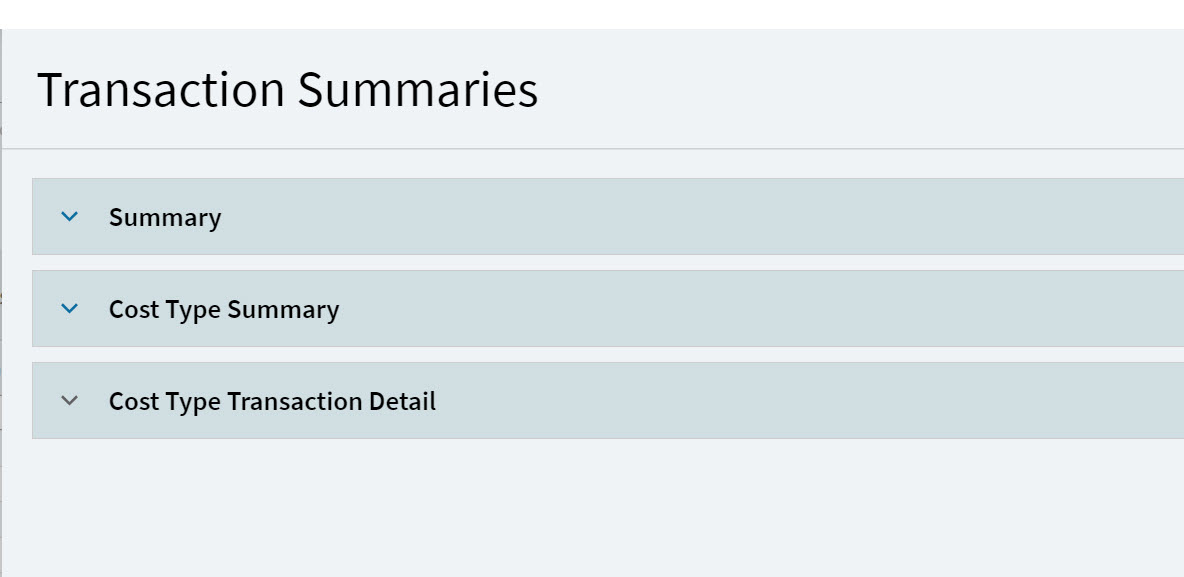
Summary
The Summary card on the Transaction Summaries slide-out displays the Accounts Receivable and Accounts Payable Transactions.
A/R Analysis is populated with Accounts Receivable transaction totals.
A/P Analysis is populated with Accounts Payable Invoice transactions totals from invoices generated from Subcontractor payments.
-
To refresh the A/R Analysis and A/P Analysis figures, click Refresh Summary.
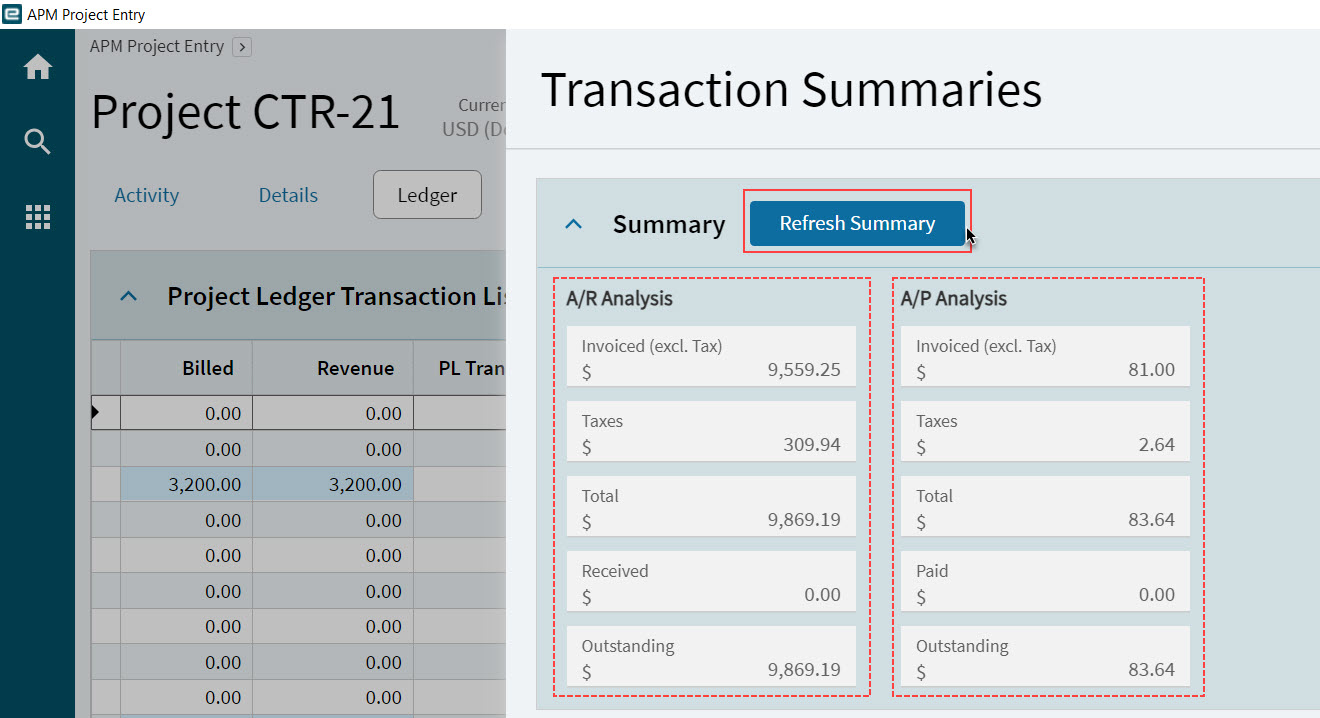
A/R Analysis |
A/P Analysis |
||
Invoiced (excl. Tax) |
The sum of A/R invoice totals (excl. tax) for the project. |
Invoiced (excl. Tax) |
The sum of A/P invoice totals (excl. tax) for the project. |
Taxes |
The sum of A/R invoice taxes for the project. |
Taxes |
The sum of A/P invoice taxes for the project. |
Total |
The sum of A/R invoice totals for the project. |
Total |
The sum of A/P invoice totals for the project. |
Received |
The sum of all monies received for the project. |
Paid |
The sum of all monies paid for the project. |
Outstanding |
Total less Received. |
Outstanding |
Total less Paid. |
Cost Type Summary
The Cost Type Summary on the Transaction Summaries slide-out shows the Budget and Costed values associated with the WBS Phase Cost Codes, grouped and summed by Cost Type Code. Details for each WBS Phase Cost Code appears on the Budget card (see Budget for a Cost Code).
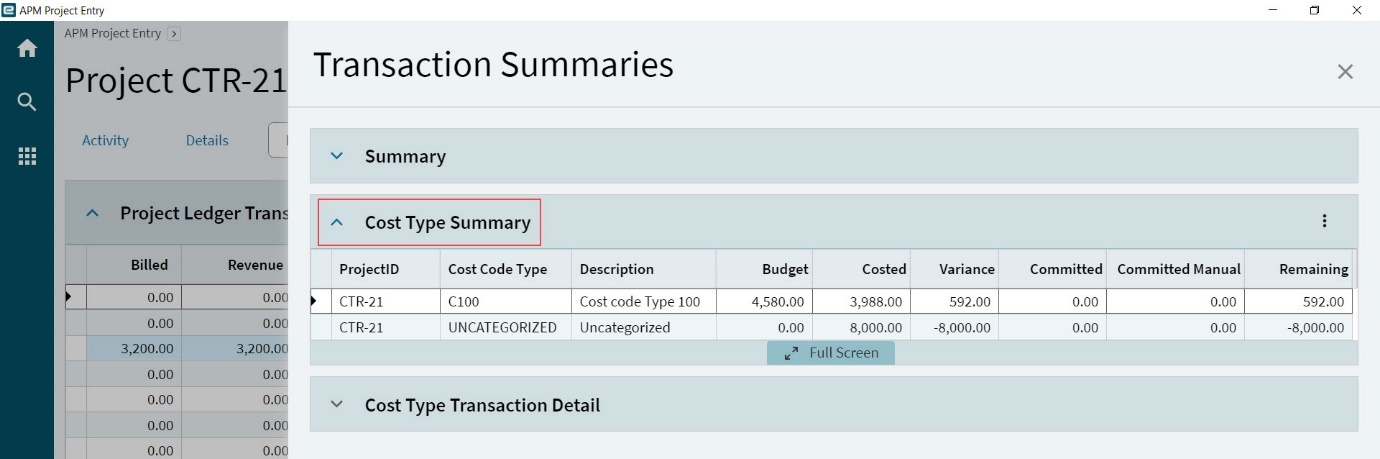
Cost Type Transaction Detail
The Cost Type Transaction Detail card on the Transaction Summaries slide-out displays the full details of all cost type transactions relating to the Project and Contract.
Transactions displayed relate to Purchase Orders, Labor Costs, Subcontractor and WIP Costs.
The Sum of all Cost Amounts and Cost WIP and the Cost Type Transaction Detail table is equal to the Total Costed.
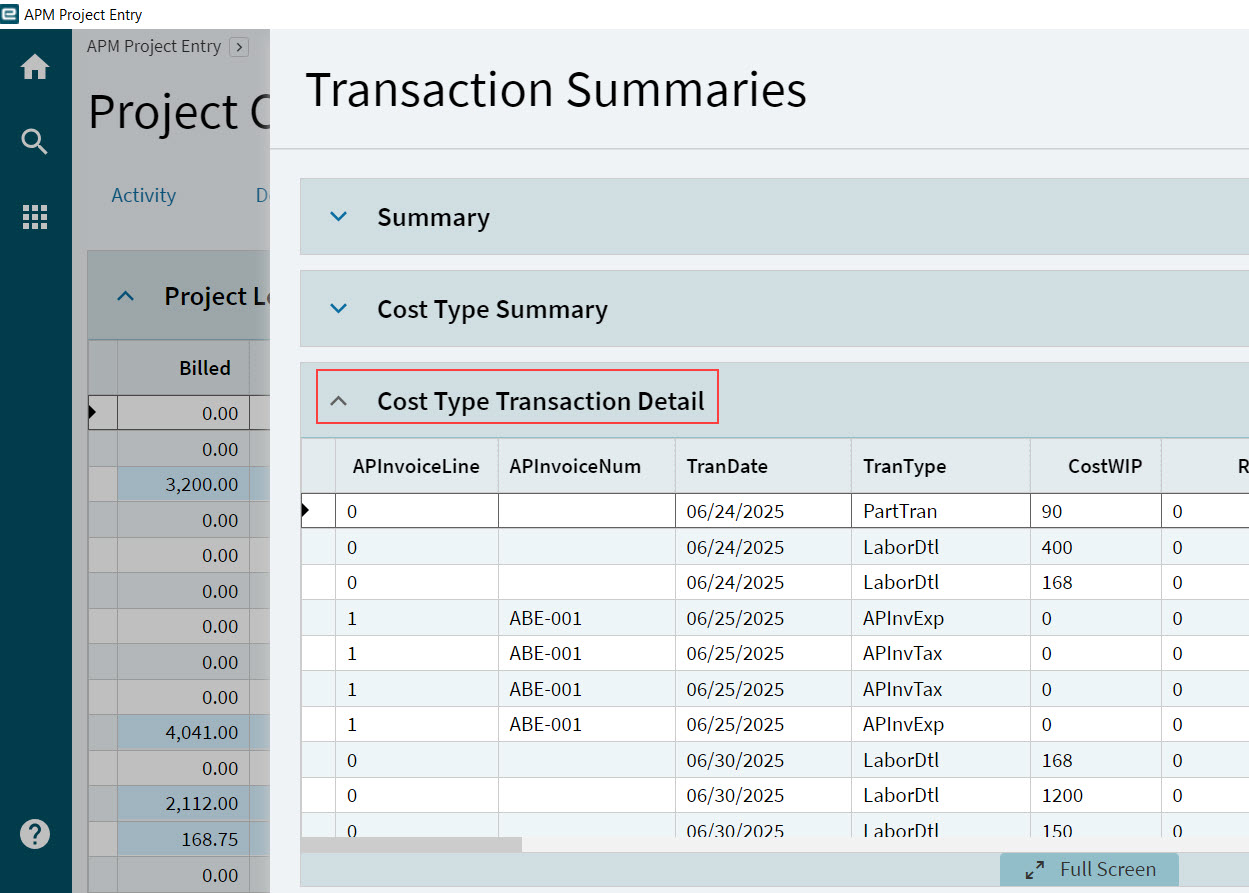
Adding Resources
Employees can be assigned to a Project and assigned various Roles within the Project. An Employee Role can be across the whole Project or restricted to a WBS Phase or a WBS Phase Cost Code.
To add resources:
-
Add Employees to the Resources List.
-
Add to an Employee’s Roles.
Resources List
To add an Employee to a Project’s Resources:
-
Navigate to APM Project Entry and open a project.
-
Select the Resources page.
-
Select Resources List on the Navigation Tree.
-
Select New
on the Resources List toolbar.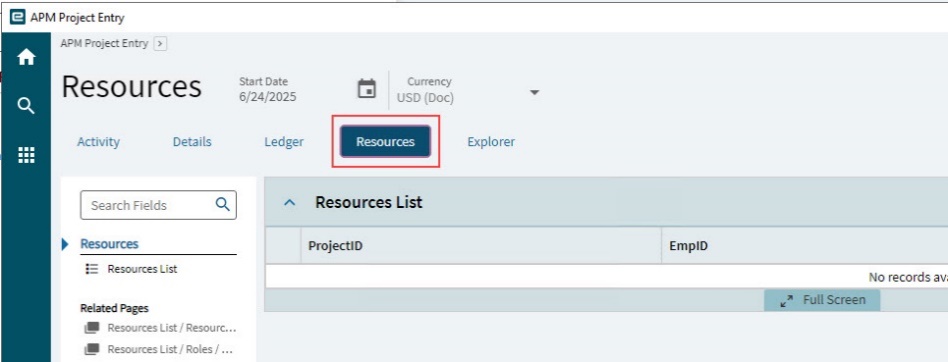
-
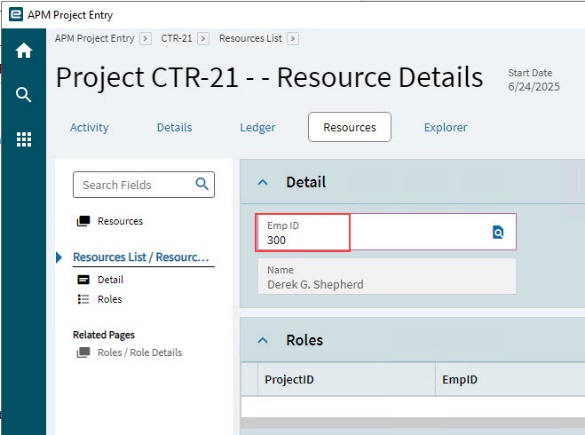
Expand the Resources List card and select New
.The Detail card expands.
-
On the Detail card, search for and select an Emp ID.
-
Select Save
The employee is added as a Resource.
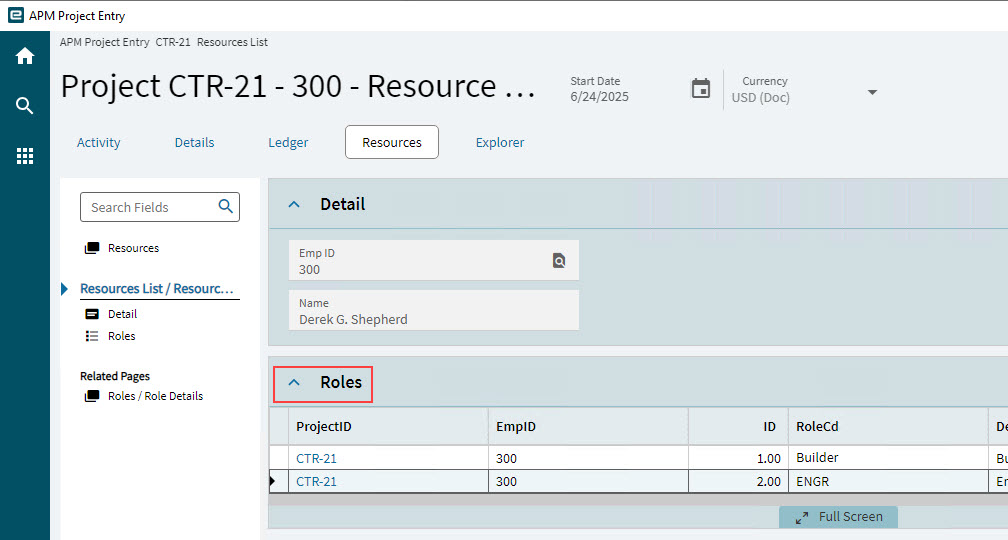
Roles
To add a Role for a Resource.
-
Navigate to APM Project Entry and open a project.
-
Select the Resources page.
-
Select Resources List on the Navigation Tree.
-
Select a Resource in the Resources List (click on the Project ID for that row) to open the Detail card for the employee.
-
Select Roles on the Navigation Tree.
-
Select New
on the Roles toolbar. -
Expand the Roles card and select New
.The Detail card for the role opens, with the Employee Id (Emp ID) already entered.
-
On the Detail card:
-
Select a Role Code.
-
Optionally select a Phase ID.
-
Optionally select a Cost Code.
-
-
Save
.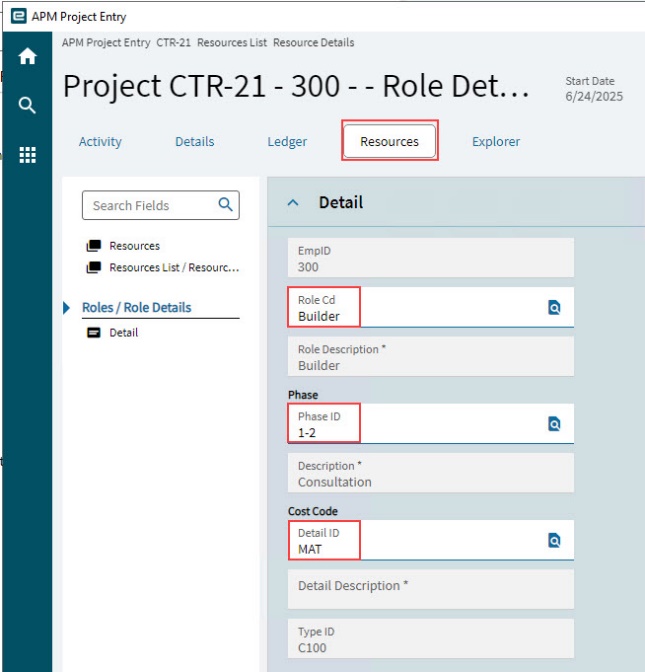
The Role is added for the Resource.
-
Continue to add Roles for the selected resource.