Creating Contracts using Contract Entry
This section describes how to add a contract and set it up so that it is ready for use. Use the Contract Entry application to create a contract to track, organise and manage the Scope, Status, Revisions, Snapshots, Retentions, Value, Contract Deliverables, and Milestones, to ensure completion within a defined scope, timeframe, and budget.
Contract Management is a specialised solution designed for the management of contracts, billing, and deliverables.
A contract is created to hold details of a quote/work secured and it can be created for the Quotation/Tender stage and the Operations stage until such time as the contract is terminated or ended.
Contract Entry also holds the billing information of a contract.
Adding New Contracts
Add a new contract directly into Contract Entry. Contracts can also be duplicated.
If you are tracking changes to your contract, you can take a baseline snapshot when your new contract has been added. See Creating a Snapshot.
| To add a contract using a contract template, you can either select a contract template from the Contract Template drop-down list in the New Contract slide-out panel, or you can select a Contract Type that is already predefined to use a contract template. If using the latter, there could be limits on what is copied from the template, based on selections made in the relevant section of the Contract Type: see Contract Creation - Template Functionality. Note that you can also use a Contract Type that does not have its own Contract Template. |
Adding a New Contract
To add a new contract:
-
Navigate to Contract Entry (Advanced Project Management > Contract Management > General Operations > Contract Entry).
-
Select New
 on the Standard toolbar.
The New Contract panel slides out.
-
Add the details for the new contract.
-
Select a Contract Type from the drop-down list.
-
If using a template, search for and select a Contract Template.
-
If using an existing quote, search for and select a From CRM Quote. This will populate From CRM Quote and Customer.
-
Search for and select a Customer if this field is empty.
-
Optionally enter a Contract Number. If Contract Number Generation is in place, then a contract number is automatically assigned.
-
Enter a Description.
-
Optionally type in a Contract Reference.
-
Optionally select a Planned Start Date and Planned End Date.
-
To create a linked CRM Quote, select the Create Linked CRM Quote check box.
-
Select a Sync Mode (Manual or Automatic-Full).
-
To create a linked project, select the Create Linked Project check box. This requires a Planned End Date so that the job can be released.
-
Click Create.
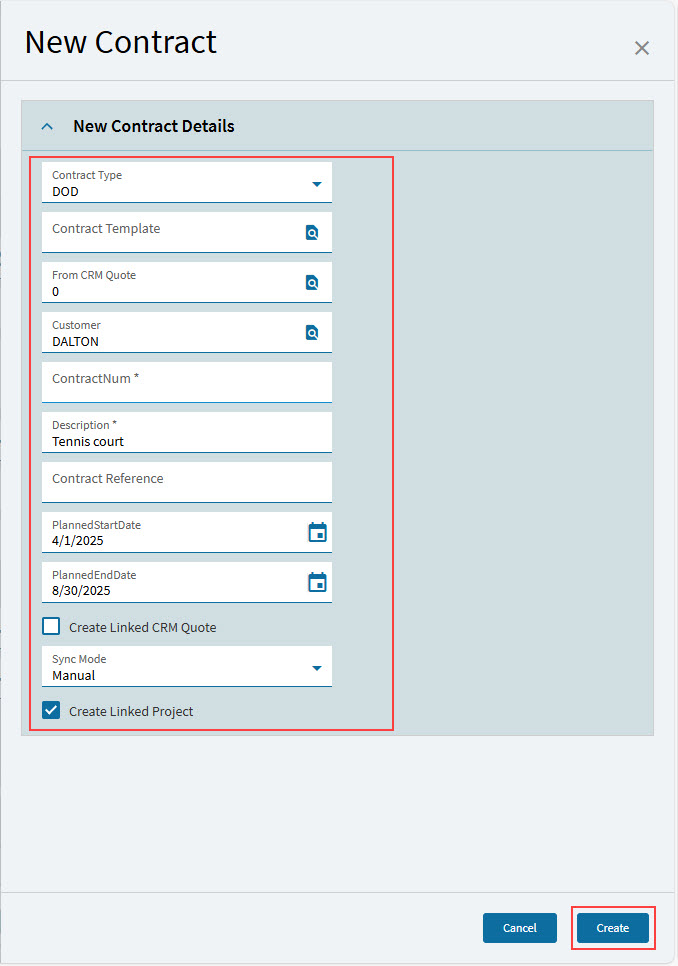
A new contract is created, populated with the captured fields as well as default values.
-
-
Add the remaining contract details. See Updating the Contract Details Page.
Duplicating a Contract
To create an identical copy of a contract:
-
Navigate to Contract Entry (Advanced Project Management > Contract Management > General Operations > Contract Entry).
-
Search for and open the contract to duplicate.
-
From the Overflow
 menu, select Duplicate Contract.
The Duplicate Contract panel slides out.
-
In the Duplicate Contract panel:
-
Optionally type in a New Contract ID. This will be added automatically if you don’t add one.
-
Optionally update the Description.
-
Select a Start Date.
-
Optionally select Include Inactive Line Items.
-
Click Duplicate Contract.
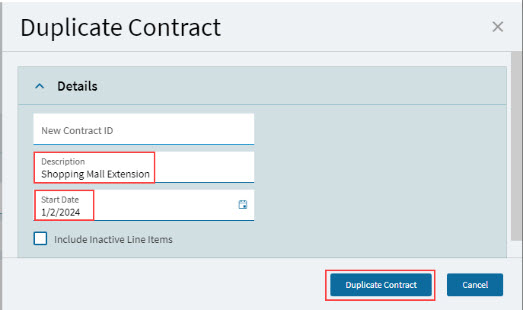
The duplicate contract is created with the original contract details retained.
-
-
Update the new contract to suit your specifications, as you would with any new contract (see Adding a New Contract).
Updating the Contract Details Page
The main details of the contract are captured and viewed on this page. Capture as follows:
-
Add the Contract Details. See Adding Contract Detail.
-
Enter or update any Contract Defaults. See Updating Defaults.
-
Review the default claim configuration and, if necessary, add more Claim Configurations. See Adding Claim Configurations.
-
Add one or more Contract Lines. See Adding Contract Lines.
-
Add one or more Contract Line Items. See Adding Contract Line Items.
-
Add Price Change Plans. See Adding and Processing Price Change Plans.
-
Add GL Controls. See Adding Contract Entity GLCs.
-
Add Rates, Markups and Price Lists if using the Rates Billing Type.
-
Save the contract by clicking Save on the context menu.
Adding Contract Detail
-
On the Detail page, expand the Contract Detail card. Enter or update the following details. Note that some of the fields are already captured or entered by default.
-
Enter a Description, Contract Reference, Planned Start Date and Planned End Date.
-
Type in a Customer name or click on the search button to search for the customer. When you tab out of the Customer field, customer details are populated from the customer record. Select Attention from the drop-down list.
-
Under Classifications, optionally select a Contract Type from the drop-down list if there is not already one selected.
-
Select a Tax Liability from the drop-down list.
-
Select Save
 on the Standard toolbar.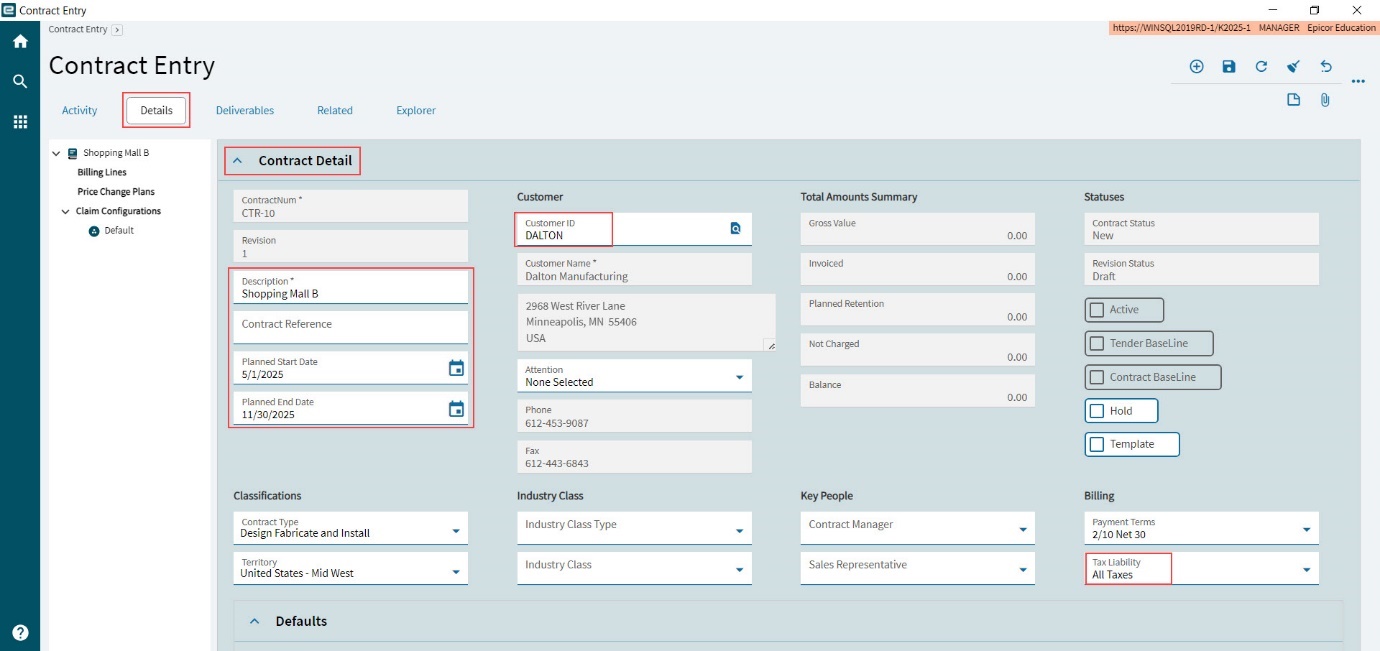
Updating Defaults
To view or edit the Contract Defaults, expand the Defaults card, which is within the Contract Detail card.
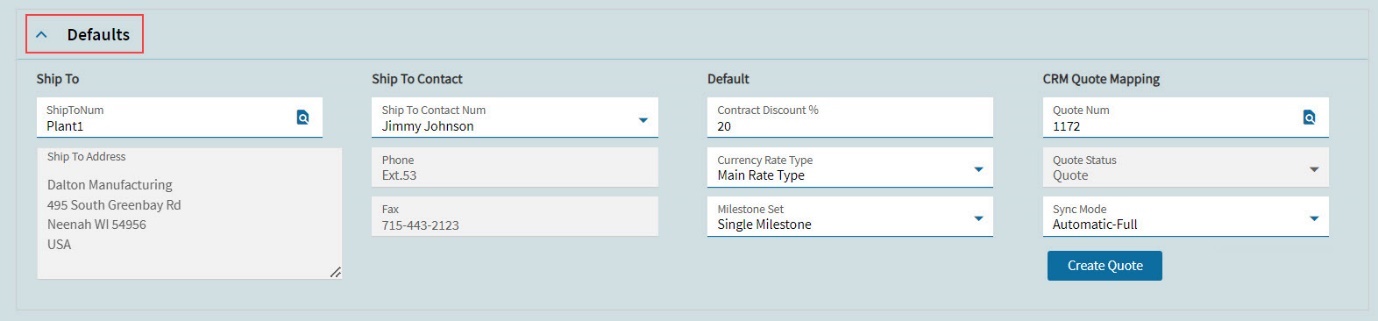
The Contract Defaults are brought into the contract from the Contract Types (if selected), the Company settings, and the Customer.
Some of the defaults can be updated in this sheet. Some defaults flow into the Contract Line Items, where they can be updated. Other defaults flow into the Contract Claim Lines.
Ship To and Ship To Contact
The selected Ship To values are used as the default Ship To details in a contract line, where they can be overridden.
-
Select a Ship To for the Customer. The Ship To Address field updates, and the list of Ship To Contact Num updates.
-
Select Ship To Contact Num from the list of contacts for the selected Ship To. The Phone and Fax numbers update accordingly.
Default
-
The Contract Discount % is applied as the default Discount % for contract line items.
-
Currency Rate Type defaults from the Company General rate type. Rate types store the conversion rules the system applies against all possible source and target currency pairs available in your company.
-
Milestone Set defaults from the selected Contract Type. Select a new Milestone Set, if required.
For a new Contract Line item, with Progress Billing Type selected, this is used as the default Milestone Set. This includes contract line items that are created from a Sales Order, which all have the Progress billing type.
CRM Quote Mapping
If the contract header is linked to a quote, the quote details appear here. You can also add a new quote from here. Either search for an existing quote from the Quote Num search box or select a Sync Mode and create a new quote by clicking on Create Quote.
Each new contract line item is given this quote number, and each new line item is added to the quote as a new line item.
| Other defaults that flow into Contract Line Items are set up in Claim Configurations. |
Adding Claim Configurations
Claim Configurations can be set up for contracts, to define contract claiming for the contract line items. Each contract also has a Default Claim Configuration. A contract’s claim configurations cannot be used by another contract.
To add a new Claim Configuration to a contract:
-
Open the Details page.
-
Select Claim Configurations on the Navigation Tree.
-
Select New Contract Claim Config
on the Standard toolbar. -
Expand the Custom Claim Configuration Details card.
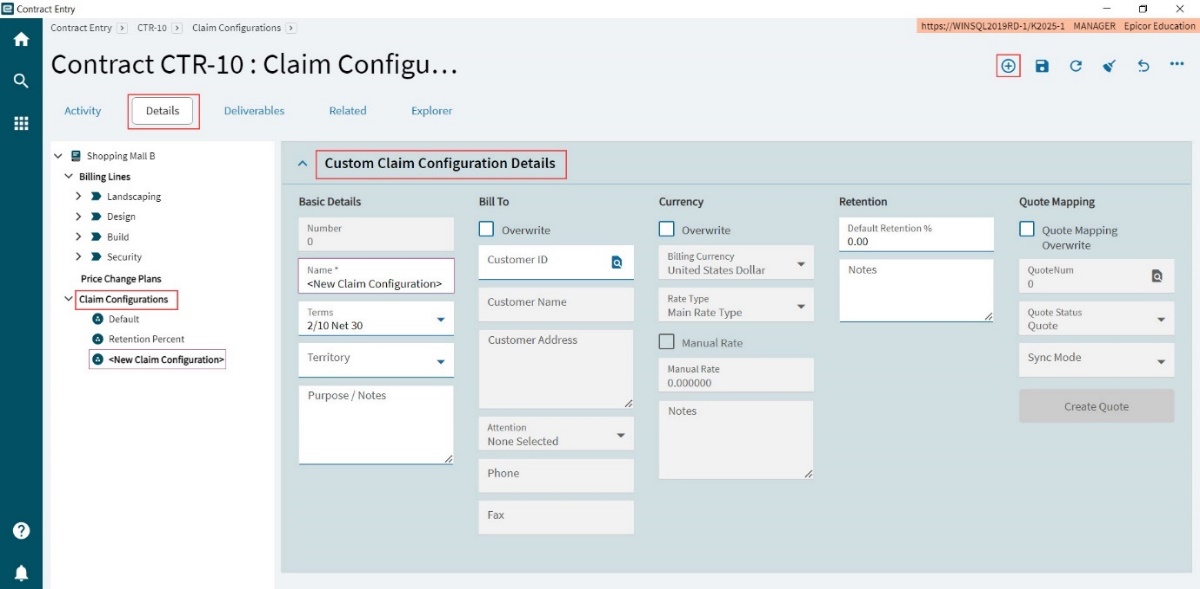
A Claim Configuration row appears on the Navigation Tree.
-
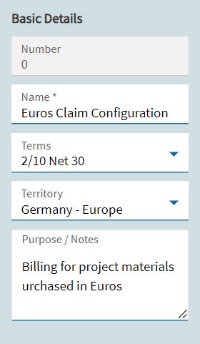
Complete the Basic Details section:
Basic Details
- Name
-
Give the claim configuration a descriptive name.
- Terms
-
Optionally select different payment terms from the drop-down. This is used as the Payment Terms or contract claims using this claim configuration.
- Territory
-
Select a territory from the drop-down list.
- Purpose/Notes
-
Use the comment box to describe what this claim configuration is intended for.
-
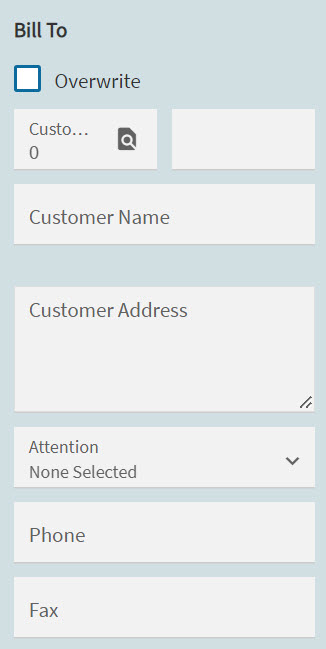
Update the Bill To section, if you want to use a different Bill To customer for this claim configuration.
Bill To
-
Select the Overwrite check box. This enables the Bill To fields.
-
Select a different Customer and Attn. If you keep the Overwrite check box selected, then contract claims using this claim configuration will bill the claim to the selected Customer.
-
-
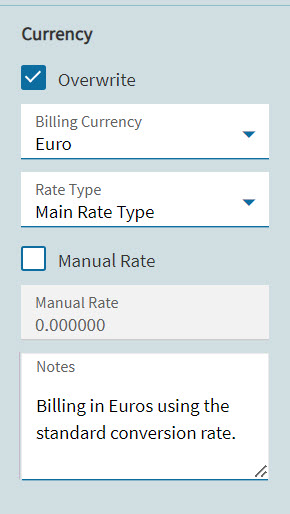
Update the Currency section to customize currency details in the contract line items and contract claims using this claim configuration.
Currency
-
Select the Overwrite check box.
-
Optionally select a different Billing Currency from the drop-down list.
-
Optionally select a different Rate Type from the drop-down list.
-
To set a manual exchange rate, select the Manual Rate check box, then enter an exchange rate value in the Rate edit box.
-
Capture notes relating to the currency settings in the Notes comment box.
-
-
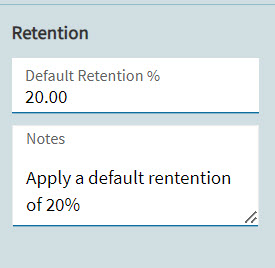
Optionally enter a Default Retention % and write a note explaining the retention percent in the Notes comment box.
Retention
-
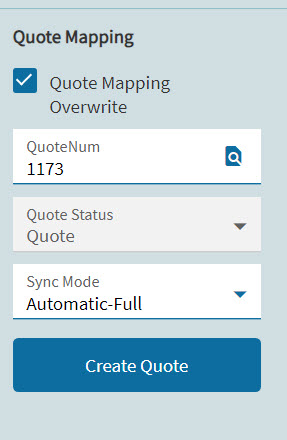
Optionally add a new quote in the Quote Mapping section. Contract line items that use this configuraion will map to the quote used here.
Quote Mapping
-
Select the Quote Mapping Overwrite check box.
-
Select the Automatic-Full Sync Mode to sync claim line items to the quote automatically. Otherwise select Manual.
-
Click Create Quote.
-
Click Create Quote.
A new quote is created and linked to the claim configuration. The quote number appears in the Quote Num search box.
-
Alternatively, select an existing quote using the Quote Num search box.
-
-
-
Select Save
on the Standard toolbar.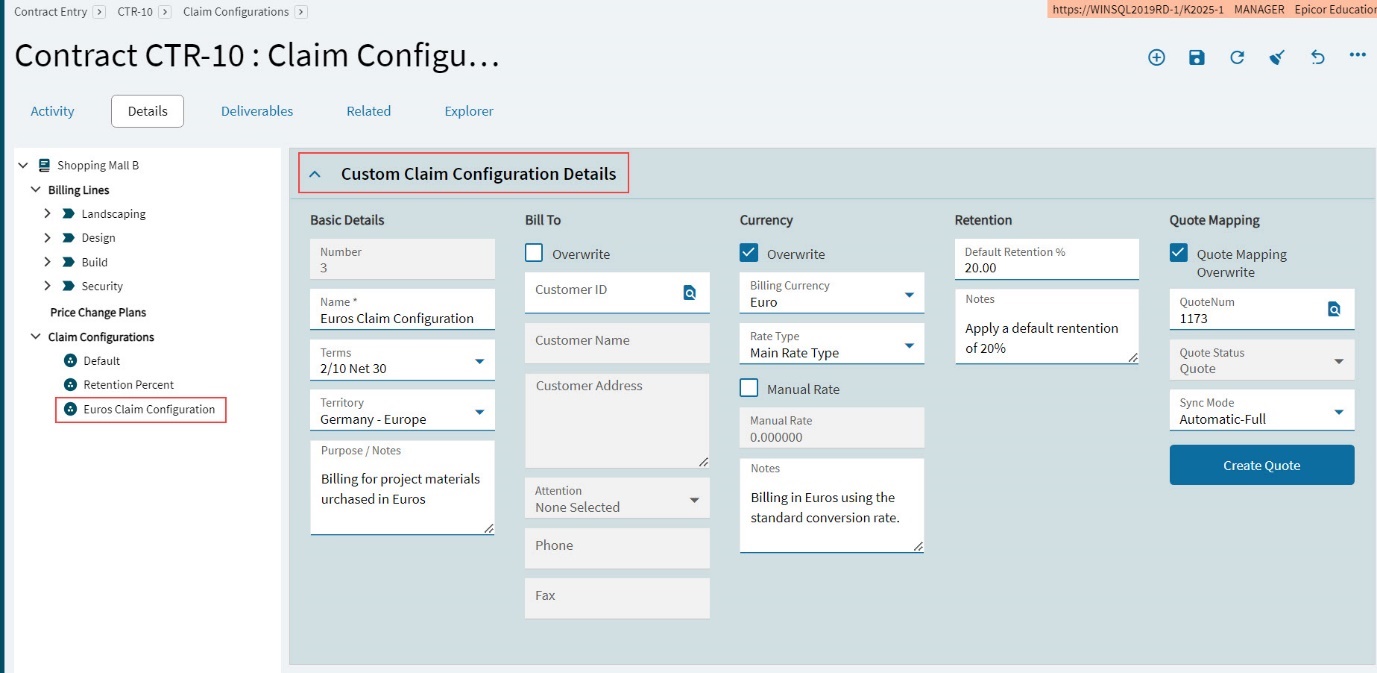
The new claim configuration is saved and appears on the Navigation Tree under the Claim Configuration node.
The claim configuration can now be used for any of the contract line items. Once a claim configuration has been set for a contract line item, it will update certain fields on the contract line item and will affect how the contract line item is claimed.
Default Claim Configuration
The Default Claim Configuration is available for each new contract. To view the Default Claim Configuration, open the Details page, then select the Default claim configuration below Claim Configurations on the Navigation Tree. Expand the Custom Claim Configuration Details card.
The Default Claim Configuration is read-only, and the values are derived from the Contract Type and other defaults.
Editing Claim Configurations
To edit a claim configuration:
-
Open the Details page and select the claim configuration node on the Navigation Tree.
-
Update the claim configuration (see Adding Claim Configurations).
-
Select Save
on the Standard toolbar.
Adding Contract Lines
You can add a new contract line, as described below, or you can duplicate an existing contract line. See Duplicating a Contract Line.
To add a new contract line:
-
Open the Details page. Select Billing Lines on the Navigation Tree.
-
Select New Contract Line
on the standard menu bar.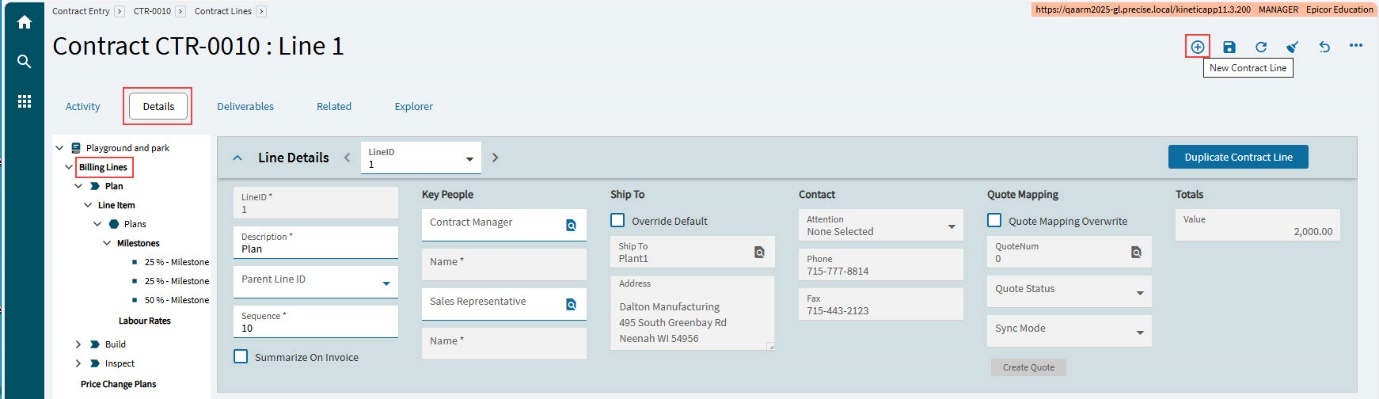
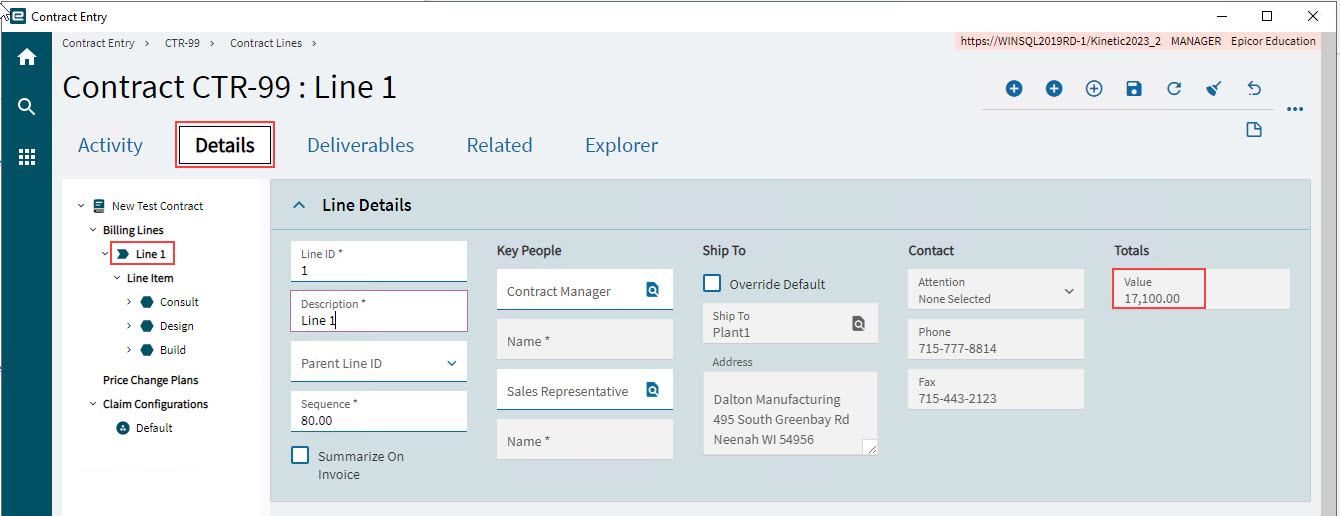
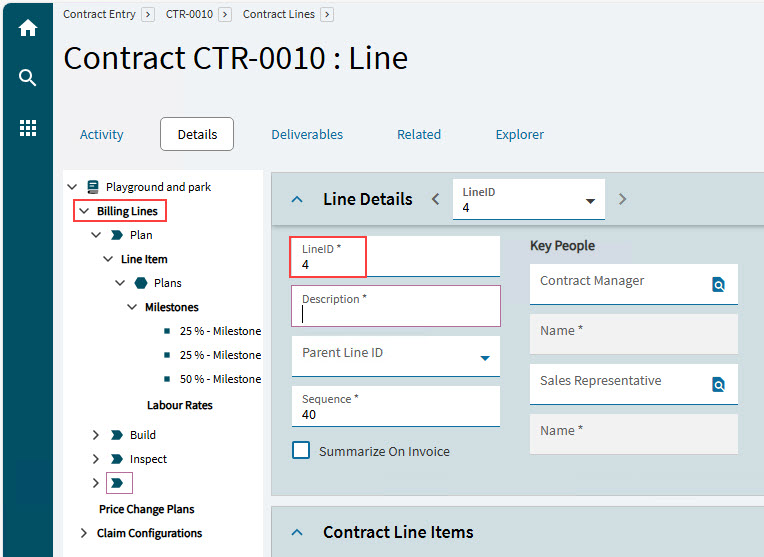
The new Contract Line appears in the Line Details card.
-
Capture the contract line details on the Line Details card.
-
Type in a Description.
-
Select a Parent Line if you want a hierarchy of contract lines. The hierarchy appears in the tree view on the left and is used for organising contract lines.
-
To reorder the contract lines, update the Sequence.
-
For all line items for the contract line to be summarized as a single line on the printed invoice, select Summarize on Invoice.
-
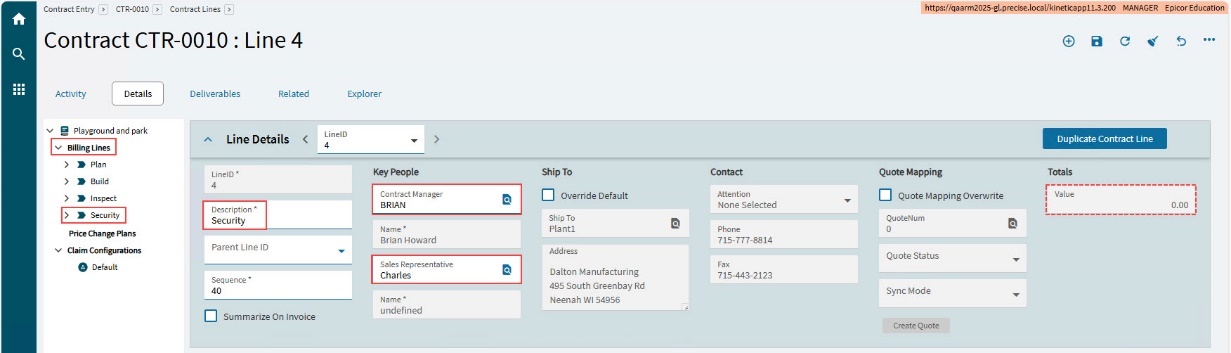
Optionally select a Contract Manager and a Sales Representative specifically for the contract line. These can also be captured in the contract header, for all contract lines. Note that you need to add people to the Workforce before you can select them as a Contract Manager or Sales Representative. See Workforce.
-
Select Override Ship To, to select alternative Contact details specifically for the contract line (see Updating Defaults).
-
Select Save
on the Standard toolbar.Note that the Totals Value is currently equal to 0.00.
-
-
Continue to add Contract lines in this way. Alternatively, you can click the New
button on the standard tool bar while the Line Details card is expanded, to add a new Contract Line.
Duplicating a Contract Line
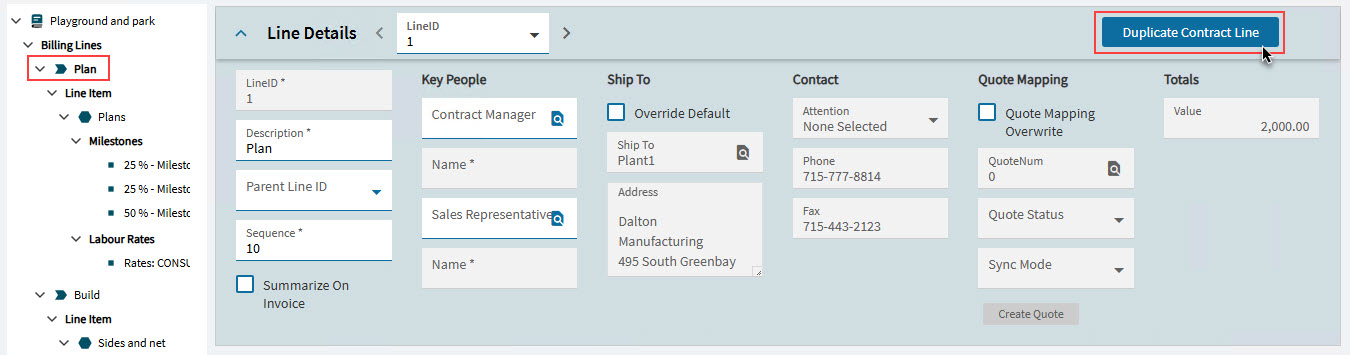
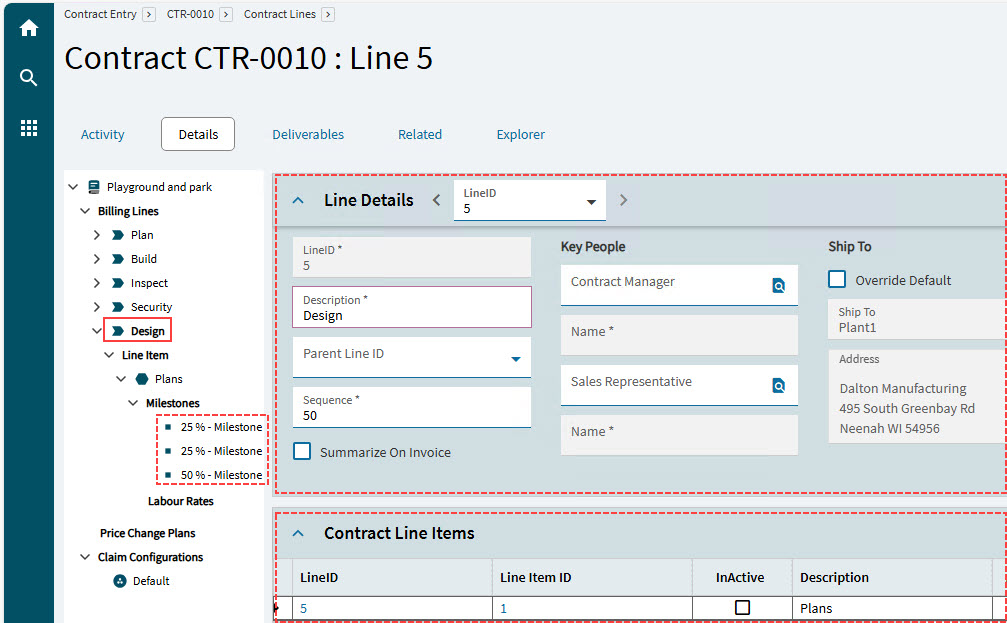
If you duplicate a contract line, you will get a copy of all details of that contract line, including all of its Contract Line Items with their respective Milestones.
To duplicate a contract line:
-
Open the contract line to duplicate.
-
Click Duplicate Contract Line, in the top right corner of the card.
-
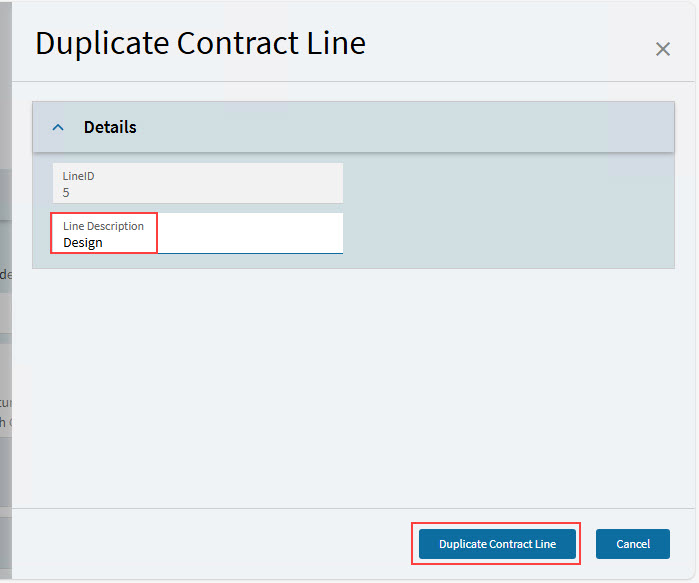
On the Duplicate Contract Line slide-out panel, enter a Line Description then click Duplicate Contract Line.
The duplicate contract line appears under its new Description at the bottom of the Billing Lines on the Navigation Tree. The line items and milestones are also duplicated.
-
Review and update the contract line, line items, and milestones, making any necessary updates. If the contract is already linked to a project, click Sync to Project to map the new contract line items to the project.
Adding Contract Line Items
A contract line item represents an item that is to be completed for the customer, and which will make up a single billable item when a contract claim is created. Each contract line item has its own billing type, and each billing type has specific fields that need to be captured. The Billing Type defaults to the selected Contract Type’s Billing Type.
| After saving a contract line item, you can change the contract line item’s Billing Type, providing you do this before it is linked to a claim. |
To create a contract line item:
-
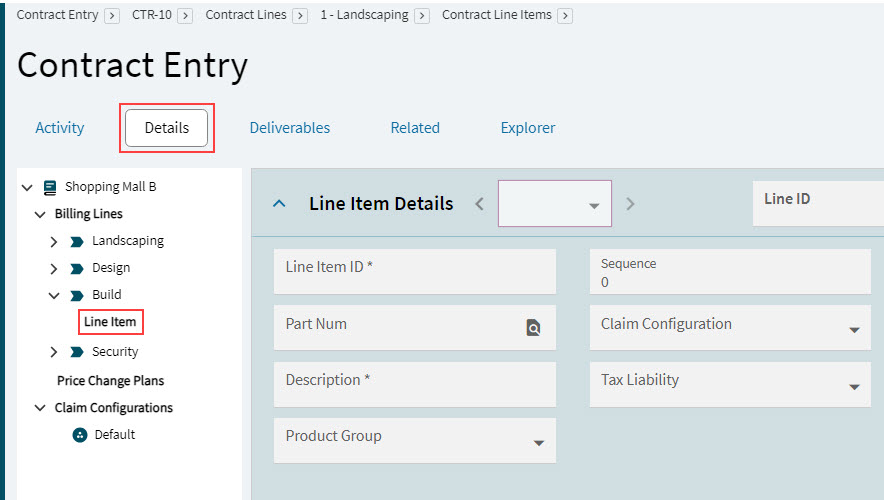
Expand a Billing Line on the Navigation Tree and select Line Item beneath this node.
-
Select New
on the Standard toolbar.The Line Items Details card expands, populated with any defaults.
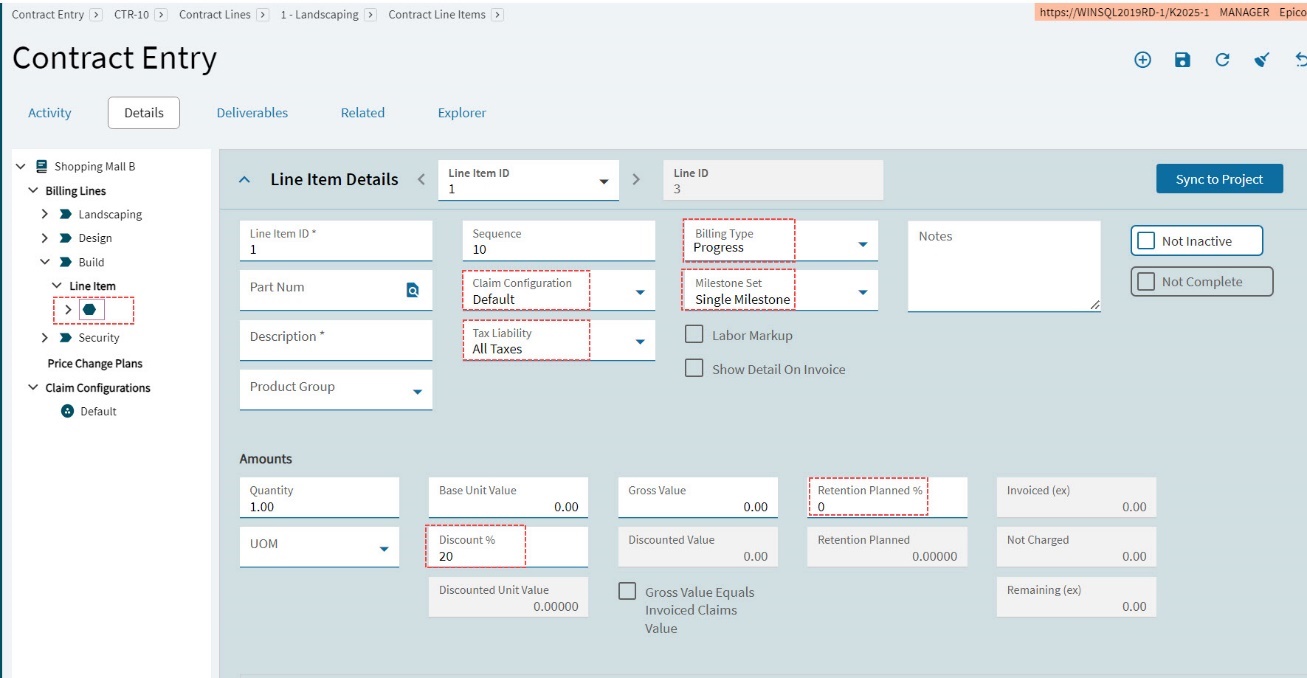
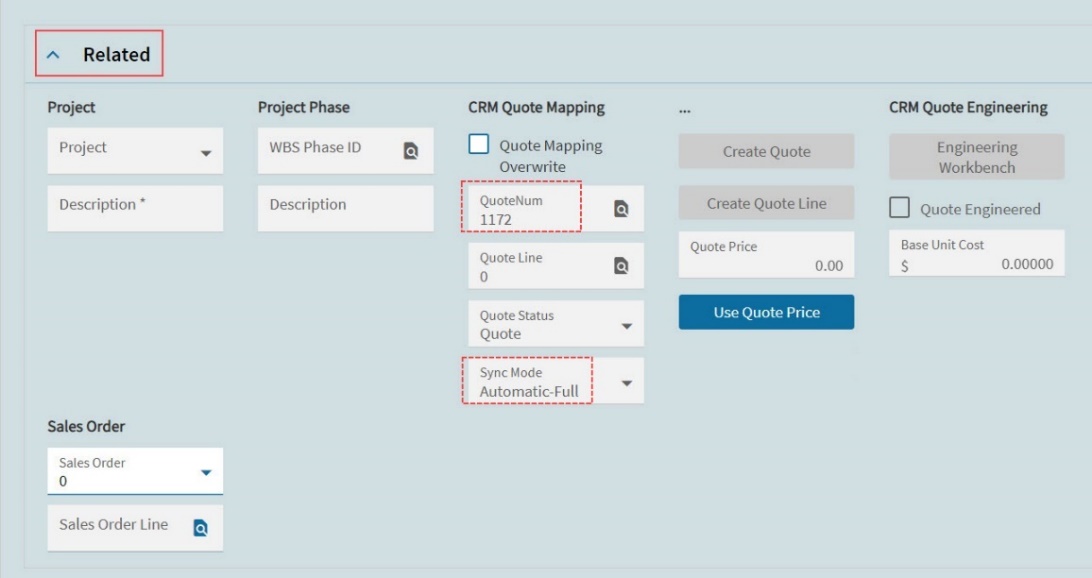
Included in the Line Item Details is the Related section.
-
Update the contract line item, following separate instructions depending on which Billing Type you select:
After saving a contract line item, you can change the contract line item’s Billing Type and Milestone Set, providing you do this before it is linked to a claim. -
If the contract is already linked to a project, click Sync to Project to map the new contract line item to the project.
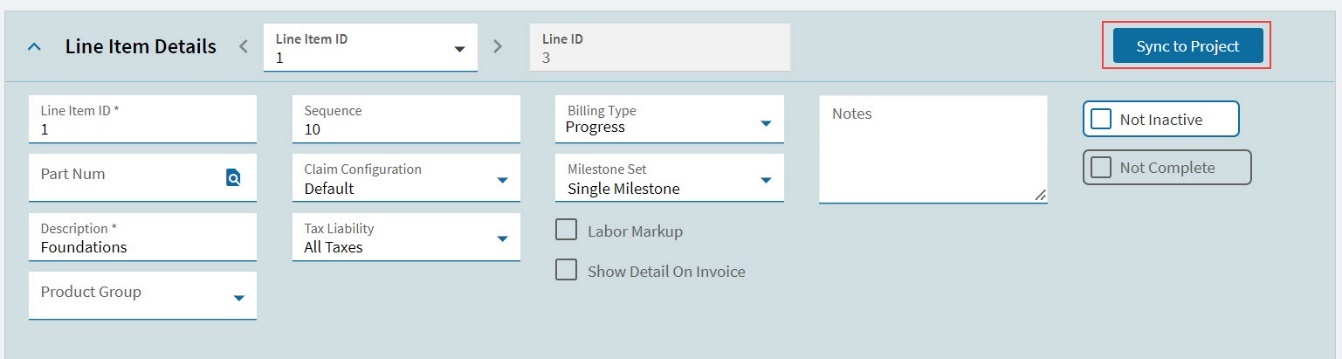
The new contract line item appears in a node below its contract line, on the Navigation Tree.
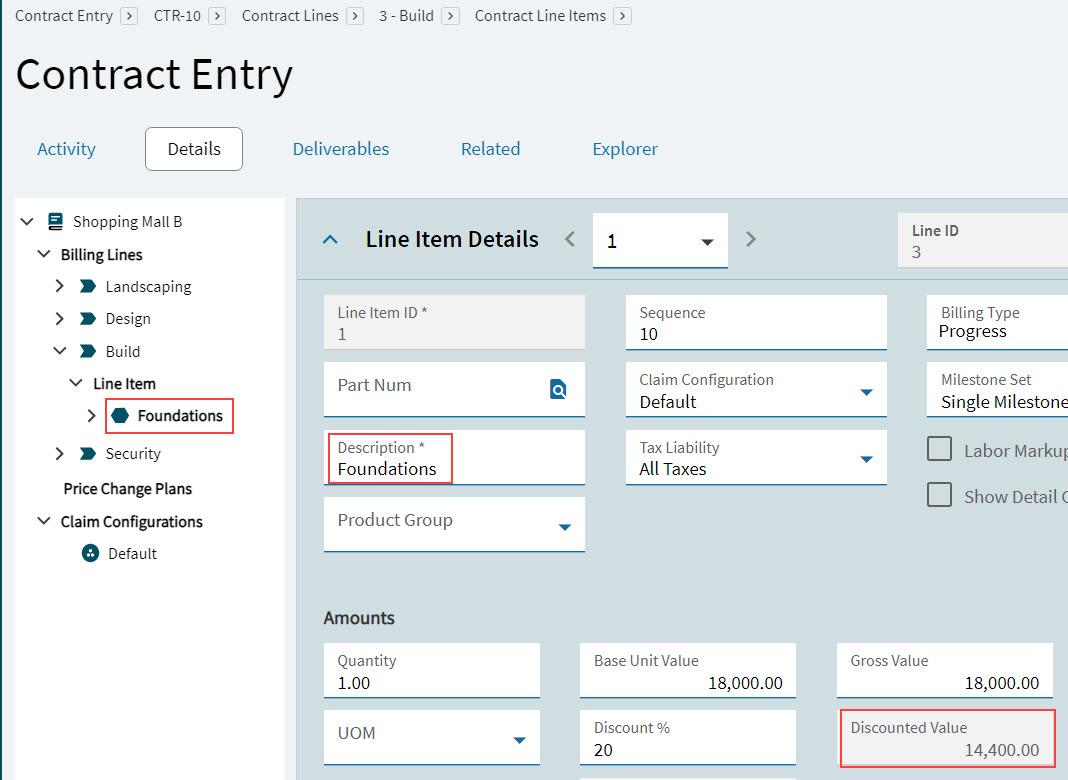
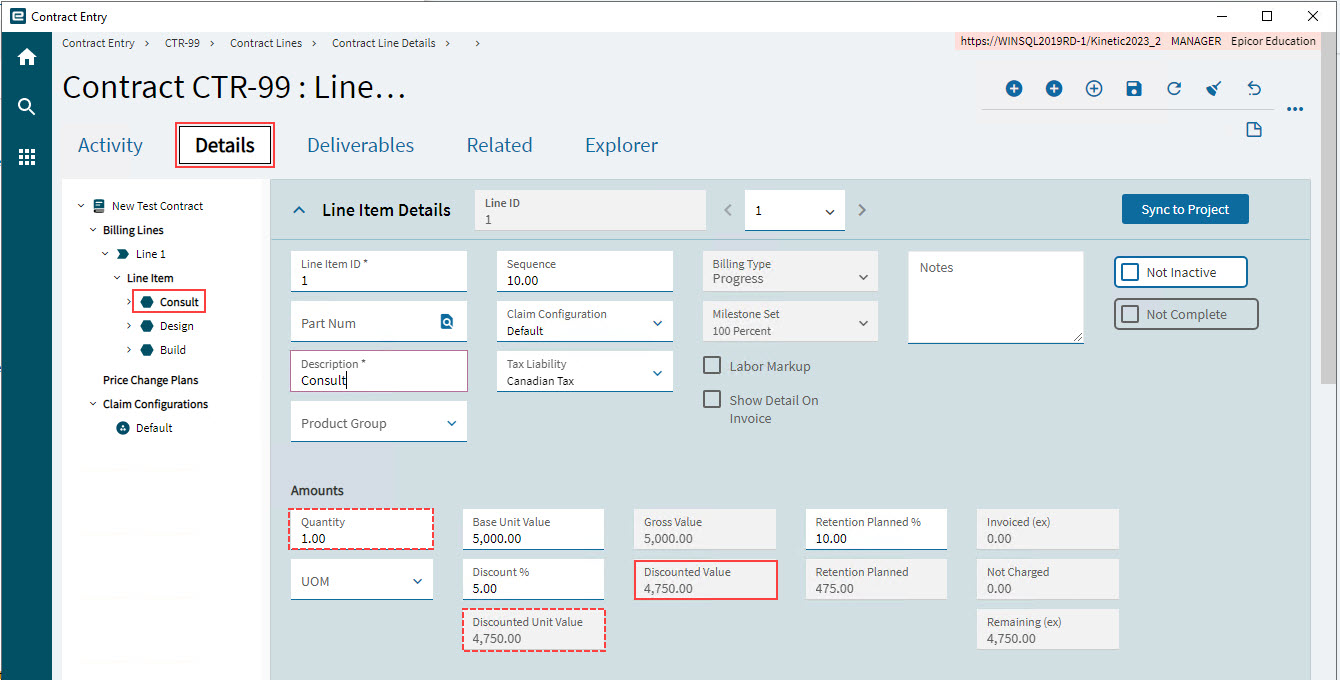
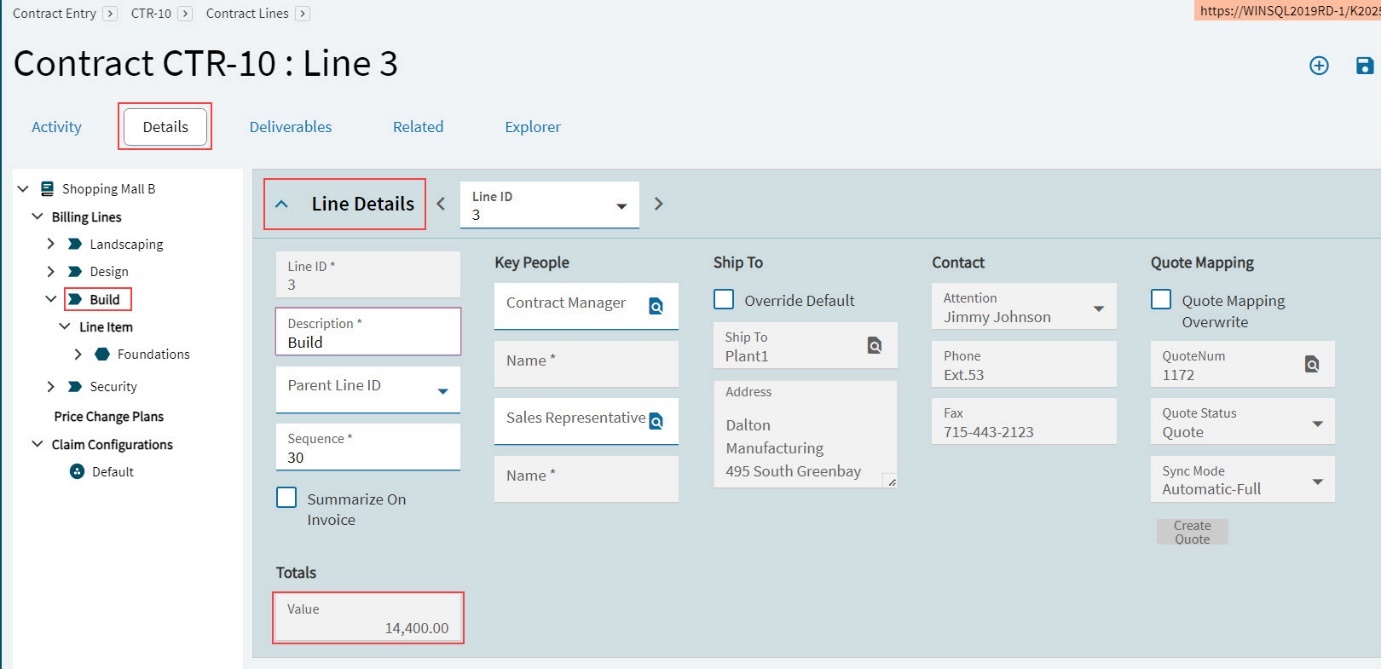
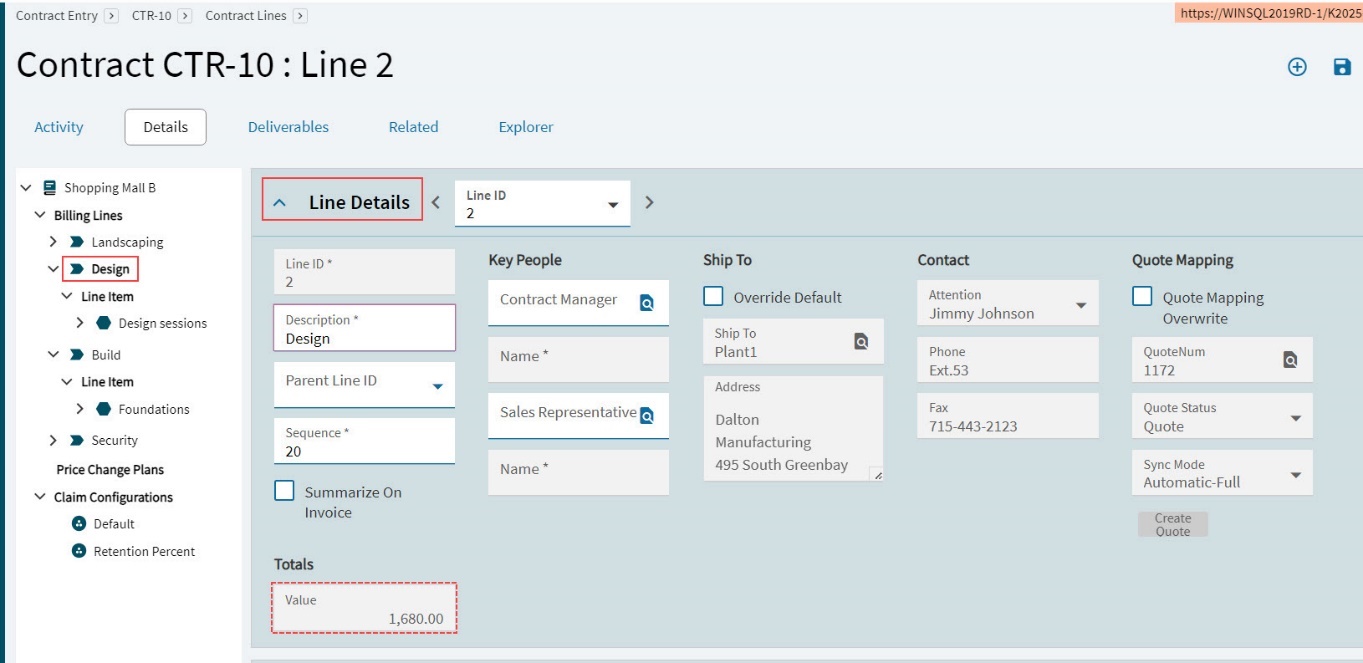
Each time a new contract line item is added, the Totals for the contract line include the new value for the contract line item (Remaining Value). Totals is the sum of the Discounted Value of all contract line items belonging to the contract line.
See also: Creating Contract Lines and Line Items from Sales Order and Adding a Quote to a Contract (where quote lines are added as contract lines and line items).
Editing Line Item Details
-
Edit the line item details according to the Billing Type you will select for the Contract Line Item.
Progress Billing Type
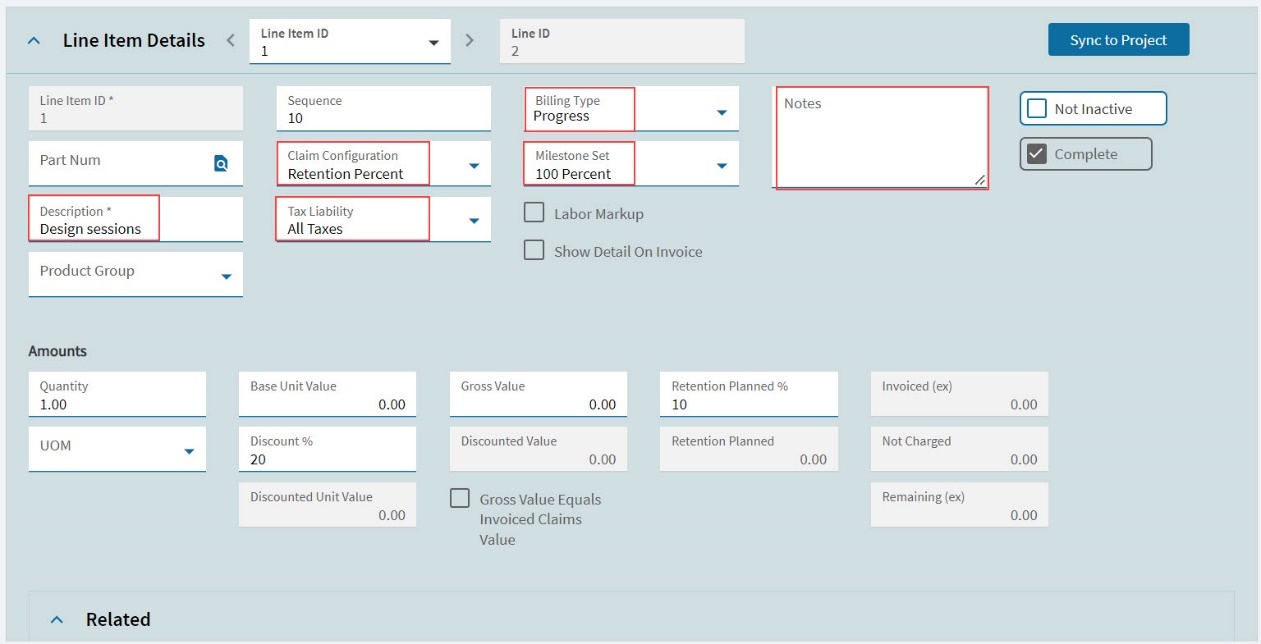
For a Progress Billing Type contract line item:
-
Optionally select a Part Num, or type in a name if the part does not exist in Part Maintenance.
-
Type in a Description. If you select a Part in the Part Num section, this will be overwritten by the part’s description.
-
Optionally select a Product Group.
-
Keep the Default Claim Configuration or select a custom Claim Configuration from the drop-down list (see Selecting a Claim Configuration).
-
The Tax Liability selection defaults from the Contract Defaults (see Updating Defaults). Update for this contract line item, if required.
-
Select the Progress Billing Type.
-
Select a Milestone Set from the drop-down list, if different from the contract type default.
The milestones from the milestone set affect how the contract line item can be claimed and invoiced.
Ensure that you have an appropriate Milestone Set available for your contract. See Milestone Set. -
Type in Notes with any special instructions or comments, if required.
-
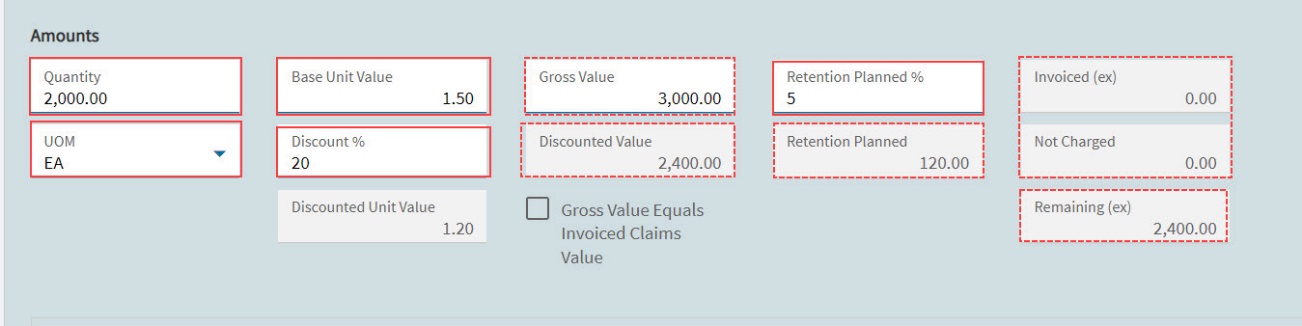
Update the Amounts section.
Updating the Amounts Section:
-
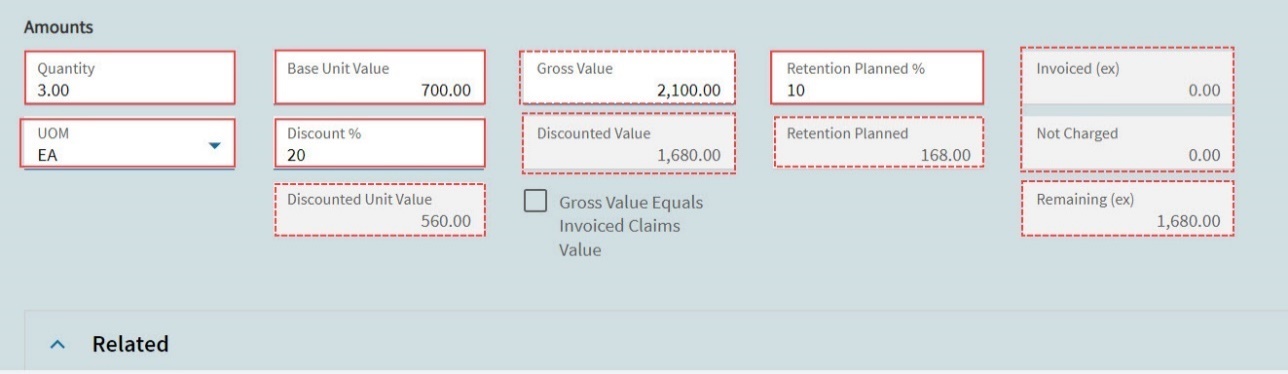
Enter a Quantity and select a UOM (Unit of Measure).
-
The Base Unit Value defaults to the Sales Unit Price for the Part, if available. Update this if necessary.
-
The Discount % uses the contract’s default Contract Discount %. Update this if necessary.
-
Select Save
on the Standard toolbar. -
The Retention Planned % percent is from the selected Claim Configuration. Update this value if necessary.
When the Contract Line Item appears in a Contract Claim, this is the Planned Retention percent (displayed in Total Contract Amounts) used for the Contract Claim Line Item.
The Amounts section is updated, with the Remaining (ex) showing the Discounted Value less Invoiced (ex) less Not Charged (ex).
-
The Discounted Value for each Contract Line Item rolls up to the Total - Value for each Contract Line. See Discounted Value on Contract Line Item.
Quantity Billing Type
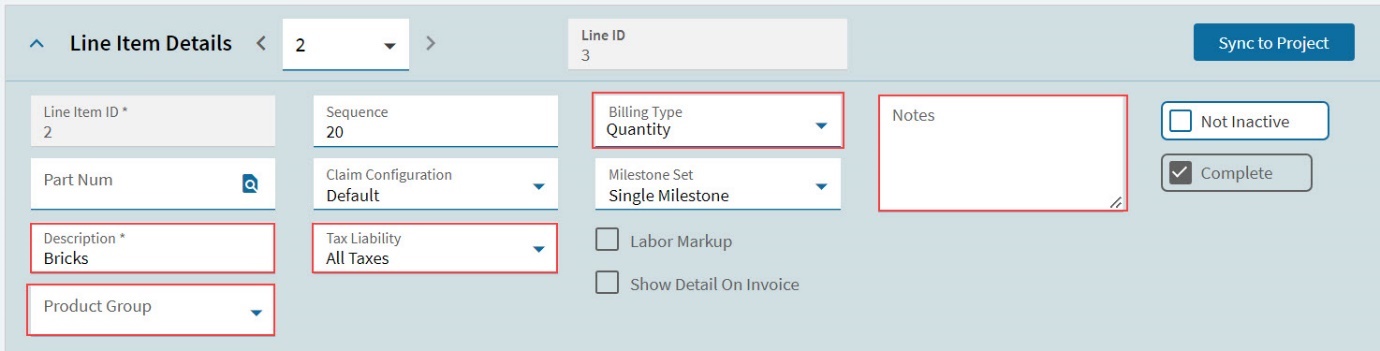
For a Quantity Billing Type contract line item:
-
Optionally select a Part Num, or type in a name if the part does not exist in Part Maintenance.
-
Type in a Description. If you select a Part in the Part Num section, this will be overwritten by the part’s description.
-
Optionally select a Product Group.
-
Select a Tax Liability.
-
Keep the Default Claim Configuration or select a custom Claim Configuration from the drop-down list (see Selecting a Claim Configuration) .
-
The Tax Liability defaults from the Contract Defaults (see Updating Defaults). Update for this contract line item, if required.
-
Select the Quantity Billing Type.
-
Type in Notes with any special instructions or comments, if required.
-
Update the Amounts section.
Updating the Amounts Section:
-
Enter a Quantity and UOM (Unit of Measure).
-
The Base Unit Value defaults to the Sales Unit Price. Update this if necessary.
-
The Discount % uses the contract’s default Contract Discount %. Update this if necessary.
-
The Retention Planned % percent defaults from the selected Claim Configuration. Update this value if necessary.
When the Contract Line Item appears in a Contract Claim, this is the Planned Retention percent used for the Contract Claim line Item. It defines the amount held back by the customer until specific conditions are met.
-
Select Save
on the Standard toolbar.The Amounts section is updated, with the Remaining (ex) showing the Discounted Value less Invoiced (ex) less Not Charged (ex).
-
Rates Billing Type
| Ensure that Rates are defined for the contract, contract line, or contract line item. See step 9, below. |
-
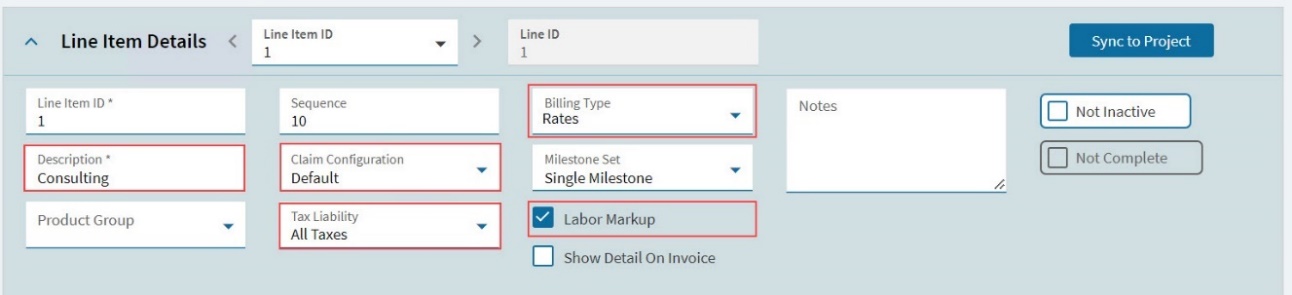
Select the Rates Billing Type. The Part Num field is removed.
-
Type in a Description.
-
Optionally select a Product Group.
-
Keep the Default Claim Configuration or select a custom Claim Configuration from the drop-down list (see Selecting a Claim Configuration) .
-
The Tax Liability value defaults from the Contract Defaults (see Updating Defaults).
Update for this contract line item, if required.
-
The Labor Markup must be selected (this is selected by default for the Rates billing type).
-
Type in Notes with any special instructions or comments, if required.
-
Update the Amounts section.
Updating the Amounts Section:
-
The Quantity defaults to 1 and the UOM defaults to EA. These are read-only values.
-
Update the Base Unit Value.
-
The Discount % does not apply to Rates billing.
-
Enter a Gross Value.
-
The Retention Planned % percent defaults from the selected Claim Configuration. Update this value if necessary.
When the Contract Line Item appears in a Contract Claim, this is the Planned Retention percent used for the Contract Claim line Item. It defines the amount held back by the customer until specific conditions are met.
-
Select Save
on the Standard toolbar.The Amounts section is updated, with the Remaining (ex) showing the Discounted Value less Invoiced (ex) less Not Charged.

After claims have been processed, the Gross Value Equals Invoiced Claims Value is selected when all claims have been processed and invoiced to the full value displayed in Discounted Value.
-
-
Ensure that Rates are defined for the contract, contract line, or contract line item. See Adding Rates. These could be Labor Rates, Price Lists, or Markups.
Selecting a Claim Configuration
If you have custom Claim Configurations for your contract (see Claim Configurations), you can select from the Claim Configuration drop-down list, replacing the Default Claim Configuration.
In the contract line item, the Base Unit Value and Planned Retention % depend on the Claim Configuration selected.
Base Unit Value
If Currency Overwrite is selected, a new Base Unit Value in the contract line item is calculated, using the exchange rate between the company’s Base Currency (as defined in Currency Master, see note, and the Claim Configuration’s Billing Currency rate (or using a Manual Rate if this is defined in the Claim Configuration). The selected Rate Type conversion rules are applied to the source and target currency pair in the calculation. The calculation is Base Unit Value = Base Unit Value * Rate.
For example, a Base Unit Value of 1.00 in the contract line item is updated to 0.70 if the selected Claim Configuration has a Manual Rate of 0.70. The same Base Unit Value is updated to 0.76 if the selected Claim Configuration has no Manual Rate, and a Billing Currency (Euro) selected with a rate of 0.76 in Currency Master Maintenance.
| For further information, refer to the standard Kinetic Help topics Rate Type Maintenance and Currency Master Maintenance. |
Sync to Project
If the contract is already linked to a project, click Sync to Project to map the new contract line item to the project. A new project WBS Phase is created for the Contract Line Item, and the two are linked.
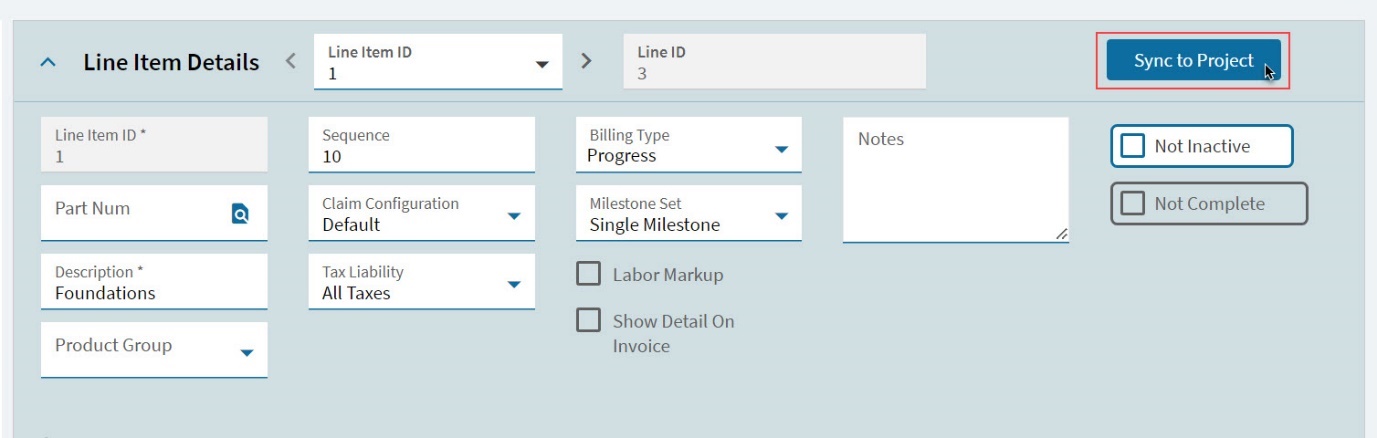
| If the contract has a Contract Type, then project syncing can be done automatically, depending on the rules defined in the contract type, and the contract status. See Contract Maintenance to Project Sync. |
Updating Related for a Contract Line Item
This card, on the Details page for a contract line item, displays project, project phase, sales order, and quote information relating to the contract line item.
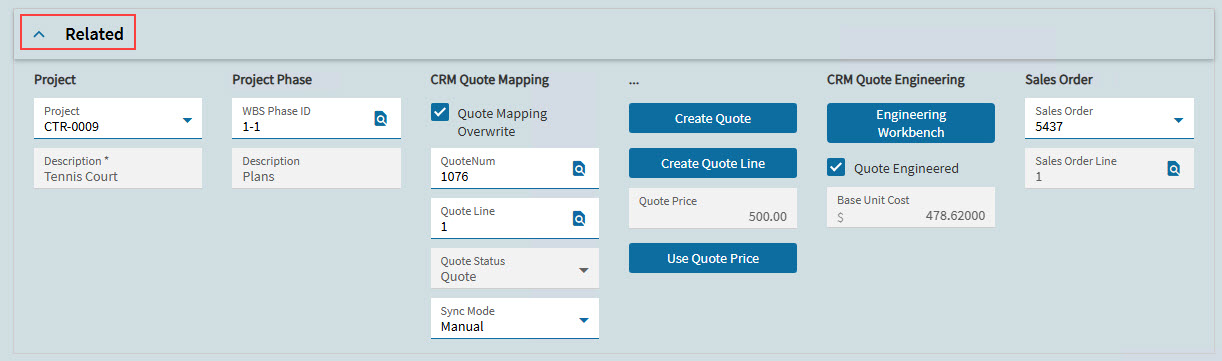
Project
If a project was created from the contract, then this appears as the project here. If there are any other related projects, you can select one of these from a drop-down list.
Project Phase
If a project was created from the contract, then a phase would be created for each contract line item. This is the Project Phase that appears here.
You can select a different Project Phase belonging to the selected Project.
Quote Mapping
If the contract header is linked to a quote, the quote details appear here. Each new contract line item is assigned this quote number, and each new line item is added to the quote as a new line item.
To overwrite the quote mapping:
-
Select Quote Mapping Overwrite.
-
Select a Sync Mode.
-
Choose Automatic-Full to sync automatically when changes are made to a line (for example, Quantities, Discount, UOM) depending on the settings defined in the Contract Maintenance to Quote settings for the Contract Type used. See Contract Maintenance to Quote Sync.
-
If you choose Manual, the line items are not mapped to the quote. The system does not automatically create or update quote line items.
-
-
Click Create Quote.
To create a new line in the quote, using the currently selected contract line item:
-
Select Quote Mapping Overwrite.
-
Select a Sync Mode. This defaults to the value specified in the contract Defaults.
-
Click Create Quote Line.
To map to a different quote line:
-
Select Quote Mapping Overwrite.
-
Search for and accept a different Quote Line.
To use the quote price for the Base Unit Cost:
-
Select Quote Mapping Overwrite.
-
Select Use Quote Price.
CRM Quote Engineering
-
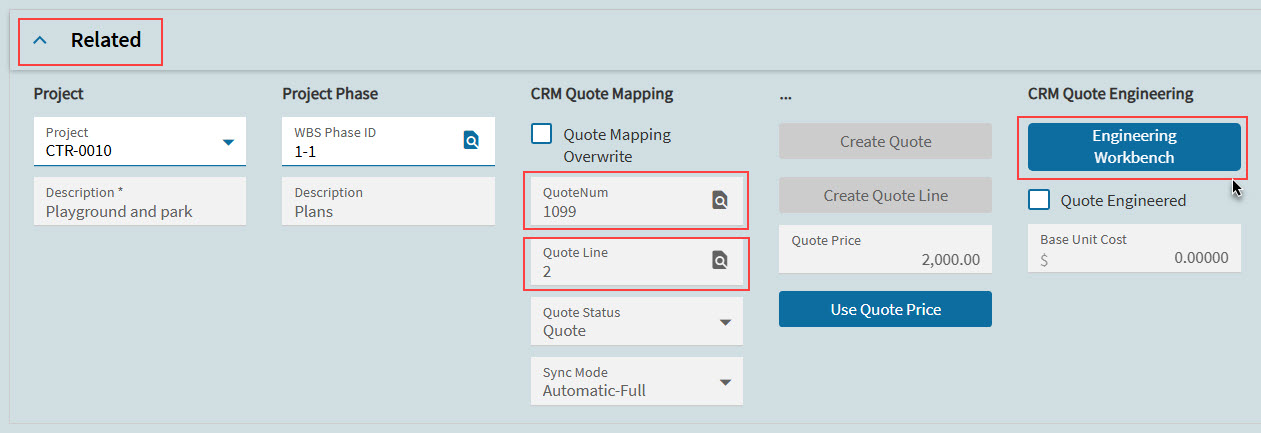
Click Engineering Workbench to open Quote Engineering entry in a new tab, for the Line Item’s Quote and Line.
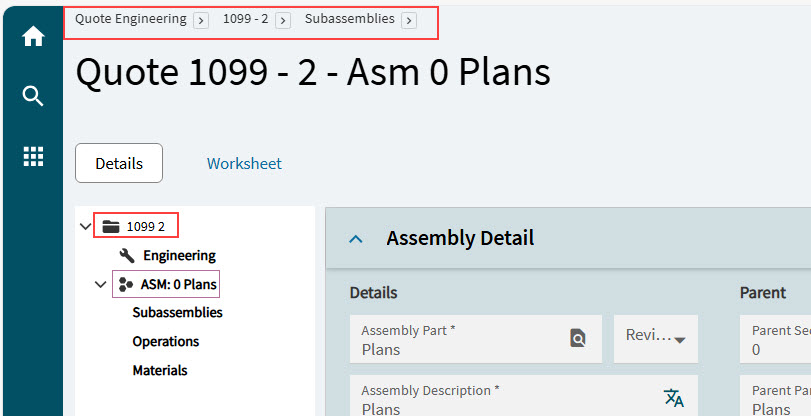
In the example below, in Contract Entry click Quote Engineering for a contract line item which is mapped to Quote Num 1099, Quote Line 2.
This opens Quote Engineering in a new tab, displaying Quote Engineering plans for the Quote Num/Quote Line.
-
Select the Quote Engineered check box to indicate that the quote line has engineered data configured.
-
The Base Unit Cost field is automatically populated from the quote price field.
Sales Order
If there are any sales orders attached to the contract, you can select one of these from the Sales Order drop-down list. Search for and select a Sales Order Line from the search box.
Line Item Milestones
Line Item Milestones are added automatically to a Contract Line Item that uses the Progress Billing Type. The Milestone Set for the Contract Line Item has a set of one or more milestones, and these are added as Line Item Milestones. See Milestone Set.
Regardless of the Billing Type selected for a Contract Line Item, you can also add a Line Item Milestone.
See:
Adding a Line Item Milestone
To add a new Line Item Milestone to a Line Item:
-
Locate the Line Item on the Navigation Tree.
-
Open the Details page.
-
Select the Milestones node below the Line Item.
The Line Item Milestone Details card displays in the main panel.
-
Select the New Line Item Milestone
button on the standard menu.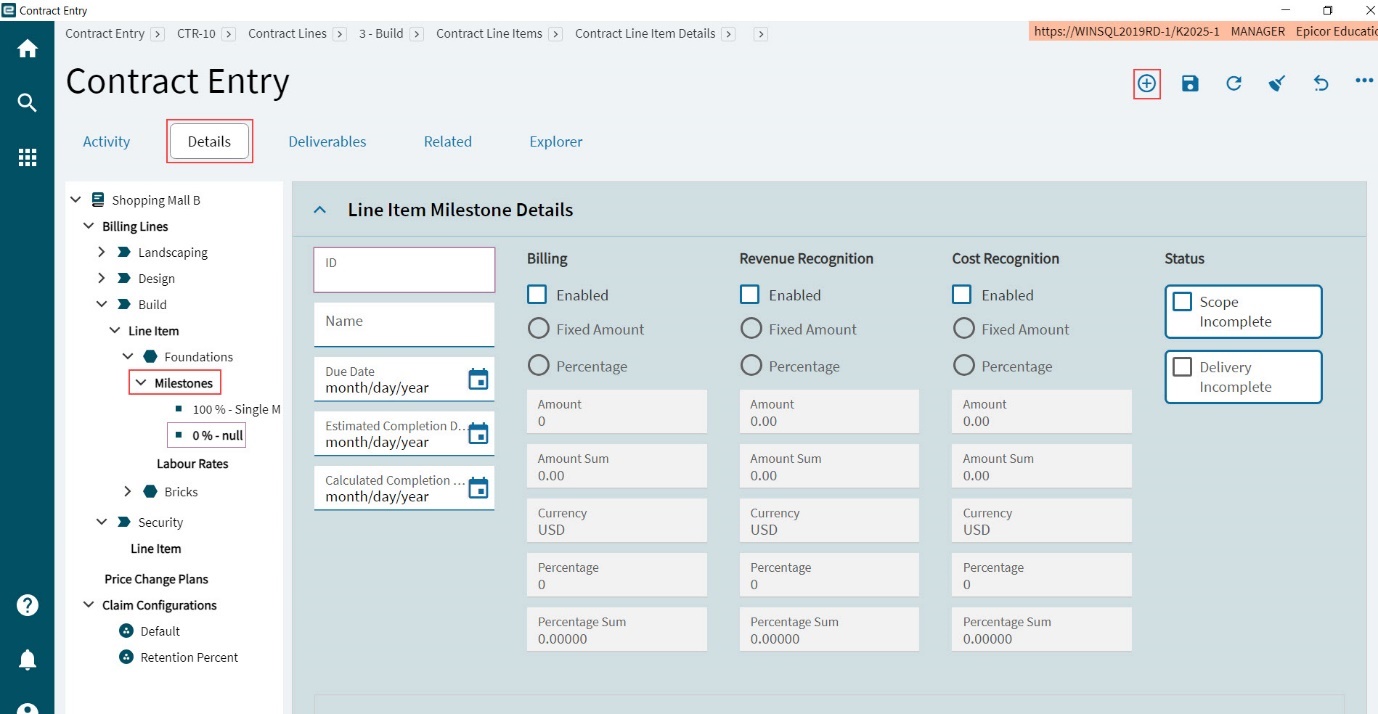
-
Enter the fields for Line Item Milestone Details. See Editing a Line Item Milestone.
-
Select Save
on the Standard toolbar.
Adding Recurring Line Item Milestones
If a recurring Milestone Set is selected for a line item, you can run Recurring Milestone Setup. The system generates a set of Milestones based on the defaults from the recurring Milestone Set, unless you define different values.
-
When adding your contract line item, ensure you choose a Milestone Set that has the Recurring Type selected. See Adding a Recurring Milestone Set in the Administration Section.
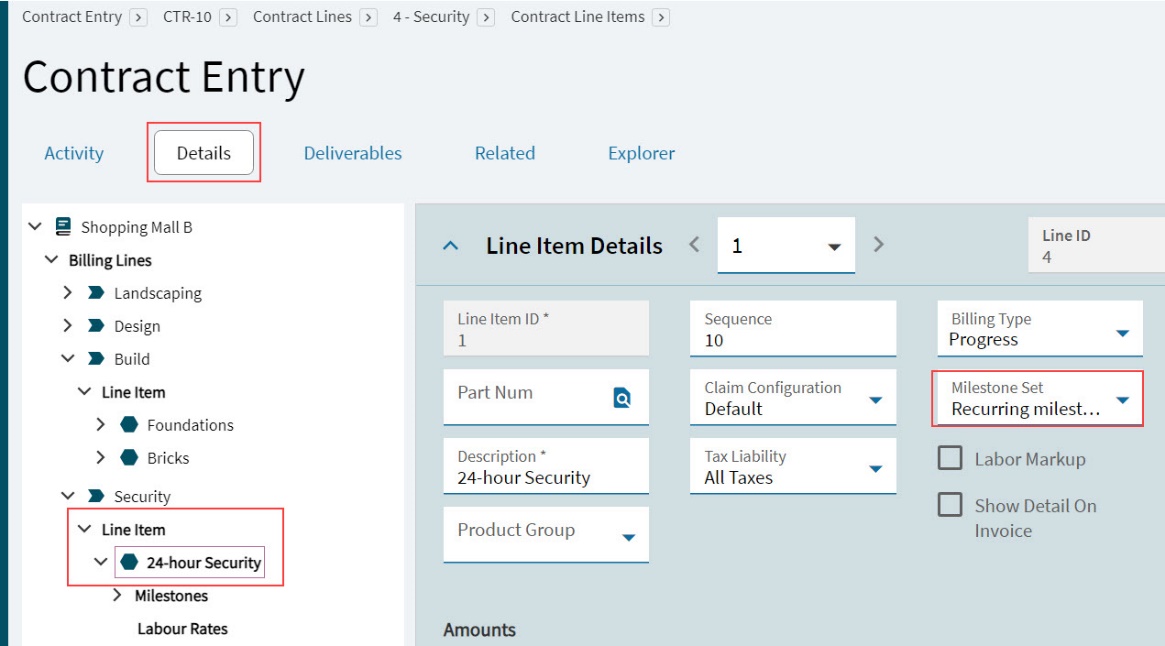
This adds a single milestone for the line item.
-
Select the Line Item on the Navigation Tree.
-
Expand the Milestones card.
-
Click Recurring Milestones Setup on the Milestones card header bar.
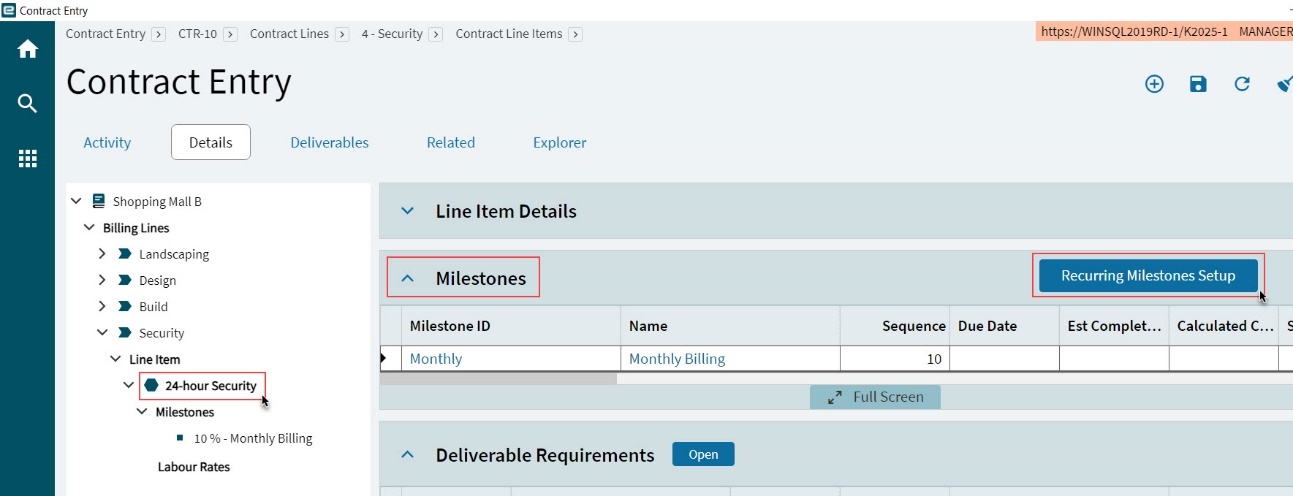
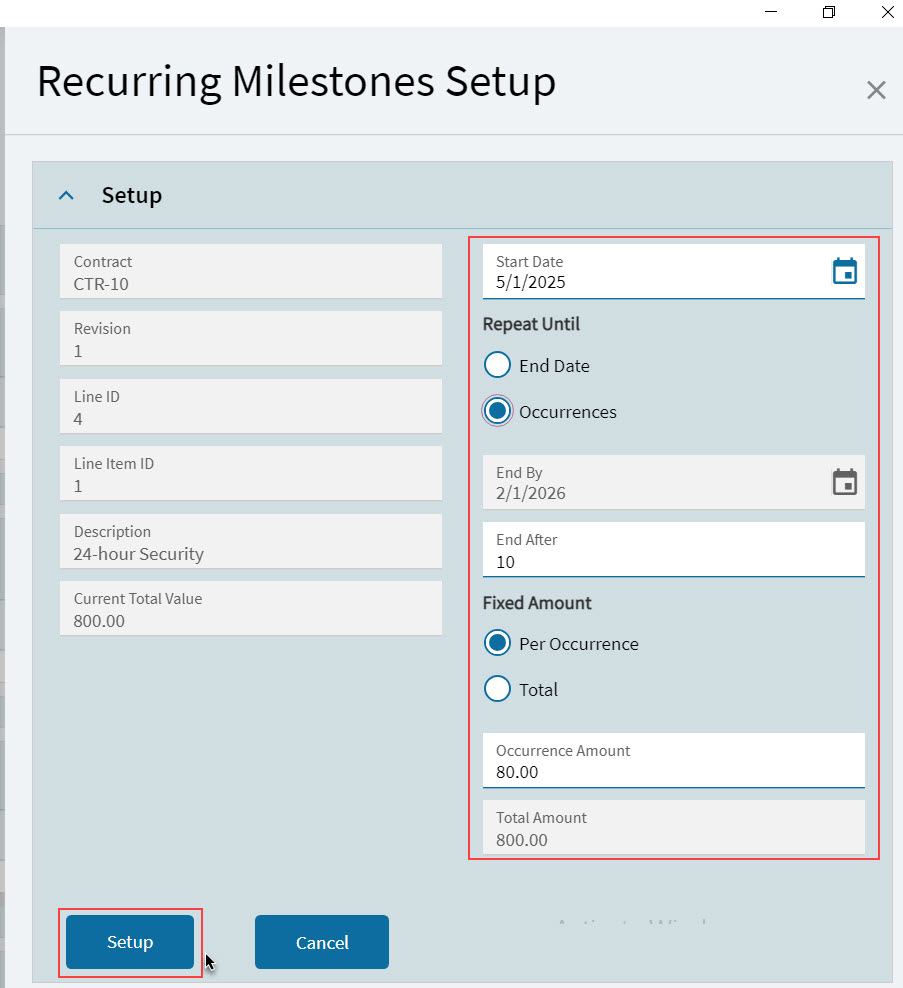
The Recurring Milestone Setup dialog displays.
-
Adjust the values and settings if necessary.
-
The Start Date defaults to the contract Start Date. Update if necessary.
-
Repeat Until:
End By and End After are calculated based on Start Date plus the duration of the Milestone Set (Modifier multiplied by Duration, for example 10 times months).
To edit End After, first select Occurrences.
End By updates automatically to allow for the updated End After.To edit End By, first select End Date.
End After updates automatically to allow for the updated End By. -
Fixed Amount:
If you update the Fixed Amount, this will update the line item Amounts.
Occurrence Amount defaults to the Discounted Value of the line item divided by End After (Occurrences). Total Amount defaults to Occurrence Amount multiplied by End After (Occurrences).
To edit Occurrence Amount, first select Per Occurrence. Total Amount updates to Occurrence Amount multiplied by End After (Occurrences). The Discounted Value also updates.
To edit Total Amount, first select Total. Occurrence Amount updates to Total Amount divided by End After (Occurrences). The Discounted Value also updates.
-
-
Click Setup.
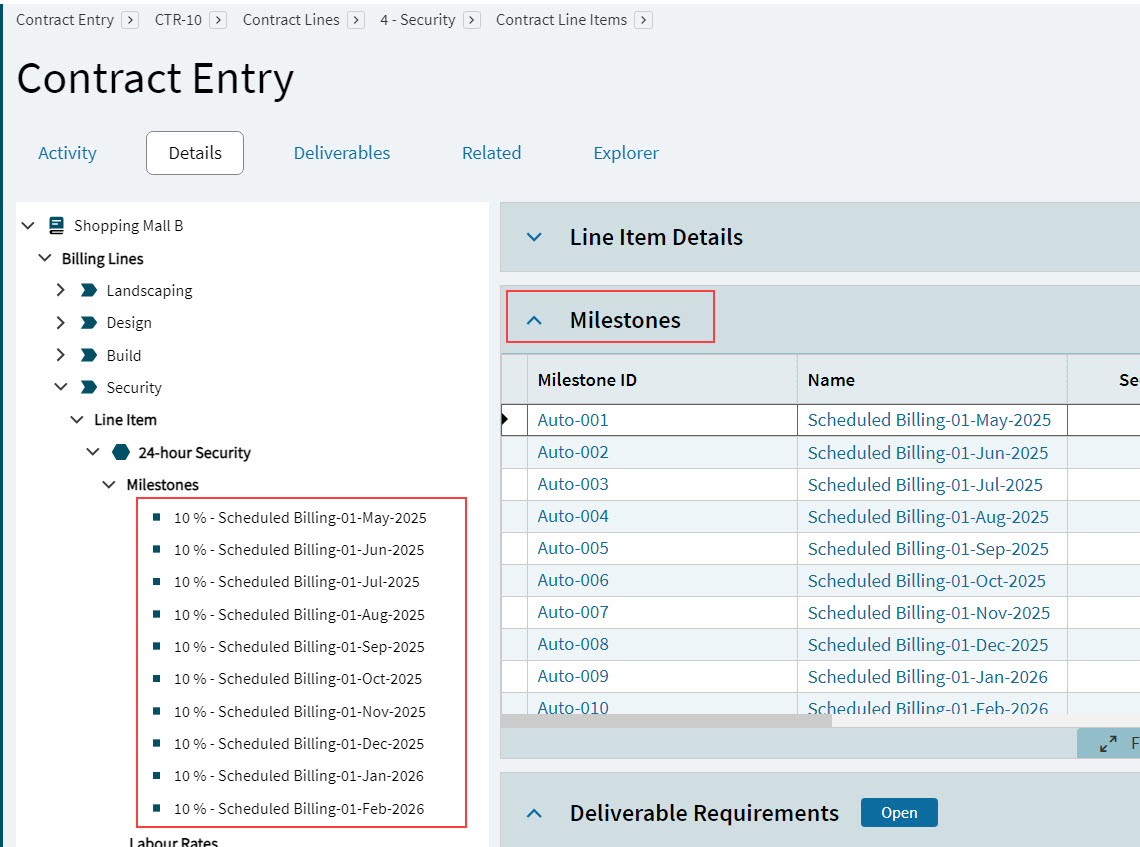
The Line Item Milestones are generated and appear below the line item on the Navigation Tree. Each Milestone ID has a prefix of 'Auto-'.
-
Edit the Line Item Milestones if necessary.
Editing a Line Item Milestone
For a Line Item Milestone that is added using a selected Milestone Set (for a Progress Billing Type), or one that you added manually, review or edit the details:
-
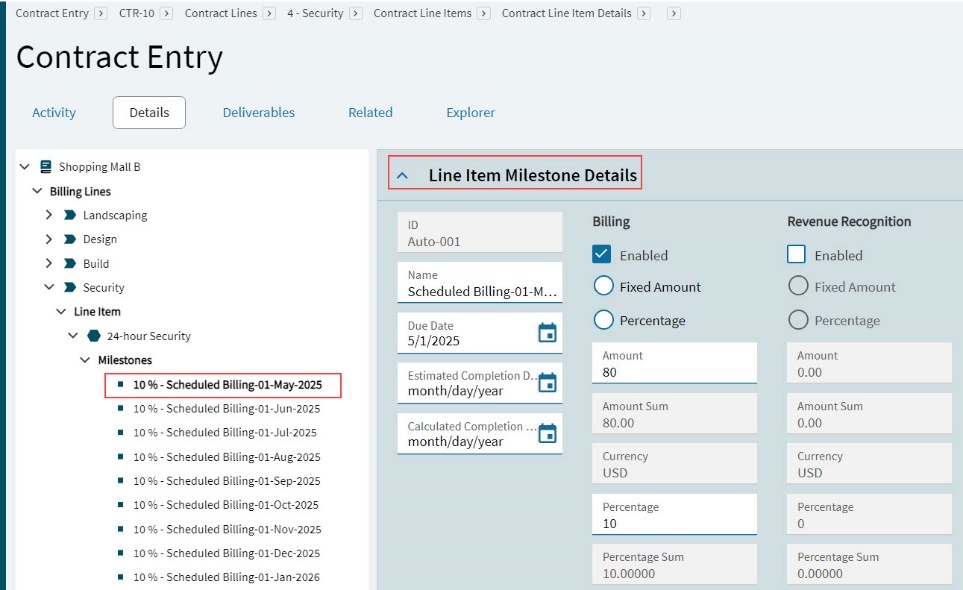
Select the Milestone on the Navigation Tree, then expand the Line Item Milestone Details card.
-
If the Milestone was added automatically, you may not edit the ID. If it is blank, you need to add an ID that is unique for the line item.
-
Update the Name, if necessary, for an existing milestone, and add a Name for a new milestone.
-
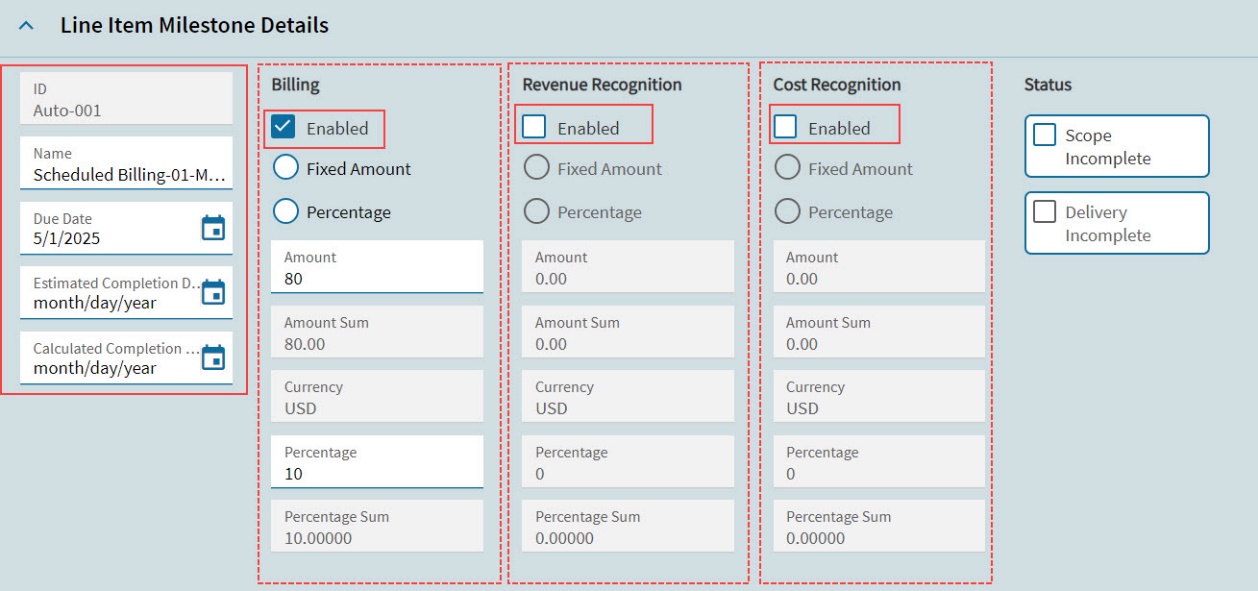
Optionally select a Due Date, an Estimated Date, and a Calculated Completion Date.
Billing is enabled by default for a generated milestone. Update the Fixed Amount or Percentage, if necessary.
If you add Line Item Milestones, you may need to adjust the Billing Amount or Percentage for any system-generated Milestones, so that the total across all the Line Item Deliverable Milestones adds up to 100% (for Percentage) or the Line Item Total Value (for Amount). -
The remaining options are for informational purposes only and will not have any effect on the contract or the related contract claims. Optionally enable the following, then select a Fixed Amount or Percentage:
-
Billing
-
Revenue Recognition.
-
Cost Recognition.
-
-
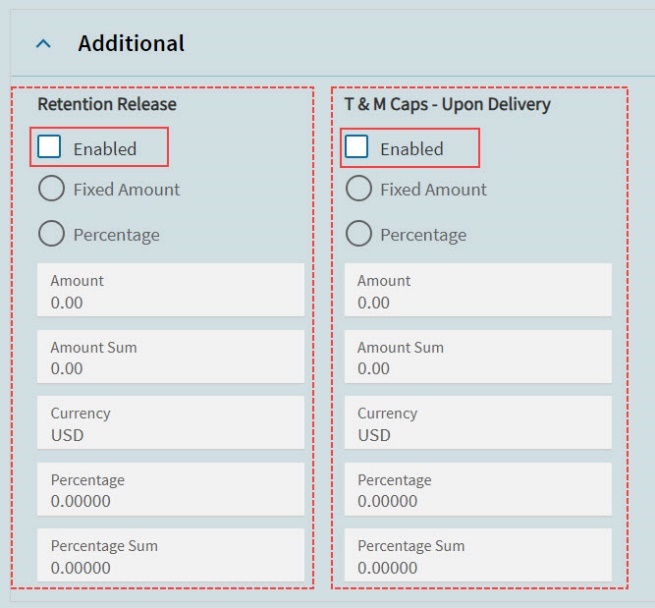
Expand the Additional card at the bottom of the Line Item Milestone Details card.
-
Optionally enable Retention Release, then select a Fixed Amount or Percentage.
-
Optionally enable T & M Caps – Upon Delivery, then select a Fixed Amount or Percentage.
-
Adding Links for a Milestone
Optionally set up links to source records.
-
Expand the Links card for the milestone.
-
Linked Quote: Select a QuoteNum and a Line from the linked quote. See how the Deliverable Update Process uses these selections.
-
Select Use Quote and Cost Data to insert estimates from the quote (see Deliverable Update Process).
-
Create Quote Line: This option is currently unavailable.
-
Show Worksheet: Select to display the Worksheet for the quote number and line number.
-
Quote Engineering: Select to display the Quote Engineering Tracker for the quote number and line number.
-
-
Linked Sales Order: Select an Order Num, Line and Release.
-
Linked Project: Select a Project ID, a Phase from the linked project, then select a Current Estimated Completion date.
-
Linked Job: Select a Job, then an Assembly, Operation and Job Operation Task. Select a Current Due Date.
-
Linked PO: Select a PO Num, then a Line and Release from the linked PO, and select a Current Due Date.
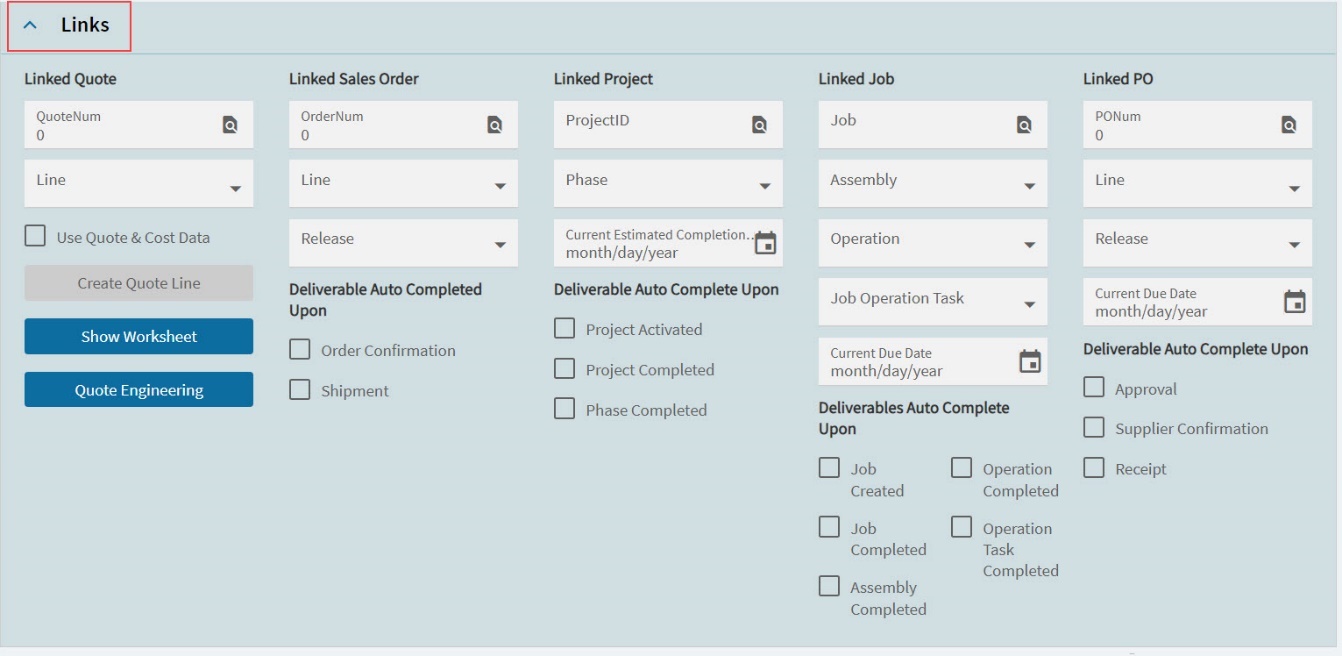
The Deliverable Auto Complete Upon check boxes are informational only. -
Select Save
on the Standard toolbar.
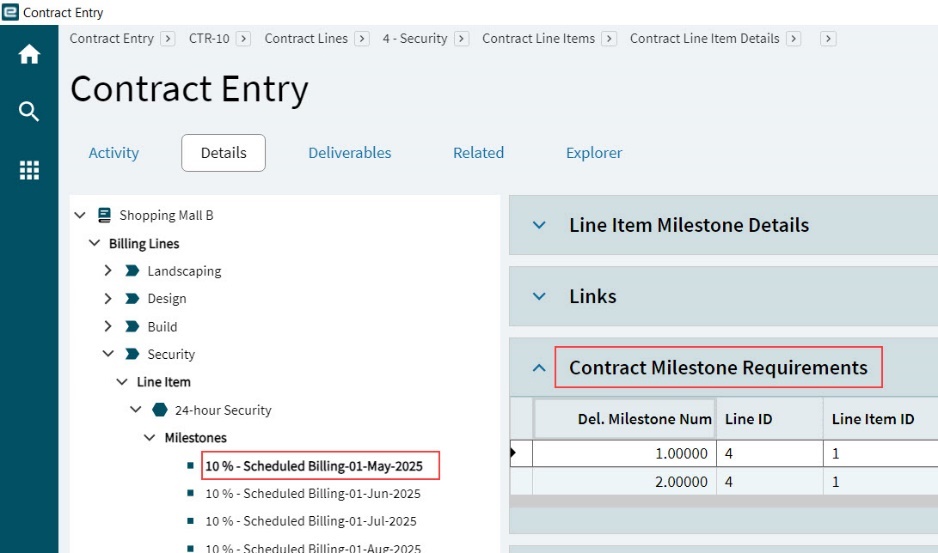
Adding Contract Milestone Requirements
This step allows you to allocate contract level milestones to a line item milestone. See Adding Contract Level Milestones.
The line item milestone is not considered complete until these contract level milestones have been completed.
To add a new Contract Milestone Requirement to a Line Item milestone:
-
Open the Details page.
-
Select the Line Item Milestone on the Navigation Tree.
-
Select the Milestones node below the Line Item.
-
Expand the Contract Milestone Requirements card.
-
Select the New Contract Milestone Requirements
button on the menu.The Milestones panel slides out.
-
Select one or more of the Available Milestones then click OK.
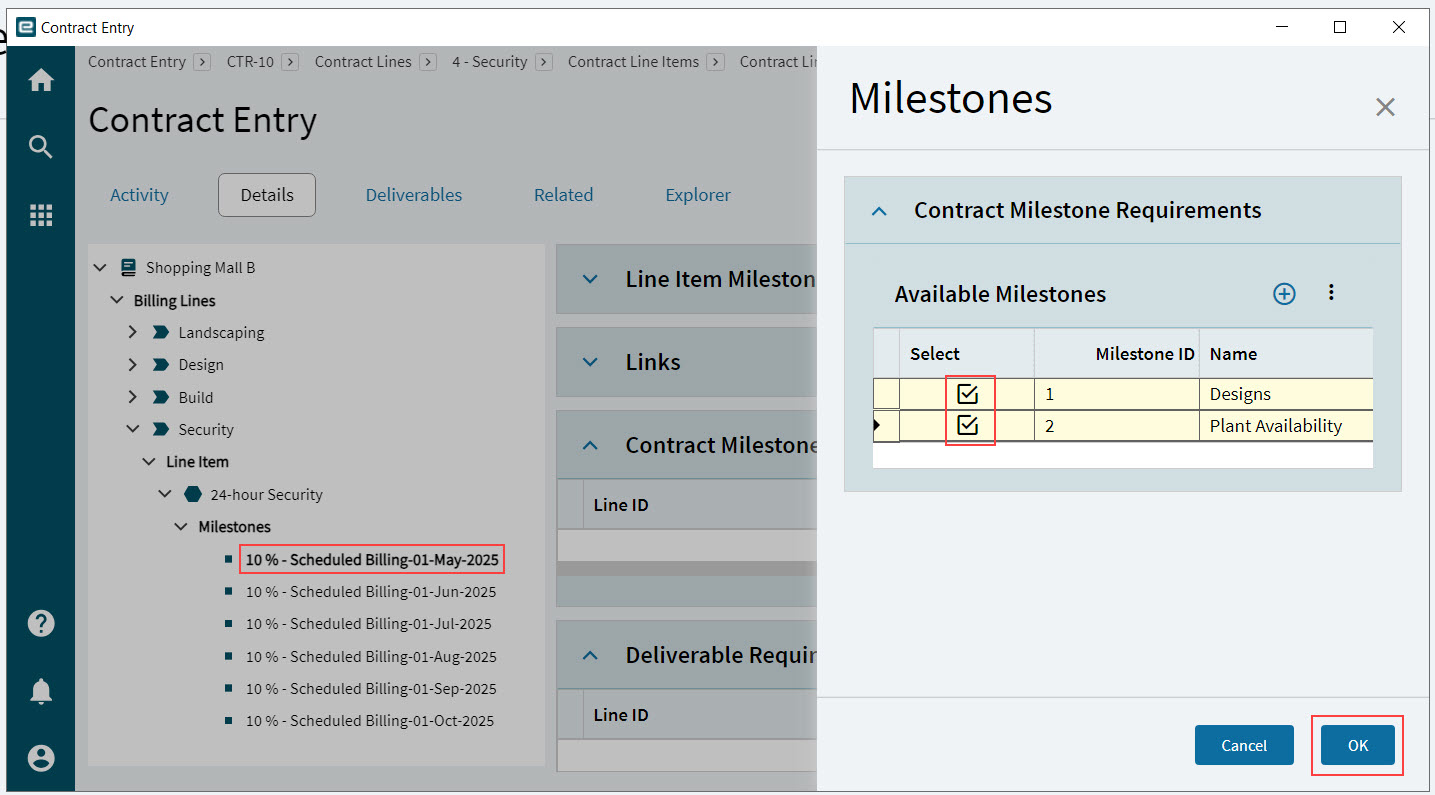
The Contract Milestone Requirements are added.
Setting Scope Complete and Delivery Complete Flags
A Line Item Deliverable Milestone has all its flags deselected to begin with. The labels are:
-
Scope Not Complete
-
Delivery Not Complete
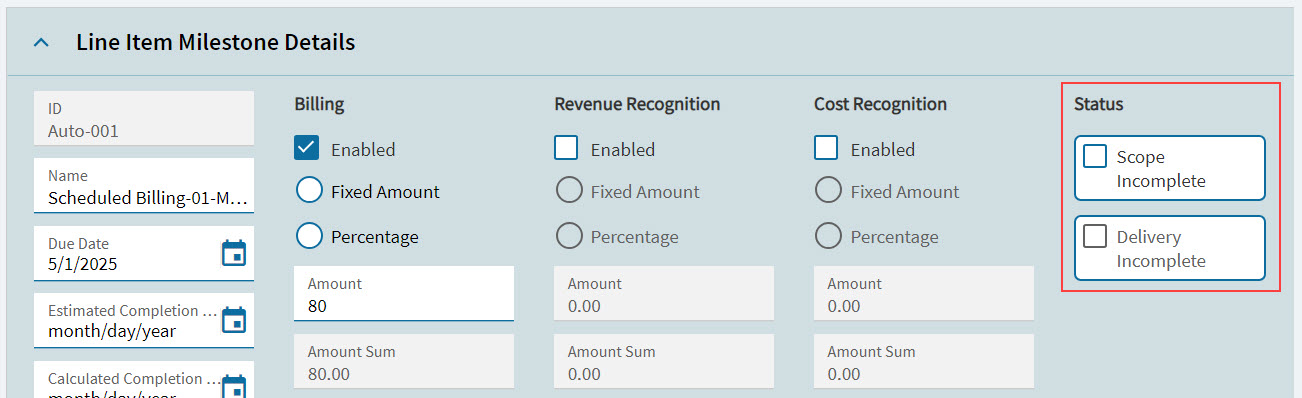
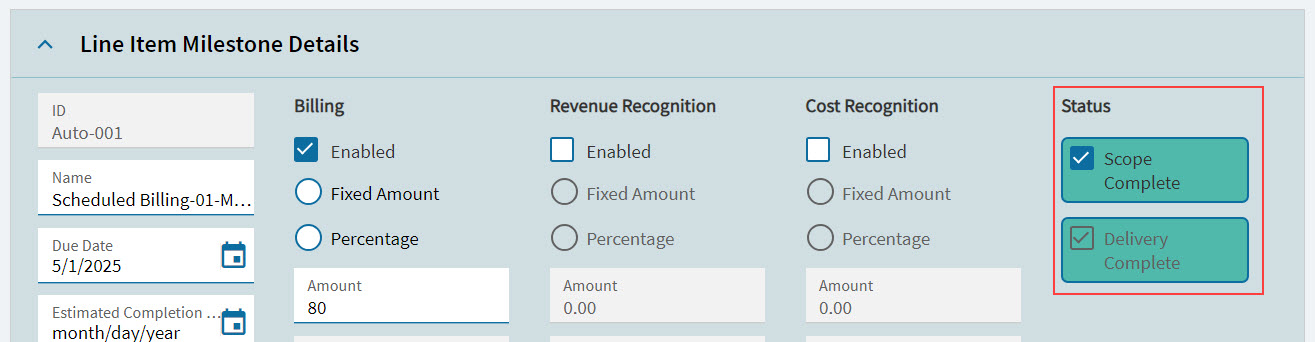
These flags are informational only. As the Line Item Milestones progress, select the applicable check box to note the stages. The selected check boxes come with new green labels, respectively:
-
Scope Not Complete
-
Delivery Not Complete
Reviewing Project Phase Cost Code Amounts
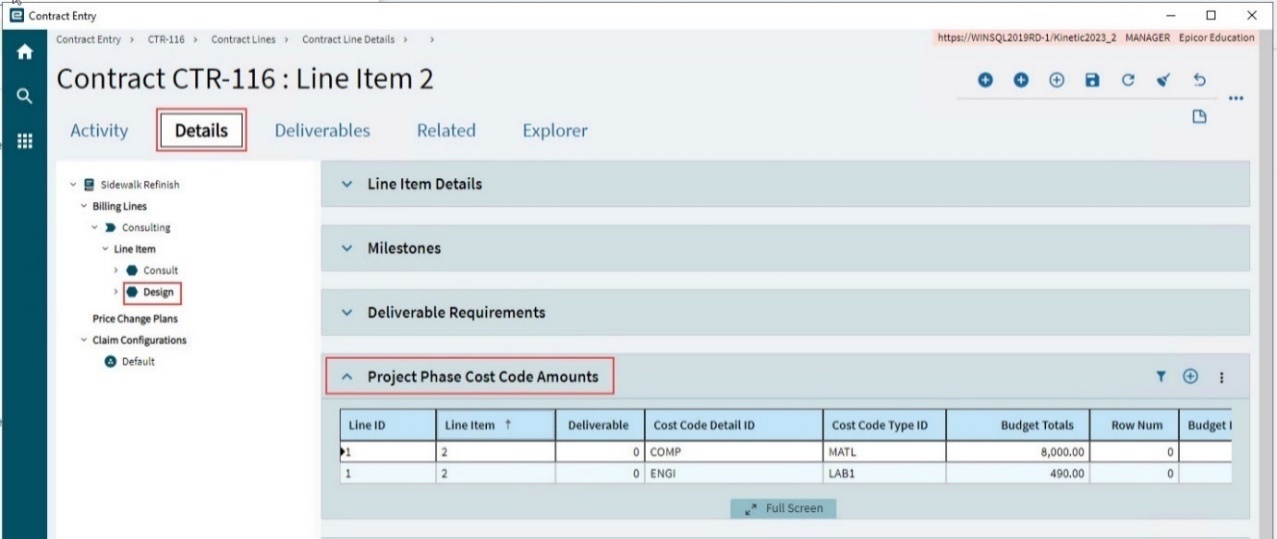
When you add Cost Codes to a WBS Phase ID in a project, these rows appear in the corresponding line item in the related Contract, on the Project Phase Cost Code Amounts card.
-
After adding Cost Codes with budgets in Project, refresh the related Contract.
-
Navigate to the corresponding line item.
-
Expand the Project Phase Cost Code Amounts card.
The Cost Codes with budgets appear in the card.
Adding Contract Line Item Entity GLC
You can add a GL Control at the Contract Line Item level. Read about GL Controls in the Contract.
To add a new GL Control to a contract line item:
-
Select the contract line item on the Navigation Tree.
-
Open the Details page.
-
Expand the Entity GLC card.
-
Click New GL Control
on the Entity GLC card menu.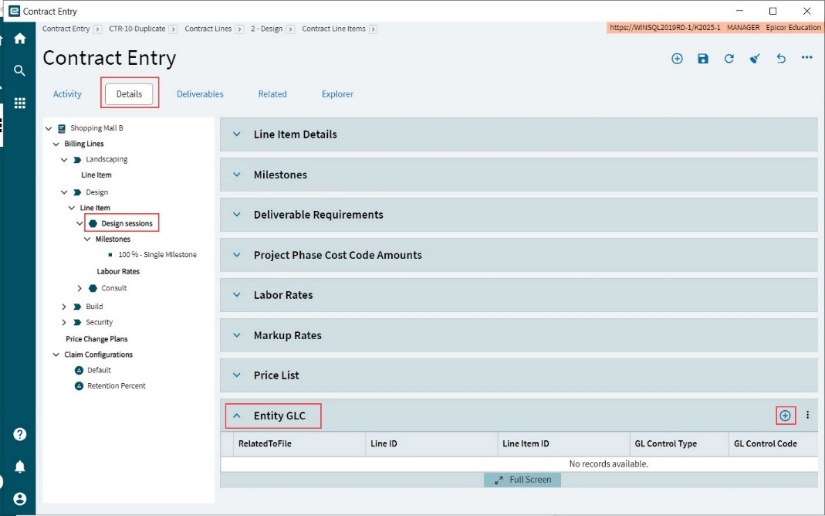
This opens the GL Control Detail card for the contract line item.
-
Search for and select a GL Control Type. This populates the Control Type Description.
-
Search for and select a GL Control Code from the drop-down list. This populates the GL Control Description.
-
Select Save
on the Standard toolbar.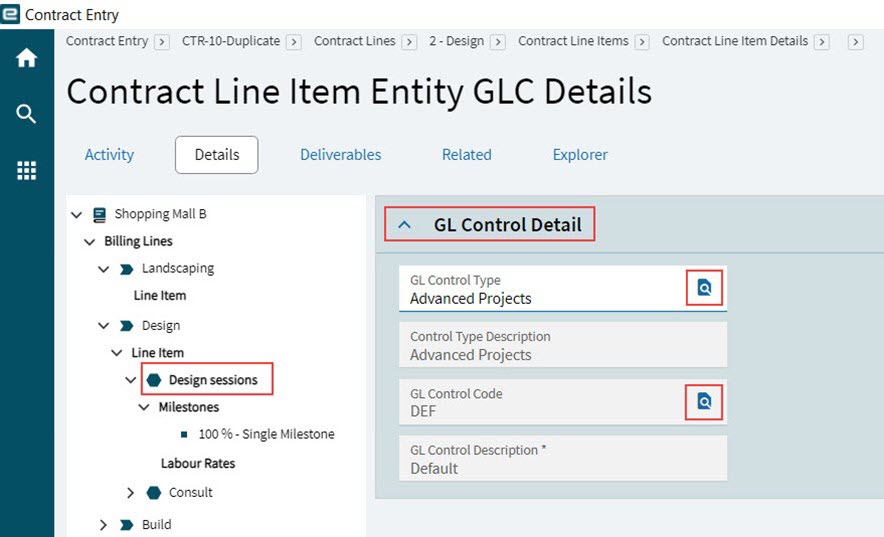
Adding and Processing Price Change Plans
Use Price Change Plans to plan and track Price Changes to the Base Unit Value on a Contract Line Item.
Adding a Price Change Plan
To add a new Price Change Plan to a contract:
-
Open the Details page.
-
Select Price Change Plans on the Navigation Tree.
-
Click New Contract Price Change
on the Standard toolbar.A new Price Change Plan row appears on the Price Change Plans card and on the Navigation Tree.
-
Click on the new Price Change Plan on the Navigation Tree.
This opens the Detail card.
-
Complete the fields on Detail card:
-
Select a Date that the Price Change should take place.
-
The Manual flag is selected and disabled, as all Price Changes Plans are currently manual.
-
Enter a Percentage.
-
Select Save
on the Standard toolbar.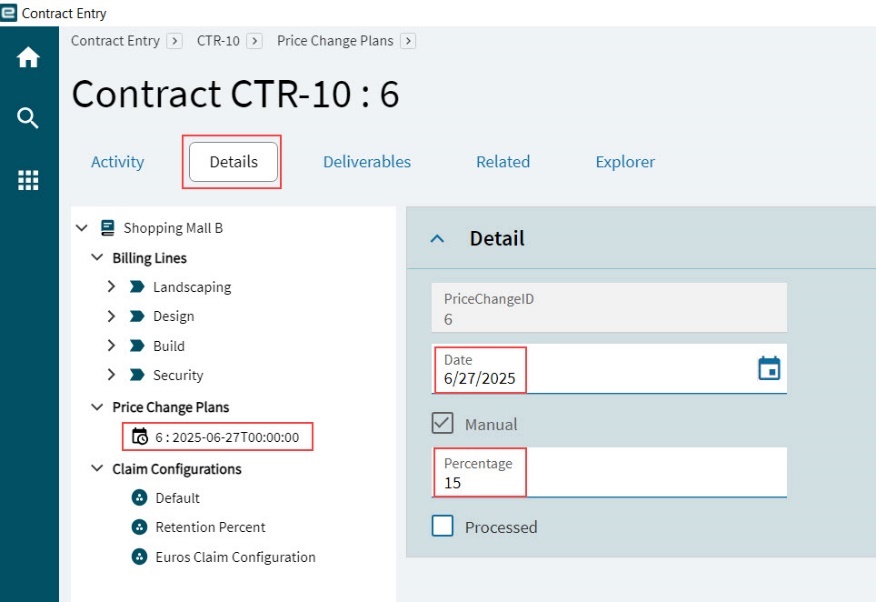
The Price Change Plan is updated. On the Navigation Tree, the price change plan name changes to the [Price Change ID] : [Date]. For example, 6: 2025-06-027T00:00:00.
-
Processing a Price Change Plan
To manually process a Price Change Plan:
-
Look through the names listed below the Price Change Plans node on the Navigation Tree.
-
Open any Price Change Plans where Date is on or before the current date.
-
If the Price Change Plan is not already marked as Processed, update the Base Unit Value on each of the Contract Line Items, by the percentage value displayed in the Price Change Plan.
-
Select the Processed check box in the Price Change Plan.
Adding Contract Entity GLCs
You can add a GL Control at the Contract level. Read about GL Controls in the Contract.
To add a new GL Control to a contract:
-
Select the contract name on the Navigation Tree.
-
Open the Details page.
-
Expand the Contract Entity GLCs card.
-
Click New GL Control
on the Contract Entity GLCs card menu.A new Contract Entity GLC row appears on the Contract Entity GLCs card.
-
Update the new Contract Entity GLC in the grid:
-
Select a GL Control Type from the drop-down list. The Description field for the GL Control Type is populated.
-
Select a GL Control Code from the drop-down list. The Description field for the GL Control Code is populated.
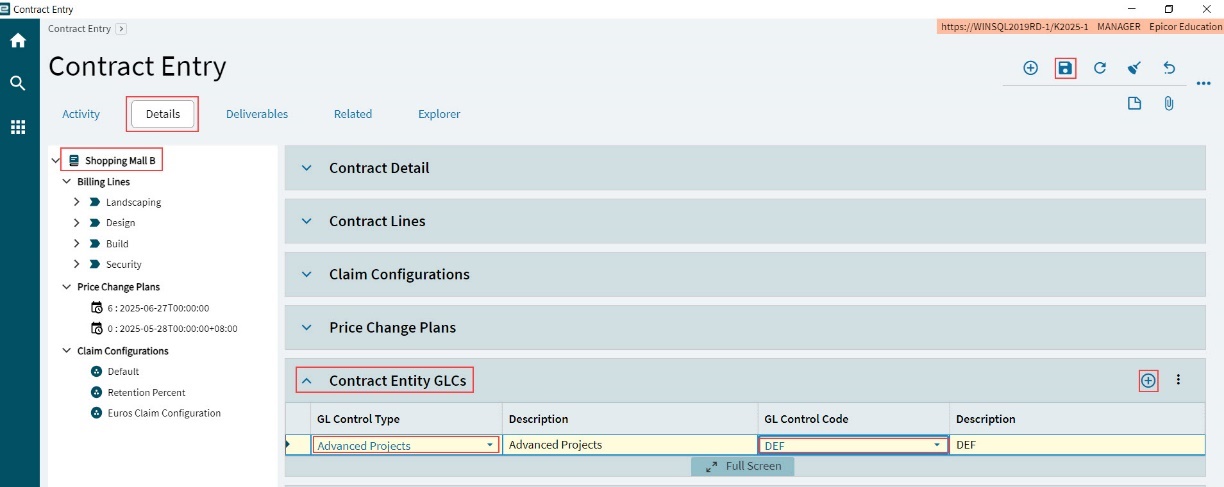
-
-
Select Save
on the Standard toolbar.
Adding Rates
Labor Rates, Price Lists and Markups can be added to a contract and used for contract line items that use the Rates billing type, to calculate the billable amount on the contract claim.
Adding Labor Rates
Labor Rates can be used for contracts that include the Rates Billing Type.
When a contract claim is created for a project job that has operations, the charge to the customer is calculated using time booked for a job and the rates set up in the contract’s Labor Rate. The Labor Rate that is used must match the booked time for Role and T/M Time Type, and the employee’s approved timesheet must fall within the Labor Rate’s Effective From and to dates.
| If there are no Labor Rates set up, then the contract claim charge is calculated using the employee’s Labor Rate (maintained in Employee Maintenance). |
Labor Rates can be added at contract header level, contract line level, or contract line item level.
| Labor Rates set at contract line item level supersede Labor Rates set at the contract line or contract header level, and Labor Rates set at contract line level supersede Labor Rates set at contract header level. |
You can add new Labor Rates specifically for a contract, or you can add a whole set of Labor Rates using a Labor Rate template that is already set up for the company (see Labor Rates).
First navigate to the appropriate place for adding the Labor Rates. Open the Details page, then:
-
To add Labor Rates at contract header level: Select the contract node
 on the tree, then expand the Labor Rates card.
 -
To add Labor Rates at a contract line level: Select the line
 under the Billing Lines node, then expand the Labor Rates card.
 -
To add Labor Rates at a contract line item level: Select the line item
 under the Billing Lines node, then expand the Labor Rates card.
Next, add the Labor Rates either manually or using a template.
Adding New Labor Rate
To manually add Labor Rates:
-
Click New
on the Labor Rates card menu.The Select Role Code and Time Type panel slides out.
-
Search for and select a Role Code in the RoleCode search box. Click OK.
-
Search for and select a Time Type Code in the TimeTypCd search box. Click OK.
-
Click Search to search for and select a Time Type Code on the Search panel slide-out, then click OK.
-
Click OK.
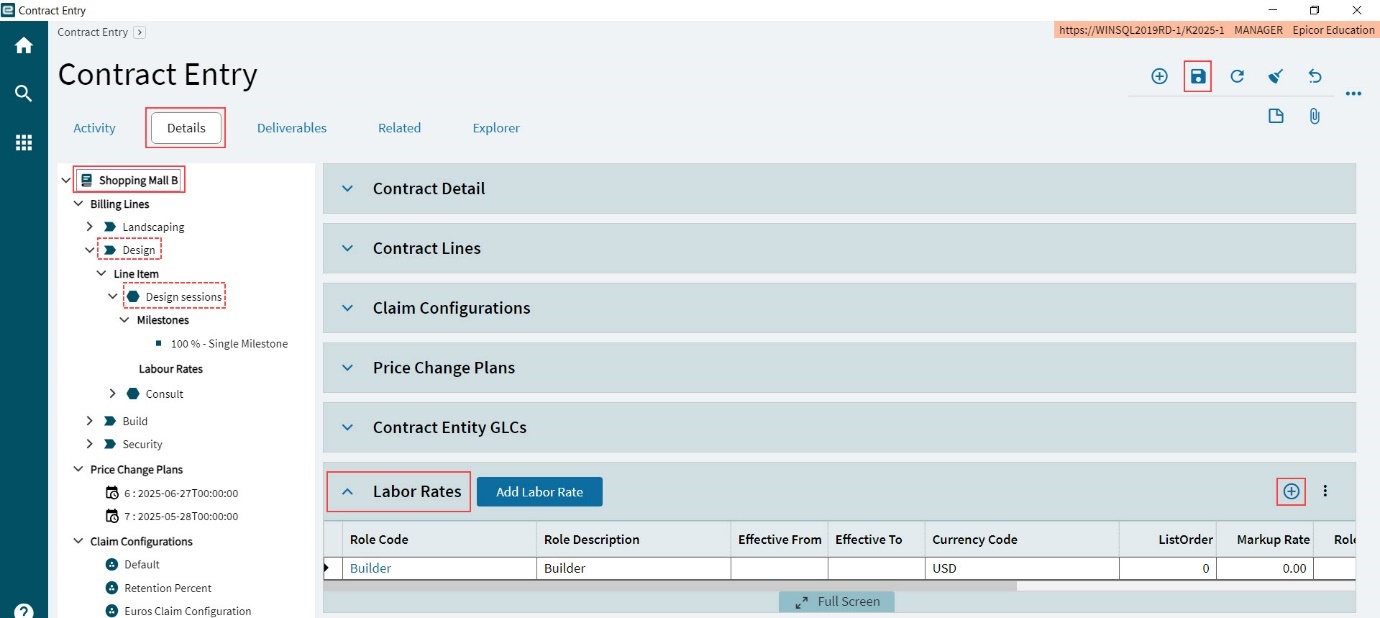
The new Labor Rate is added, with the selected Role Code and Time Type.
-
Select the Role Code in the grid, to edit the Labor Rate.
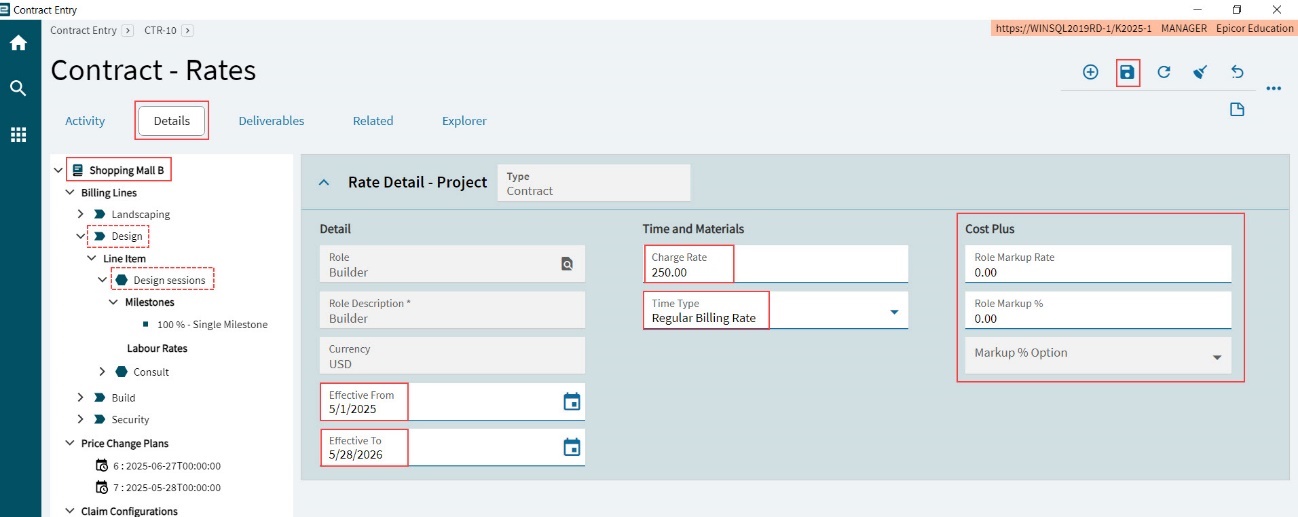
-
Edit the Labor Rate.
-
Select an Effective From date.
-
Select an Effective To date.
-
Enter a Charge Rate OR
Enter a Role Markup Rate and/or a Role Markup %, and a Markup % Option (Markup or Profit) if you will be using Cost Plus calculations in your Contract/Project.
-
Click Save.
-
Adding Labor Rates from a Labor Rates Template
To add a set of Labor Rates from a Labor Rates template (see Labor Rates):
-
Click Add Labor Rates on the Labor Rates card.
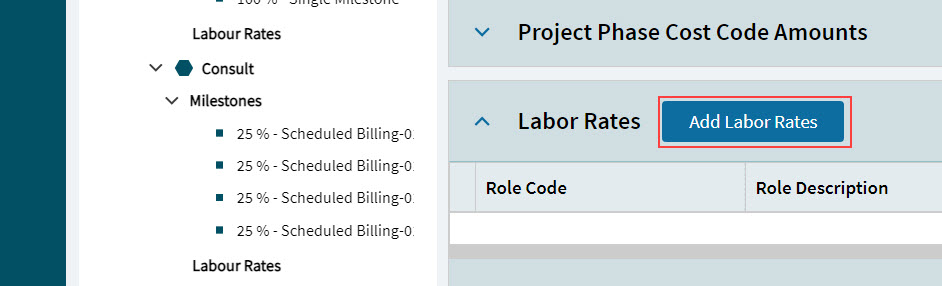
The Add Labor Rates slide-out panel appears.
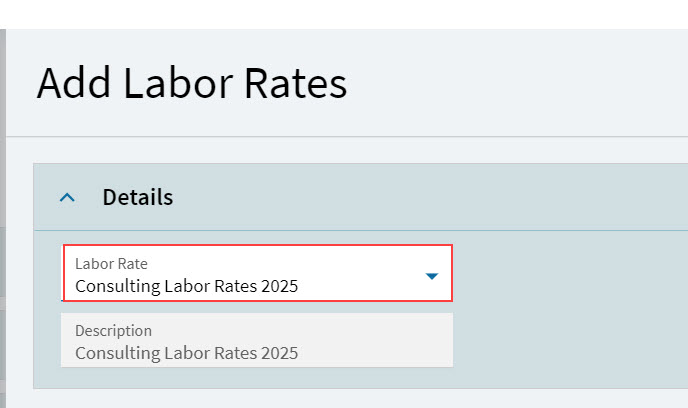
-
Select a Labor Rate from the drop-down list.
-
Click OK.
The set of Labor Rates is added to the Labor Rates list for the contract header/contract line/contract line item.
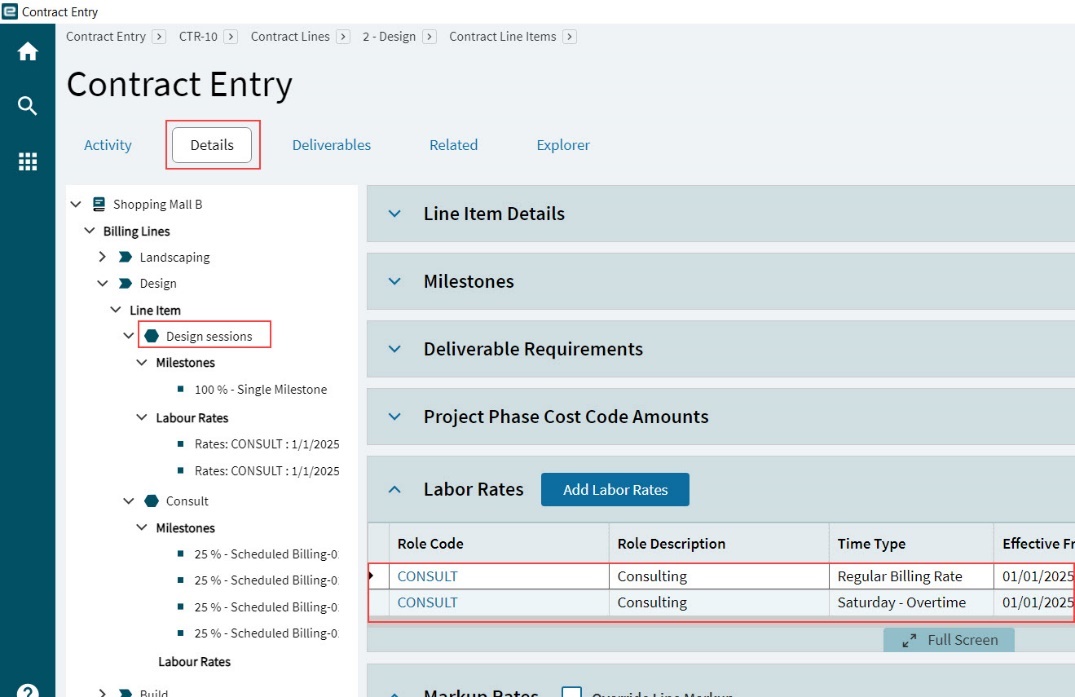
-
Optionally edit the Labor Rate in the same way that you edit manually added Labor Rates, by clicking on the Role Code.
You can continue to add Labor Rates for the different roles and time types that this contract/contract line/contract line item requires. To add different charge rates over time, for the same Role and Time Type, ensure that you enter different Effective dates and that there are no period overlaps.
Adding Markup Sets
Use Markup Sets to control the rates relating to line items used within the contract. See Markup Sets.
Within a contract, the markup set hierarchy is:
-
Contract Line Item
-
Contract Line
-
Contract Header
To add Markup Sets:
-
Open the Details page.
-
To add a markup to the contract header:
-
Select the contract on the Navigation Tree.
-
Expand the Markup Rates card.
-
Select New
on the Markup Rates menu bar. -
Click Search, then select a Markup Set from the Search Results and click OK.
-
Click Save
on the standard menu bar.
-
-
To add a markup to a contract line:
-
Select a contract line on the Navigation Tree, under the Billing Lines node.
-
Expand the Markup Rates card.
-
Select the Override Header Markup check box.
-
Select New
on the Markup Rates menu bar. -
Click Search, then select a Markup Set from the Search Results and click OK.
-
Select Save
on the Standard toolbar.
-
-
To add a markup to a contract line item:
-
Select a contract line item on the Navigation Tree, under the Line Item node for a line item.
-
Expand the Markup Rates card.
-
Select the Override Line Markup check box.
-
-
Select New
on the Markup Rates menu bar.-
Click Search, then select a Markup Set from the Search Results and click OK.
-
-
Select Save
on the Standard toolbar.
| Take note of the Effective From and Effective To dates when adding a markup set. |
The Markup Set is added, at the selected level.
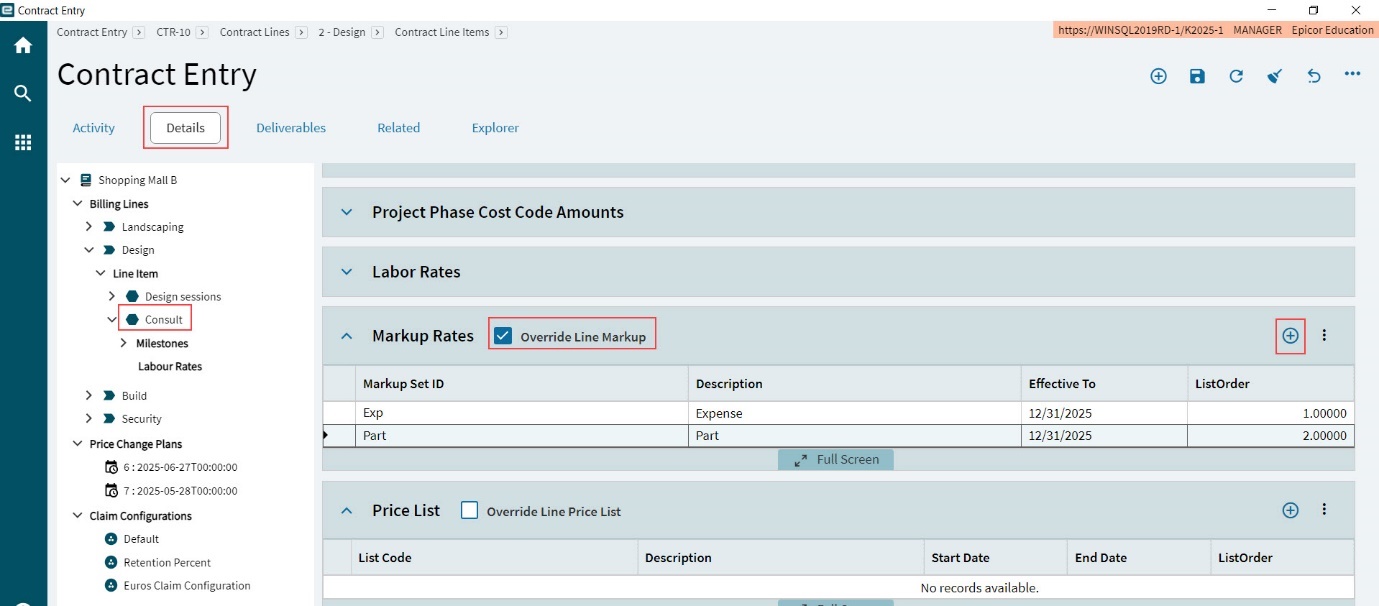
Adding Contract Price Lists
Use contract price lists to control the prices that will be billed to the customer, after purchase orders are raised and receipted for jobs relating to the contract, where the relevant part (product or service) is included in any of the Price Lists used.
Price Lists Hierarchy
The system uses the following hierarchy to obtain the price for a Part:
-
Contract Line Item (Contract price lists in APM)
-
Contract Line (Contract price lists in APM)
-
Contract Header (Contract price lists in APM)
-
Customer Ship To (standard Kinetic)
-
Customer (standard Kinetic)
-
Customer Group (standard Kinetic)
-
Sales Unit Price on Part (standard Kinetic)
To add Contract Price Lists:
-
Open the Details page.
-
To add a price list to the contract header:
-
Select the contract on the Navigation Tree.
-
Expand the Price List card.
-
Select New
on the Price List menu bar. -
Click Search, then select a Price List from the Search Results and click OK.
-
-
To add a price list to a contract line:
-
Select a contract line on the Navigation Tree, under the Billing Lines node.
-
Expand the Price List card.
-
Select the Override Header Price List check box.
-
Select New
on the Price List menu bar. -
Click Search, then select a Price List from the Search Results and click OK.
-
-
To add a price list to a contract line item:
-
Select a contract line item on the Navigation Tree, under the Line Item node for a line item.
-
Expand the Price List card.
-
Select the Override Line Price List check box.
-
Select New
on the Price List menu bar.
-
-
Click Search, then select a Price List from the Search Results and click OK.
Take note of the Start Date and End Date when adding a price list.
The price list is added at the selected level. Continue to add as many price lists as required.
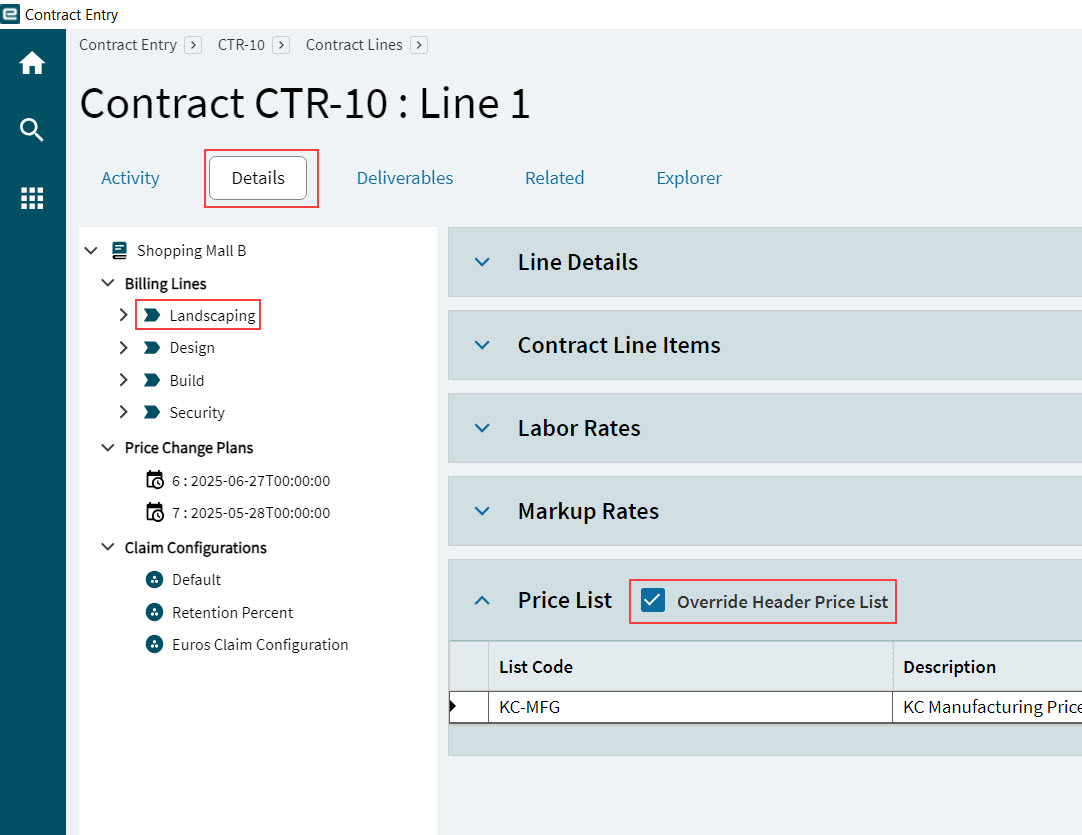
Updating the Deliverables Page
Optionally add Deliverables to a contract, to document the agreed deliverables and to help determine when to start contract claiming. A contract claim should only be started when the contract line item’s deliverables are complete (although this is not enforced).
Each deliverable is assigned an importance rating, and given a due date and a description, as well as an approach description, status, and various other attributes.
A deliverable can be linked to a quote, sales order, project, job, and PO.
Deliverable Groups are added and used to group deliverable items.
Adding Deliverable Groups
Deliverable groups are used for grouping related deliverables.
Deliverable Group Details
-
Open the Deliverables page.
-
Select Deliverable Groups on the Navigation Tree.
-
Select New Deliverable Group
on the Standard toolbar. -
Expand the Deliverables Group Details card, and enter a Group ID, a Name, and a Description.
-
Select Save
on the Standard toolbar.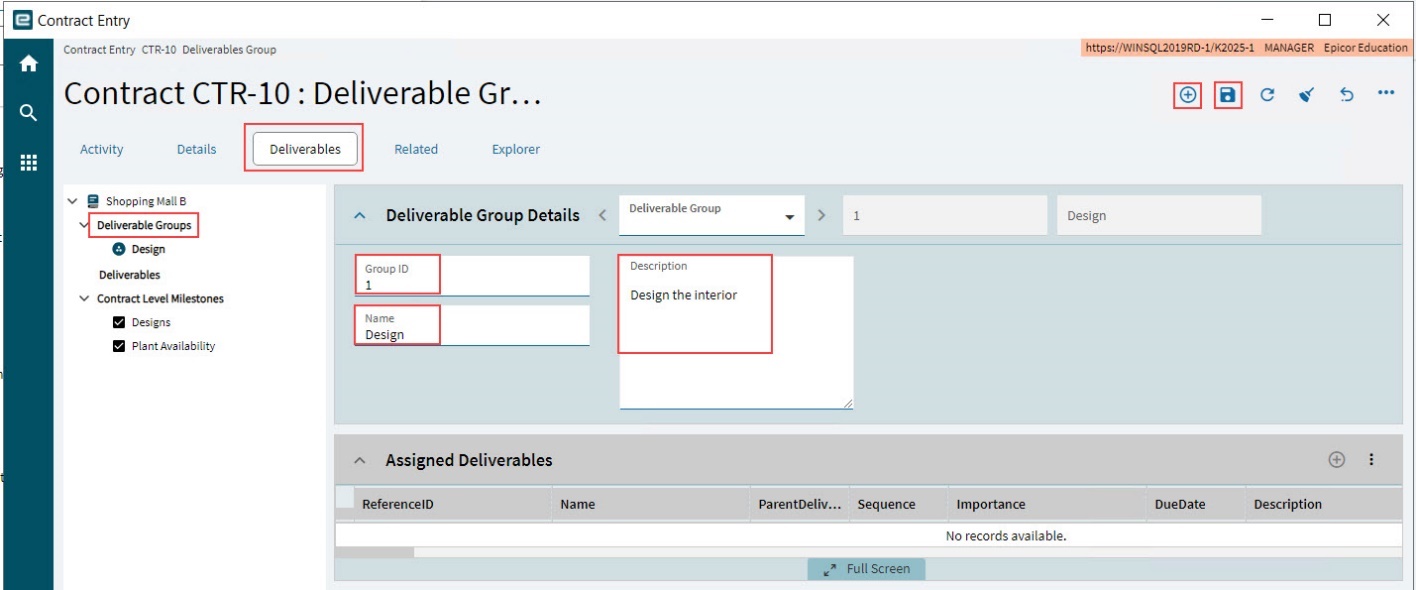
Assigned Deliverables
After you have selected this deliverable group to various deliverables, these deliverables appear on the Assigned Deliverables card.
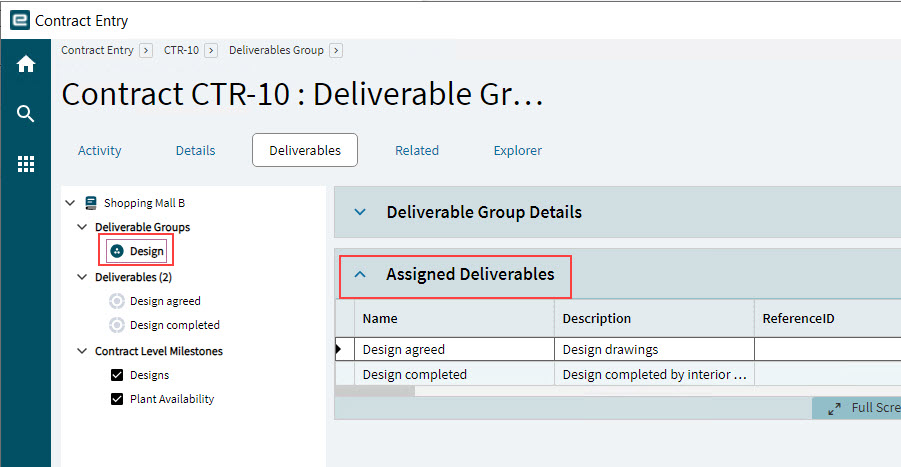
Adding Deliverables
A deliverable is the smallest unit in Deliverables and should contain a single item, which could reference a part or service, for example.
Deliverables are comparable to contract line items. A contract structure could potentially have a contract line item for each deliverable, although this is not mandatory.
Deliverable line items can be assigned to contract deliverable milestones and to contract line items.
Deliverable Fields to Capture
Below is a deliverable with fields captured:
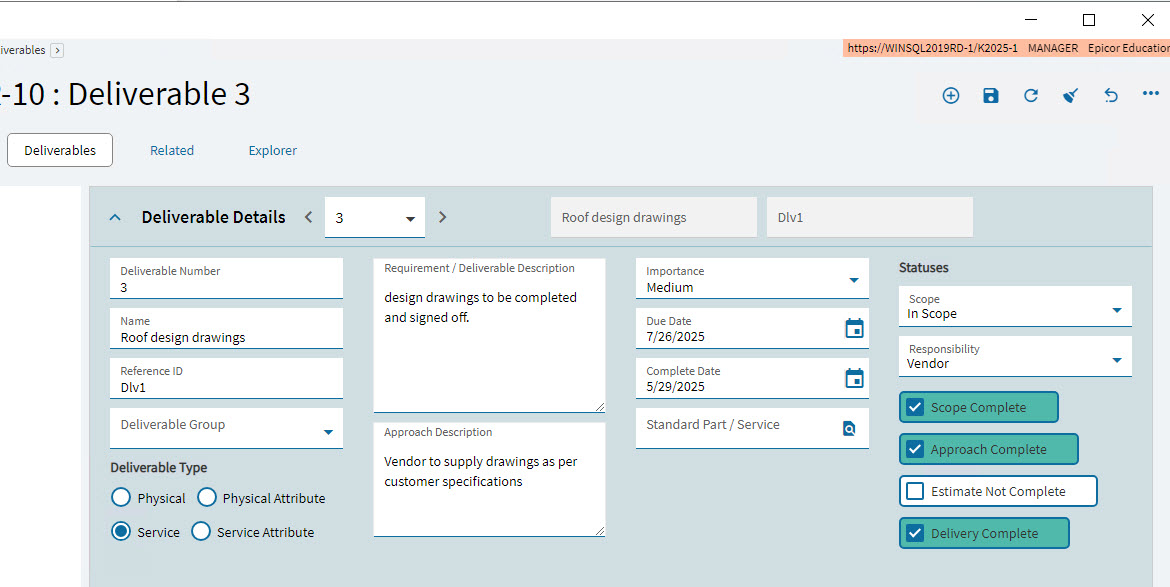
Use the Name to briefly state exactly what this deliverable item is.
The Reference ID could be used to group a few deliverable items together. For example, use “Construct-A" for three related deliverable, and "Construct-B" for two or three other related deliverables. Or it could be used to reference a project, or the customer’s own deliverable name.
Select a Deliverable Group from the list of deliverable groups already created for this contract. This is a useful way of grouping deliverables, especially for reporting and dashboards.
There are four Deliverable Types of deliverable items: Physical, Physical Attribute, Service, Service Attribute. Types are another way of classifying or grouping deliverable items and are also useful for reporting and dashboards.
Use the Requirement / Deliverable Description and Approach Description to clearly define information regarding the deliverable and how it will be measured or assessed, making it easier for both parties to agree on whether a deliverable is in fact complete. The Description might, for example, list criteria relating to a deliverable item’s quality, and even physical attributes such as weight, size, or color could be recorded here.
The Importance of the deliverable item will be taken into consideration when the Contract Deliverable Milestone needs to be completed. For example, a deliverable item with a 1 (Very High) Importance belonging to a Contract Deliverable Milestone would need to be completed before the Contract Deliverable Milestone could be completed, whereas one with a 5 (Very Low) Importance could potentially be exempt. In addition, the Importance rating could be considered during project planning.
The Due Date should fall on or before the due date for the Contract Level Milestone that the deliverable item will be assigned to. This is also useful to know when planning phases and jobs in projects relating to the contract. The Complete Date cannot be selected for a new Deliverable.
Standard Part / Service: A deliverable item can be directly linked to a Part or Service from Part Maintenance. For an intangible deliverable, or a deliverable that does not relate to a single part or service, this can be left out.
Statuses
- Scope
-
The deliverable can be In Scope, Out of Scope, or Not Selected. An example of a deliverable that is In Scope is a “Design Plan”. An example of a deliverable that is Out of Scope is a “Status Report”.
- Responsibility
-
Define who is responsible for this deliverable. Options are: Not Selected, Customer, Third Party or Vendor. For example, the Customer is responsible for approving a design (where Design Approval is the deliverable), whereas the Vendor is responsible for creating the design (where Design Creation is the deliverable).
To record the progress of a deliverable, select the four different check boxes, depending on the completion status of this deliverable:
- Scope Not Complete
-
Select this when the scope of the deliverable has been defined (the label changes to Scope Complete). Check that all deliverable details are filled in before selecting this box.
- Approach Not Complete
-
Select this when the approach has been clearly defined (the label changes to Approach Complete). Check that the Approach Description has been filled, as well as the Responsibility. The Standard Part /Service could also be selected, as part of the approach.
- Estimate Not Complete
-
Select this when there is an estimate (the label changes to Estimate Complete). The estimate can be captured in Quotation and Cost Estimates.
- Delivery Not Complete
-
Select this when the delivery is complete (the label changes to Delivery Complete and the Complete Date is updated to show the current date). For example, if the deliverable is a part, and the part is delivered, then delivery is complete.
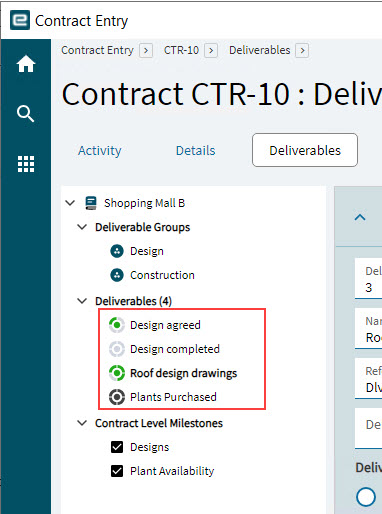
A deliverable’s statuses are summarised using icons with special coloring, on the Navigation Tree:
-
An Out of Scope deliverable has a black
 icon.
icon. -
An In Scope deliverable has a green and grey
 icon. Green sections are for selected check
boxes (for example, Scope Complete) while grey sections are for unchecked check boxes
(for example, Estimate Not Complete).
icon. Green sections are for selected check
boxes (for example, Scope Complete) while grey sections are for unchecked check boxes
(for example, Estimate Not Complete).
Add New Deliverable
-
Open the Deliverables page.
-
Select Deliverables on the Navigation Tree.
-
Click New Deliverable
on the Standard toolbar, or right-click on Deliverables and select New Deliverable from the pop-up menu. -
Expand the Deliverable Details card.
-
Enter the Deliverable Details. See the descriptions above in Deliverable Fields to Capture.
Linking to Source Records
Optionally set up links to source records, using the sections in the Links card within the Deliverable Details card. See also how the Deliverable Update Process uses these selections.
- Linked Quote
-
Select a Quote Num, and a Line from the linked quote. Select Use Quote and Cost Data to insert estimates from the quote (see Deliverable Update Process).
- Create Quote Line
-
This option is currently unavailable.
- Show Quote Worksheet
-
Select to display the Worksheet for the quote number and line number.
- Quote Engineering
-
Select to display the Quote Engineering Tracker for the quote number and line number.
- Linked Sales Order
-
Select an Order Num, Line and Release.
- Linked Project
-
Select a Project ID, a Phase from the linked project, then select a Current Estimated Completion date.
- Linked Job
-
Select a Job, then an Assembly, Operation and Job Operation Task. Select a Current Due Date.
- Linked PO
-
Select a PO Num, then a Line and Release from the linked PO, and select a Current Due Date.
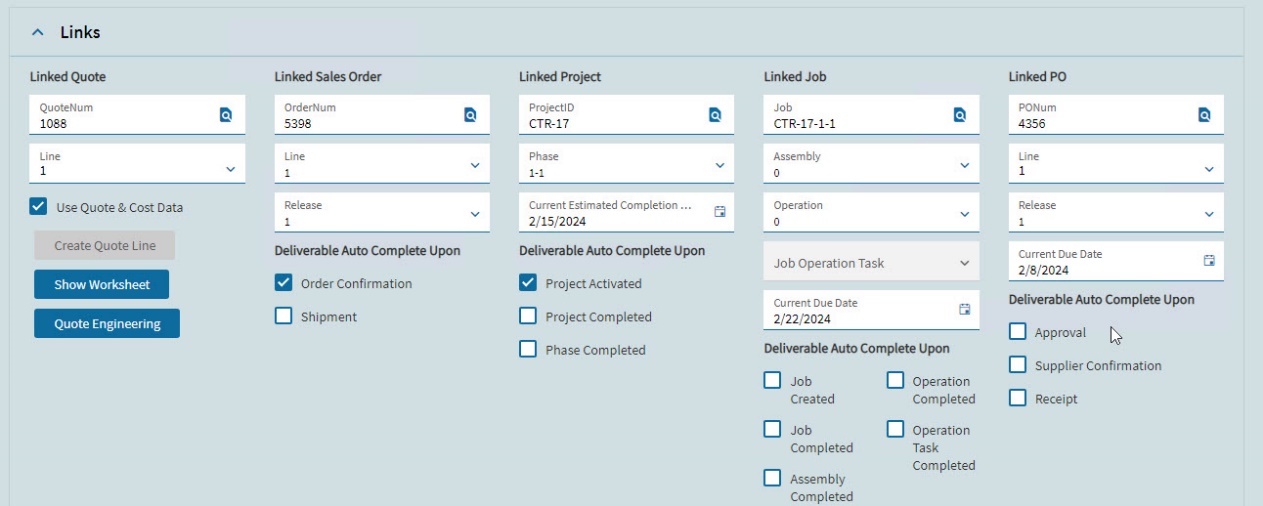
The Deliverable Auto Complete Upon check boxes are informational only. Use the check boxes to highlight relevant information. -
After capturing the details, select Save
on the Standard toolbar.
-
Setting Deliverable Flags
A new deliverable has all its flags cleared to begin with. The labels are:
-
Scope Not Complete
-
Approach Not Complete
-
Estimate Not Complete
-
Delivery Not Complete
These flags are informational only.
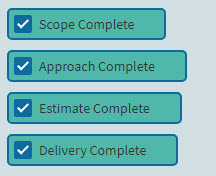
As work on the deliverable progresses, select the applicable check box to note the stages. The selected check boxes come with new green labels, respectively:
-
Scope Complete
-
Approach Complete
-
Estimate Complete
-
Delivery Complete
|
Adding Quotation and Cost Estimates
To add quotation and cost estimates of a deliverable:
-
Select a deliverable on the Navigation Tree.
-
Expand the Quotation and Cost Estimates card.
-
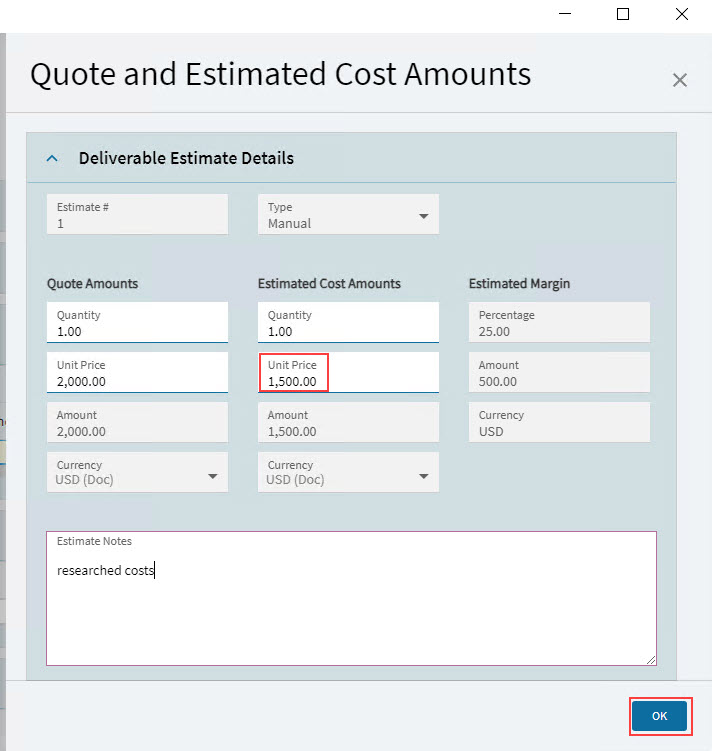
Click New Deliverable Estimate
on the Quotation and Cost Estimates card menu.The Quote and Estimated Cost Amounts panel slides out.
-
Capture the following in the panel:
-
Quote Amounts: Quantity and Unit Price.
-
Estimated Cost Amounts: Quantity and Unit Price.
-
Estimate Notes.
-
-
Click OK.
-
Select Save
on the Standard toolbar.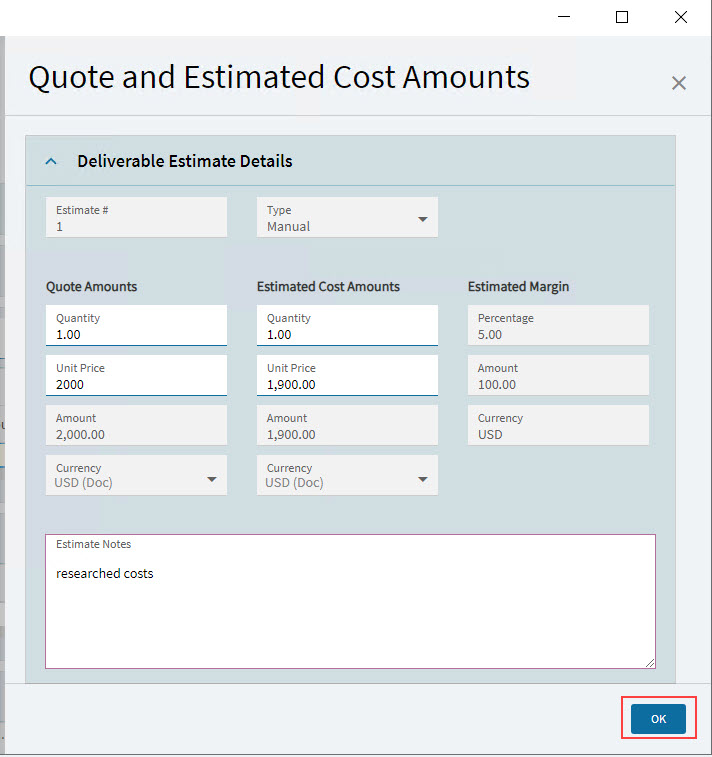
The estimate is added. It has a Manual Type.
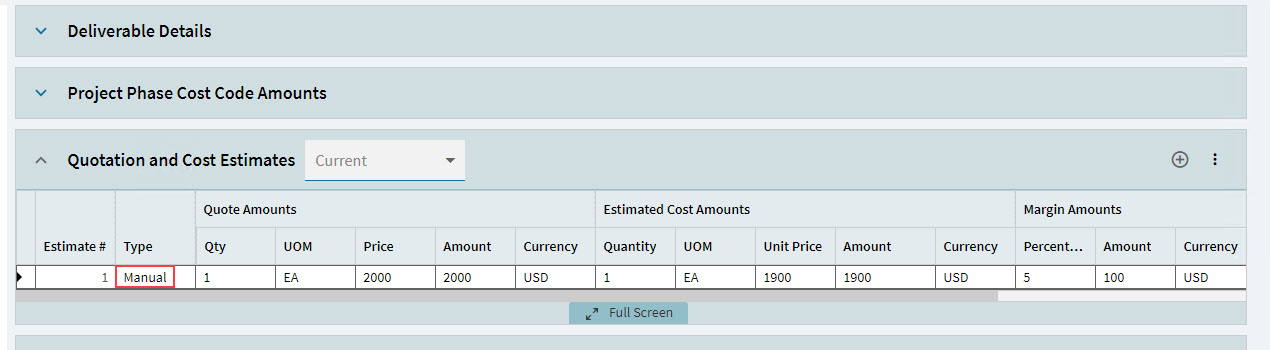
You can also insert a quote estimate for a Linked Quote, using the Deliverable Update Process. See Deliverable Update Process.
To edit an Estimate (Manual or Linked Quote):
-
Click on the Estimate # in the grid.
The Quote and Estimated Cost Amounts panel slides out.
-
Edit the values.
-
Enter an Estimate Note.
-
Click OK to save your changes.
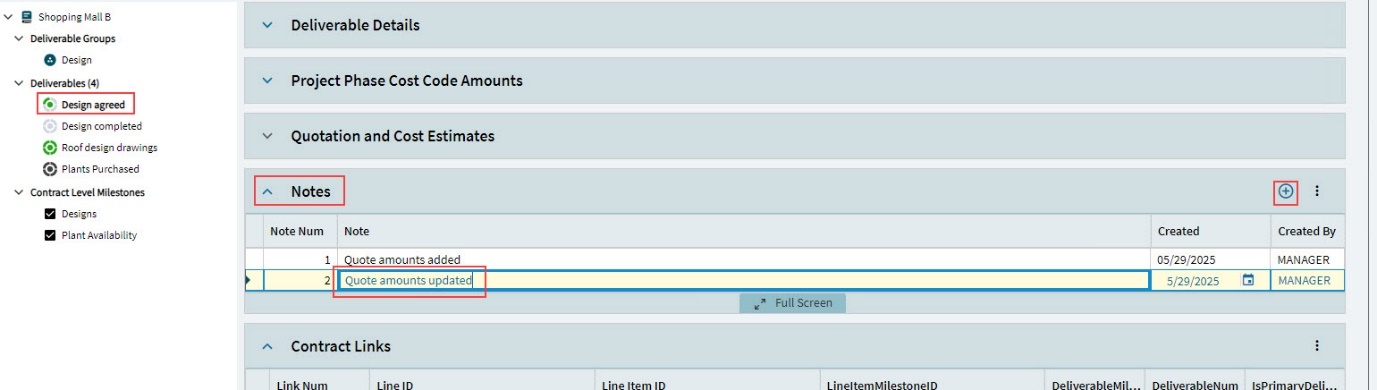
Adding Notes
Optionally add notes for the deliverable.
-
Select a deliverable on the Navigation Tree.
-
Expand the Notes card.
-
Click New Deliverable Note
on the Notes menu bar. -
Type in a Note.
Contract Links
Contract Line Items that are linked to the deliverable item are listed here.
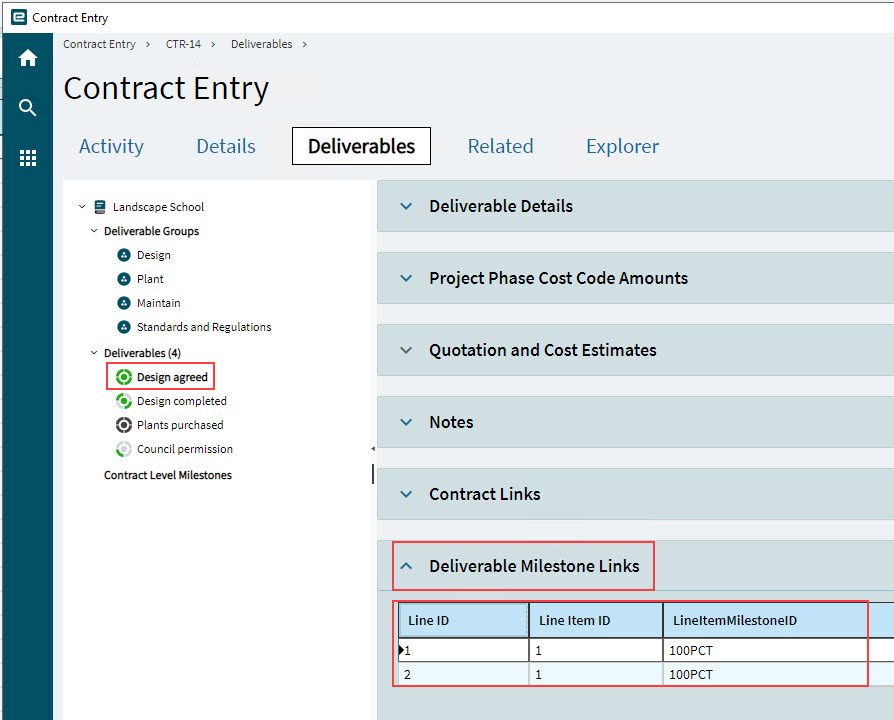
Deliverable Milestone Links
The Deliverable Milestone Links card displays the Contract Line Item Milestones which have this deliverable as one of their deliverable requirements.
Adding Contract Level Milestones
Contract Level Milestones are a group of one or more deliverables that can be linked to line item milestones. Each Contract Level Milestone has a due date. (Note that due dates for the different contract levels milestones may overlap.)
Deliverables (once they have been added) are selected for each Contract Level Milestone, and the contract level milestone should not be considered complete until all its deliverables are completed.
Contract Deliverable Milestone Details
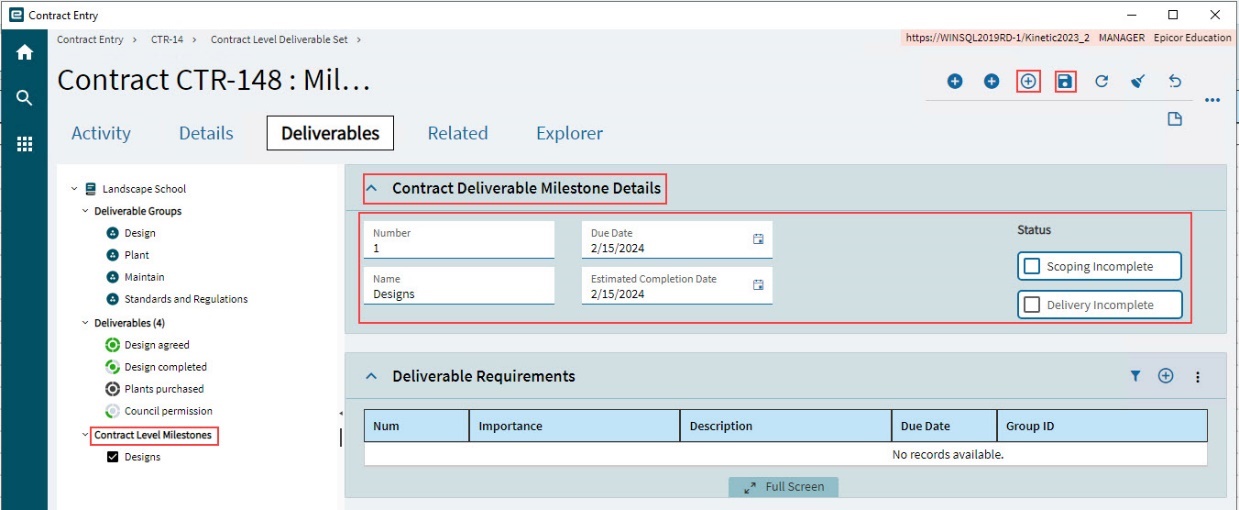
To add a new Contract Level Milestone:
-
Open the Deliverables page.
-
Select Contract Level Milestones on the Navigation Tree.
-
Click New Contract Deliverable Milestone
on the Standard toolbar, or right-click on Contract Level Milestones and select New Contract Deliverable Milestone from the
pop-up menu. -
Expand the Contract Deliverable Milestone Details card.
-
Enter/select the following in Contract Deliverable Milestone Details:
Name A descriptive name for the Contract Deliverable Milestone.
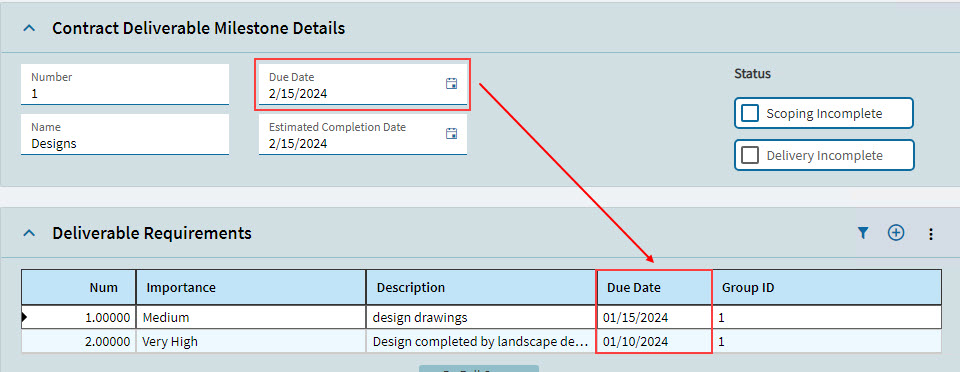
Due Date When this should be ready by. Note that the due date for a contract level milestone should not be earlier than any of its deliverable item due dates.
Estimated Completion Date Optional.
Status Select Scoping Incomplete when scoping is complete. The check box updates to Scoping Complete.
Select Delivery Incomplete when delivery of the Contract Level Milestone is complete. The check box updates to Delivery Complete.
-
Select Save
on the Standard toolbar.
Deliverable Requirements
The new Contract Level Milestone requires a group of one or more deliverables. This step describes how to add these.
Before this step, ensure you have added all the deliverables for this contract (see Add New Deliverable).
To assign a deliverable to a Contract Level Milestone:
-
Select the Contact Level Milestone on the Navigation Tree.
-
Expand the Deliverable Requirements card.
-
Click New
on the Deliverable Requirements menu bar.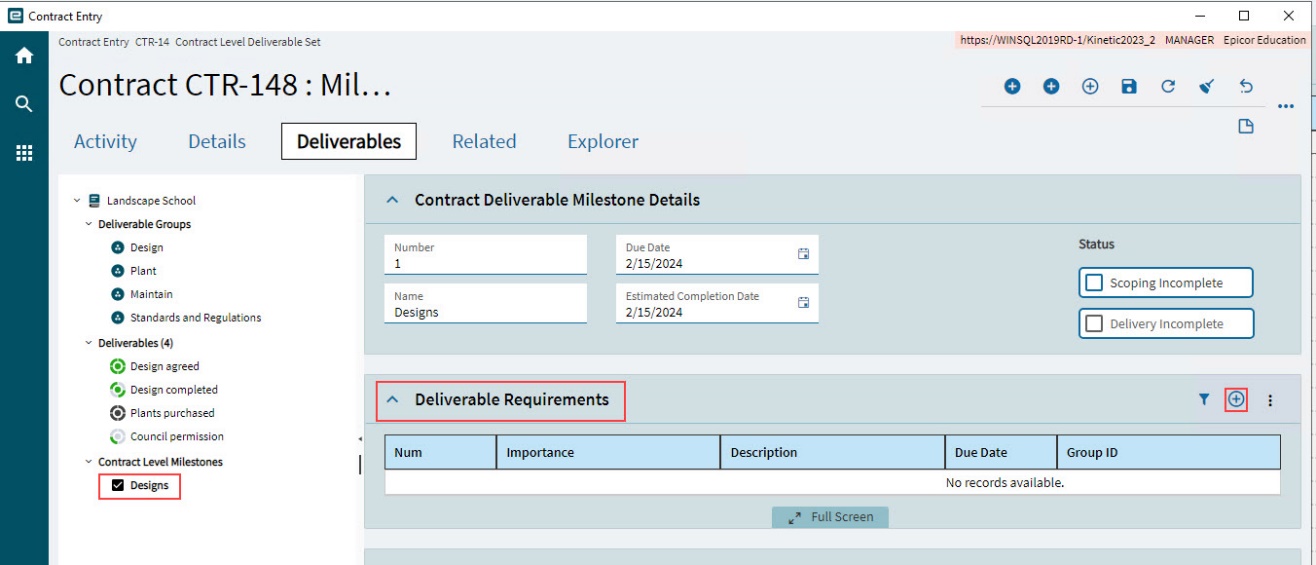
The Deliverable Milestones To Be Completed panel slides out.
-
Select one or more deliverables, then click OK.
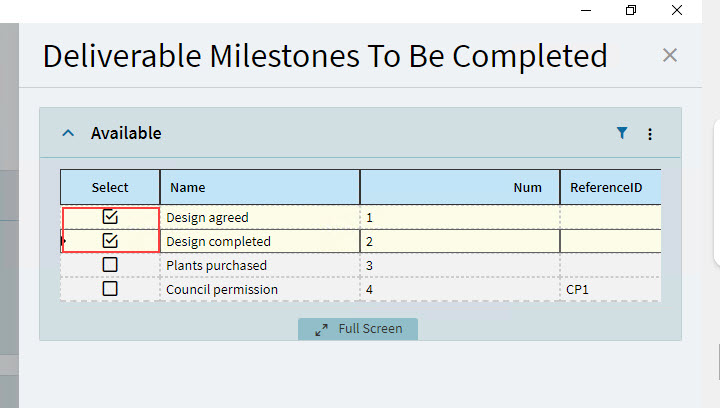
The selected deliverables are assigned to the Contract Level Milestone.
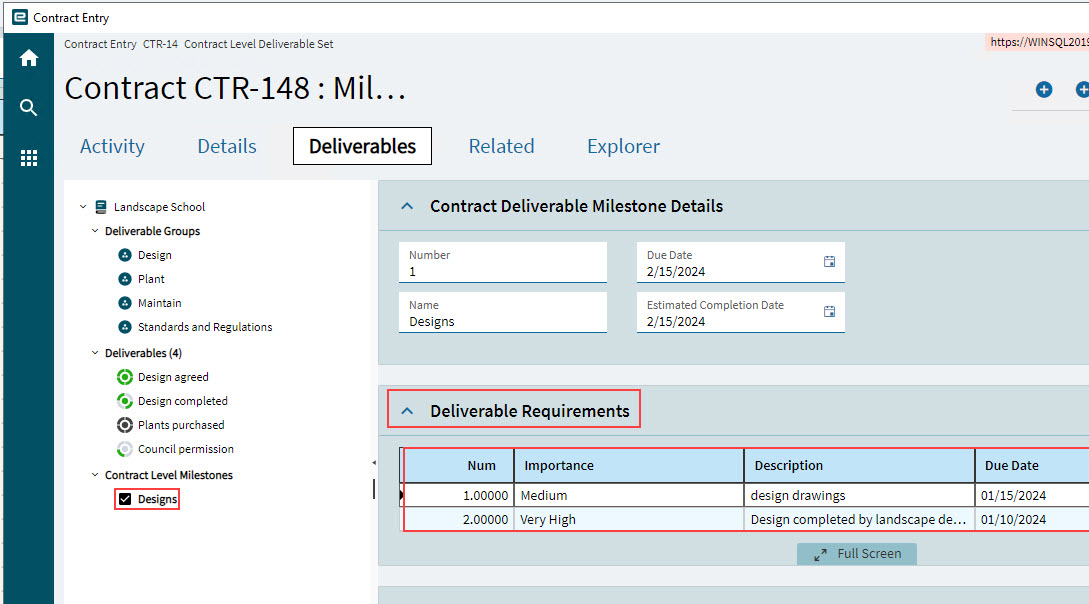
To unassign a deliverable item, select it on the Deliverable Requirements grid, then select Delete from the card menu. -
Check that the due dates for the deliverable requirements are on or before the contract deliverable milestone due date.
-
Select Save
on the Standard toolbar.
Where Used: Contract Line Item Milestones
If a Contract Level Milestone is a selected Deliverable for a Contract Line Item then that Contract Line Item is listed under Where Used: Contract Line Item Milestones. The Line ID and Item ID in the grid refer to the contract’s Line ID and Line Item ID, respectively.
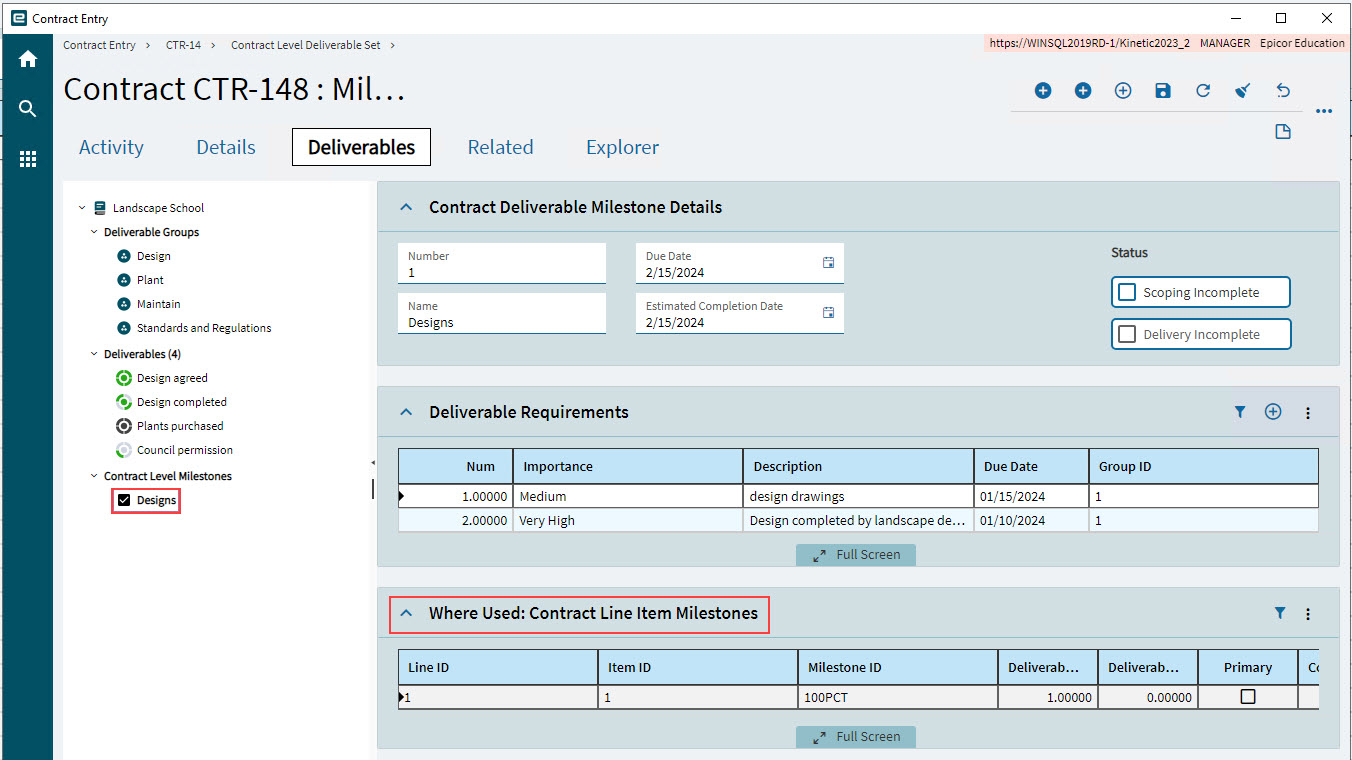
| A Contract Level Milestone can be added to more than one Contract Line Item Milestone. |
Viewing and Updating the Related Page
Quotes, Projects, and Sales Orders that are mapped to a Contract appear on separate cards on the Related page in Contract Entry. Also use the Related page to add and link Workforce and Contacts to the contract.
Linked Quotes
The primary Related Quote appears on the Linked Quotes card on the Related page. This is the quote that is created from the contract (see Creating a Quote from a Contract).
To view the quote details, right-click on the Opportunity/Quote and select APM Quote Entry.
Separate quotes that are mapped to contract line items appear on the Related card within the Line Item Details card.
Linked Projects
A Contract Line Item will not be pulled into a Contract Claim unless it is linked to a Project and Project WBS Phase ID.
Therefore, to enable billing, ensure that each contract line item is linked to a Project WBS Phase.
Project Created from Contract
If a Project is created from a contract (see Creating a Project from Contract), this is the primary Related Project and appears in the Linked Projects card on the Related page. A Project WBS Phase is created for each Contract Line Item and is mapped to that Contract Line Item.
If a Contract Line Item is added after a Project is created from the contract, you need to sync it to the project (see Sync to Project). This creates a corresponding Project WBS Phase in the primary Project and maps/links with the Contract Line Item.
Project Added to Contract
If you add a Project to a Contract (see Adding a Project to a Contract), the Project is related to the Contract and also appears on the Linked Projects card on the Related page.
Linked Sales Order
Sales Orders that have been added to the Contract (see Adding a Sales Order to a Contract) appear on the Linked Sales Orders card on the Related page.
Workforce
Add contacts to the Workforce so that they are available in the contract header in the Key People drop-down (Contract Manager and Sales Representative).
Available contacts are maintained in Person / Contact (see Sales Management > Setup > Customer Relationship Management > Setup > Person / Contact) and have a Context Link to Workforce.
|
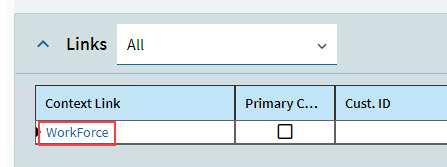
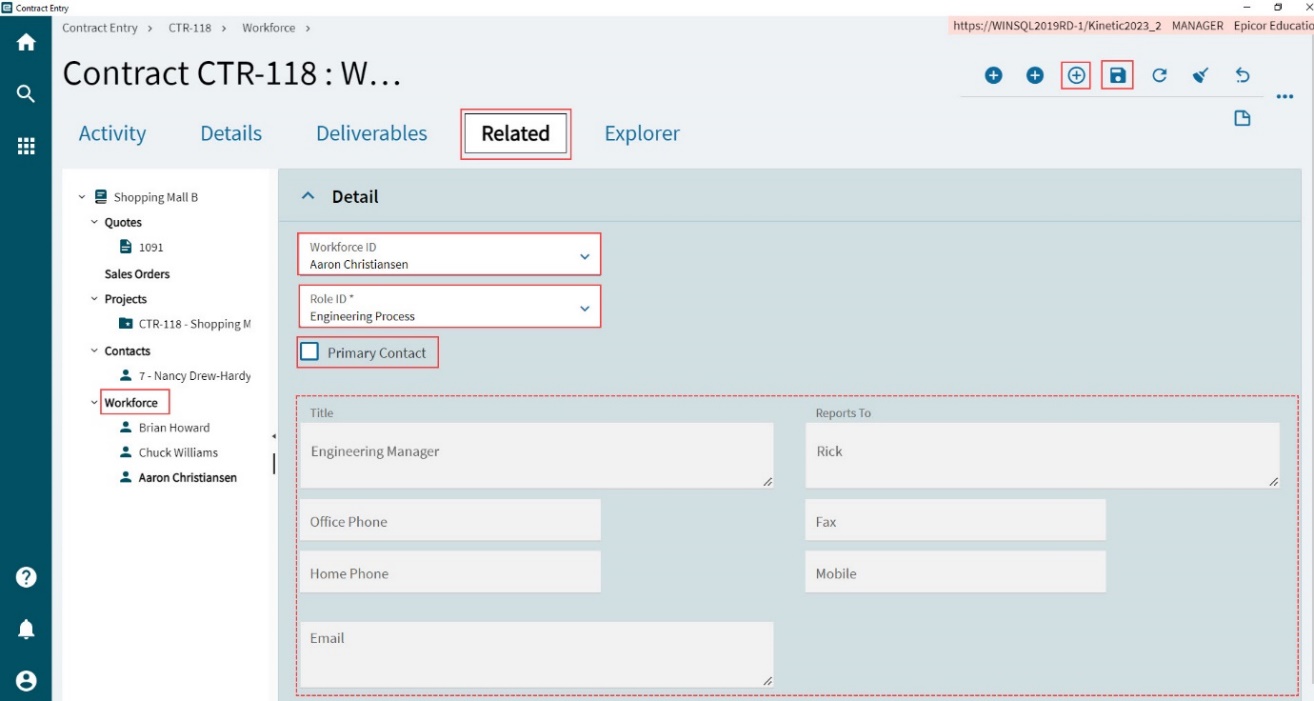
To add a contact to Workforce:
-
Open the Related page.
-
Select the Workforce node on the Navigation Tree.
The Detail card is displayed in the main panel.
-
Select New Workforce
on the Standard toolbar. -
Capture details for the new Workforce.
-
Select a Workforce ID from the drop-down list.
-
Select a Role ID from the drop-down list.
-
Select Primary Contact if this is to be the primary contact in the contract. There can only be one primary contact, so selecting this automatically clears the check box on a previously selected primary contact.
-
-
Select Save
on the Standard toolbar.The available details for the remaining fields are populated from the existing Contacts record.
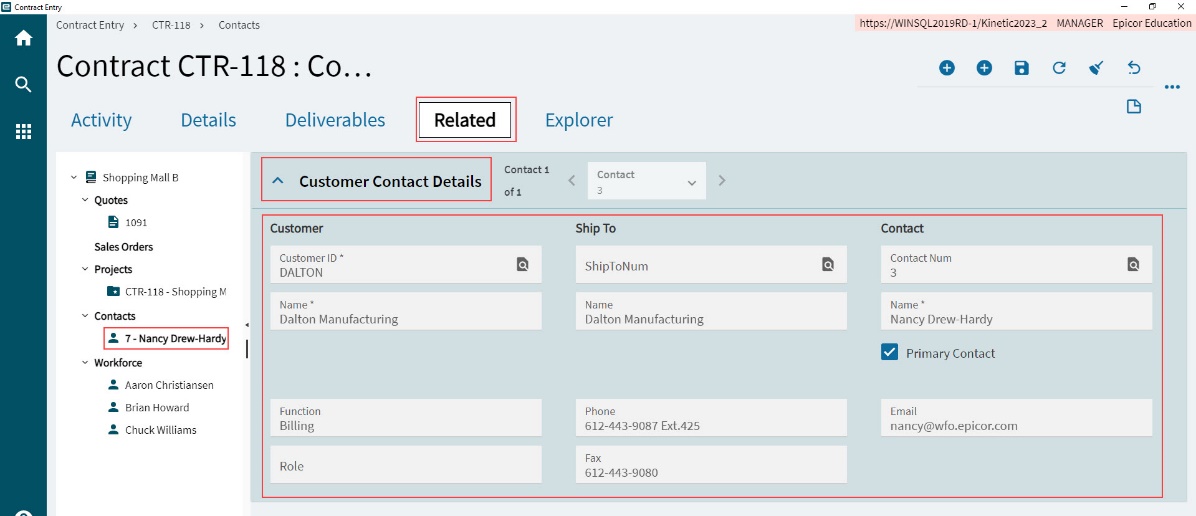
Contacts
When you select a Customer for the contract, the customer’s Primary Contact for Billing is selected as the contract’s Attention contact. They are also added to the list of contract Contacts.
To view the contract’s contacts:
-
Open the Related page.
-
Expand the Contacts node on the Navigation Tree.
-
Select a contact under the Contracts node, to view the details on the Customer Contact Details card.
Relevant details from the Customer Maintenance application are displayed on the Customer Contact Details panel.
Adding a New Contact
To add a new contact:
-
Open the Related page.
-
Select the contract
node at the top of the Navigation Tree. -
Expand the Contacts card.
-
Click Add New Contract Contact
on the Contacts card menu bar.The Customer Contact Details card opens, for a new contact.
-
Select a Customer ID, Ship To, and Contact.
-
Select Save
on the Standard toolbar.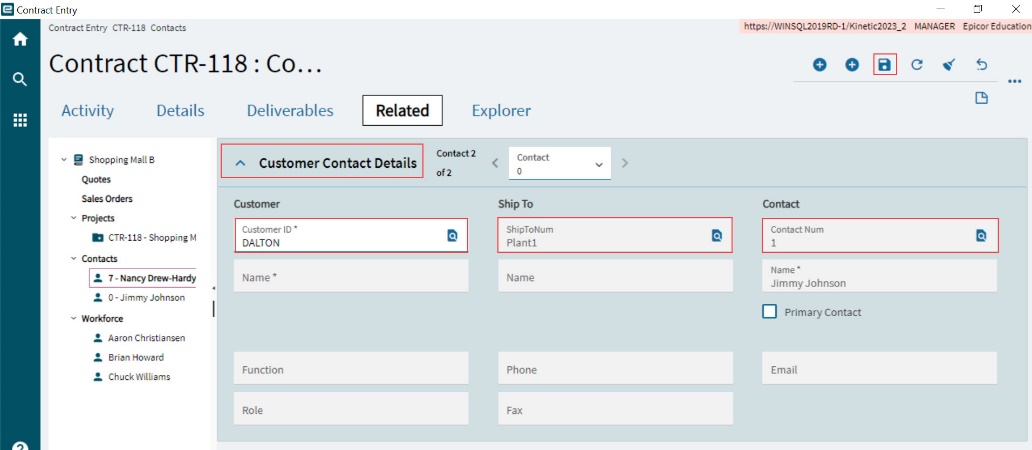
The selected contact is added to the contract.
Revisions
Each revision of the contract is listed on the Revisions card, on the Related page. See Revising a Contract.
Referencing Data in Contracts
Quote Mapping
When a contract line item is mapped to a quote, any changes to the quote can be updated automatically in the contract line item. Quote lines are created and mapped to contract line items when a quote is created in Creating a Quote from a Contract.
To update quote line values to the contract line items in the current contract:
-
Click Refresh on the Standard toolbar, to bring in the latest details from the quote.
-
Click Map to Quote in the Related section for any contract line item.
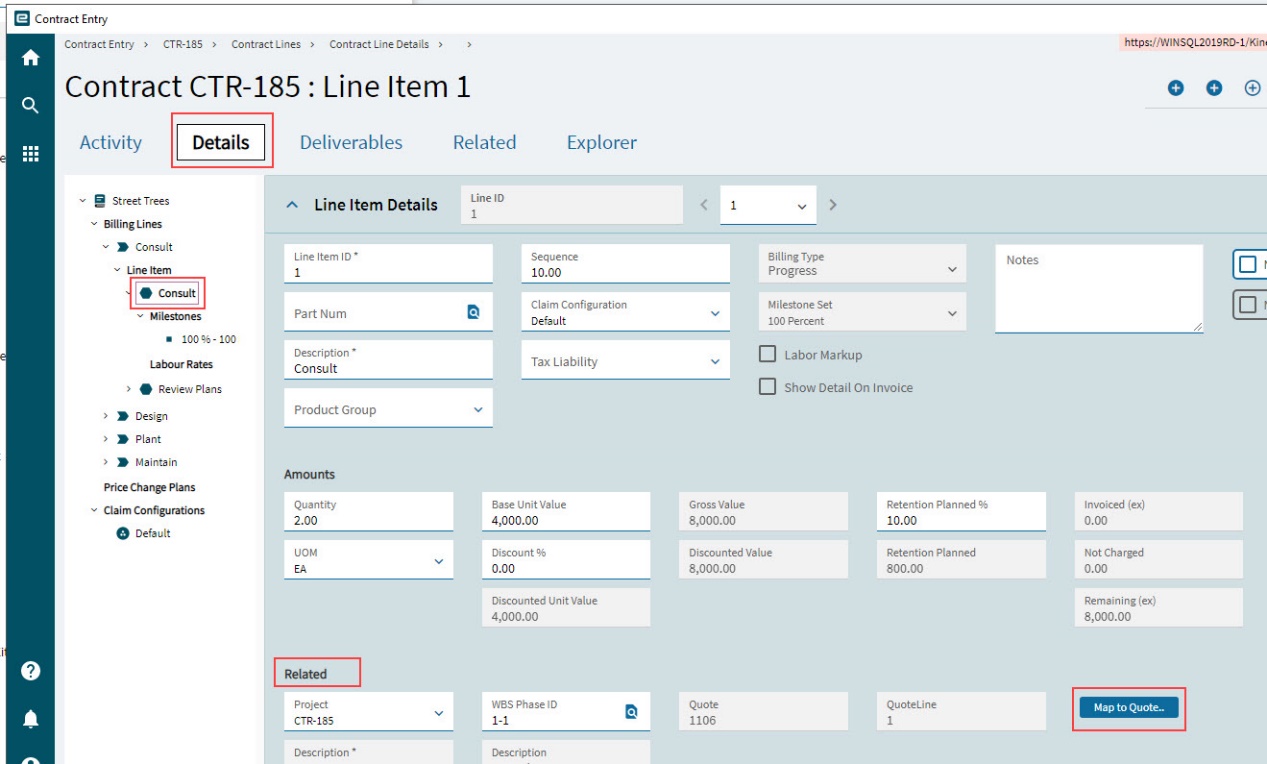
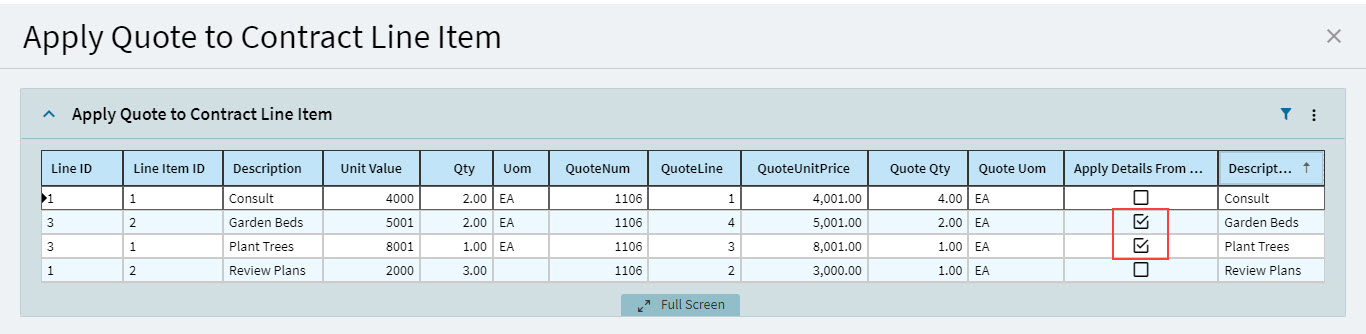
The Apply Quote to Contract Line Item dialog appears. Note that only lines that have differences will be deselected.
-
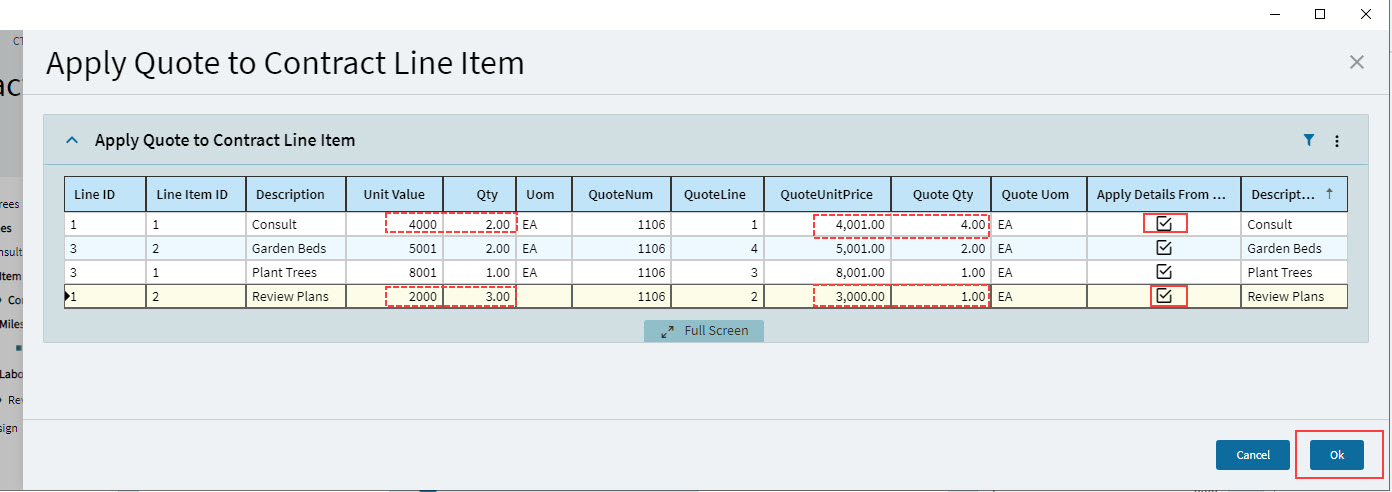
For each line that you want to map, select Apply Details From Quote.
-
Select OK.
-
Click Save Save
on the Standard toolbar, after the dialog closes.
The selected contract line items will be updated with the latest Quote Unit Price and Quote Qty from their mapped lines on the quote.
Sales Order Mapping
You can map a Sales Order to a Contract, and Sales Order Lines to Contract Line Items. Mapping does not change the value of the Contract and is only used as a reference to the Sales Order. To map a Sales Order to a Contract, you need to add the Sales Order. See Adding a Sales Order to a Contract.
After a Sales Order is added to a Contract, you can create Contract Lines and Contract Line Items from the Sales Order, which will bring in the sales order line details, including the values. See Creating Contract Lines and Line Items from Sales Order.
| This will change the value of the contract. |
Project Mapping
Create Project from Contract
You can create a project from the contract. This will create the primary related project for the contract and will automatically create WBS phases for each contract line and contract line item, mapping each contract line item to its corresponding WBS phase. See Creating a Project from Contract.
If you add contract line items after creating a project from the contract, you need to sync the new contract line items to the project. See Sync to Project.
Checking Contract Totals
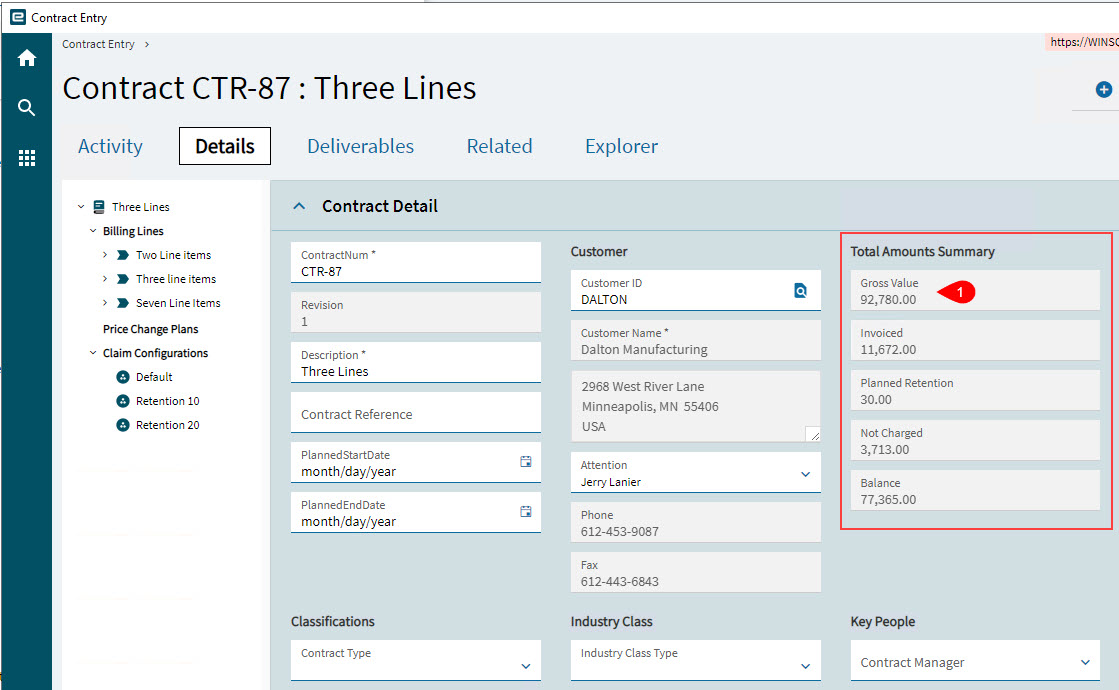
The Total Amounts Summary is the total value of the contract, as agreed by both parties.
Totals Amounts Summary on Contract
The Total Amounts Summary lists a summary of values relating to the contract, including all the contract totals as well as the values brought in from Contract Claim.
- Gross Value
-
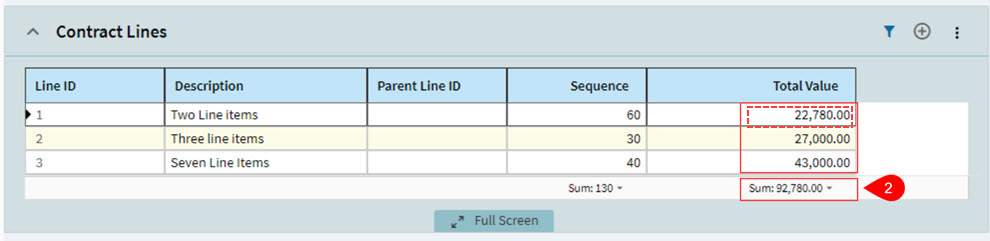
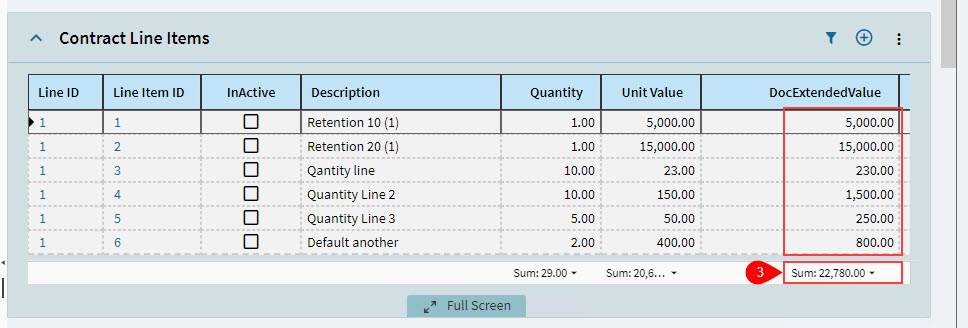
The Extended Value for each Contract Line Item (3) rolls up to the Total Sales Value for each Contract Line (2), which rolls up to the Gross Value for the Contract (1).
- Invoiced
-
The total invoiced amount to date.
- Planned Retention
-
This starts out as the sum of Planned Retention and is updated with Retention totals when the Contract Claims are invoiced.
- Not Charged
-
The total Not Charged amount to date.
- Balance
-
This is the Gross Value less the Invoiced, Planned Retention, and Not Charged amounts.
|
Figure 5: Gross Value on Contract Detail |
|
Figure 6: Sum of Total Value for Contract Lines |
|
Figure 7: Sum of Extended Value for Contract Line Items belonging to a Contract Line |