Contract Claim Entry
Use the Contract Claim process to bill the customer for work or deliverables completed against the contract.
Using Contract Claim Entry, pull contract details and related costs into a contract claim. Review the separate claim lines, adjusting as necessary, until the claim is ready to release and submit to the customer.
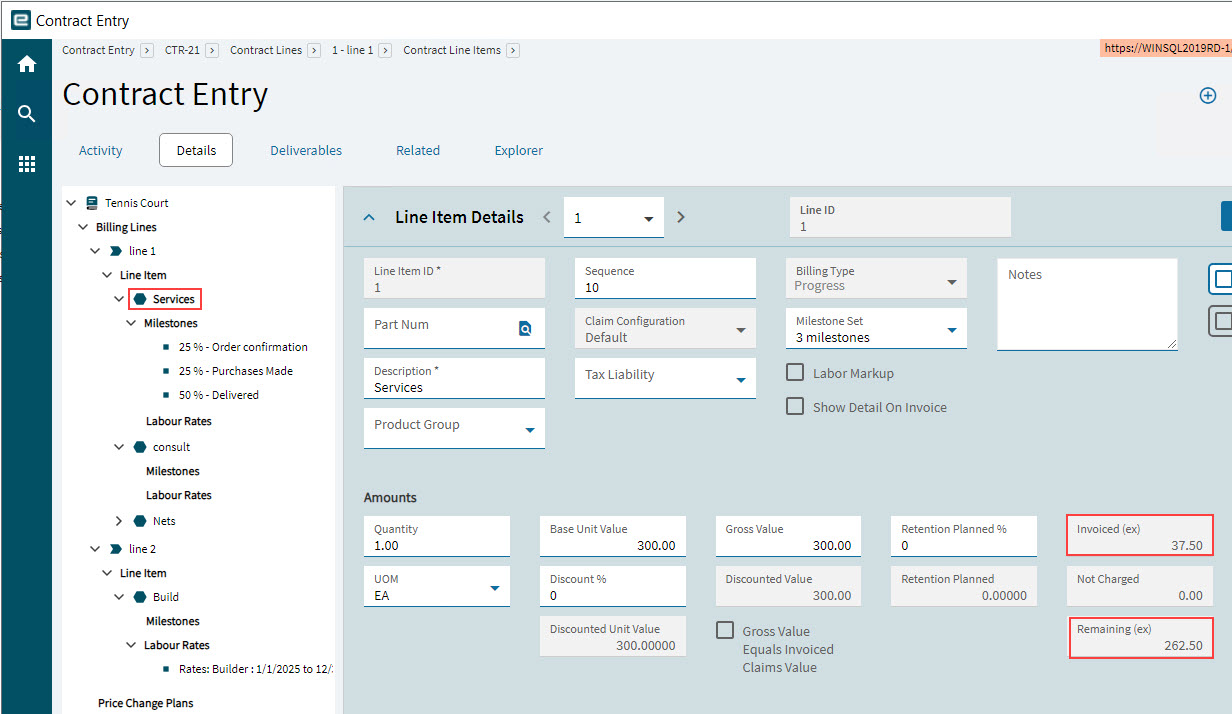
Approved claims can be invoiced to the customer. Invoiced claims increase the Invoiced (ex) and decrease the Remaining (Ex) for the affected Contract Line Items, thus increasing the Invoiced and decreasing the Balance for the Contract.
The invoice is generated to the Accounts Receivable module within Financial Management. Posting is controlled by the “Contract Claim AR Invoice” setting in the Automatic Transaction Posting area of APM Project Management Configuration (see Configuration Details).
A negative claim will be reflected on a Credit Memo within the Accounts Receivable Module. The following sections also relate to contract claims:
Prerequisites
-
Only contracts that have the Active Contract Status are available for claim creation.
-
The contract must be linked to an active Project.
-
The contract must have contract line items and with a value to bill. You can keep claiming against the contract until all values are fully paid.
-
You cannot create a contract claim while an open contract claim already exists for the contract > claim configuration>contract line item combination (or contract > claim configuration > contract line item > transaction detail combination for rates billing).
Multi-Currency
Multi-currency functionality allows for a contract to be billed in more than one currency, with separate currencies used in separate contract line items. For example, products and materials can be billed in Euros, while services are billed in the local currency (for example, US dollars).
The currency for a line item is set by a Claim Configuration which is set up within the contract and then selected for a line item. The Claim Configuration has a Currency portion which controls how the Base Unit Value is calculated on the contract line item and which Currency Code appears in the Contract Claim and resulting AR Invoice.
Contract Claiming and Billing Types
For Contract Line Items using the Progress or Quantity billing type: you can claim amounts against these contract line items until there is nothing left to claim, each time creating a new contract claim and creating an invoice from the contract claim.
For a Contract Line Item using the Rates billing type, you need to generate a Cost against the related Project, WBS Phase, and Cost Code, before you can claim up to those amounts against the contract line item.
Processing Contract Claims and Retentions
If a Contract Claim has a Retention amount, you need to first process the main Contract Claim, then separately process the Retention amount.
For Contract Claims that are not Retentions:
-
Enter a contract claim (see Entering a Contract Claim).
If you need to refresh an existing contract claim from the contract, see Refreshing Claim from Contract.
-
Optionally calculate the tax (see Tax Calculation).
-
Optionally remove zero value lines from the contract claim (see Removing Lines from the Claim).
-
Print the claim for the customer to review (see Claim Document Generation/Printing).
-
Release and Approve the Contract Claim (see Submission and Approval).
-
Optionally remove unapproved lines from the contract claim (see Removing Lines from the Claim).
-
Create an AR Invoice from the Contract Claim (see Generate an AR Invoice).
-
See how the claim and AR Invoice appear in the Contract, the AR Invoice Tracker, and the Project (see Viewing the Contract Claim, Invoice and Revenue).
For Contract Claims that are Retentions:
-
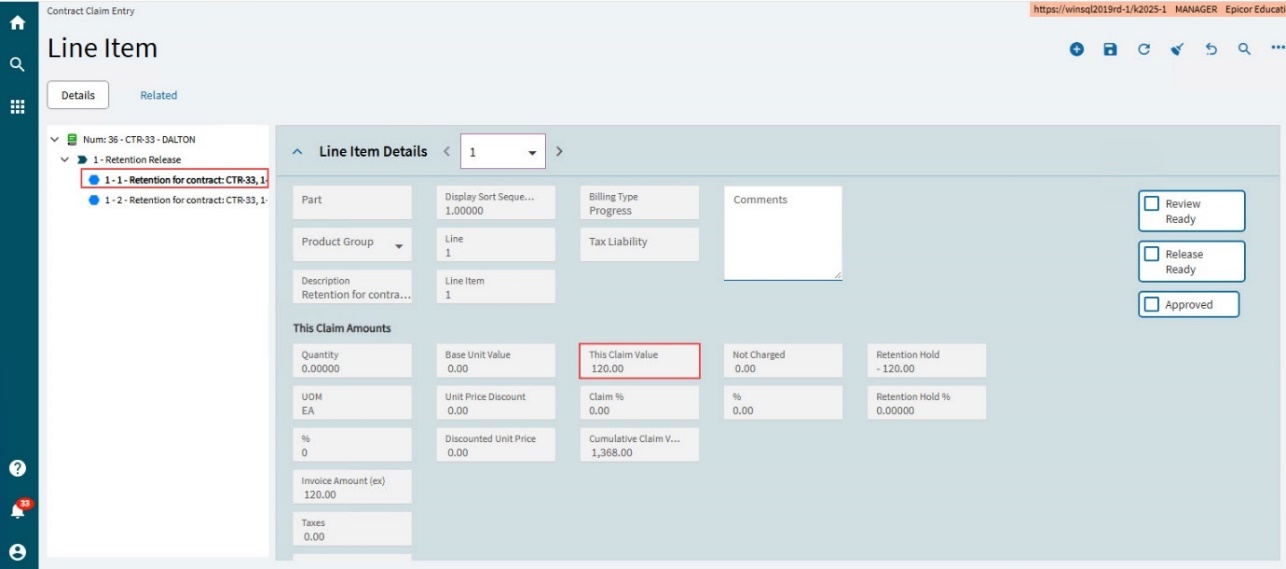
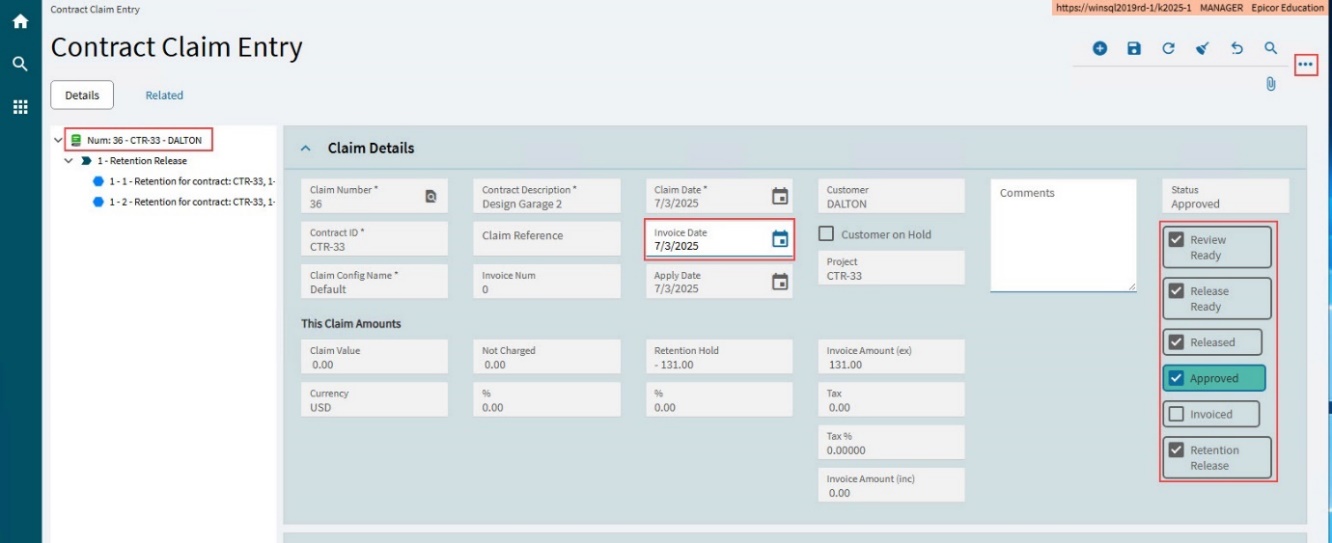
Release the Contract Retention from Contract Entry (see Releasing Contract Retentions), updating or keeping the Release Perc/Release Amt for the separate Line Items. This creates a contract claim, flagged as a Retention Release, and with the Released Status set. Each Line Item in the Claim has a value in This Claim Value that corresponds to the Release Amt for that line item in Release Contract Retentions.
-
Calculate the tax (see Tax Calculation).
-
Optionally remove zero value lines from the Contract Claim Retention (see Removing Lines from the Claim).
-
Print the claim retention for the customer to review (see Claim Document Generation/Printing).
-
Approve the Contract Claim Retention (see Submission and Approval).
-
Optionally remove unapproved lines from the Contract Claim Retention (see Removing Lines from the Claim).
-
Create an AR Invoice from the Contract Claim Retention (see Generate an AR Invoice).
-
See how the Claim and AR Invoice appear in the Contract, the AR Invoice Tracker, and the Project (see Viewing the Contract Claim, Invoice and Revenue).
-
To create a new contract claim while still in the Contract Claim Entry screen, select Get Details from Contract from the Overflow
 menu.
menu.
Opening a Contract Claim
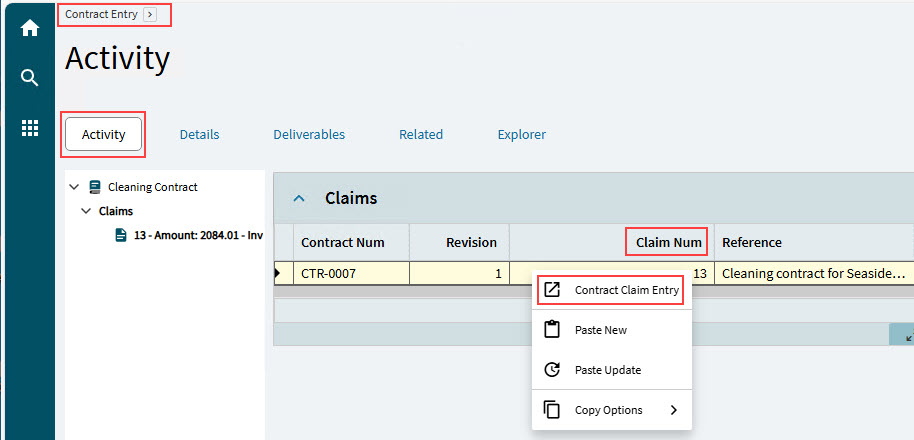
To open a Contract Claim from a contract in Contract Entry:
-
Open the contract in Contract Entry.
-
Open the Activity page.
-
Select Claims on the Navigation Tree.
-
Expand the Claims card.
-
In the Claims grid, right-click on the Claim Num, then select Contract Claim Entry from the pop-up menu.
Alternatively, if you know the Contract Claim number, you can open the Contract Claim in Contract Claim Entry:
-
Open Contract Claim Entry.
-
Filter the grid using the Claim Num.
-
Select the Claim Num in the results grid. This opens the Contract Claim.
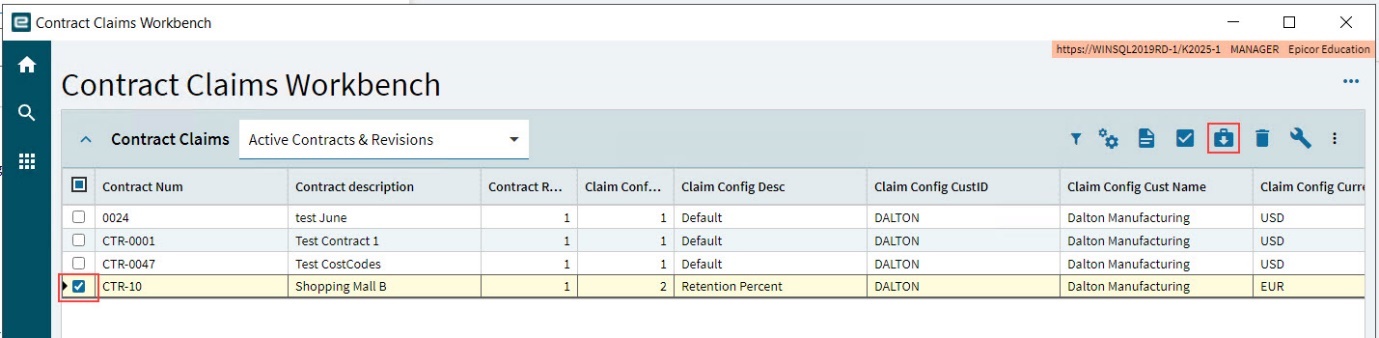
You can also open a contract claim from the Contract Claims Workbench. See Contract Claims Workbench.
Entering a Contract Claim
-
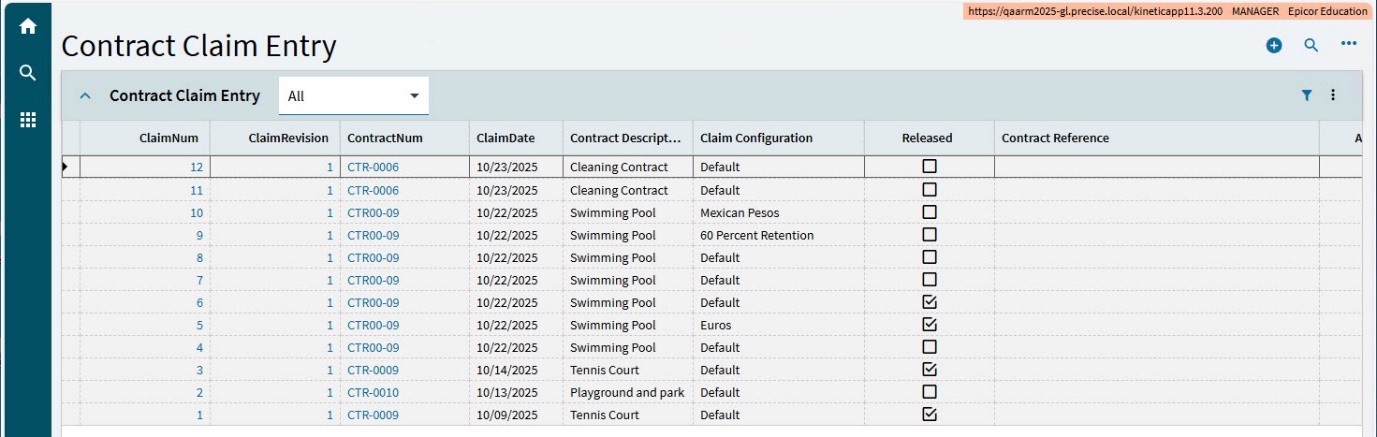
Navigate to Contract Claim Entry (Advanced Project Management > Contract Management > General Operations > Contract Claim Entry).
A list of contract claims appears in the results pane.
To generate a new contract claim:
-
Select New Claim from Contract
 on the Standard toolbar OR
-
Open Contract Claim Entry by clicking on a Contract Num in the grid.
-
In Contract Claim Entry, select Get Details from Contract from the Overflow
menu.
-
-
Select contract details in the Get Details From Contract slide-out panel:
-
Contract: Search for and select a contract to claim against. The contract must be linked to an Active project.
-
Claim Config: Select a claim configuration from the drop-down list. These are the claim configurations belonging to the selected contract. Only contract line items using the selected claim configuration are added to the contract claim. See Claim Configurations.
-
Claim Date: The claim date (defaulted to current date) can be in the past or in the future but should not be before the planned start date.
-
-
Click OK.
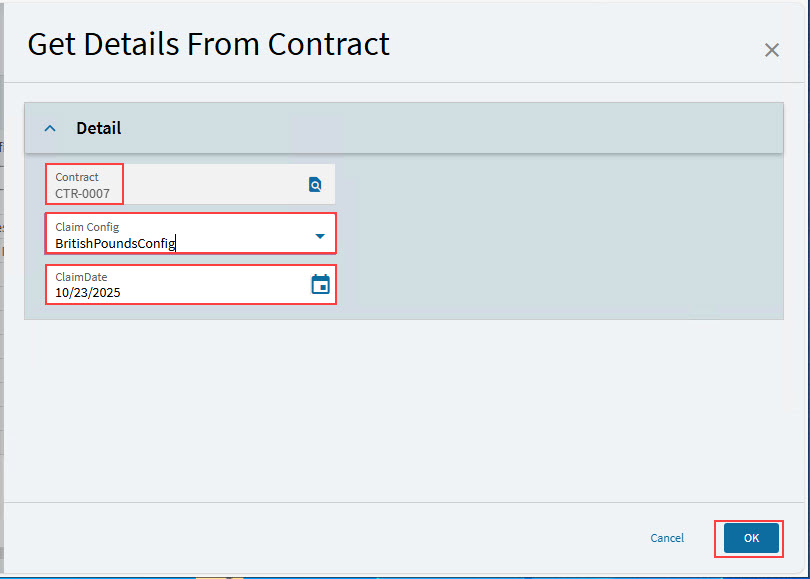
A new contract claim is generated for the selected contract and claim configuration. The new contract claim displays in Contract Claim Entry.
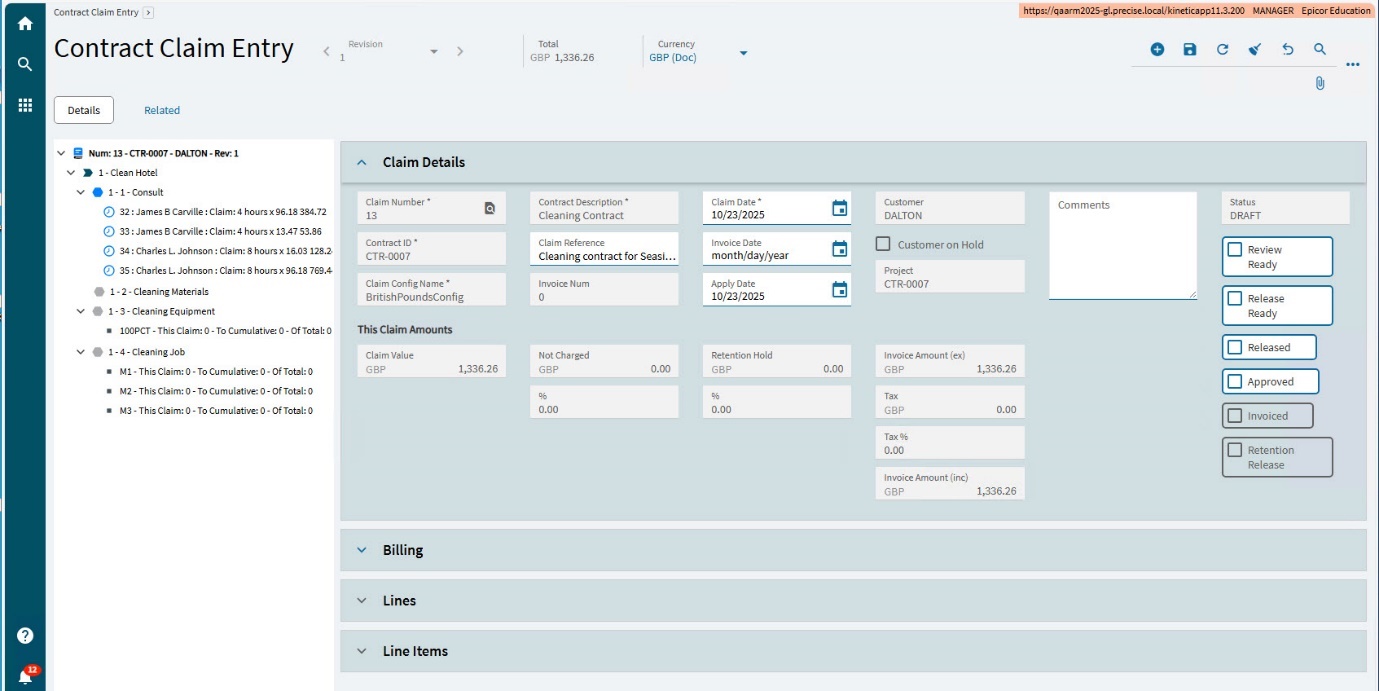
All claim line items (that are not already in an open claim) for the Contract and Claim Configuration, where there is an amount that can be claimed, are included in the new contract claim.
Contract Claim Document Header
The Contract Claim Header displays the contract Revision number, the contract Total and the Document Currency.
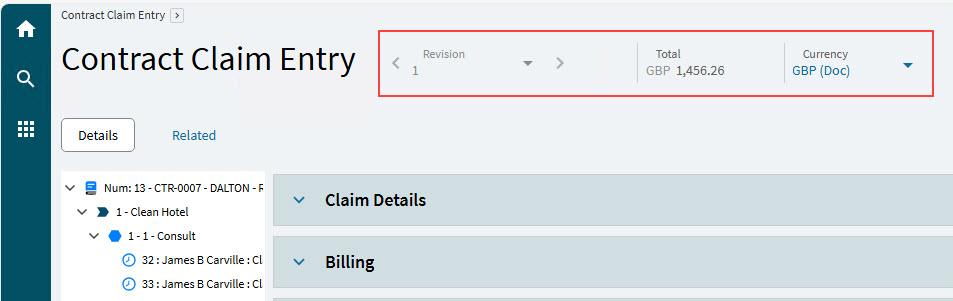
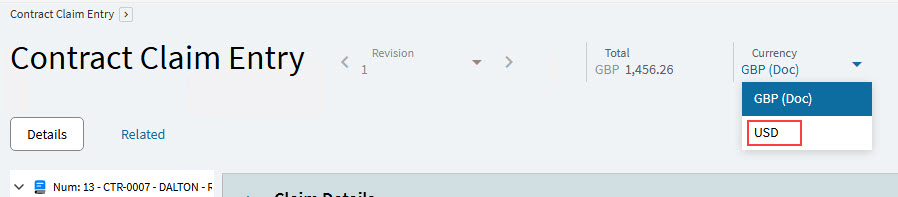
Switching Currency
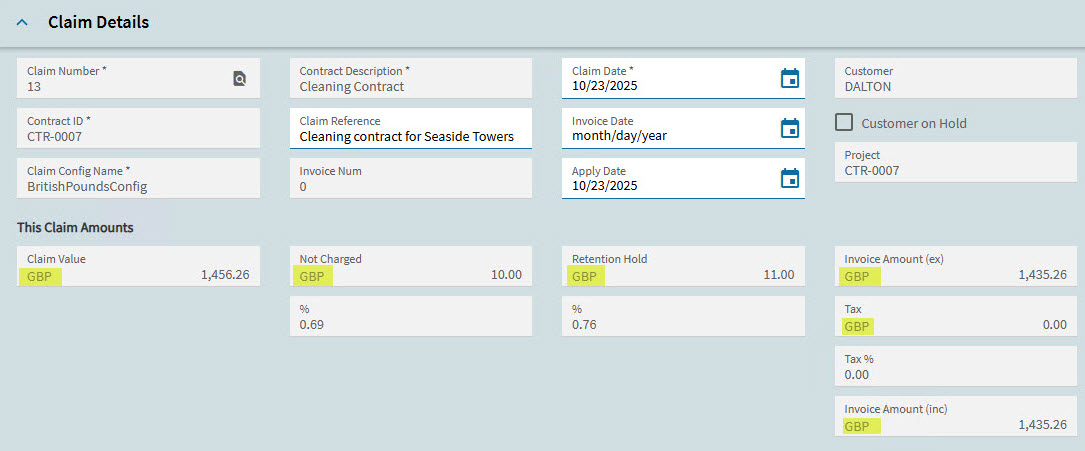
The document currency defaults to the currency used in the Claim Configuration, as defined in the contract. See Adding Claim Configurations. This is also the currency that appears in the Claim Details, as shown by the currency symbol (GBP in this example).
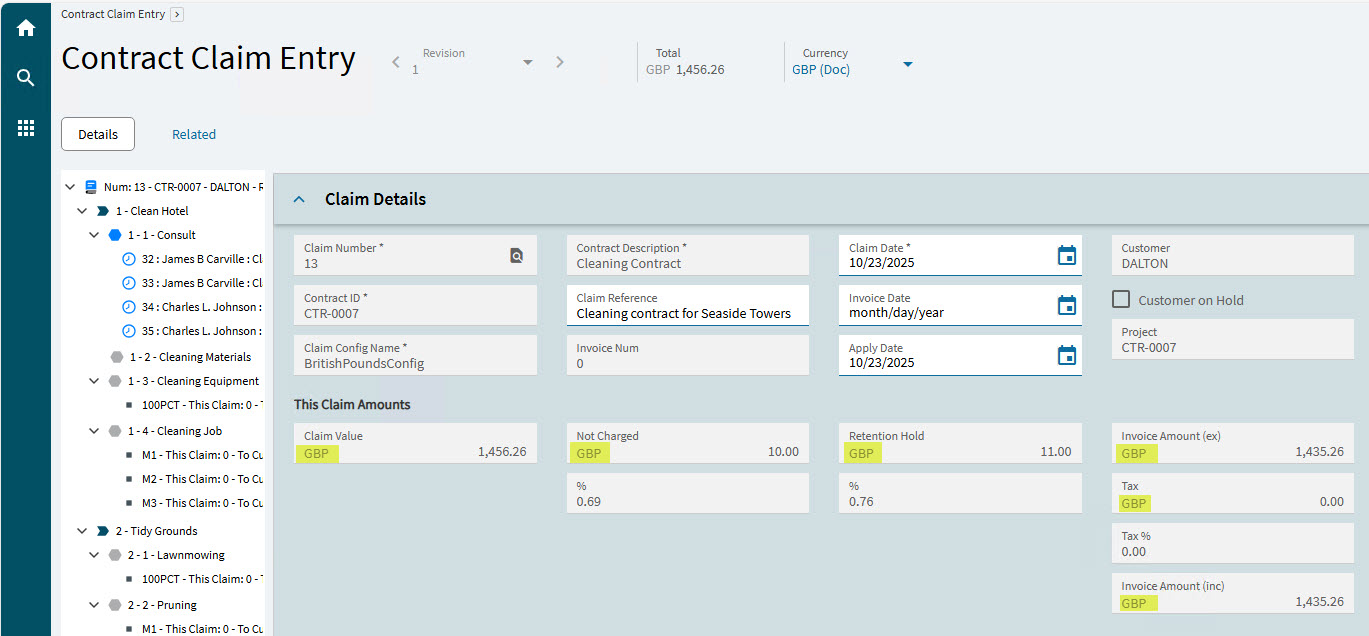
In closer detail:
-
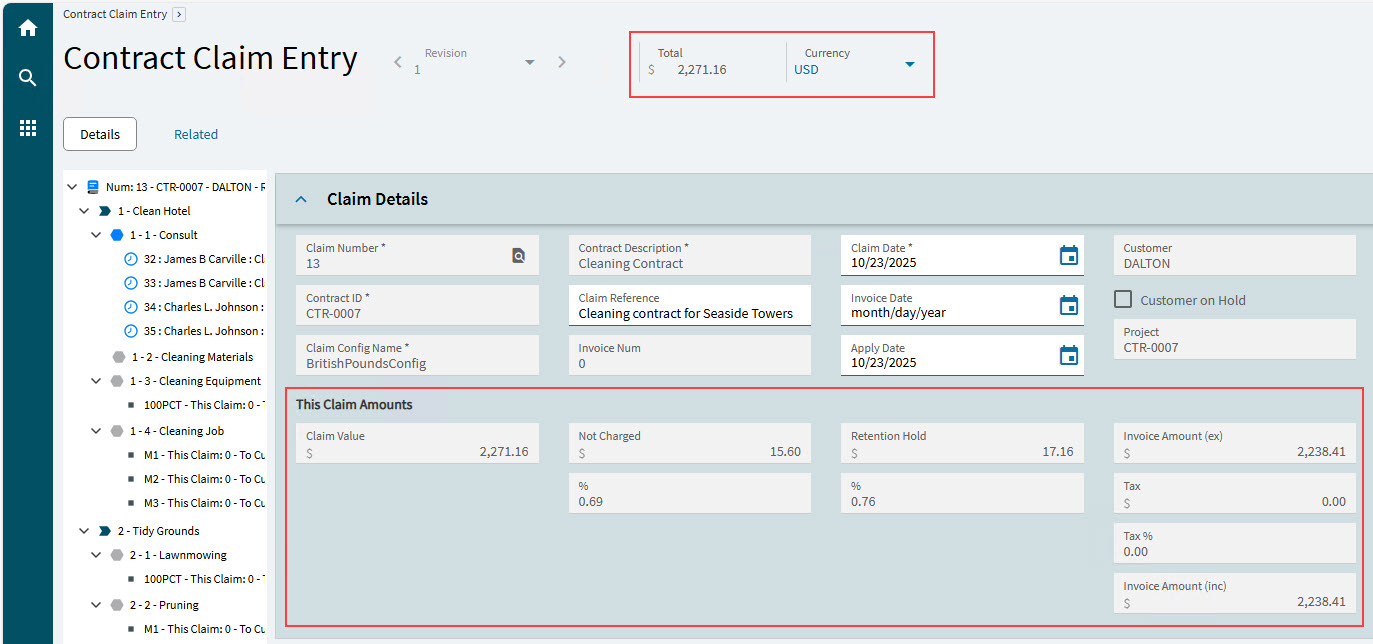
You can switch to the Base currency on the Document Header, by selecting from the Currency drop-down. This is the Customer’s currency.
This converts the values using the conversion rate between the two currencies. The new values as well as the symbol for the base currency replace the previous values.
Contract Claim Details
-
Open the Details page and expand the Claim Details card.
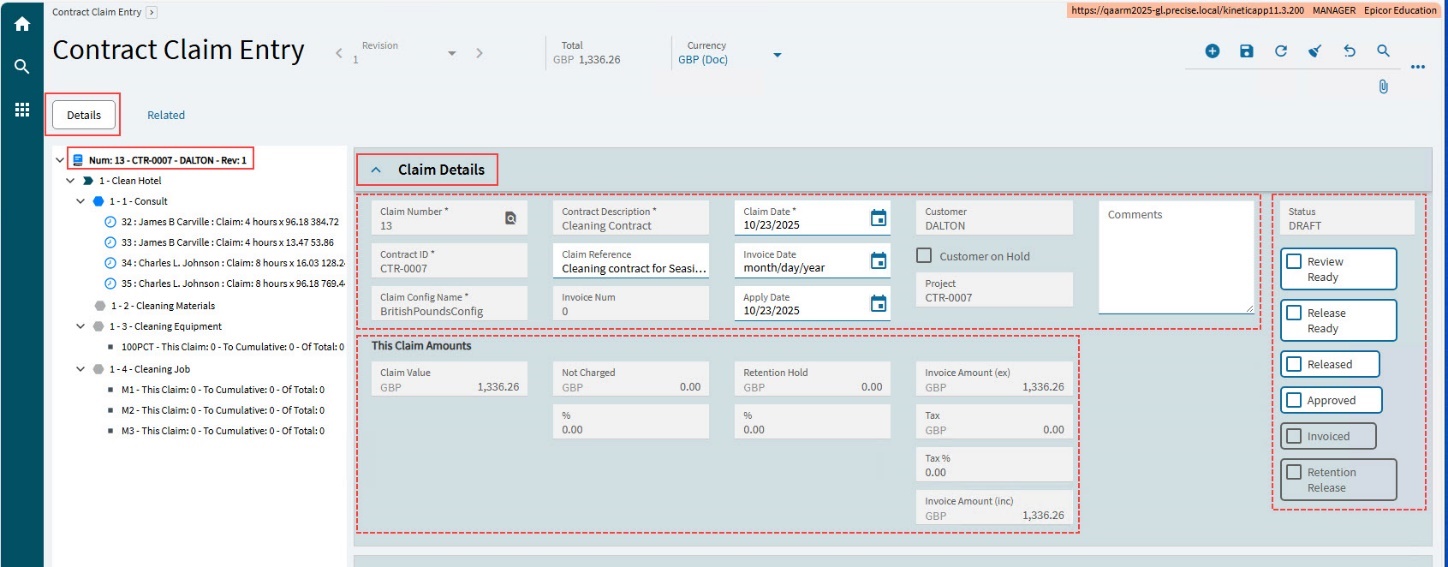
Claim Details

The Claim Details are populated as follows:
| Claim Number |
The claim number assigned by the system. |
| Contract ID |
The Contract Claim is for this contract. |
| Claim Config Name |
The Claim Configuration selected when the contract claim was created. |
| Contract Description |
The contract description for the selected contract. |
| Claim Reference |
Optionally enter a reference for the claim. |
| Invoice Num |
This field is populated with the Invoice Number after an invoice is created from the claim. |
| Claim Date |
The date selected when the claim was created. |
| Invoice Date |
Enter an Invoice Date when you create an invoice from the claim. |
| Apply Date |
The date that the invoice is to be applied. Defaults to the Claim Date. |
| Customer |
The contract customer. |
| Customer on Hold |
If the customer is on ‘credit hold’, this check box is selected. |
| Project |
The primary project linked to the contract. |
| Comments |
Enter comments relating to the claim, for example: feedback and queries from customers, claim progress, or important notes relating to the claim. The Comment on the Claim Details appears on the Invoice Heading Comment in APM AR Invoice Tracker. |
Status and Checklist
Work through the claim and view the current claim status using the check boxes in the Status section:
|
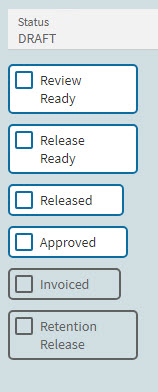
| Status |
For a new contract claim, this is DRAFT. Thereafter, it moves through Released, Approved, Invoiced. |
| Review Ready |
Select when the claim is ready to review. |
| Release Ready |
Select when this claim is ready to release to the customer. |
| Released |
Select when this claim is ready to be submitted for the customer to review and approve. At Release stage, you may select
Print Claim from the Overflow |
| Approved |
Indicates the approval status of the contract claim. After a claim has been released and when the customer has approved the claim value, the claim will be updated and approved. Once a claim is approved, it is ready for an AR Invoice to be generated. |
| Invoiced |
When selected, indicates that the Claim has been posted into the Accounts Receivable module. The Invoice number from that module will populate within the Invoice number field. |
| Retention Release |
Indicates the claim is a retention release. Retention release will produce a contract claim so that an AR invoice can be raised. |
This Claim Amounts
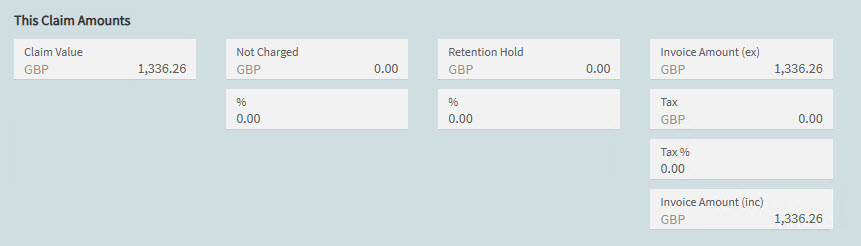
The values shown in This Claim Amounts on the Claim Details card are the sum of the values on each claim line for the contract claim. For milestones (progress billing) and quantity lines, the values start as zero and therefore do not contribute to the total. If there are any rates billing transactions, these will have a value, contributing towards the total.
As you update the claim line values, these values will update. The values are:
| Claim Value and Currency |
The sum of claim values for each claim line in this contract claim. The Currency is from the Contract Details, or from the Claim Configuration if there is an Overwrite for Currency. |
| Not Charged |
The value Not Charged expressed as an amount and as a percentage (%). The amount is the sum of the Not Charged amounts from the individual Claim Line amounts. |
| Retention Hold |
The value held in retention, expressed as an amount and as a percentage (%). The amount is the sum of the Retention Hold amounts from the individual Claim Line amounts. |
| Invoice Amount (ex) |
The amount less tax that appears on the invoice. This is the sum of the Invoice (ex) from the individual Claim Line amounts. |
| Tax |
The tax amount that appears on the invoice. This can be calculated before the Invoice is
generated (select Calculate Tax from the Overflow |
| Tax % |
The tax portion as a percentage of the Invoice Amount (inc). |
| Invoice Amount (inc) |
The full invoice amount, including tax. |
See how to update the value of the different claim lines, depending on the different billing types used:
-
For Progress billing, see Editing Claim Line Item Details for Progress Billing.
-
For Quantity billing, see Editing Claim Line Item Details for Quantity Billing.
-
For Rates billing, see Editing Claim Line Item Details for Rates Billing.
When all the claim lines have been updated for the contract claim, the remaining claim details can be completed before the contract claim is ready to be submitted to the customer.
Billing
-
Still on the Details page, expand the Billing card.
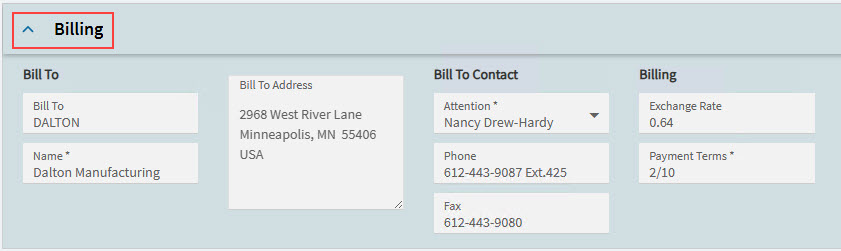
The Billing card is populated as follows:
| Bill To |
If the selected Claim Configuration has a Bill To Customer defined, and the Bill To Overwrite check box is selected, then these are the details used in the claim’s Bill To section. Otherwise, the contract customer’s Default Bill To is used. |
| Bill To Contact |
These details are from the Contract Customer’s details (Attention, Phone, Fax). If the Claim Configuration has different details under Bill To, then these will be used instead. |
| Billing |
The Exchange Rate field is set by the selected Claim Configuration’s Currency field if there is a Currency Overwrite. Otherwise, the base currency of the contract is used (which is the currency on the contract customer’s billing information). If the billing currency matches the base currency, then the Exchange Rate is 1. The selected Claim Configuration’s Terms appear in the Payment Terms. |
Contract Claim Line Details
-
Navigate through the contract claim lines, using the Navigation Tree.
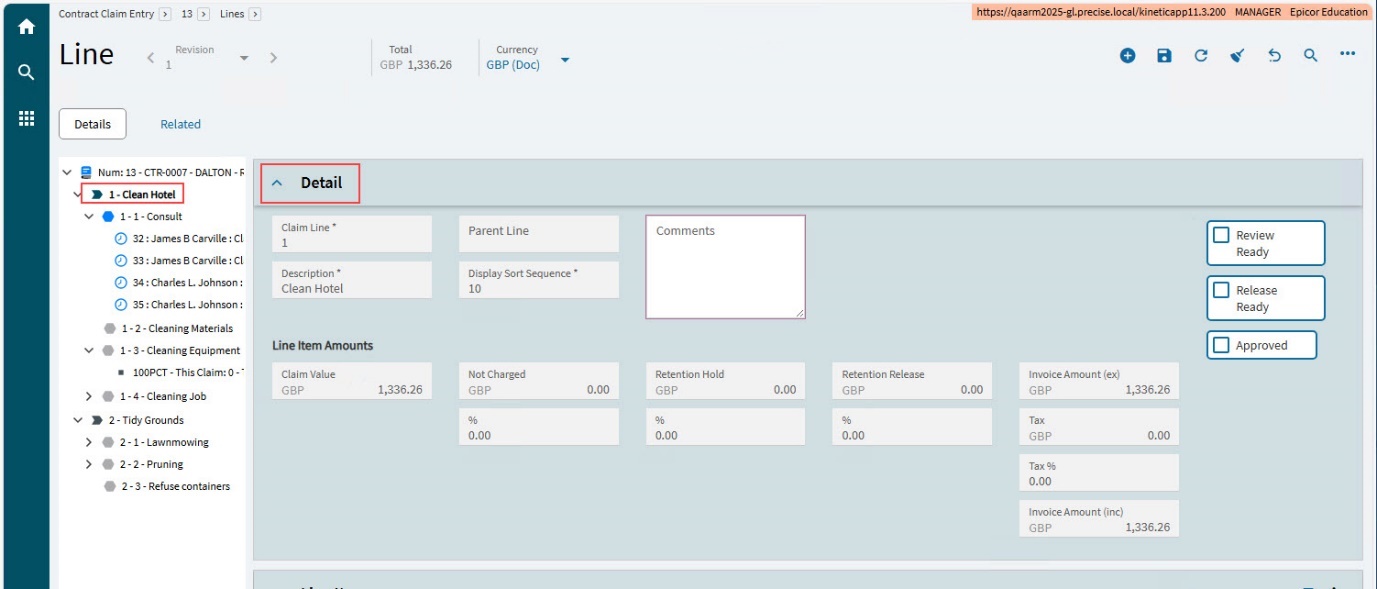
Line Item Amounts
The line item amounts cannot be updated. Each value is a rollup of the line items belonging to this line.
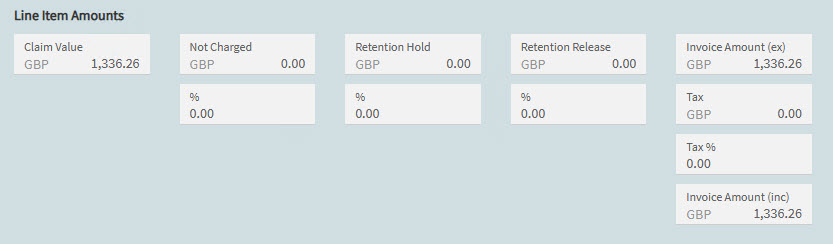
Contract Claim Line Item Details
Review and edit each of the Contract Claim Line Items, prior to releasing the Contract Claim.
Line Item
The Contract Claim Line Item layout differs according to its Billing Type, which originates from the corresponding Contract Line Item.
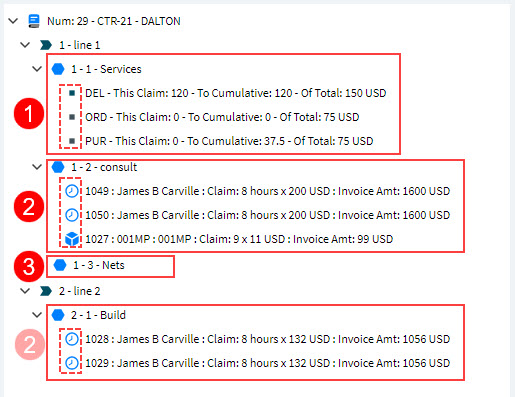
Depending on its Billing Type, a line item may have child nodes. These are represented by icons.

|
Progress Billing Type line items consist of one or more Milestone Detail |

|
Rates Billing Type line items consist of one or more Part Transaction Detail |

|
Quantity Billing Type line items have no child nodes. |


Details
Billing Type is from the corresponding Contract Line Item.
Tax Liability is from the corresponding Contract Line Item.
Editing Claim Line Item Details for Quantity Billing
Select a claim line item on the Navigation Tree. Below is an example of a claim line item using the Quantity Billing Type.
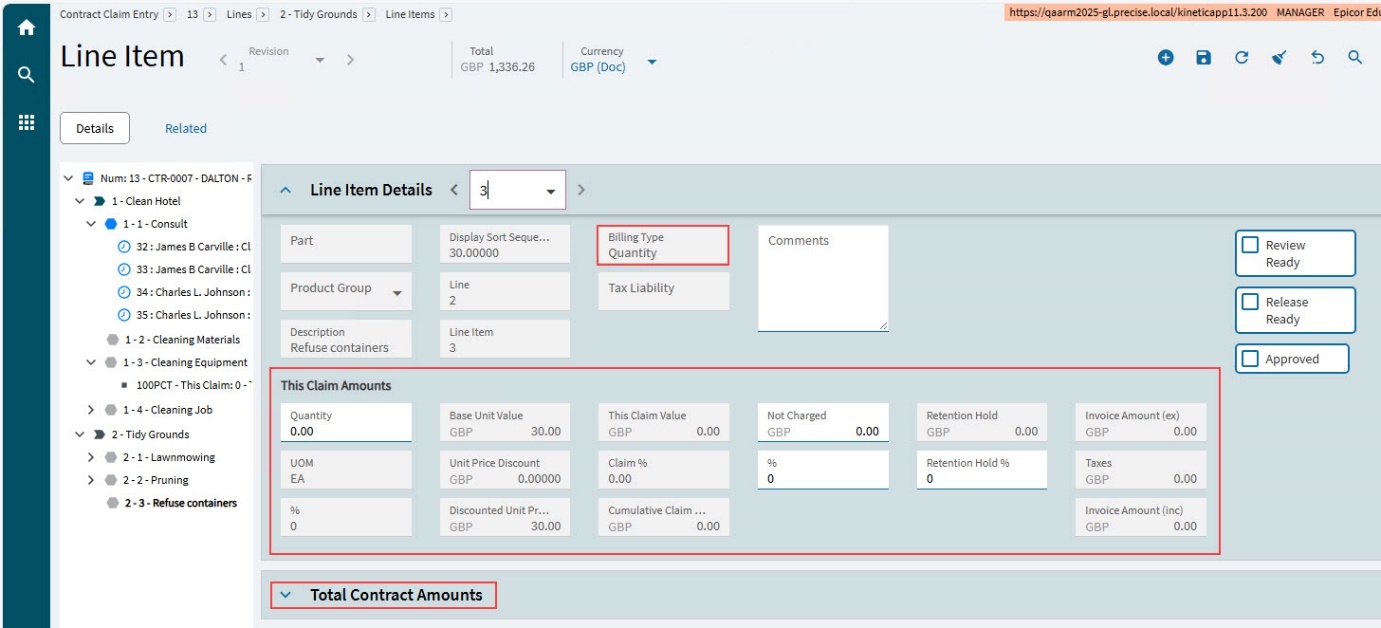
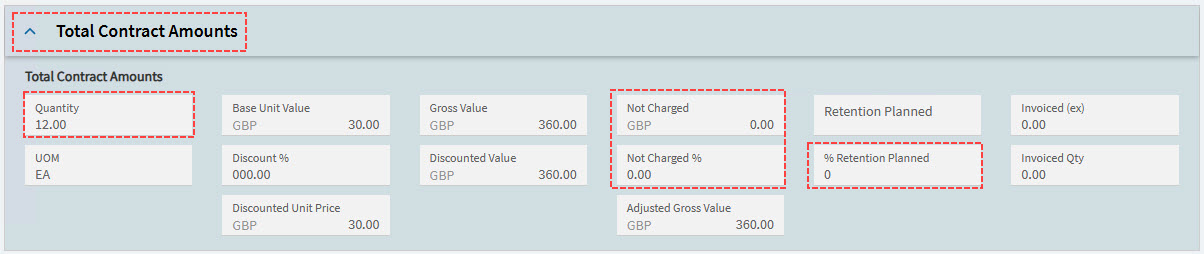
The Total Contract Amounts card shows details from the corresponding Contract Line Item, such as the Quantity, Base Unit Value, Discount Unit Price and Retention Planned.
Refer to the values in Total Contract Amounts when updating the values in This Claim Amounts.
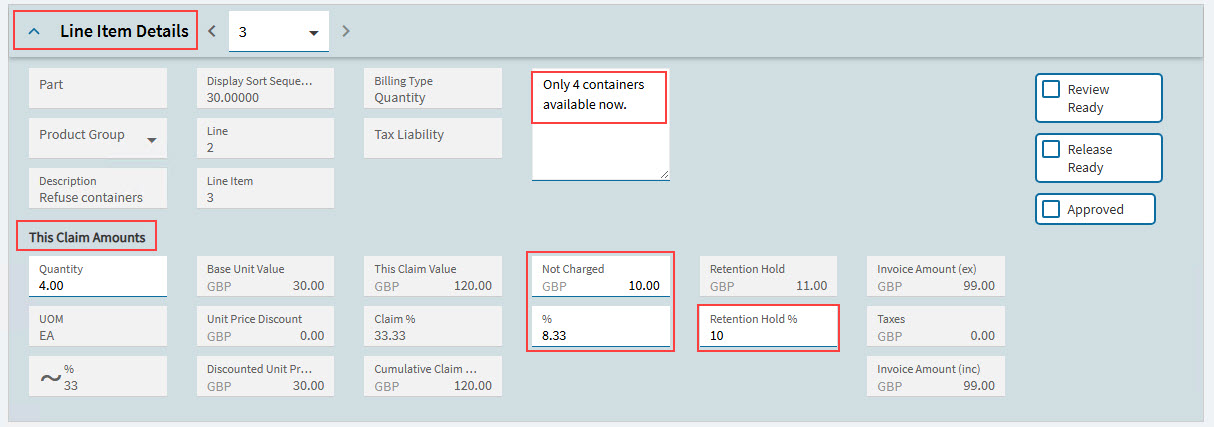
To adjust the claim amount for this Claim Line Item, update the following in This Claim Amounts on the Line Item Details card:
-
Enter a Comment, if applicable.
-
Enter a Quantity, which can be all or part of the Quantity in Total Contract Amounts.
-
Enter a Not Charged value, or percent %, if applicable.
-
Adjust the Retention Hold % if the actual retention is to differ from the % Retention Planned in Total Contract Amounts.
-
Select Save
 on the Standard toolbar.
The values in This Claim Amounts adjust:
-
This Claim Value is the Quantity multiplied by the Discounted Unit Price.
-
Not Charged % is Not Charged as a percentage of This Claim Value.
-
Retention Hold is (This Claim Value less Not Charged) multiplied by Retention Hold %.
-
The Invoice Amount (ex) is This Claim Value less Not Charged less Retention Hold.
-
The Invoice Amount (inc) is Invoice Amount (ex) plus Taxes.
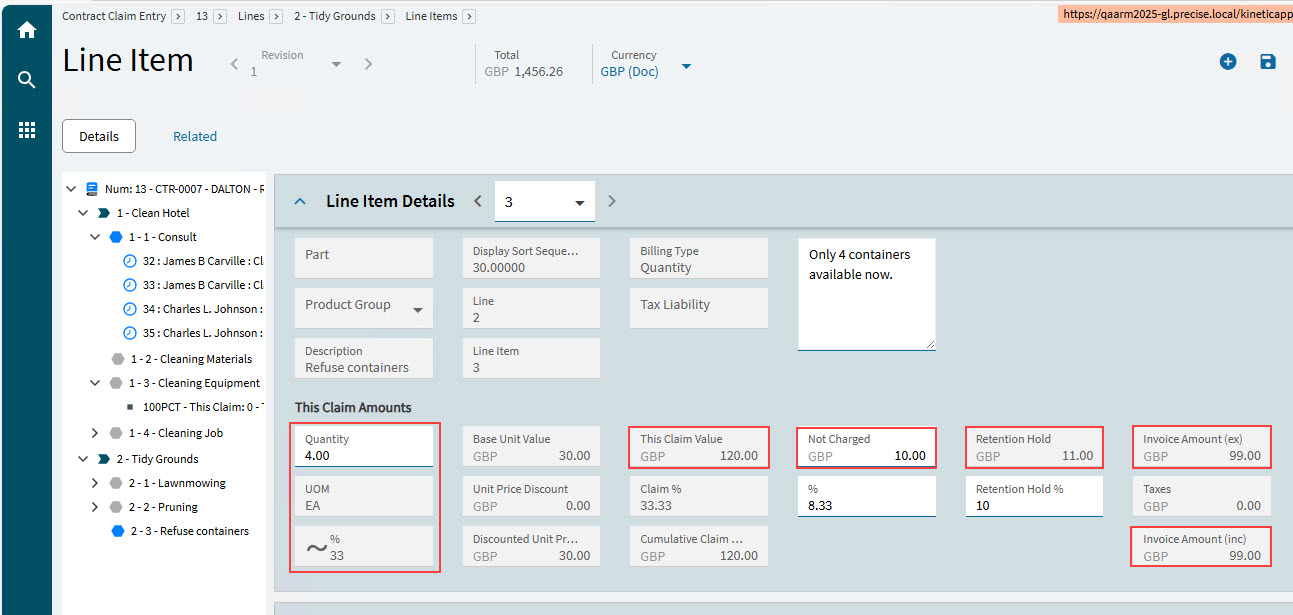
The saved values roll up into This Claim Amounts for the Claim Line, which in turn roll up into This Claim Amounts on the Claim level.
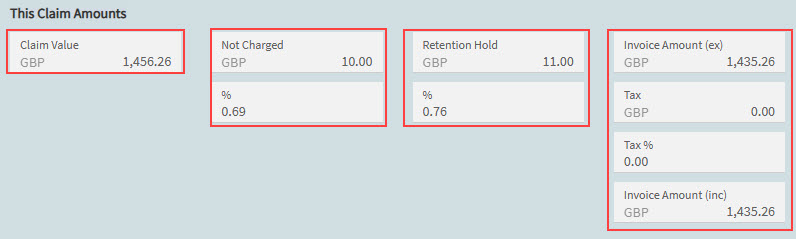
Each value in This Claim Amounts is also expressed as a percentage of the Claim Value.
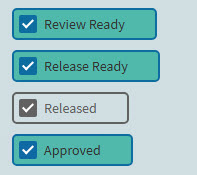
You can optionally review this line item, going through the check boxes as follows:
-
Select Review Ready when all the amounts are captured, and the line item is ready for a review.
-
Select Release Ready when the line item has passed review and is ready to be released with the other line items, to the customer.
-
Select Released when the line item has been released to the customer.
-
Select Approved when the customer has approved this line item.
-
Save.
Unit Price Discount
A Claim Line for Quantity Billing Type gets its discount from the Unit Price Discount on the Contract Line Item. This is the only discount that can be applied for a Claim Line of this type.
Cancelling a Quantity Billing Claim Line Item
To cancel a Claim Line Item for a Quantity Billing Type, enter a negative value in the Quantity field, and then process the claim as normal. This does not need to be the full quantity that was originally claimed but should not exceed this. Check the Invoiced Qty and the Invoiced (Ex) in the Total Contract Amounts for the line item to see what has been invoiced to date.
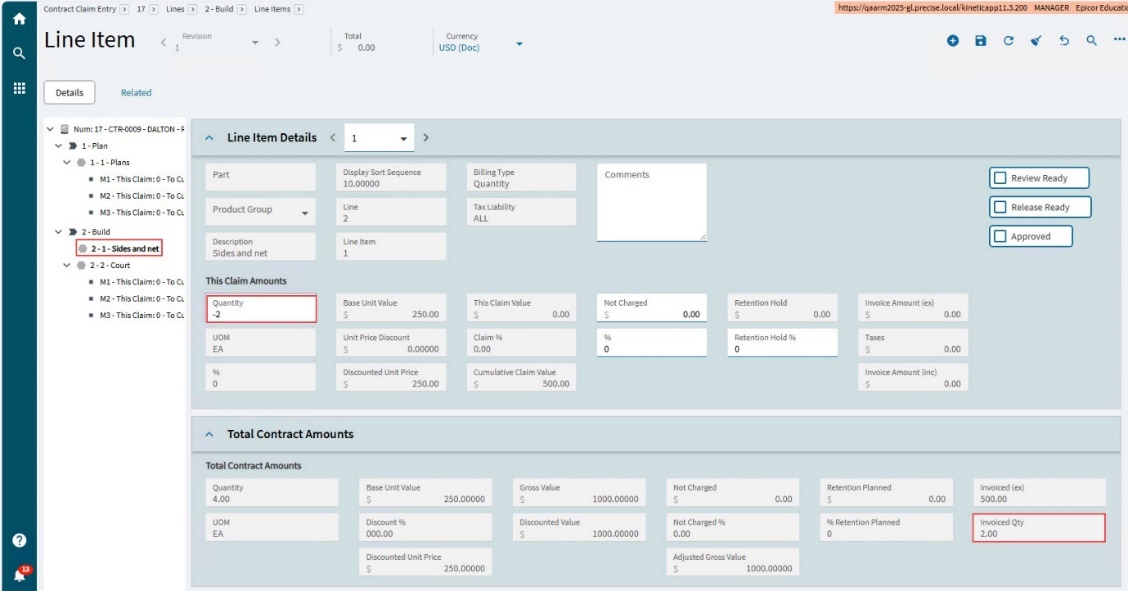
A Credit Memo will be posted if the Invoice Amount for the Claim is less than zero.
Editing Claim Line Item Details for Progress Billing
| Check that any contract deliverables for the affected contract line items are complete, before adding a new claim. |
To update a claim line item from a Progress Billing contract line item:
-
Select the claim line item on the Navigation Tree.
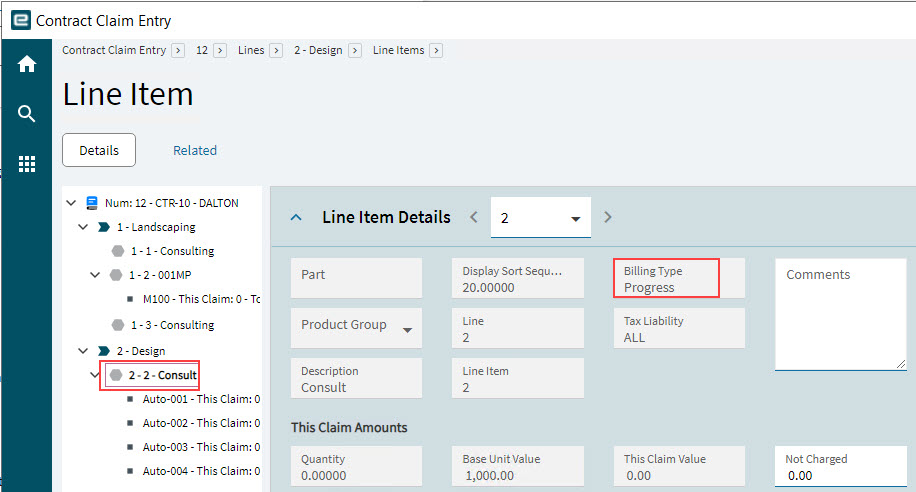
-
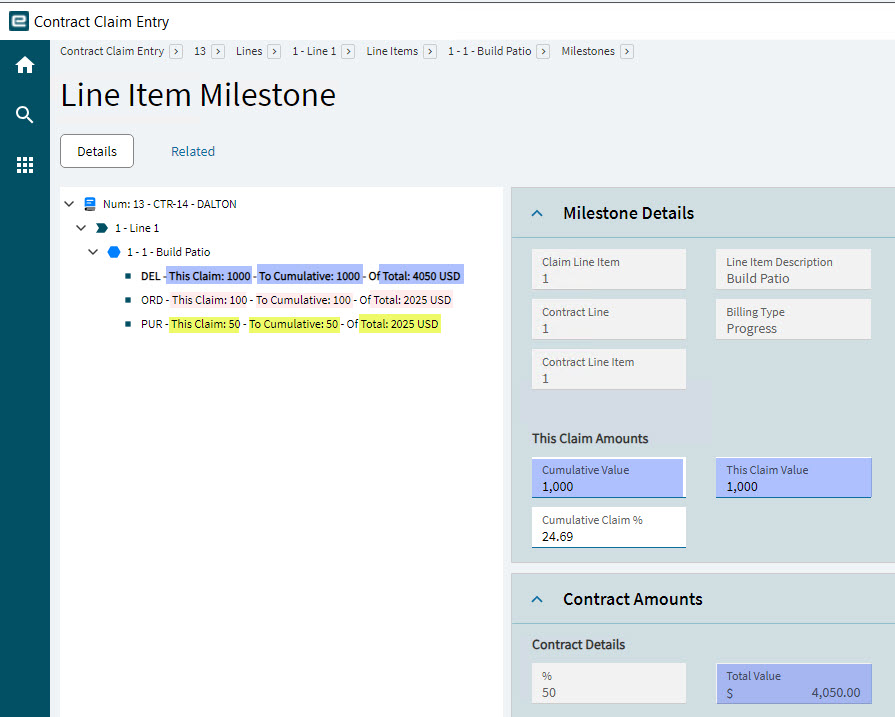
Work through each milestone for the claim line item. See Editing a Progress Milestone.
The milestone labels on the Navigation Tree update to show the milestone’s This Claim Value, Cumulative Value, and Total Value.
-
Select the Line Item on the Navigation Tree.
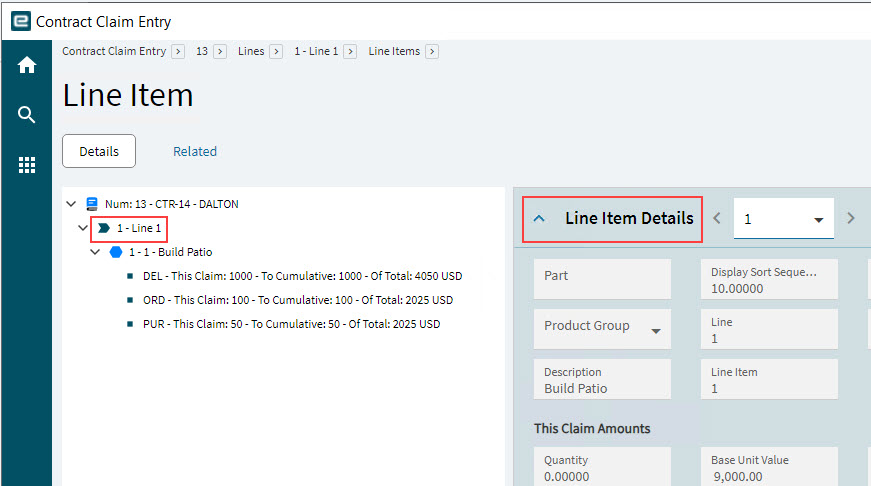
The Line Item Details displays the updated values for This Claim Amounts.
-
Update Not Charged if you are not going to charge a portion of this claim value for the line item, for any reason. You can update Not Charged value or %.
-
Update Retention Hold % if there is to be a retention for this Line Item.
-
Click Save.
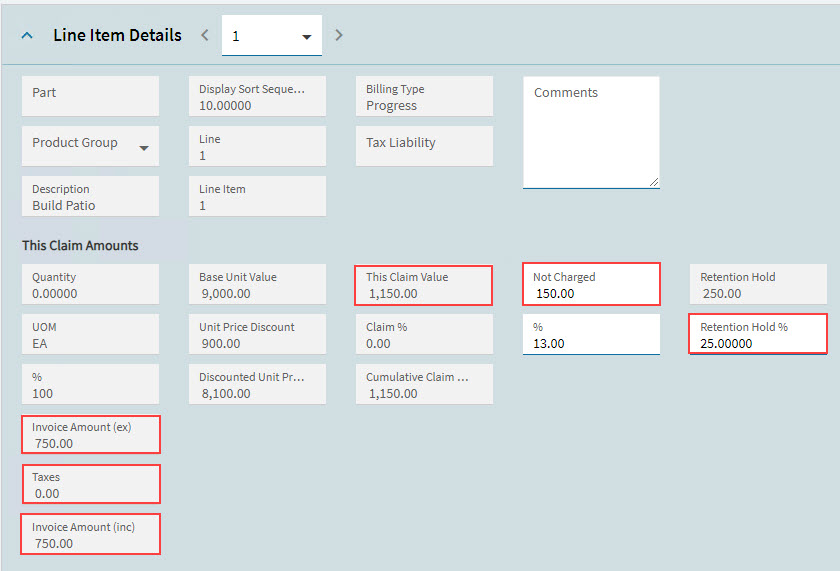
The amounts update as follows:
-
The Invoice Amount (inc) updates to This Claim Value less Not Charged.
In this example, 1,150.00 - 150.00 = 1,000.00.
-
Retention Hold updates to Retention Hold % of Invoice Amount (inc).
In this example, 25% of 1,000.00 = 250.00.
-
The Invoice Amount (ex) updates to Invoice Amount (inc) less Retention Hold.
In this example, 1,000.00 - 250.00 = 750.00.
-
If there are Taxes, these are added to Invoice Amount (ex) to get Invoice Amount (inc).
You can optionally review this claim line item, going through the check boxes as follows:
-
Select Review Ready when all the amounts are captured, and the line item is ready for a review.
-
Select Release Ready when the line item has passed review and is ready to be released with the other line items, to the customer.
-
Select Approved when the customer has approved this line item.
-
Save.
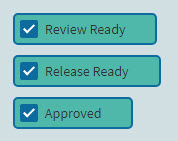
The Line Item on the Navigation Tree gets a different-colored icons to reflect these check boxes:
If the line values are over zero |
If the line values are zero |
|||
|
light-blue icon |
No check boxes selected |
|
light-gray icon |
|
dark-blue icon |
Review Ready selected |
|
medium-gray icon |
|
dark-green-icon |
Release Ready selected |
|
medium-gray icon |
|
light-green icon |
Approved selected |
|
dark-gray icon |


| Alternatively, select the check boxes at the claim line level or at the claim level. |
Editing a Progress Milestone
|
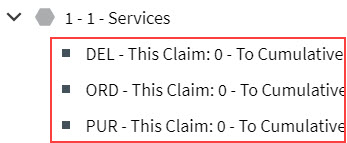
On the Navigation Tree, each line item milestone has a milestone  icon.
icon.
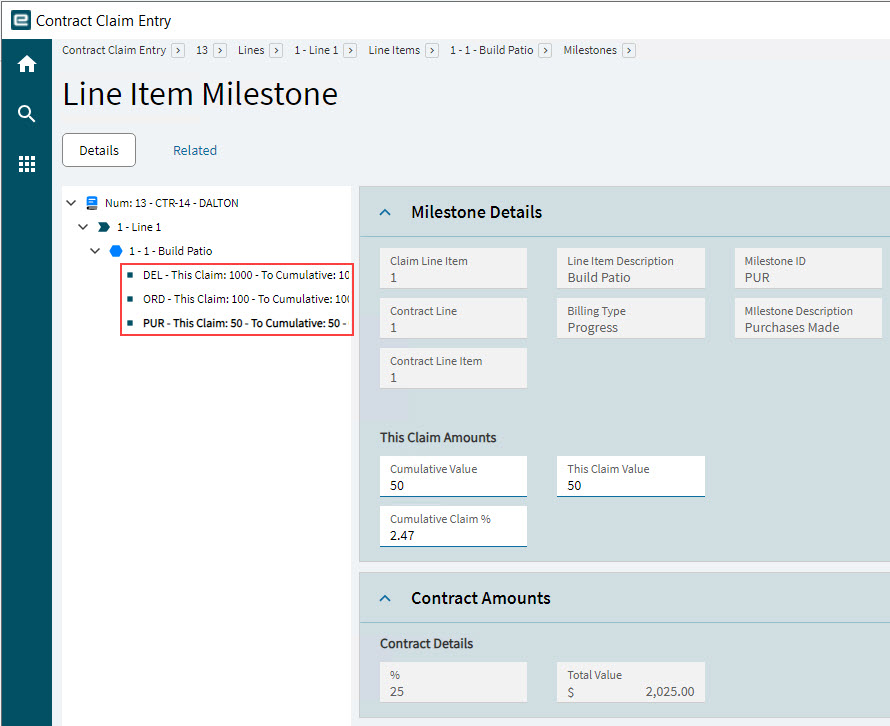
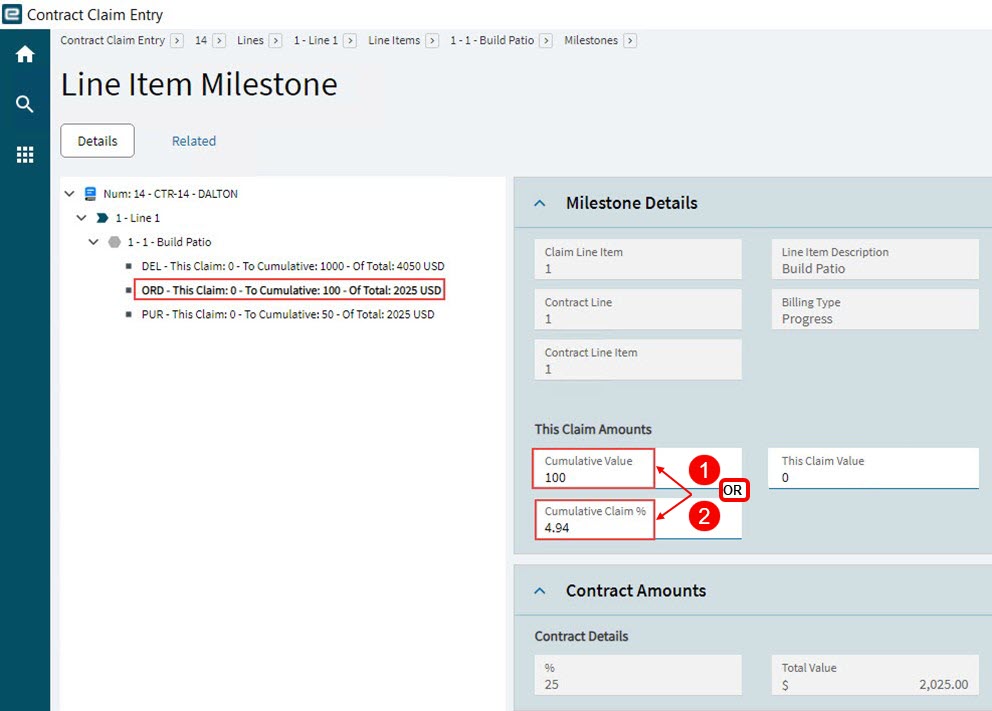
There will be one or more Milestones, depending on the Milestone Set selected in the associated Contract Line Item. For each Milestone, determine the percentage complete and update the Cumulative Value OR Cumulative Claim % in the Cumulative Application section, accordingly (refer to the Total Value in the Contract Amounts). The percentages for the different milestones could vary, depending on the actual progress of this contract line. For example, the first milestone out of three milestones could be 100.00 Progress %, with 0.00 Progress % for the remaining milestones. Or each milestone could be 25.00 Progress %, and so on.
-
Navigate to the Milestones on the Navigation Tree.
For each milestone, update as follows:
-
Select a milestone on the Navigation Tree.
This opens the Milestone Details card.
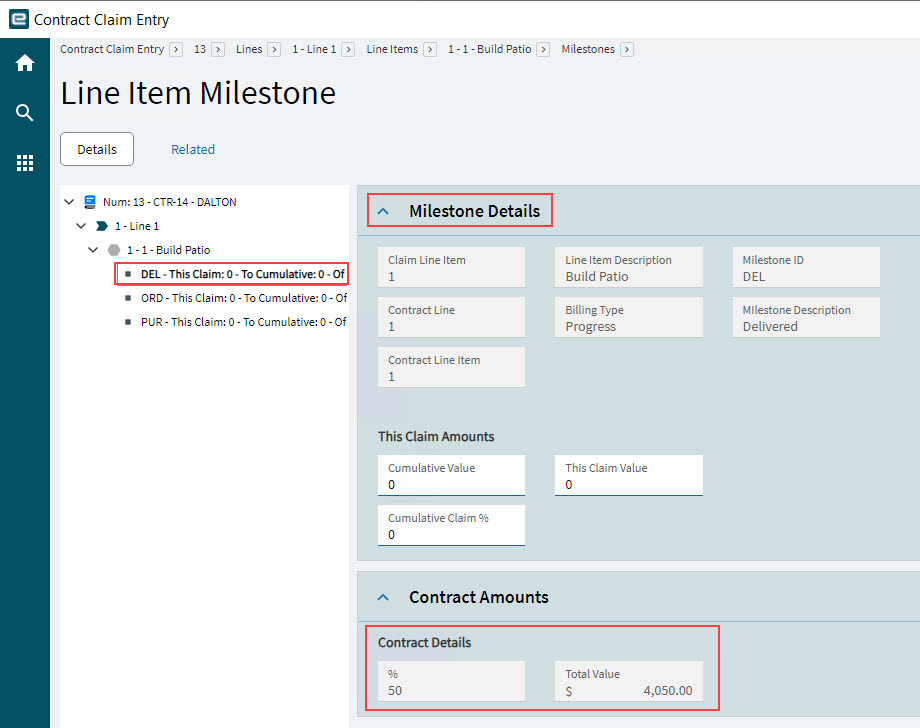
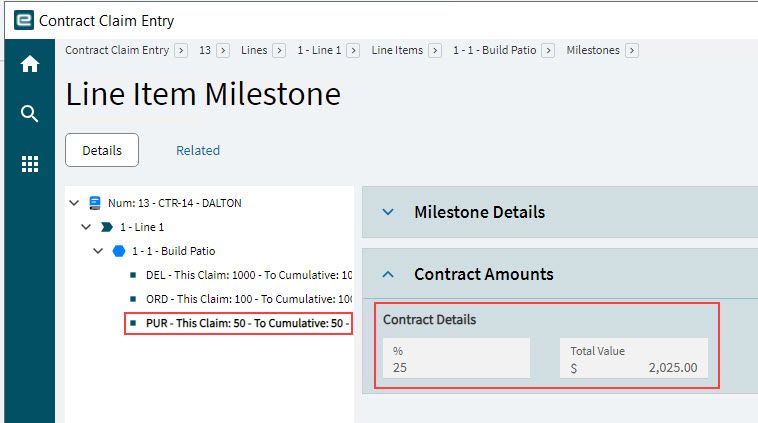
The Contract Details section shows the percentage % and Total Value that the selected milestone has, as part of its contract line.
-
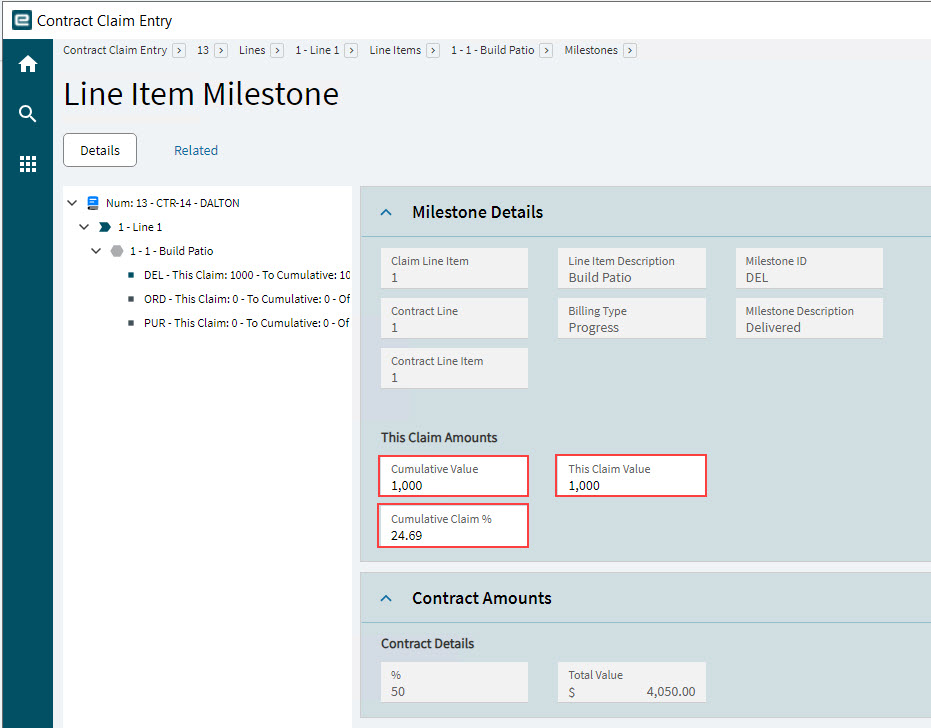
Enter a value in This Claim Amounts if you want to claim for this milestone in this Contract Claim. You can leave these as zero. You can enter a value in any of the three fields: Cumulative Value, Cumulative Claim % or This Claim Value. The Cumulative Claim % is the percentage of the Total Value. This amount (cumulative % of the Total Value) is calculated and displayed in This Claim Value. Total Value is the Discounted Value of the contract line item for the selected milestone (Discounted Value multiplied by the % for that milestone).
-
Select Save
on the Standard toolbar.This updates the other values (Cumulative Value, Cumulative Claim % or This Claim Value).
-
Continue updating the This Claim Amounts for each milestone for the line item.
Contract Amounts
Expand the Contract Amounts card to see the value of the selected milestone.
-
The % shows the milestone percentage.
-
The Total Value shows the value of the milestone (the milestone percent of the contract line item value).
Unit Price Discount
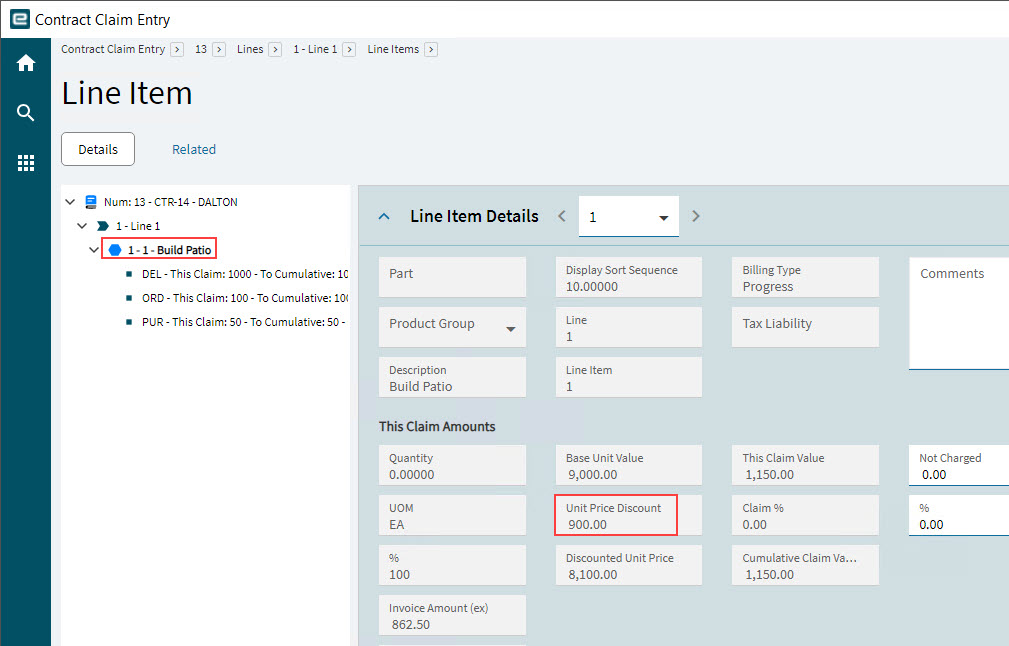
A Contract Claim’s Line Item for Progress Billing Type gets its discount from the Discount % on the corresponding Contract Line Item.
This is the only discount that can be applied for a Claim Line of this type.
Cancelling a Progress Billing Claim Line Item
To cancel a Claim Line Item of Progress Billing Type: create a new claim for contract-claim configuration combination, then overwrite the Cumulative Claim % with a lower percent or overwrite the Cumulative Value with a lower value. Then process the claim as normal.
This does not need to be the full value/percent that was originally claimed. For example, if the Cumulative Claim % was 20%, change it to 15% in a new Contract Claim.
If cancelling/reversing a contract claim for a particular Milestone called 'ORD' for a contract line item, on a contract:
-
Add a new Contract Claim for the same contract-claim configuration combination as used for the original contract claim.
-
Select Milestone ORD on the Navigation Tree.
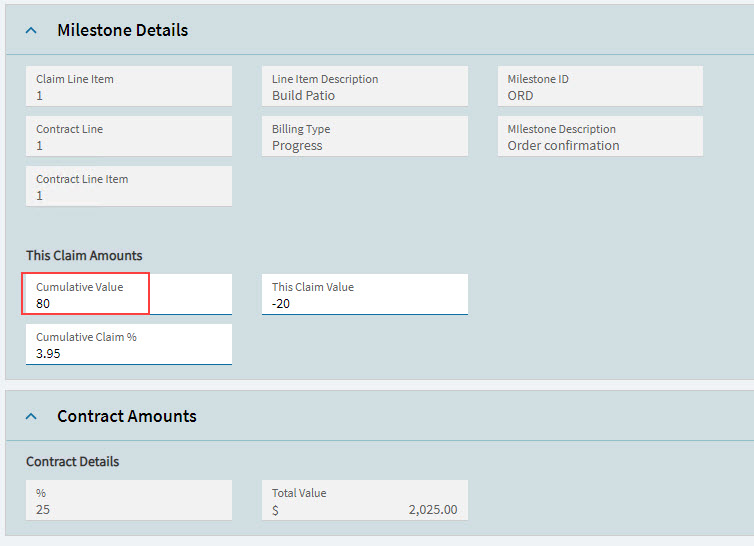
The Cumulative Value and Cumulative Claim % that have been claimed to this point appear for Milestone ORD, in the This Claim Amounts section. This Claim Value is 0 for a milestone in a new contract claim.
-
Update the Cumulative Claim % or update the Cumulative Value to what it should have been when the claim was first generated. If This Claim Value is lower than the current value, then this will result in a cancellation. In the example below, the This Claim Value shows a negative value when the Cumulative Value is lower than before.
-
Save the Claim Line, and finish processing the Contract Claim as usual (see Processing Contract Claims and Retentions).
The Claim can be viewed as a negative, on the Claims card on the Activity page of the Contract.
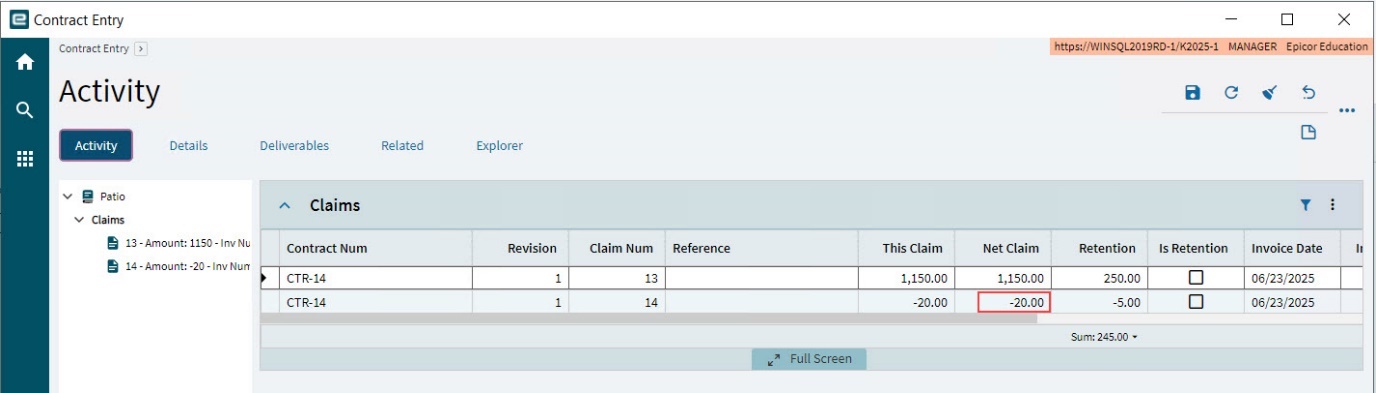
For cancellations, a Credit Memo is generated to make the adjustment.
Editing Claim Line Item Details for Rates Billing
The Contract Amounts / Forecast section shows details from the corresponding Contract Line Item. Rates billing type does not support Unit Price Discounts or Planned Retention from the contract; however, Claim Discount and Retention amounts may be applied within the Claim Line Item.
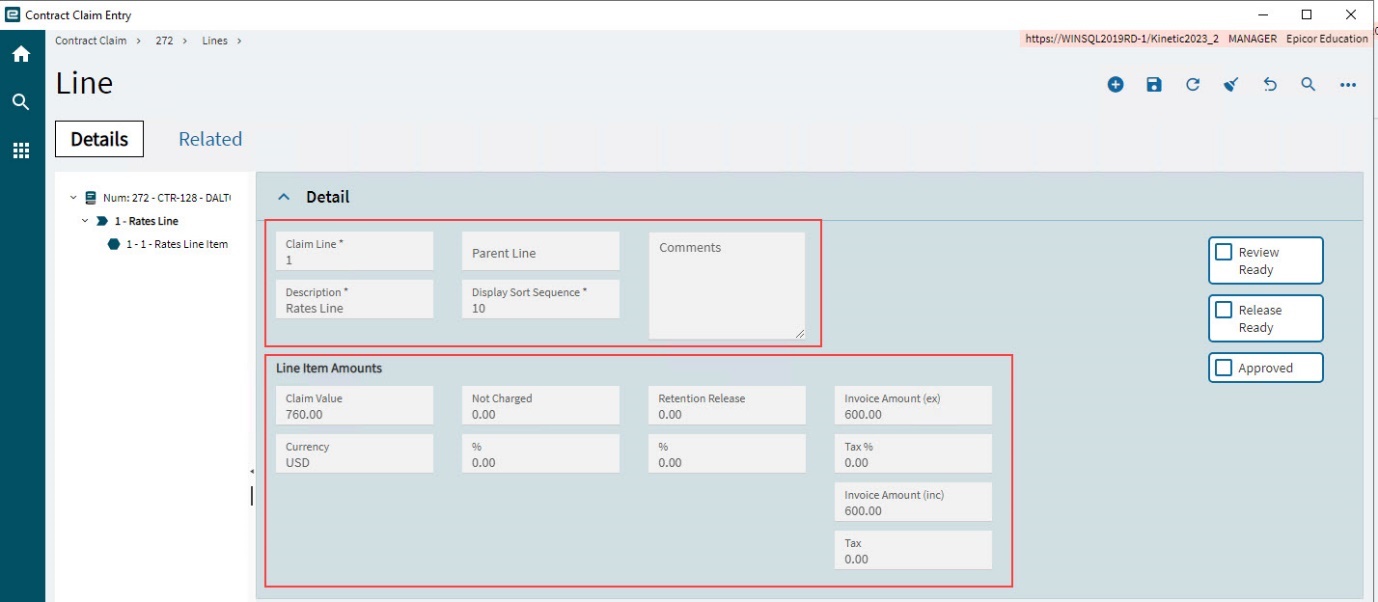
See how to edit rates lines for:
Holding a Rates Billing Line Item
You can put a rates billing line on hold until a later date. This excludes the line from the invoice, and it will not appear in future claims until the Hold Release Date or later. See details in the following sections for putting the different rates billing types on hold.
See how to hold:
Rates: Time
When time is costed against a WBS Phase of a Project (using a Time detail record), a Rates Claim Line is brought into a Contract Claim for the Rates billing type Contract Line Item corresponding to the WBS Phase.
If the Contract Line Item has Labor Markup selected, and there is a Labor Rate for the Contract Line Item that matches the Role and T/M Time Type of the Time > Detail record, then this results in a Time Claim Line Item, which appears under the Rates: Time card of the Contract Claim.
| Note: See how Labor Rates are added to a Contract: Adding Labor Rates. |
Time captured against a Project WBS Phase Job Operation is used to calculate the Gross Billable for amount on the Rates: Time card.
When a Contract Line item with Rates Billing has a Labor Rate defined, and the Labor Markup selected, time captured against a Job operation for the corresponding WBS Phase in the related Project is a cost against the line item.
To review or adjust the Rates Billing for a claim line item for Rates: Time:
-
Select the Details page.
-
Select the line item on the Navigation Tree.
-
Expand the Rate: Time card.
-
Click on a Project Ledger Number in the grid.
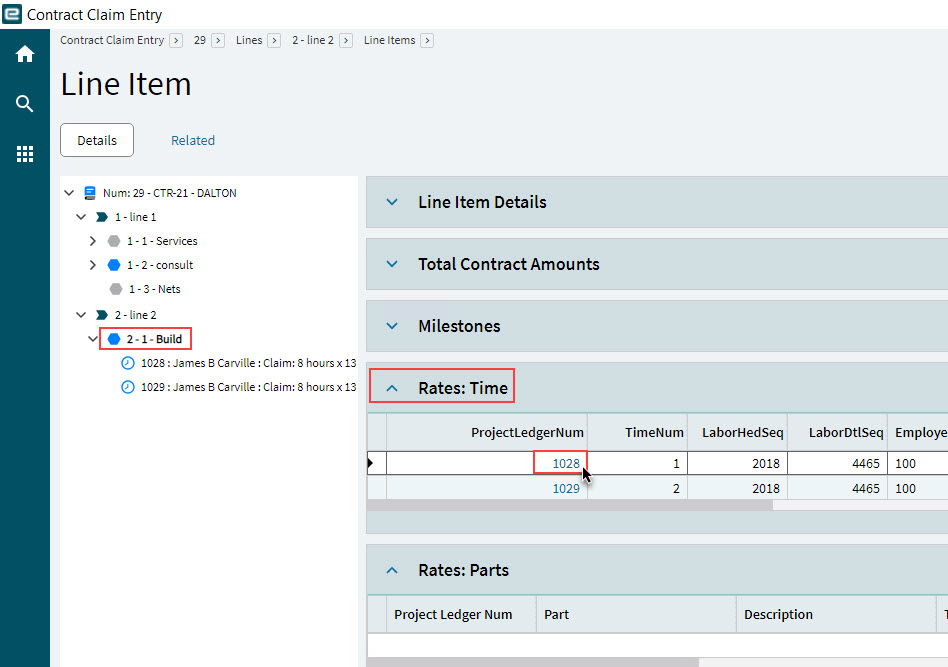
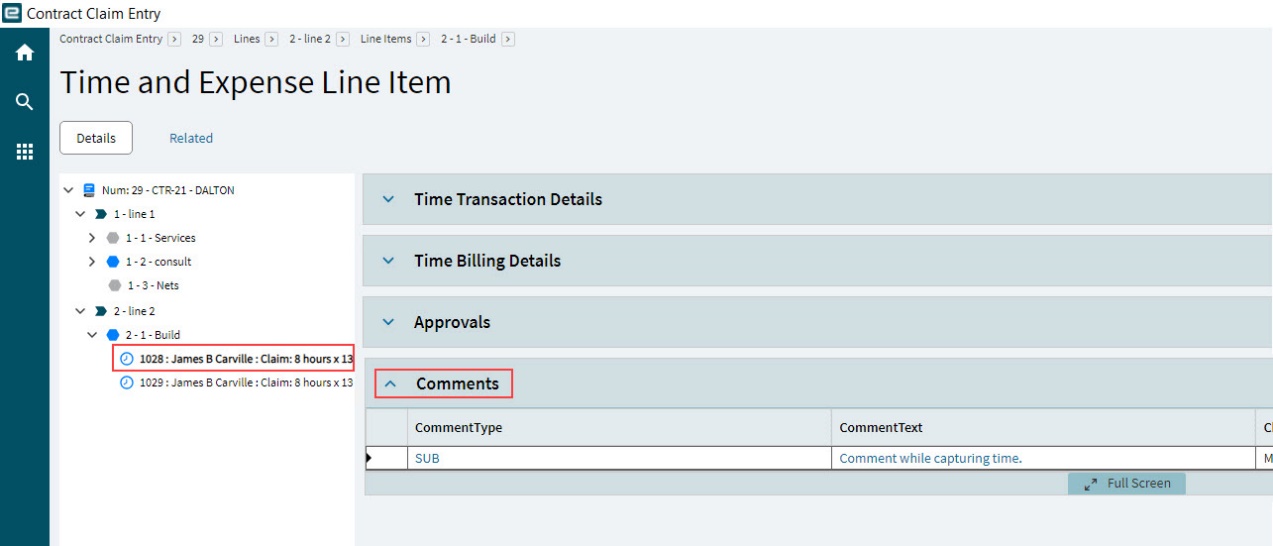
The Time and Expense Line Item detail displays.
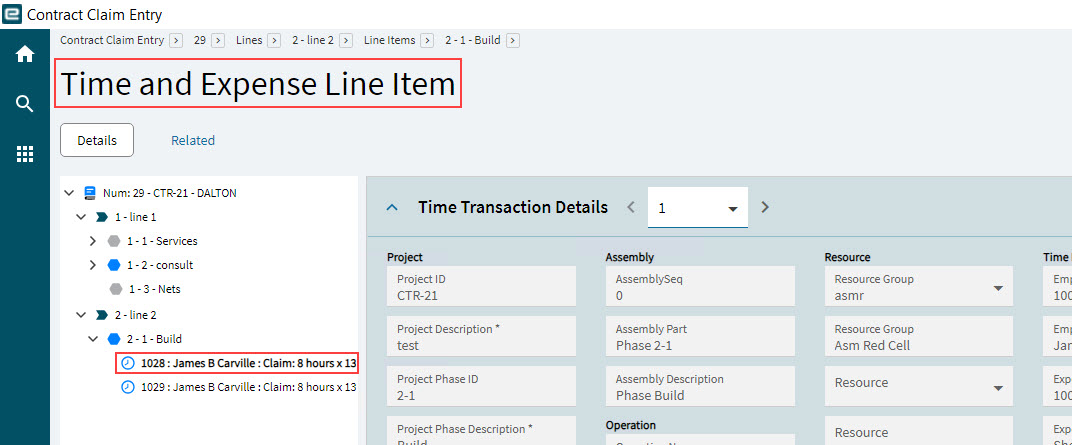
The Time and Expense Line Item detail has four main sections:
- Time Transaction Details
-
The project and job operation details, and the details for time captured against this.
- Time Billing Details
-
The billing details that make up the Total Billable Amount for the transaction.
- Approvals
-
The name of the approver and the date time stamp that the time was approved.
- Comments
-
Comments made while times were captured.
Reviewing the Time Transaction Details
The Time Transaction Details section shows the Project and Job details, as well as the Employee ID, Date, Hours, Role and Time Type for the Timesheet captured against the WBS Phase Job (Operations).
-
Expand the Time Transaction Details card to view job and time details.
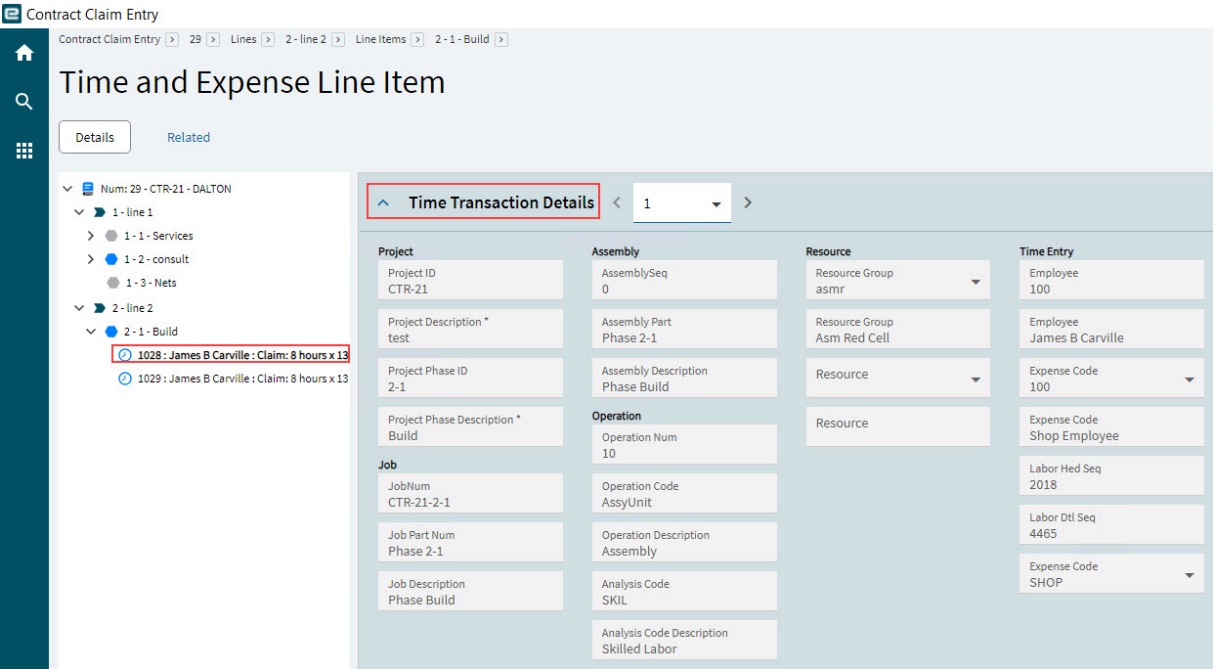
Details are shown for the following:
| Project |
Project Id, Description, Project Phase ID and Project Phase Description |
| Job |
The Job num, Job Part Num and Job Description |
| Assembly |
The Assembly Sequence, Assembly Part and Assembly Description |
| Operation |
The Operation Number, Operation Code, Operation Description, Analysis Code and Analysis Code Description |
| Resource |
The Resource Group Code and Description, the Resource Code and Description |
| Time Entry |
Employee Number and Name, Expense Code and Description, Labor Sequence numbers, Expense Code, Role Code and Description, Time Type, Clock In Date and Time, Clock Out Date and Time, Hours, Time Entry Notes |
| Project Ledger Details |
The Project Ledger Number |
Updating Time Billing Details
Use this section to review the billing rate, mark-ups, and any additional charges or no charge hours for the hours worked. You can also use this section to put the billing on hold for the transaction.
| If the contract’s Contract Type has defaults for Advanced - Automatic Rates Billing Claim Defaults Configuration for Labor Transactions, then these settings and values appear in the Time Billing Details. They may be updated here. |
Note that with a time transaction, there is a Labor transaction and a Burden transaction. Both of these appear in the Contract Claim.
-
Expand the Time Billing Details card.
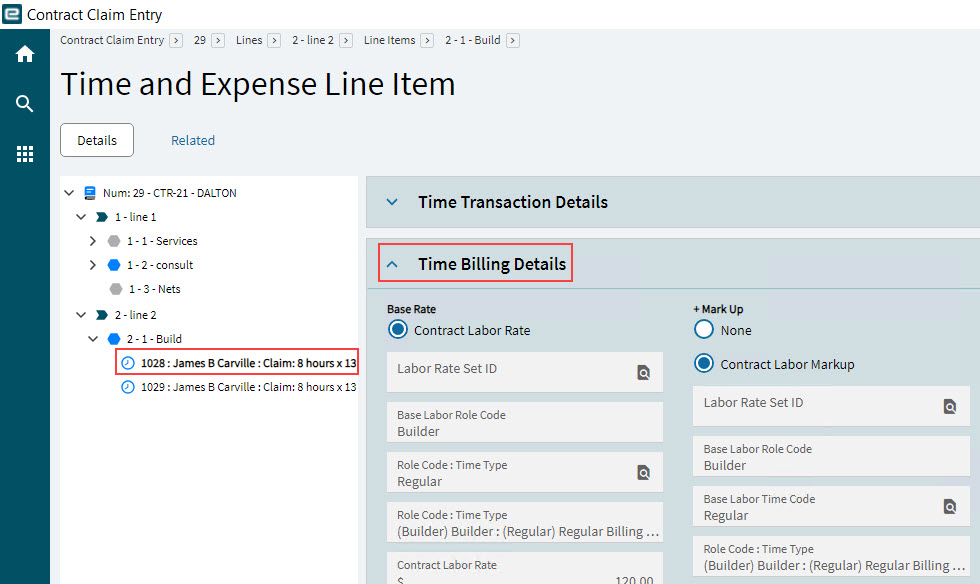
The Total Billable/ Invoice Amount for a time billing detail is calculated as follows:
Base Rate + Mark Up + Additional = Charge Rate. |
Charge Rate * Claim Hours = Extended Value. |
Extended Value – No Charge Hours = Gross Billable Total. |
Gross Billable Total – Retentions = Total Billable / Invoice Amount. |
To set the amounts:
-
Determine a Charge Rate.
-
Select a Base Rate.
-
If the underlying contract has a Labor Rate for the contract/contract line/contract line item then you can select the Contract Labor Rate option.
The Contract Labor Rate amount will be used as the Base Rate.
This is the Charge Rate for the Role Code and Time Type on the Rate Detail applicable to the contract line item, in Contract Entry.
-
If there is an Employee Role Code Rate for the Employee>Time Code>Time Type then you can select the Employee Role Code Rate option.
The Employee Role Code Rate amount will be used as the Base Rate.
This is the Charge Rate on the Employee record for the Role Code and Time Type.
-
Select Project Ledger Cost Rate to use the actual cost entered in the Project Ledger as the Base Rate.
For the Labor portion of the cost, this uses the Labor Rate for the employee, on the Employee record (Production Info).
For the Burden portion of the cost, this uses the Costing Burden Rates (Production) for the Resource Group selected in the time entry.
-
Select Manual to set a Manual Rate to use as the Base Rate.
-
-
Optionally select a Mark Up. This is added to the Base Rate.
-
Select None to add no Mark Up.
-
Select Contract Labor Mark Up to use the Mark Up dollar amount. This value is only available if a Labor Rate is used for the contract/contract line/contract line item, which has a Mark Up element included.
-
Select Contract Rates Markup if there is an available rate to use here.
-
To add a Mark Up if there are no acceptable rates to use, select Manual %, then enter a Mark Up % which calculates a mark up amount multiplying the Base Rate by the percentage, or select Manual Amount and enter a Mark Up Amount.
-
-
Optionally set an Additional amount or percentage.
-
Select None to add no additional amount.
-
Select Manual %, then enter a Manual % which is used to calculate an additional amount by multiplying the Base Rate by the percentage.
-
Select Markup Amount to use as the Additional amount.
-
The Charge Rate is calculated as the Base Rate plus the Mark Up Amount plus and Additional amount (Markup Amount). Extended Value is calculated as Charge Rate multiplied by Charge Quantity.
-
-
Optionally add No Charge Hours.
-
Enter a value in the No Charge Quantity edit box, for hours that will not be charged.
-
Select a No Charge Reason from the drop-down list.
-
Save.
The Gross Claim Amount is calculated as the Extended Value minus the No Charge Value.
-
-
Optionally adjust the Retentions. Enter a value in the Retention % edit box.
The Retention Amount is the Gross Claim Amount * Retention %. The Total Billable / Invoice Amount is the Gross Billable Total less the Retention Amount.
-
Finally update the Billing Claim Status section:
-
To put a hold on the Time Billing Details:
-
Select Hold.
-
Select a Reason and a Hold Release Date.
-
Select Save
on the Standard toolbar.
-
The Claim Line Item is on hold until the specified date and will not be included in the Contract Claim amounts, or the invoice.
-
Review Ready: Select when the claim transaction line is ready to review.
The time node in the hierarchy changes from light blue
 to dark blue
  .
. -
Release Ready: Select when the claim transaction is ready to release to the customer.
-
Approved: Select when the claim transaction line is approved.
To hide this from the invoice, select Hide On Invoice.
The time node in the hierarchy changes from dark blue
to green  .
.
-
Viewing Approvals
The Approvals card shows the name of the user who approved the employee’s times, and the date and time these were approved.
-
Expand the Approvals card to view approvals.
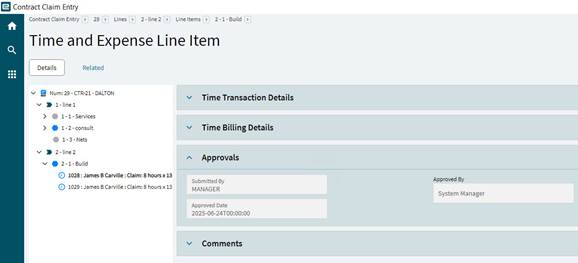
Viewing Comments
If comments were saved when the time was captured in APM Time Entry, these will appear in the Comments card of the Time and Expense Line Item detail.
-
Expand the Comments card to view all comments captured for the time transaction.
Rates: Parts
When material is costed against a WBS Phase of a Project, a Rates Claim Line is brought into a Contract Claim for the Rates billing type Contract Line Item corresponding to the WBS Phase.
If the Contract Line Item has Labor Markup selected, and the cost transaction has a relation to parts (inventory or otherwise) in Kinetic, then this results in a Part Claim Line Item, which appears under the Rates: Parts card of the Contract Claim.
To review or adjust the Rates Billing for a claim line item for Rates: Parts:
-
Select the Details page.
-
Select the line item on the Navigation Tree.
-
Expand the Rates: Parts card.
-
Click on a Project Ledger Num in the grid.
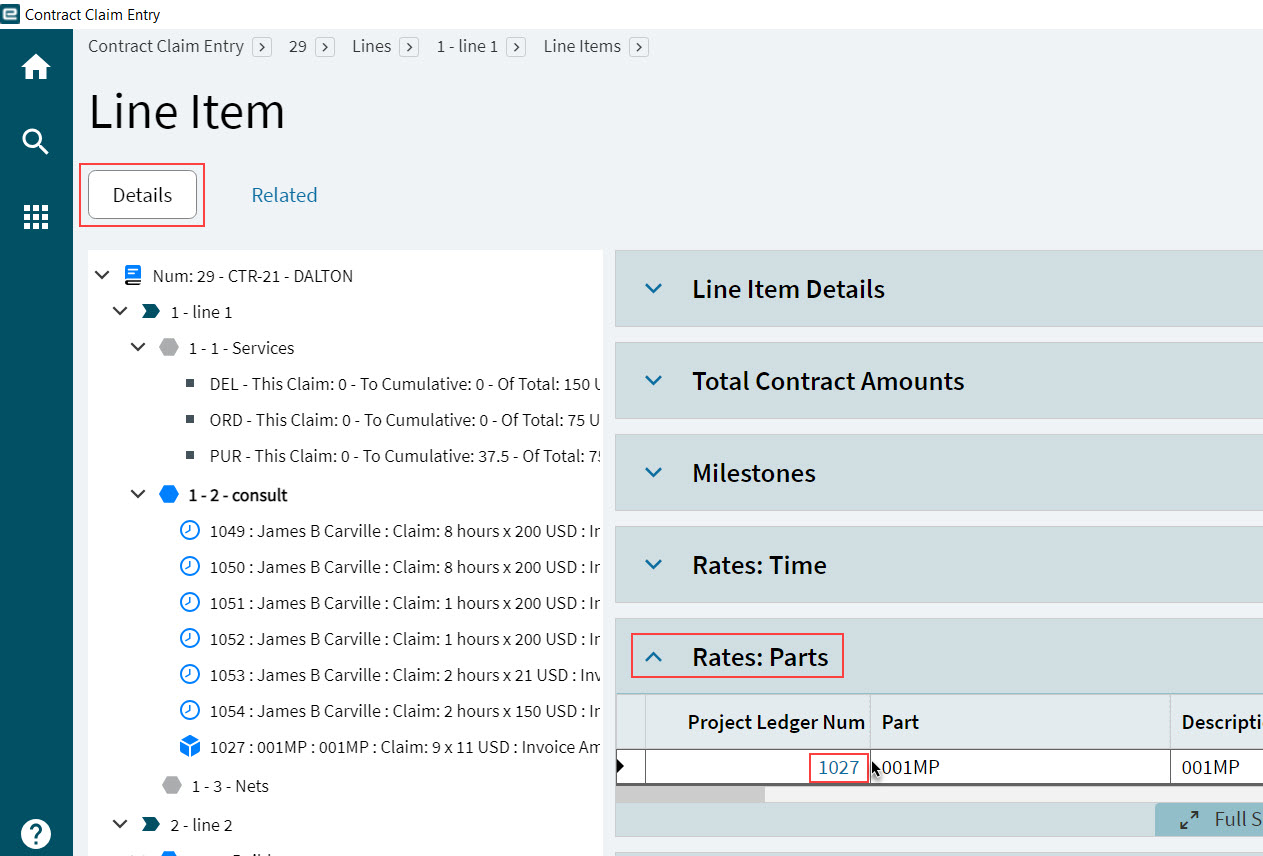
The Rates Parts Details displays.
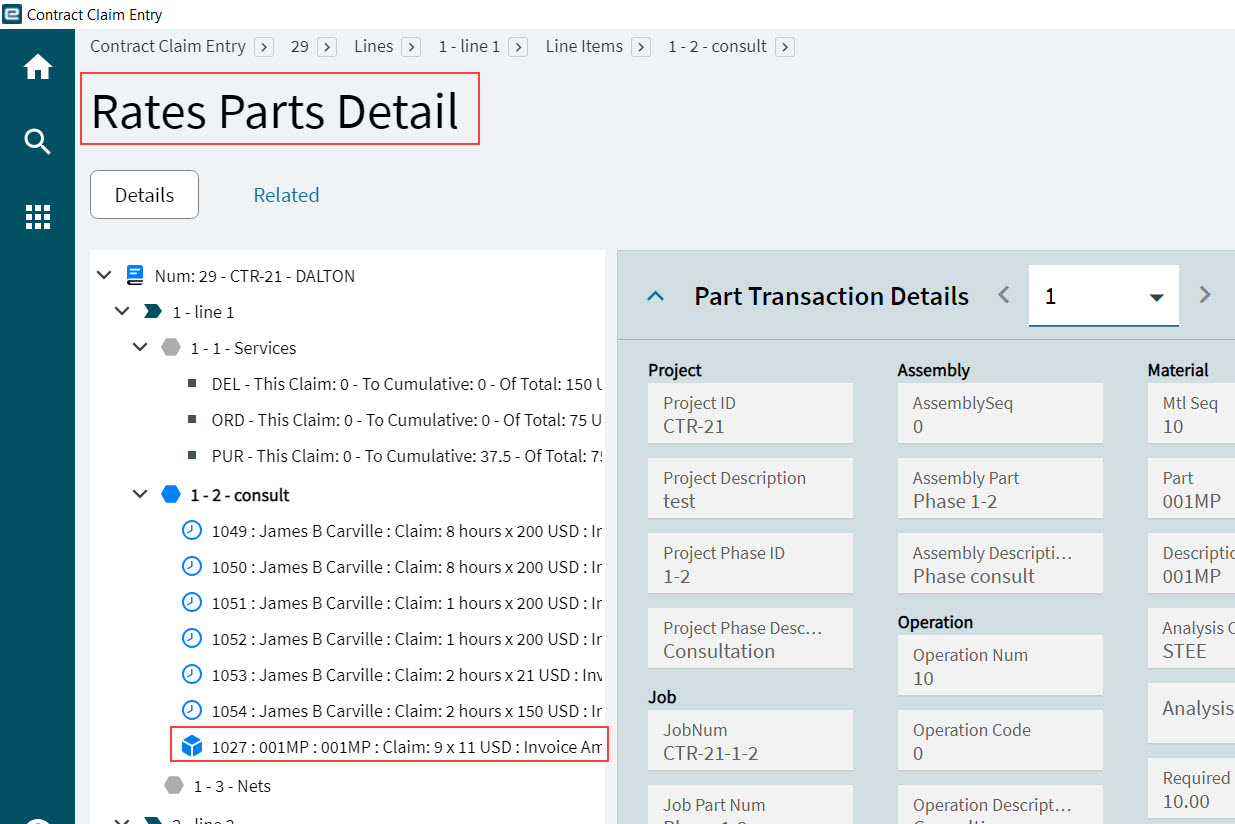
The Rates Parts Detail has two cards:
- Part Transaction Details
-
The project and job material details.
- Billing Details
-
The billing details that make up the Total Billable Amount for the transaction.
Reviewing the Part Transaction Details
The Part Transaction Details section shows the Project and Job details, as well as the Project Ledger transaction details.
-
Expand the Part Transaction Details card to view job and material details.
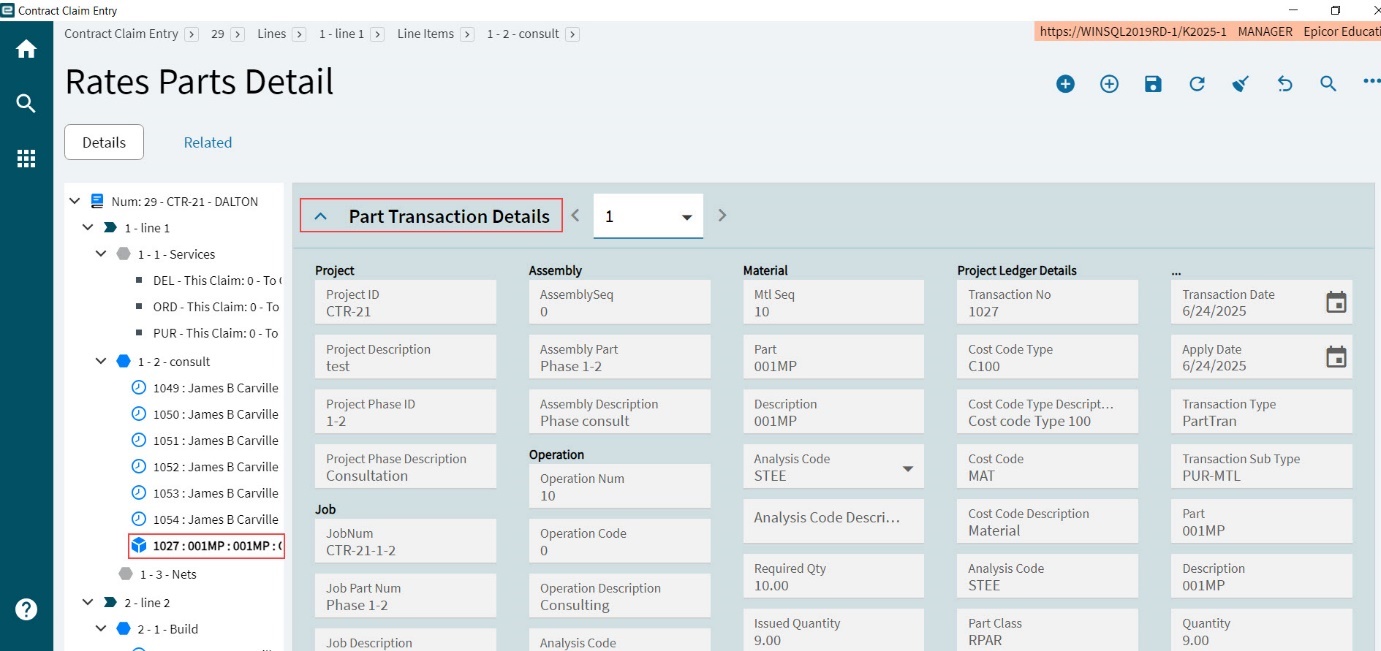
Details are shown for the following:
| Project |
Project Id, Description, Project Phase ID and Project Phase Description |
| Job |
The Job Num, Job Part Num and Job Description |
| Assembly |
The Assembly Sequence, Assembly Part and Assembly Description |
| Operation |
The Operation Num, Operation Code and Description, Analysis Code and Description |
| Material |
The Material Sequence, Part Code and Description, Analysis Code and Analysis Code Description, Required Quantity, Issued Quantity, and Estimated Unit Cost Amount |
| Project Ledger Details |
Transaction Number, Cost Code Type and Description, Cost Code and Description, Analysis Code, Part Class, Expense Code, Transaction Date, Apply Date, Transaction Type, Transaction Sub Type, Part, Description, Quantity, Costed Amount, Actual Unit Cost Amount |
Updating Billing Details
Use this section to review the billing rate, mark-ups, and any additional charges or no charge hours for the materials used for the project job. You can also use this section to put the billing on hold for the transaction.
| If the contract’s Contract Type has defaults for Advanced - Automatic Rates Billing Claim Defaults Configuration for Material Transactions, then these settings and values appear in the Billing Details. They may be updated here. |
-
Expand the Billing Details card.
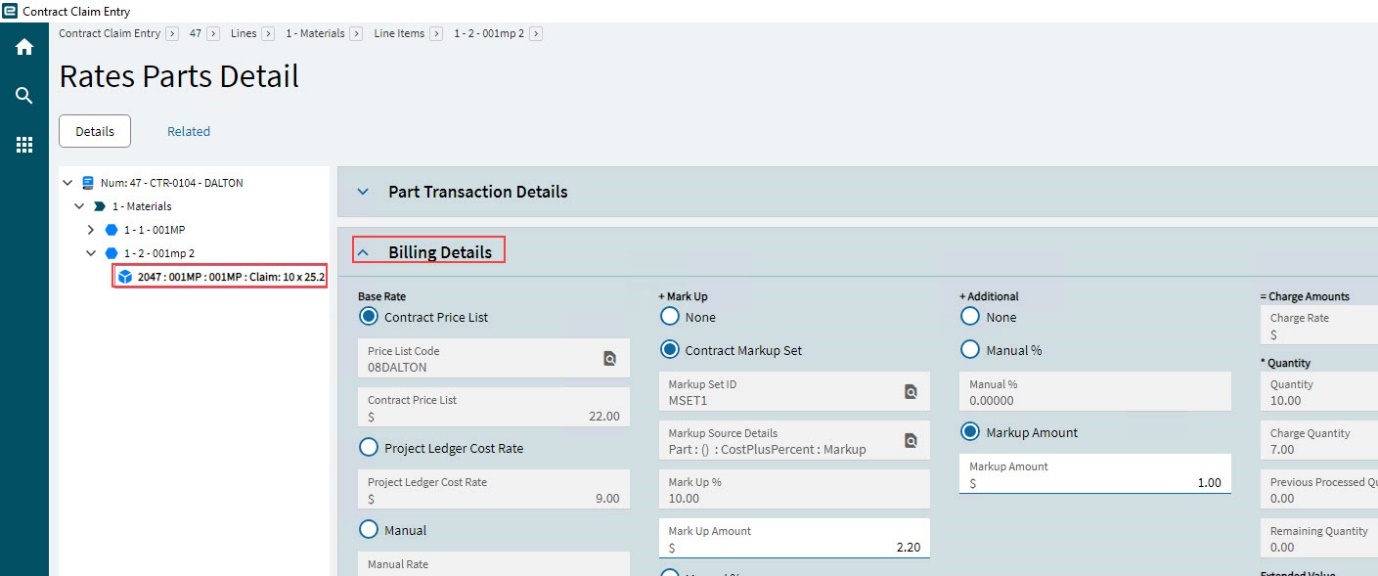
The Total Billable for a parts billing detail is calculated as follows:
Base Rate + Mark Up + Additional = Charge Rate. |
Charge Rate * Claim Hours = Extended Value. |
Extended Value – No Charge Hours = Gross Billable Total. |
Gross Billable Total – Retentions = Total Billable / Invoice Amount. |
To set the amounts:
-
Determine a Charge Rate.
-
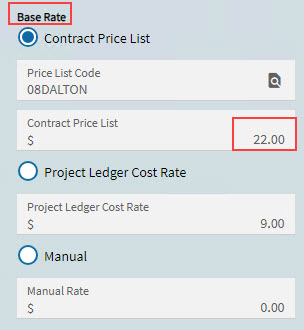
Select a Base Rate from one of the following options:
-
Contract Price List: This is the price list for the contract, which is determined based on the price list hierarchy. If you select the Contract Price List option, the Contract Price List amount for the part will be used as the Base Rate. See Price List.
-
Select Project Ledger Cost Rate to use the actual cost entered in the Project Ledger as the Base Rate. This cost rate was determined using the received amount for the line, in Receipt Entry.
-
Select Manual to set a Manual Rate to use as the Base Rate. Enter a Manual Rate.
-
-
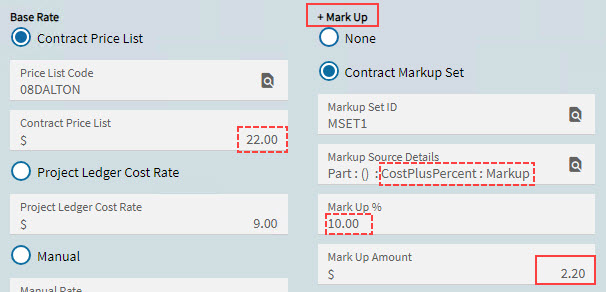
Optionally select a Mark Up. This is added to the Base Rate.
-
Select None to add no Mark Up.
-
Select Contract Markup Set to use the Mark Up dollar amount. This value is available if the contract has a current Part markup set. The markup is applied to the price on the contract’s price list.
-
To add a Mark Up if there are no acceptable rates to use, select Manual %, then enter a Mark Up % which calculates a mark up amount multiplying the Base Rate by the percentage, or select Manual Amount and enter a Mark Up Amount.
-
-
Optionally set an Additional amount or percentage.
-
Select None to add no additional amount.
-
Select Manual %, then enter a Manual % which is used to calculate an additional amount by multiplying the Base Rate by the percentage.
-
Select Markup Amount to use as the Additional amount.
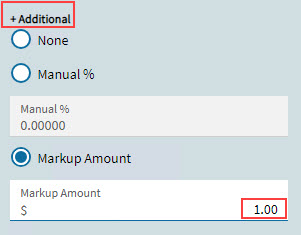
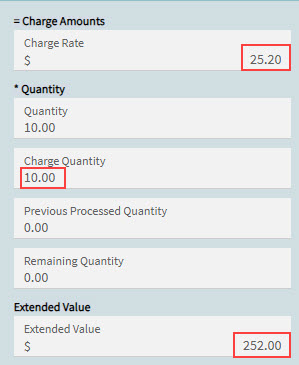
The Charge Rate is calculated as the Base Rate plus the Mark Up Amount plus an Additional amount (Markup Amount).
Extended Value is calculated as Charge Rate multiplied by Charge Quantity.
-
-
-
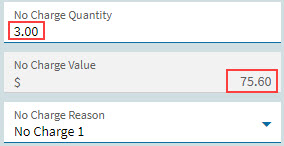
Optionally add No Charge Hours.
-
Enter a value in the No Charge Quantity edit box, for hours that will not be charged.
-
Select a No Charge Reason from the drop-down list.
-
Save.
The No Charge Value is calculated as the No Charge Quantity multiplied by the Charge Rate.
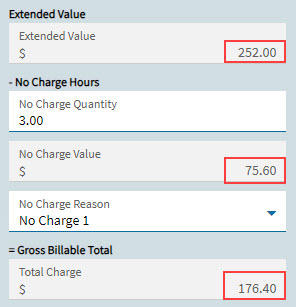
The Gross Claim Amount is calculated as the Extended Value minus the No Charge Value.
-
-
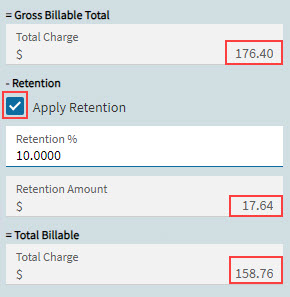
Optionally adjust the Retentions. Enter a value in the Retention % edit box.
The Retention Amount is the Gross Billable Total * Retention %.
The Total Billable is the Gross Billable Total less the Retention Amount.
-
Update the Billing Claim Status section:
-
To put a hold on the Rates Billing Details:
-
Select Hold.
-
Select a Reason and a Hold Release Date.
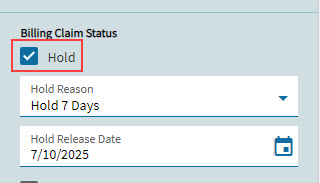
The Claim Line Item is on hold until the specified date and will not be included in the Contract Claim amounts, or the invoice.
-
-
Review Ready: Select when the claim transaction line is ready to review.
The parts node in the hierarchy changes from light blue
 to dark blue
  .
. -
Release Ready: Select when the claim transaction is ready to release to the customer.
-
Approved: Select when the claim transaction line is approved.
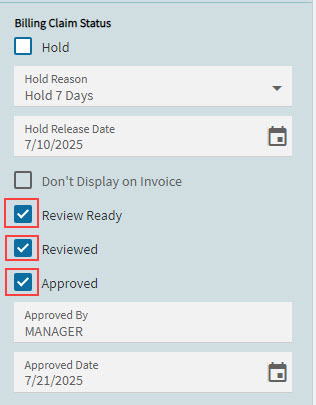
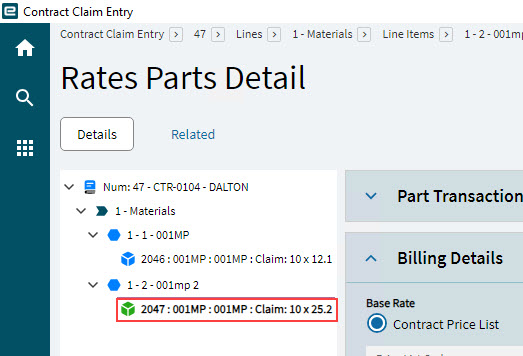
The parts node in the hierarchy changes from dark blue
to green  .
.
-
Rates: Other
In earlier versions of Advanced Project Management (APM), if there were Rates used in jobs, or other cost transactions in the related project that were not included in the Contract Rates, these appeared in the Others tab in Contract Claim Entry.
If the Contract Line Item had Labor Markup selected, but there was no Price List for the Contract Line Item with a Part that matched the Part/Rev code in the Receipts for the Job Material Purchase Order record for the WBS Phase Job Material, then this resulted in an Others Claim Line Item, which appeared under the Rates: Other card of the Contract Claim.
Likewise, if there was time captured against a job operation for a WBS Phase linked to a Rates billing item then, but with no Labor Rate defined in the contract, the claim appeared in Rates: Other.
If there is historical data such as this, then you will see this in the Rates: Other card of the contract claim.
For rates claims in later versions of APM, see the sections Rates: Parts and Rates: Time for material and labor costings, respectively.
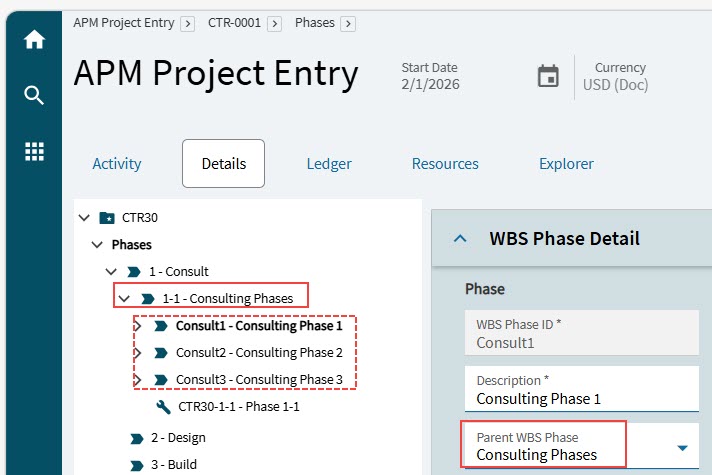
Multiple Transactions for a Single Contract Line Item
In the example below, you can see how multiple transactions (each pair of labor and burden transactions against its own project phase job) are grouped together under a single phase_1 - 1 - Consulting Phases_ which in turn is related to a single contract line item.
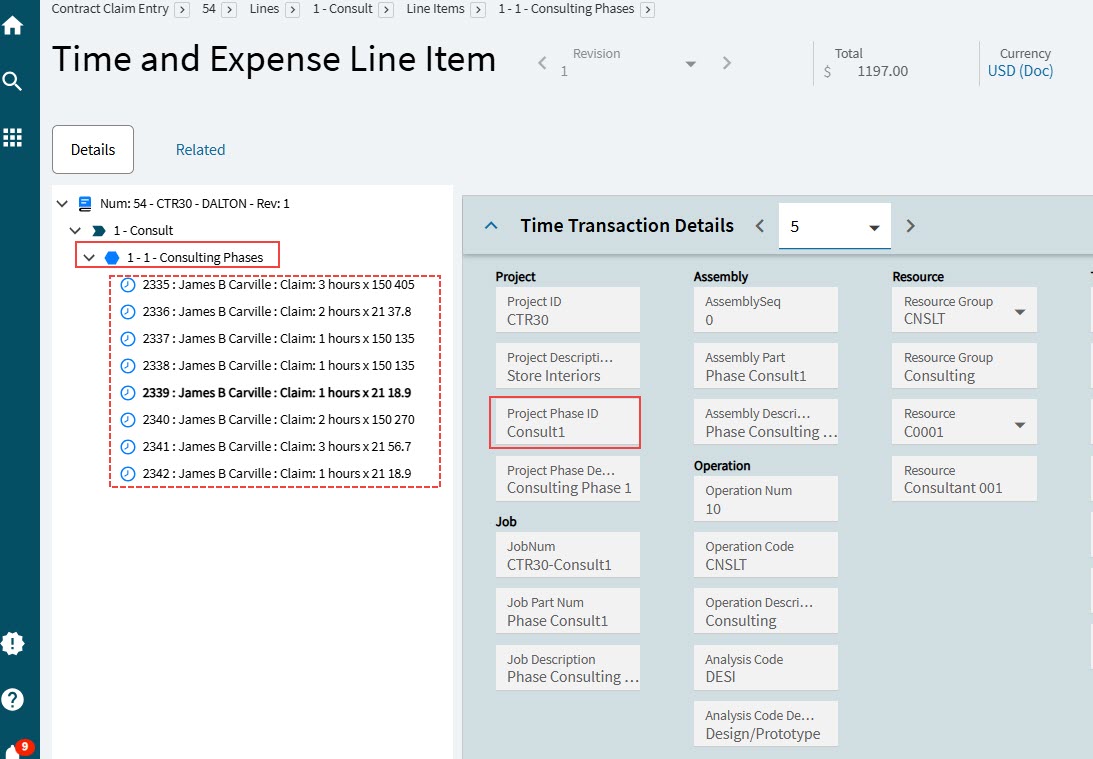
Here is the single contract line item that all of these contract claim lines relate to:
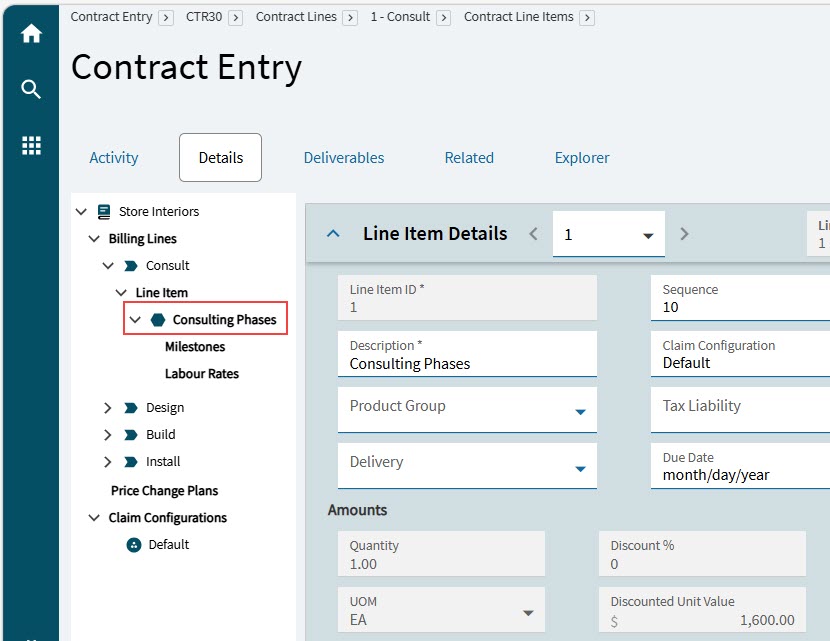
This is because the contract line item has the Include Child Phases in Rates Billing check box selected, and the linked project phase’s child phases can therefore be grouped for billing purposes.
Tax Lines
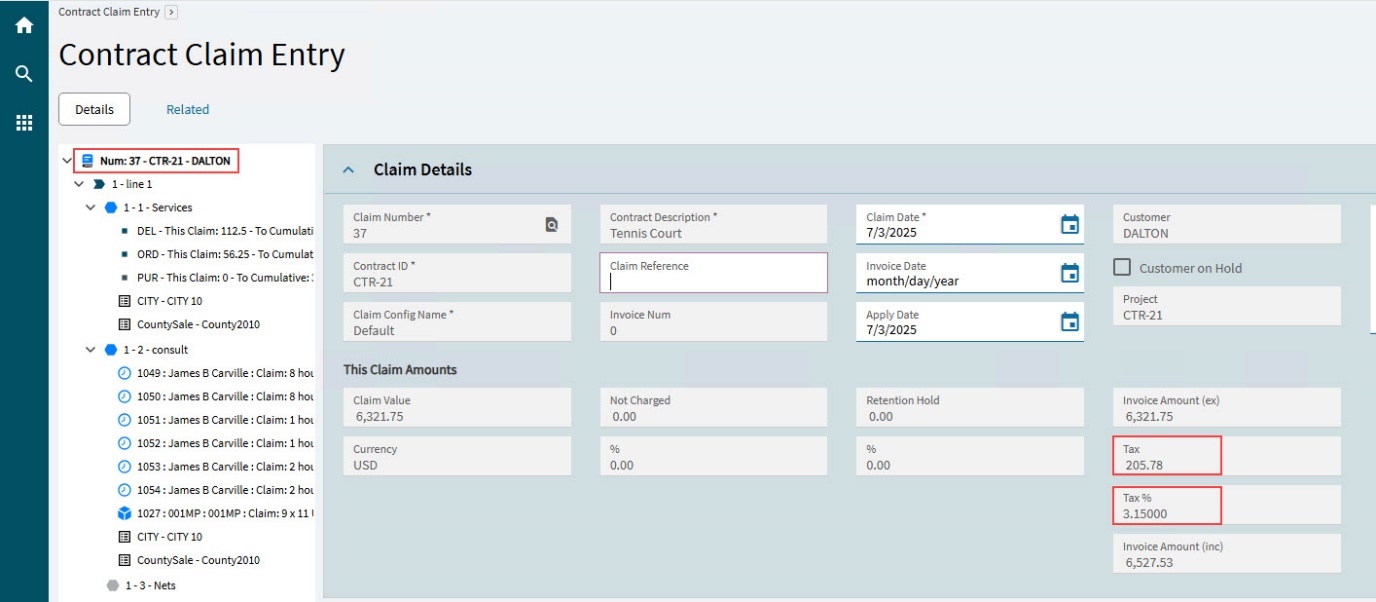
Tax Lines are created for each Line Item on a Contract Claim, where there is a Claim Value (This Claim Value), and where the Line Item has a Tax Liability with Tax Types (the Tax Liability is selected in the corresponding Line Item on the Contract).
Tax Lines are generated when you run Tax Calculation (see Tax Calculation), or when you create the invoice (see Generate an AR Invoice).
A tax line is created for each Tax Type associated with Tax Liability. The Taxable Amount is the Invoice Amount (ex) for the Line Item, and the Percent is the percent for the Tax Type.
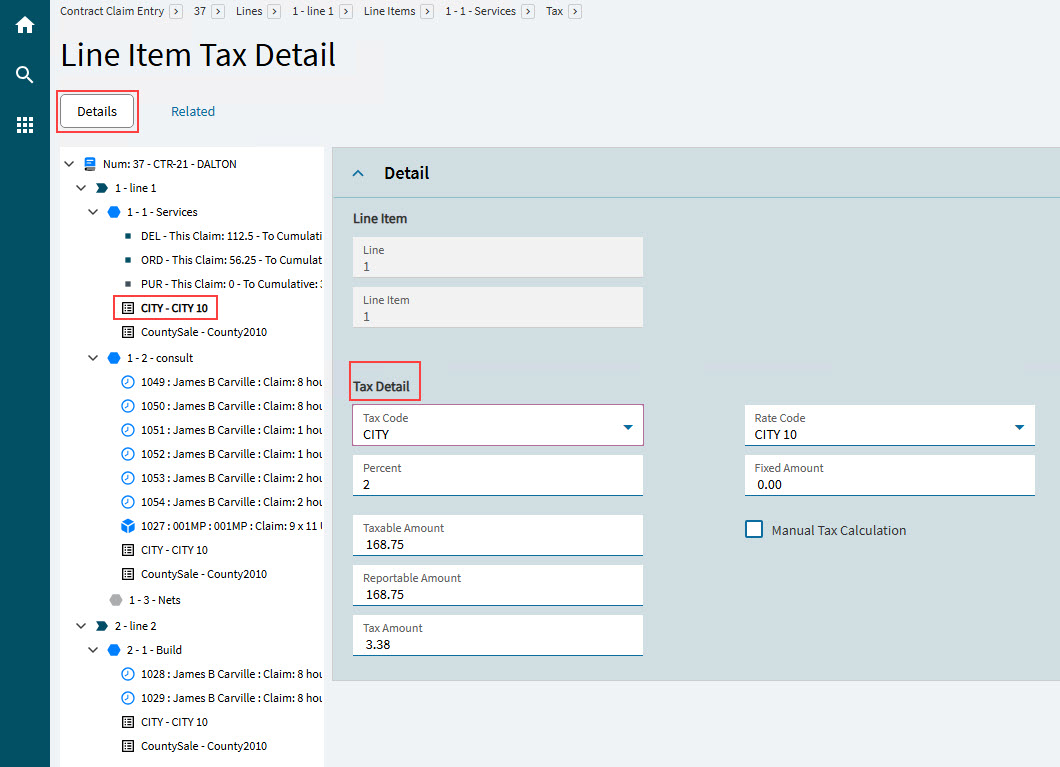
The sum of the Tax Amount for the different Tax Lines appears as the Taxes amount on the Line Item Detail. This is added to Invoice Amount (ex) to calculate Invoice Amount (inc).
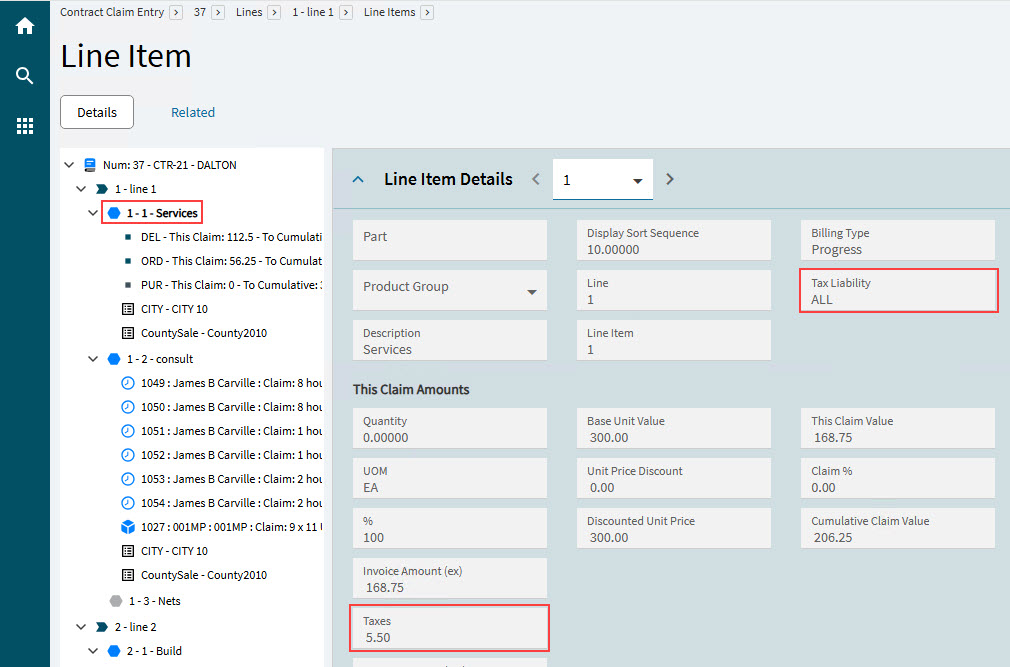
On the Claim Details page, the Tax is the sum of Taxes from the Line Items. Tax % is the Tax amount expressed as a percentage of the Invoice Amount (inc).
Retentions
Claim retentions apply to all billing types. This is the agreed amount/percentage retained by the customer until specific conditions are met, as part of the contract terms.
When the retention conditions are met, the retention can be released, and the customer invoiced for this portion of the claim.
Claim Retention
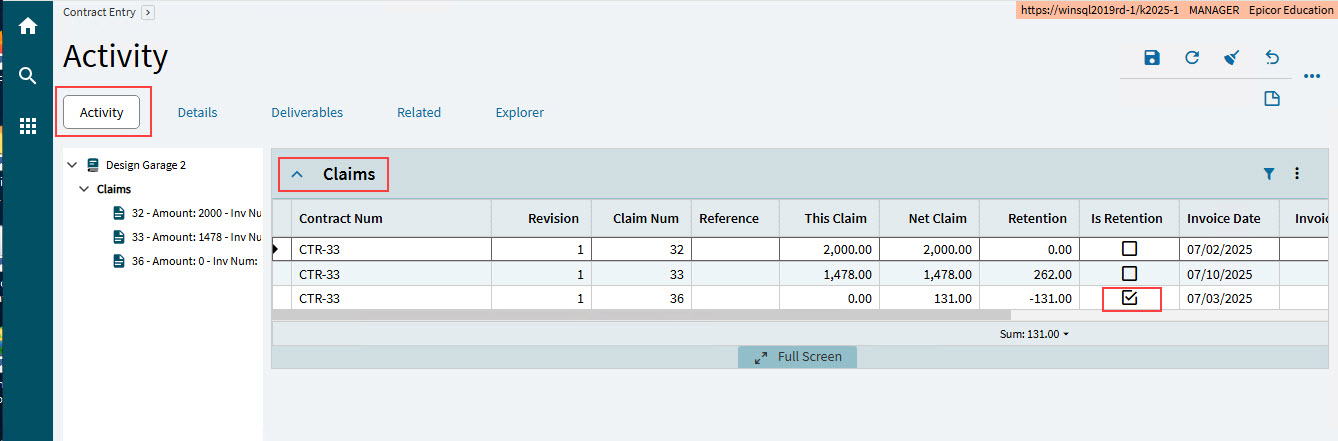
Claim Retentions appear on the Claims card on the Activity page of the Contract. See Viewing Contract Claims.
If a Contract Claim has a Retention Amount, this appears in the Retention column. Claim Retentions are flagged in the Is Retention column.
The example below shows a single Retention Claim.
Releasing Retention Claim
The Retention Claim is released from Contract Entry and then approved and invoiced from Contract Claims Entry.
See Releasing Contract Retentions (in Contract Entry) and Processing Contract Claims and Retentions (in Contract Claim Entry).
Tax Calculation
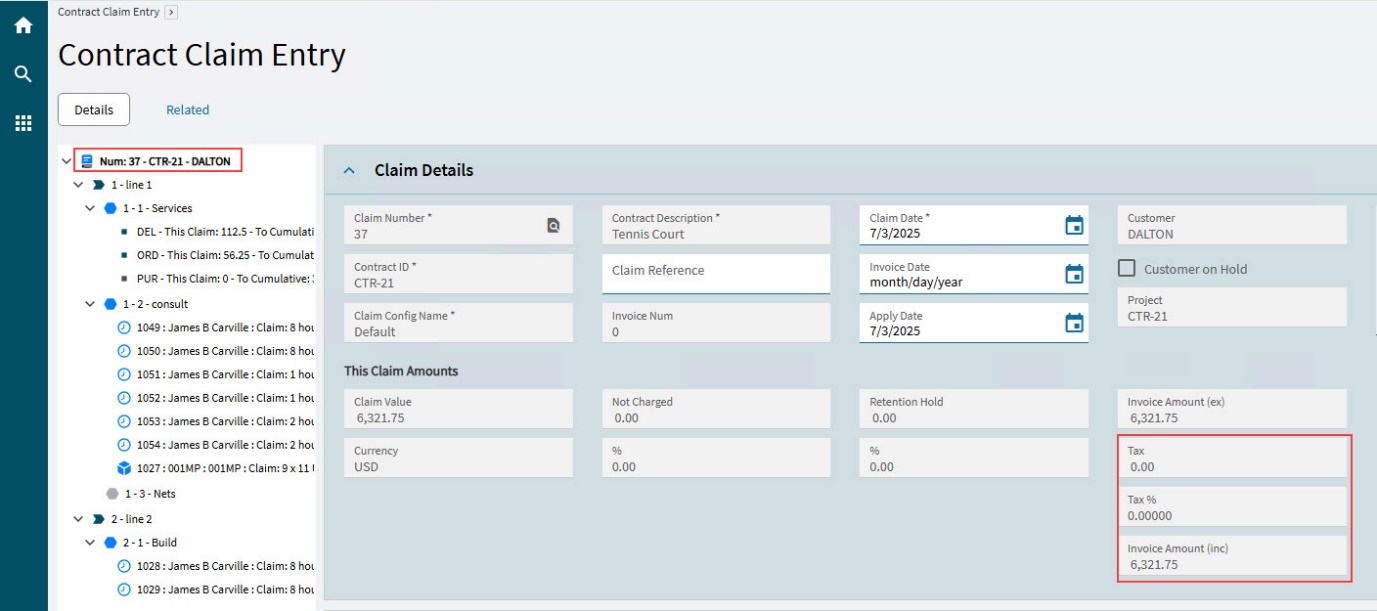
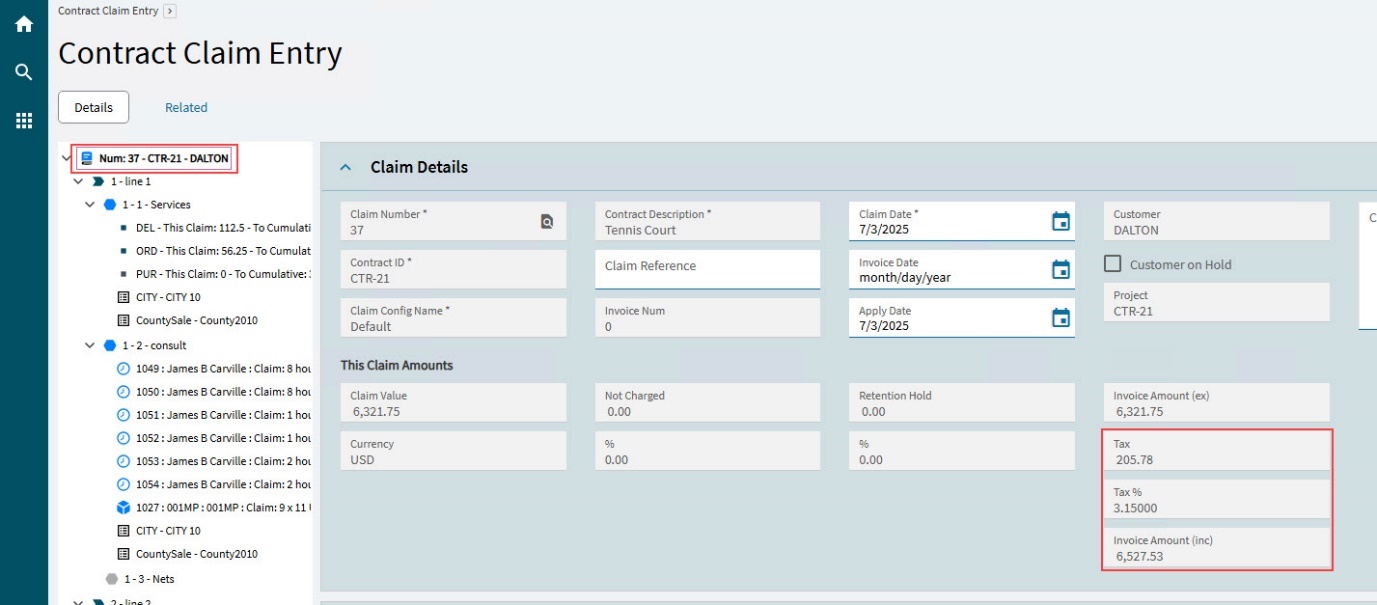
Before submitting the contract claim or claim retention to the customer, calculate the tax.
-
Select Calculate Tax from the Overflow
menu. Wait for the tax to be calculated.
| The Calculate Tax process is included when an invoice is generated, regardless of whether you execute it manually in this step. |
|
Figure 8: Claim Invoice Amounts Before Tax Calculation |
|
Figure 9: Claim Invoice Amounts After Tax Calculation |
Removing Lines from the Claim
You may optionally tidy up the claim by removing lines that have zero value, before generating the claim document and sending it to the customer for approval.
After the approvals have been marked on the claim, you can remove any lines that are not approved before generating the invoice.
To delete any line or line item from the claim:
-
Right-click on the line/line item on the Navigation Tree.
-
Select Delete Line or Delete Line Item or Delete Line Item Milestone.
-
Click Yes on the confirmation dialog.
To remove all zero-value items from the claim:
-
Select Remove > Zero Value Items from the Overflow
menu. -
Confirm by clicking Yes on the Information slide-out panel.
Line items with zero value are removed from the contract claim.
These are the lines where the Claim Value, Not Charged, and Retention all equal to zero.
To remove all items from the claim that have not been approved:
-
Select Remove > Not Approved Items from the Overflow
menu. -
Confirm by clicking Yes on the Information slide-out panel.
Line items that have not been approved are removed from the contract claim.
Refreshing Claim from Contract
You can refresh an existing contract claim from a contract, for example if the contract has been updated, or if you removed lines from the contract claim that you want to reinstate.
-
To refresh a contract claim, select Refresh Claim from Contract from the Overflow
menu.Any contract lines for the contract number > contract configuration > contract line item combination (or the contract number > contract configuration > contract line item > transaction-details combination for rates billing) that are not already in the contract claim are now brought in.
| You cannot change a contract claim after it has already been invoiced. |
Claim Document Generation/Printing
After calculating the tax, you can generate and print the claim or claim retention. Note that you can do this without first calculating the tax portion, if you don’t want to show tax on the contract claim report.
-
Select Print Claim from the Overflow
menu. -
Keep the selected values.
-
Select the Print Preview
 button on the menu bar.
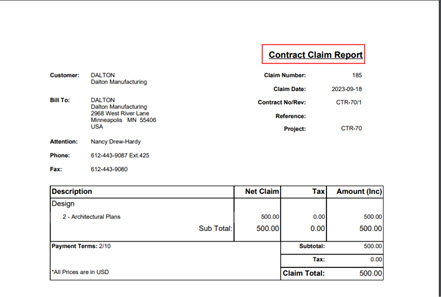
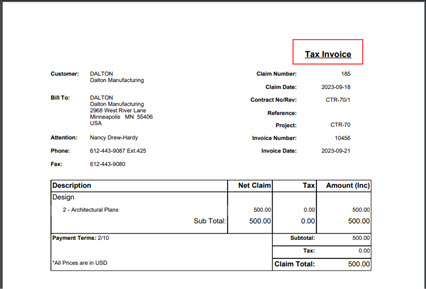
If the contract claim has already been invoiced, the report header is Tax Invoice, otherwise it is Contract Claim Report.
|
Figure 10 Contract Claim report |
|
Figure 11 Tax Invoice |
Submission and Approval
When the contract claim report is ready to be submitted to the customer for approval:
-
Select Released on the Contract Claim Header card, to indicate that the claim has been released to the customer.
For released Contract Retentions, the Released flag is already selected. -
Send the contract claim report to the customer, for approval.
If the customer has any queries with the claim, you can adjust it until an agreement is reached, and they are ready to approve the claim. After each adjustment, recalculate the tax, and regenerate the Contract Claim Report. When the customer has approved the claim:
-
Select Approved on the Contract Claim Header tab.
The contract claim is now ready for invoicing.
Generate an AR Invoice
| There must be Contract Claim Line Items to be invoiced. |
To generate an invoice for a contract claim:
-
Ensure that Released and Approved are selected on the Claim Details card on the Details page.
-
Select Save
on the Standard toolbar. -
Select an Invoice Date from the date picker.
-
Select Create Invoice From Claim from the Overflow
menu.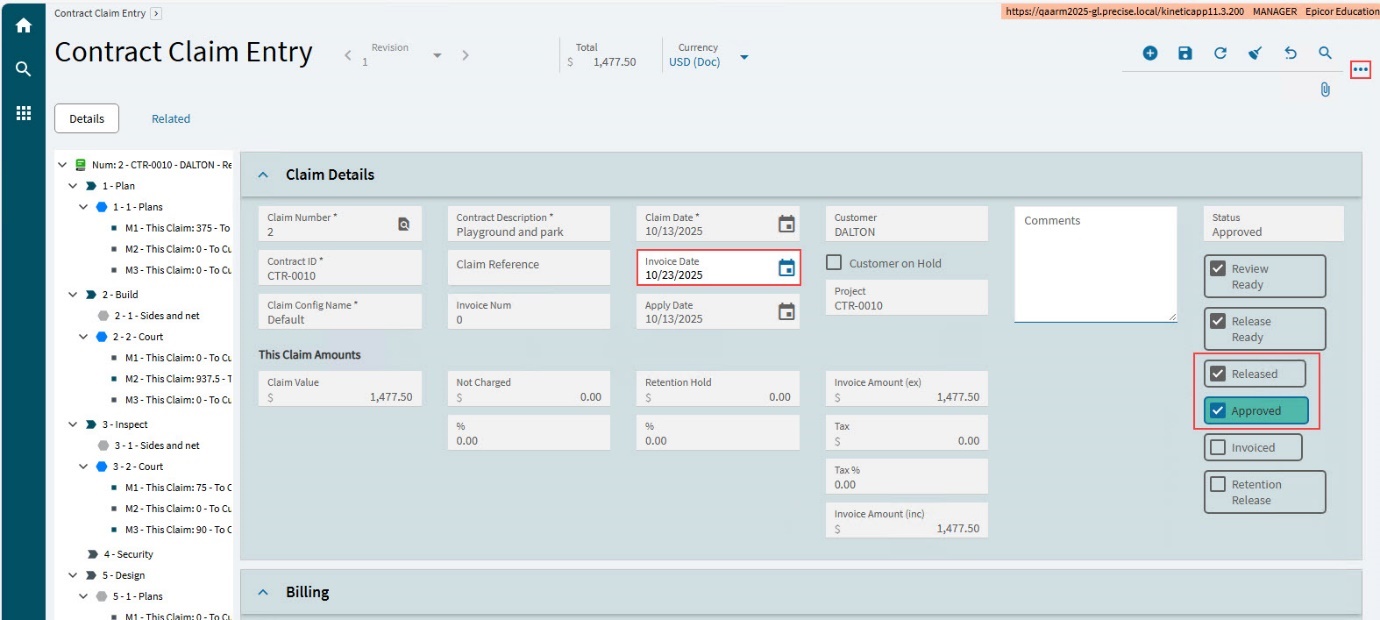
-
Select Yes to Please confirm invoice creation and posting to Epicor, in the pop-up dialog.
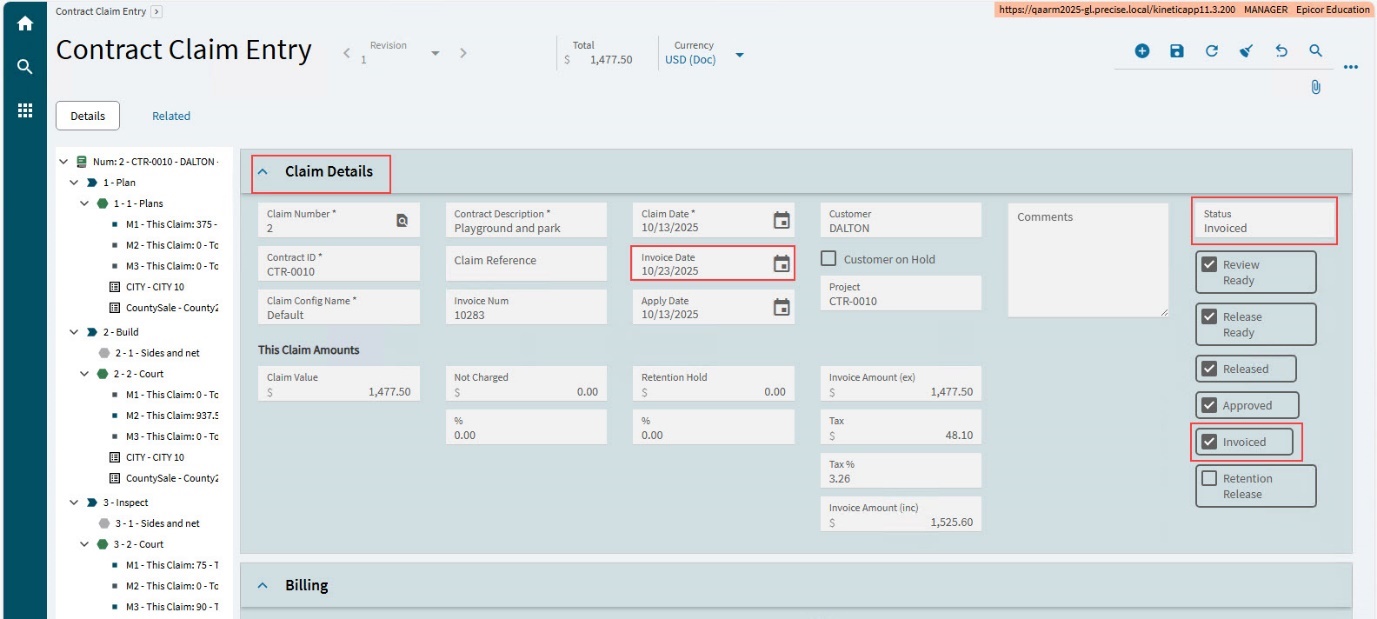
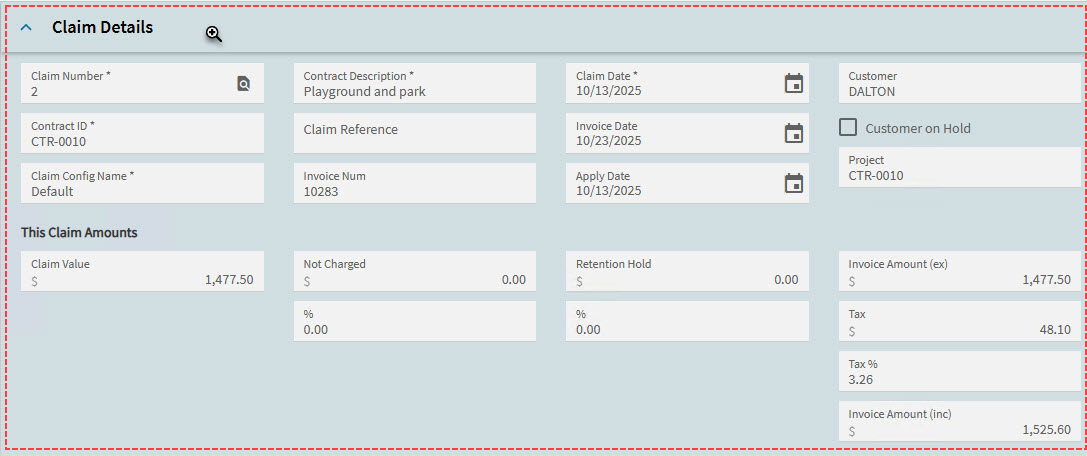
The contract claim is invoiced. On the Claim Details card, note the following:
-
The Invoiced check box is selected, indicating that the contract claim has been invoiced.
-
The Status shows Invoiced.
-
The Claim Amounts are updated.
-
The Invoice Date is updated.
-
The Invoice Num field displays the new AR Invoice number.
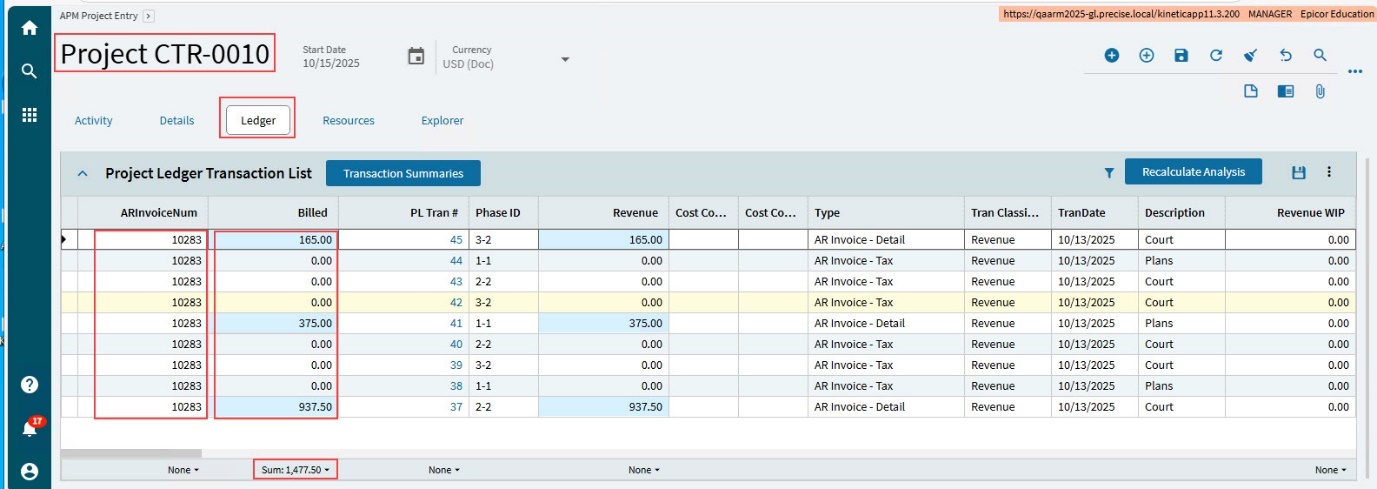
Viewing the Transaction in the Project
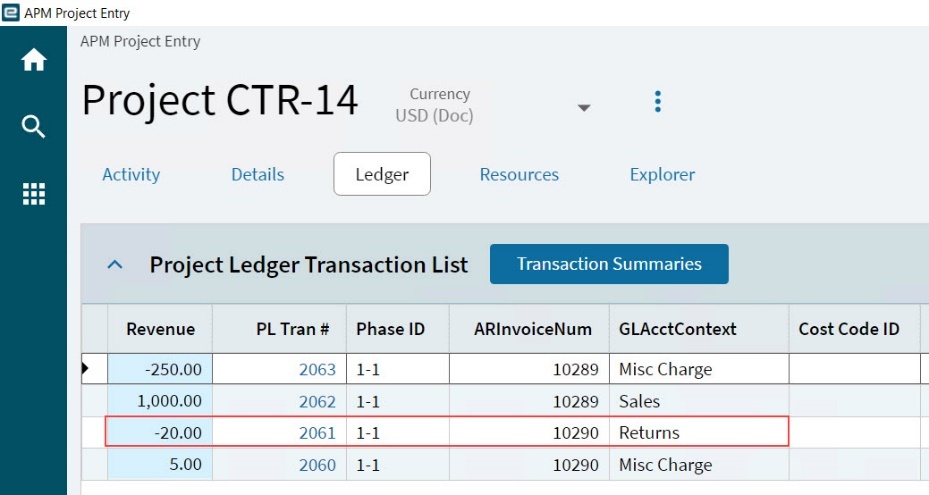
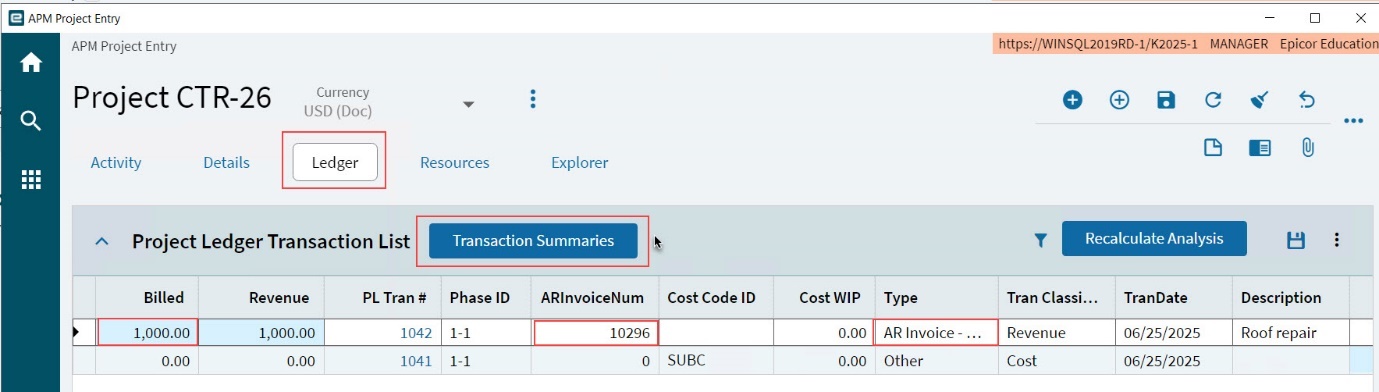
In APM Project Entry, run Recalculate Analysis to see the transaction in the Project Ledger Transaction List (see Ledger Page):
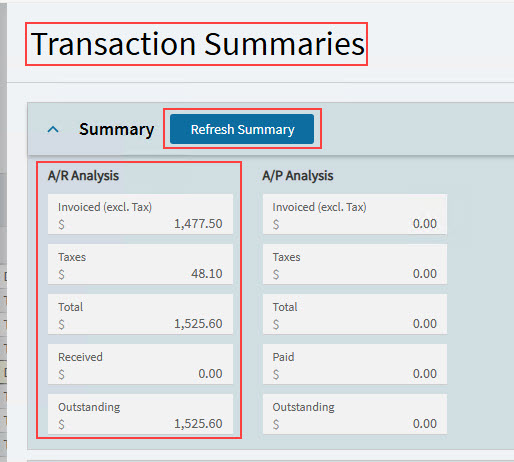
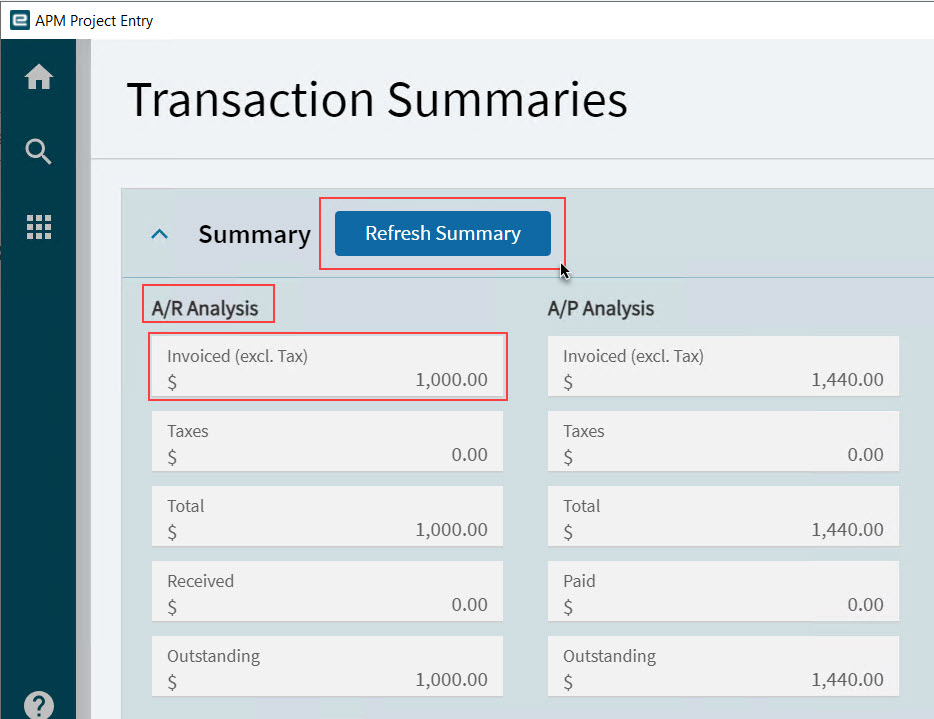
The A/R Analysis in Transaction Summaries also includes the amount from the AR Invoice.
Deleting an Open Contract Claim
If you need to make a lot of changes to a Contract Claim that has not yet been invoiced, you can delete it and then add it again.
To delete a Contract Claim:
-
Open the Contract Claim in Contract Claim Entry.
-
Ensure the Status is Draft, Released, or Approved.
-
Select the Contract Claim on the Navigation Tree.
-
Select Delete Contract Claim from the Overflow
menu, or right-click on the Contract Claim in the tree and select Delete from the pop-up menu.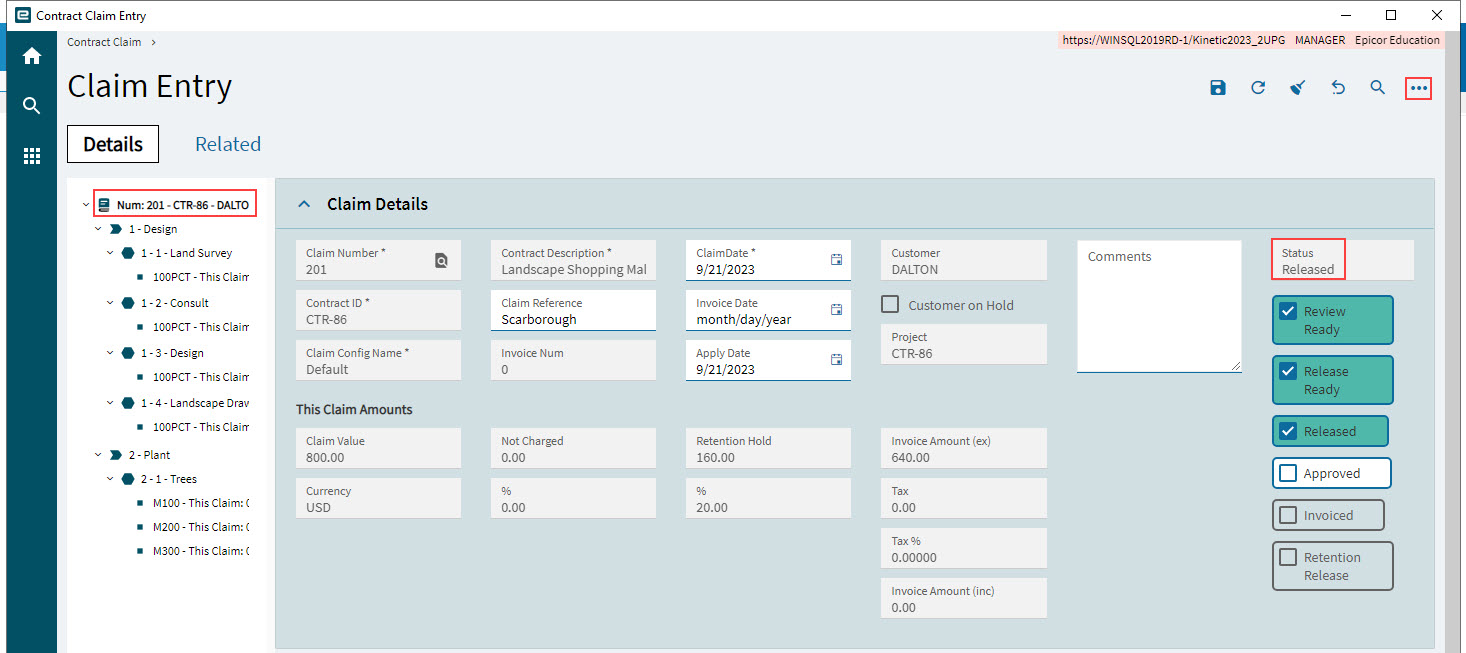
-
Click YES in the Delete Confirmation dialog box.
Create Rates Cost WIP
The Create Rates Cost WIP function is applicable to rates-based billing items.
If there are invoiced contract claim line items found for WIP clearing transaction creation, then the function will create those clearing transactions.
To fully process and recognize the cost recognition transactions, the Capture COS/WIP and Recalculate Analysis processes must be executed.
Note that this function is only available if the Configuration setting Rates Billing Related Cost WIP Automatic Clearing is enabled.
Viewing the Contract Claim, Invoice and Revenue
View the AR Invoice in APM AR Invoice Tracker
To view the invoice details in APM AR Invoice Tracker, right-click on the invoice number
and select  APM AR Invoice Tracker.
| Refer to the AR Invoice Tracker topic in Kinetic Help for more information. |
View the Contract Claims in Contract Entry
-
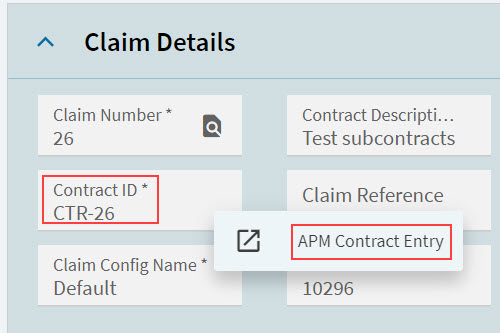
Open the contract that this claim relates to (right-click on the Contract ID on the Claim Details sheet and select APM Contract Entry).
The Claims card on the Activity page shows all contract claims for this contract.
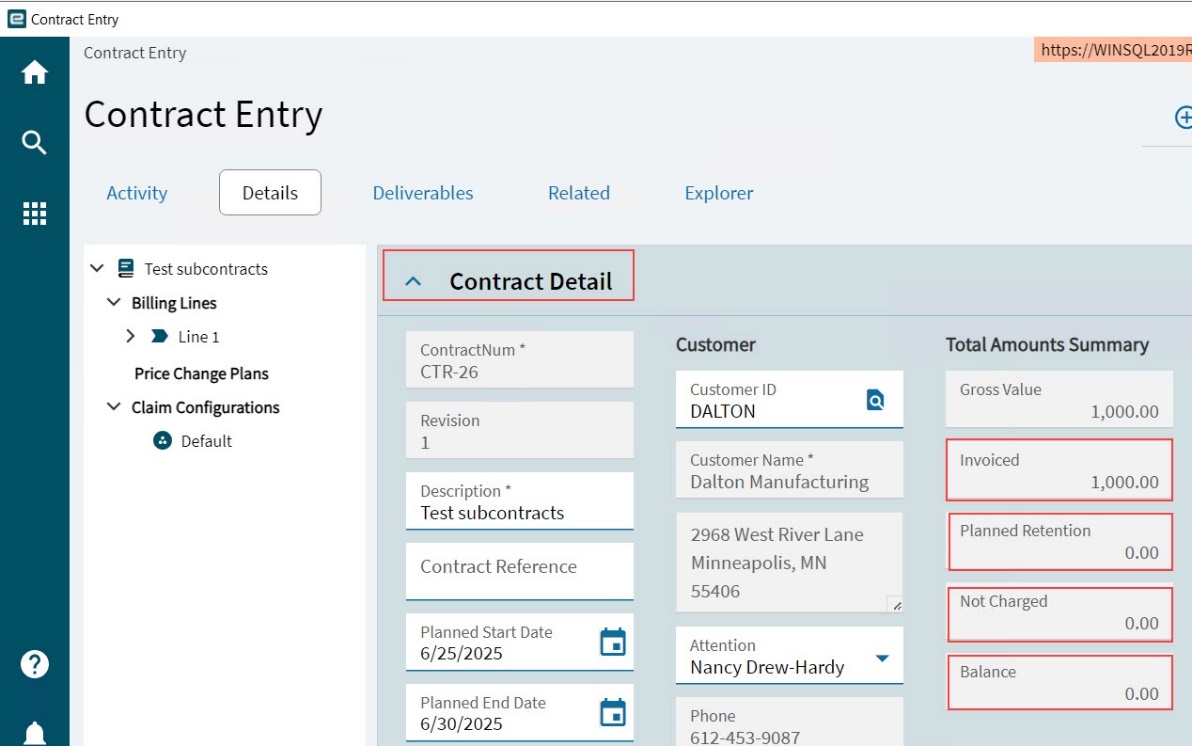
The Contract Detail card on the Details page displays updated values for:
- Invoiced
-
The sum of invoiced amounts for all claims against this contract
- Planned Retention
-
The sum of all outstanding retention amounts for all claims against this contract
- Not Charged
-
The sum of not charged amounts for all claims against this contract
- Balance
-
The Gross Value less Invoiced, Planned Retention and Not Charged
View in APM Projects
The AR Invoice must be posted for it to be viewed within APM Projects.
| Automatic posting is controlled by the “AutoPostClaimARInvoices” setting in the Automatic Transaction Posting area of APM Project Management Configuration (see Configuration Details). To post manually, use APM AR Invoice Entry. |
-
Open the related project.
-
Run Recalculate Analysis (see Running Recalculate Analysis).
-
Open the Ledger page (see Summary).
The AR Invoices details for the Contract Claims appear in the grid.
-
Click on Transaction Summaries.
-
On the Transaction Summaries panel, click Refresh Summary.
The AR Invoice amount updates the summary amount in the A/R Analysis section.
Cancellations or Claim Reversals
If a Contract Claim needs to be totally or partially reversed/cancelled:
-
Add a new Contract Claim for the same Contract/Claim Configuration Contract.
-
Edit the Claim Lines that need to be cancelled/reversed. See how to do the cancellation/reversal for the different types of Claim Lines:
-
For Progress Billing Type: Cancelling a Progress Billing Claim Line Item.
-
For Quantity Billing Type: Cancelling a Quantity Billing Claim Line Item.
-
-
Complete the Contract Claim as usual. See Processing Contract Claims and Retentions.
A Credit Memo Invoice is generated for the Claim Reversal.
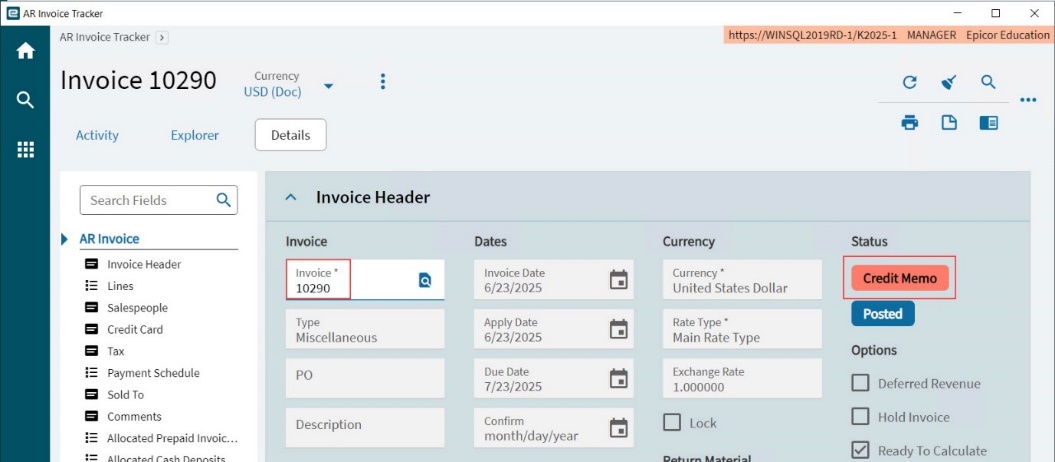
| For further information on Credit Memos, refer to the standard Kinetic Help topic Credit Memo in the Accounts Receivable section. |
-
You can now create a new Contract Claim against the contract when ready.
Viewing the Cancellation Transaction in the Project
In APM Project Entry, run Recalculate Analysis to see the Returns transaction in the Project Ledger Transaction List (see Ledger Page):
|