Project Operations in APM Project Entry
These are the operations available on the APM Project Entry screen.
Create Project Job
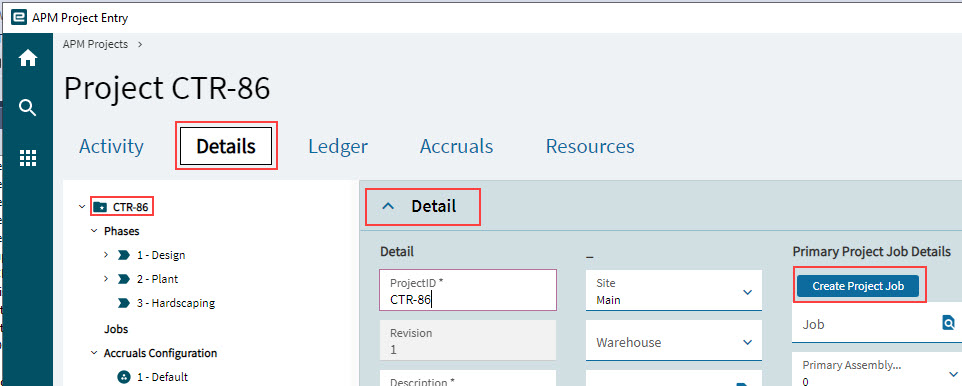
To create a job for the project:
-
Open the Details page.
-
Select the project on the Navigation Tree.
-
Select Create Project Job on the Detail card to create a new primary job for a project.
|
Create WBS Phase Job
| You can only create a WBS Phase job when the Project header has its own job. See Create Project Job. |
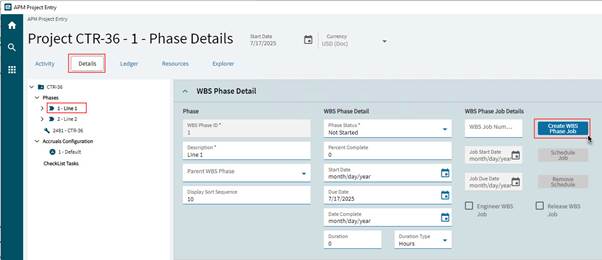
To create a WBS Phase Job:
-
Open the Details page.
-
Select the WBS Phase on the Navigation Tree under Phases.
-
Expand the WBS Phase Detail card.
-
Select Create WBS Phase Job.
|
Running Recalculate Analysis
Use Recalculate Analysis to bring in all transactions relating to the project. These include AP Invoices, AR Invoices, Labour and Part charges, and Costs charged to the project. Budget Spread Actuals are also calculated within this process.
To run Recalculate Analysis:
-
Select
 Recalculate Analysis from the
  Overflow menu.
 -
On the Recalculate Analysis panel:
-
Select Process.
-
If the process is executed successfully, an Information panel appears. Select OK.
-
Close the Recalculate Analysis panel.
-
-
Select Refresh on the Standard toolbar.
The applicable values are updated, and you can see all transactions in the Ledger cards (see see Ledger Page). Cost Code values are also updated (see Cost Code).
| You can also run Recalculate Analysis in the Ledger (see Ledger Page). |
Creating Budgets
Start by creating budgets at the WBS Phase > Cost Code level.
If the check box Automatically Roll Up Child Phase and Cost Code Budgets to This Level is selected for higher levels (selected by default), then the budgets are automatically rolled up to each higher level. In this case, there is no need to capture budgets at the higher levels.
If the check box is not selected, you can manually capture a budget for each selected level. If there are differences between the edited Budget and the calculated Roll Up / Allocation then both these fields are highlighted.
Approving Budgets
You can approve each budget individually, from each Cost Code budget up to the WBS Phases and finally at Project level, or you can approve budgets from the top down.
To approve the whole project budget:
-
Select the check box: Automatically Roll Up Child Phase and Cost Code Budgets to This Level.
-
Select Approve.
-
Select Yes on the Question panel, to confirm.
The budget is approved at the Project level and at each level beneath the project.
You can approve at any of the lower levels in the same manner. If the “Automatically Roll Up…” check box is selected, then lower level budgets are approved automatically. To approve just the selected budget, without approving at lower levels, first clear the check box.
See:
Importing/Exporting
Exporting Budgets
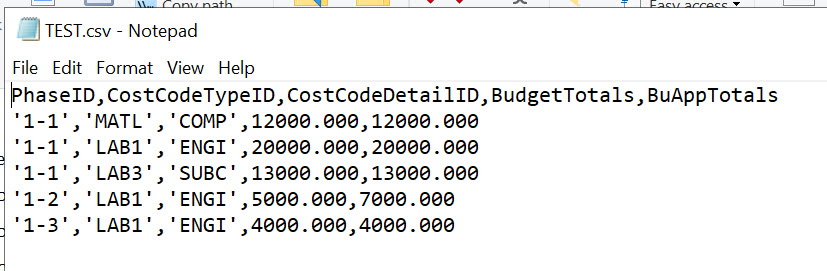
Use this function to export Phase IDs, Cost Codes and their associated Budget and Approved Amount values from the current project to a CSV file.
-
Select
 Export Budget from the Overflow menu.
 -
On the panel:
-
Type in a File Name to export to.
-
Select Generate File.
A pop-up message appears when the file has been created.
-
-
Use the Epicor option 'Server File Download' to save the file in your system. (Navigate to System Management > Schedule Processes > Server File Download.)
-
Use File Explorer to locate and open the downloaded .CSV file.
Importing Budgets
Use this function to import one or more Cost Codes for the different WBS Phases. Each row to import contains the WBS Phase ID, the Cost Code Type ID with a Cost Code ID belonging to the type, a Budget amount and an Approved amount.
If you have an existing file to import
-
Select
Import Budget from the Overflow menu.The Import Budget (CSV) slide-out panel displays.
-
If you have an existing file to import, browse and select or enter the file directory and name in the CSV File edit box, then click Import. When the file is selected, select OK.
If the CSV file contains errors, a warning dialog message is displayed, highlighting the lines that failed to import. Lines without errors will be imported into the project.
If the CSV file contains valid values in the correct format, the budget is imported, and a Successfully Imported dialog message is shown. The Cost Codes are imported with their Budget and Approved values and appear under the respective WBS Phases.
If you do not have a file to import
-
If you have no file to import, type a file name in the CSV Export edit box, then click Generate CSV Template.
-
Take a note of the file directory and file name that appear in the CSV Export edit box.
-
Edit the generated CSV file in Notepad or similar, then save and try the import again, using the new file.
Importing Budgets from Quote
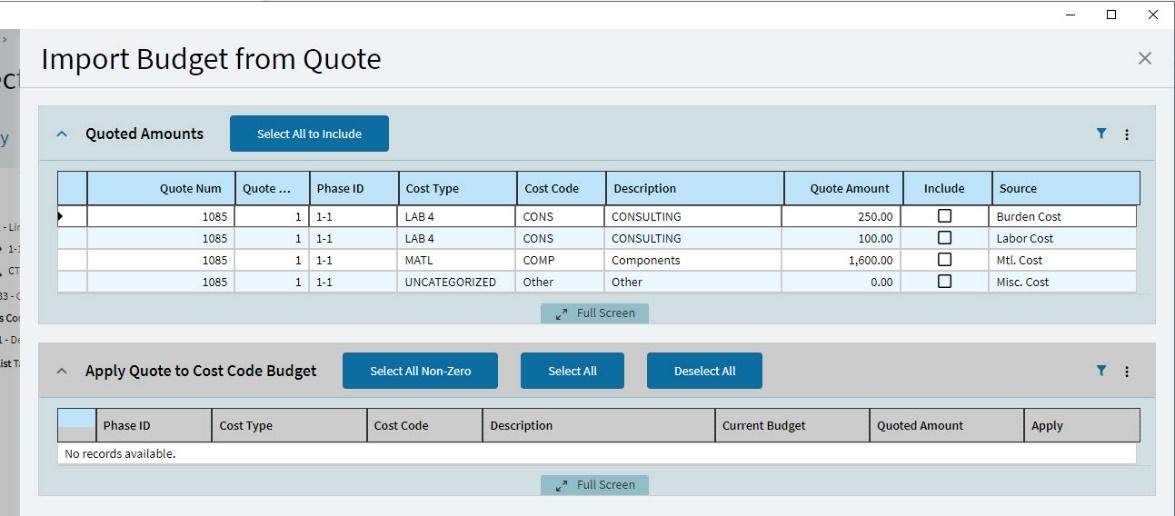
Use this function to import Cost Codes and Budgets for the different WBS Phases, using a Quote that is related to the Project. This function uses the Quote that was created when the Project was created from the Contract. See Creating a Project from a Contract.
To import budgets from the related quote:
-
Open the project in APM Project Entry.
-
Select
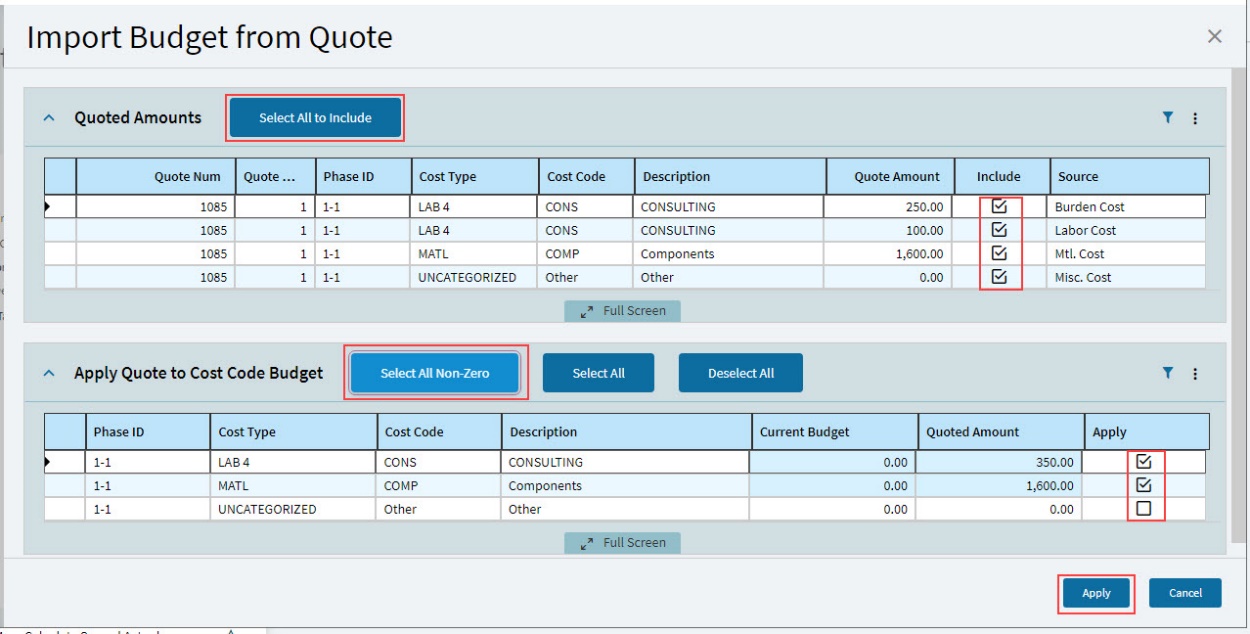
Import Budget from Quote from the Overflow menu.The Import Budget from Quote slide-out panel displays, with Phase IDs from the related Quote.
The Quote Lines (or the Operations and Materials for manufacturing quote lines) must have an Analysis Code that has a corresponding Cost Code in Cost Code Maintenance. This is covered in the Quotes and Projects Budgets Exercise. The Quote Amount is the Quote Line’s Unit Cost total for the Analysis Code.
-
On the Quoted Amounts toolbar, select the lines to include (select the Include check box for each line to import or click Select All to Include).
-
On the Apply Quote to Cost Code Budget toolbar, select the lines to import (click Select All Non-Zero or click Select All. Alternatively, select the Apply check box next to each line to import.)
-
Click Apply.
The selected quote lines are imported. Cost Codes are inserted into the respective WBS Phases with a Budget equal to the Quoted Amount. If matching Phase > Cost Codes exist, the budgets are updated.
The budget can now be adjusted and approved as usual.
| If you adjust the Unit Cost on the Quote, you can re-import the Budgets from the Quote by repeating this procedure. |
Calculating Spread Actuals
Spread Actuals are calculated in the Recalculate Analysis function. See Recalculate Analysis.
Closing a Project
The Close Project function closes and deactivates a project.
To close the current project:
-
Select
 Close Project from the Overflow menu.
 -
On the Question panel, select Yes to confirm.
-
Select OK.
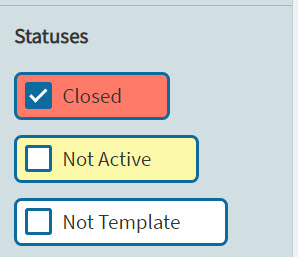
The blue Open label changes to a red Closed label, and the green Active label changes to a yellow Not Active label.
-
To re-open the Project, select Not Active to change it to Active, then clear the Closed check box to update to Open.
| Instead of closing a project, you can set it to Inactive by clearing the Active check box. You can then reactivate the project at any point. |
Creating a Project Journal
To transfer Costs or Revenue between WBS Phases, Cost Codes or GL accounts within the current Project, you can create a GL Journal entry for the project, using Advanced Project Journal Entry. Likewise, you can transfer Costs or Revenue between the current Project and another Project.
For detailed instructions, see APM Project Journal Entry.