Contract Operations in Contract Entry
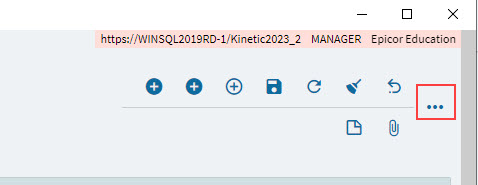
You can access most of the contract operations from the Overflow  menu.
menu.
|
Changing Prices on a Contract
Use the Price Change Plans card in Contract Entry to plan and track Price Changes. See Adding and Processing Price Change Plans.
Contract Completion
To complete a contract, select Completed as the Next Status, in Change Contract Status (see Changing the Contract Status). A Completed contract cannot be edited, but you can change the status back to Active if necessary.
Revising a Contract
To revise a contract:
-
Navigate to Contract Entry (Advanced Project Management > Contract Management > General Operations > Contract Entry).
-
Search for and open the contract to revise.
-
From the Overflow
menu, select Revise Contract. -
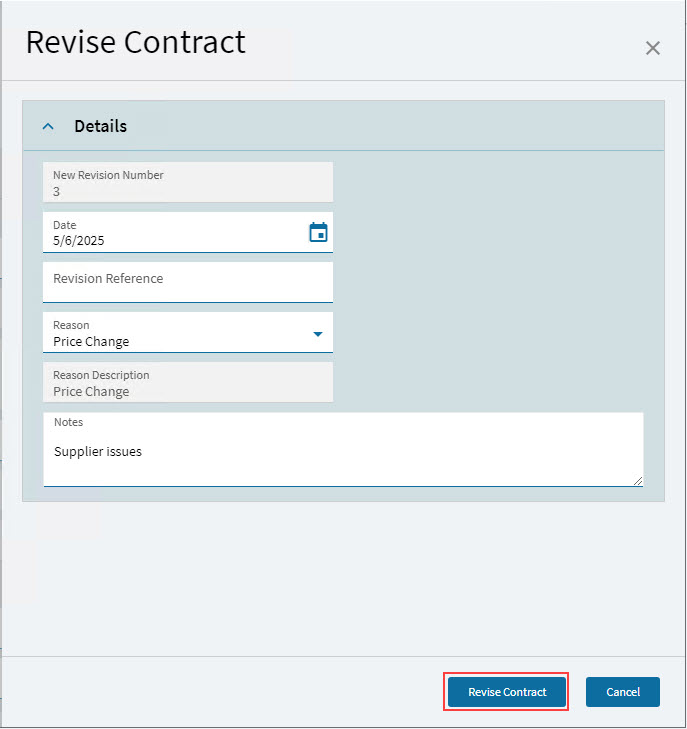
In the Revise Contract slide-out panel: update the Date if required, add a Revision Reference, select a Reason Code from the drop-down list (this populates the Reason Description field), and optionally add Notes to give some context to the revision.
-
Select Revise Contract.
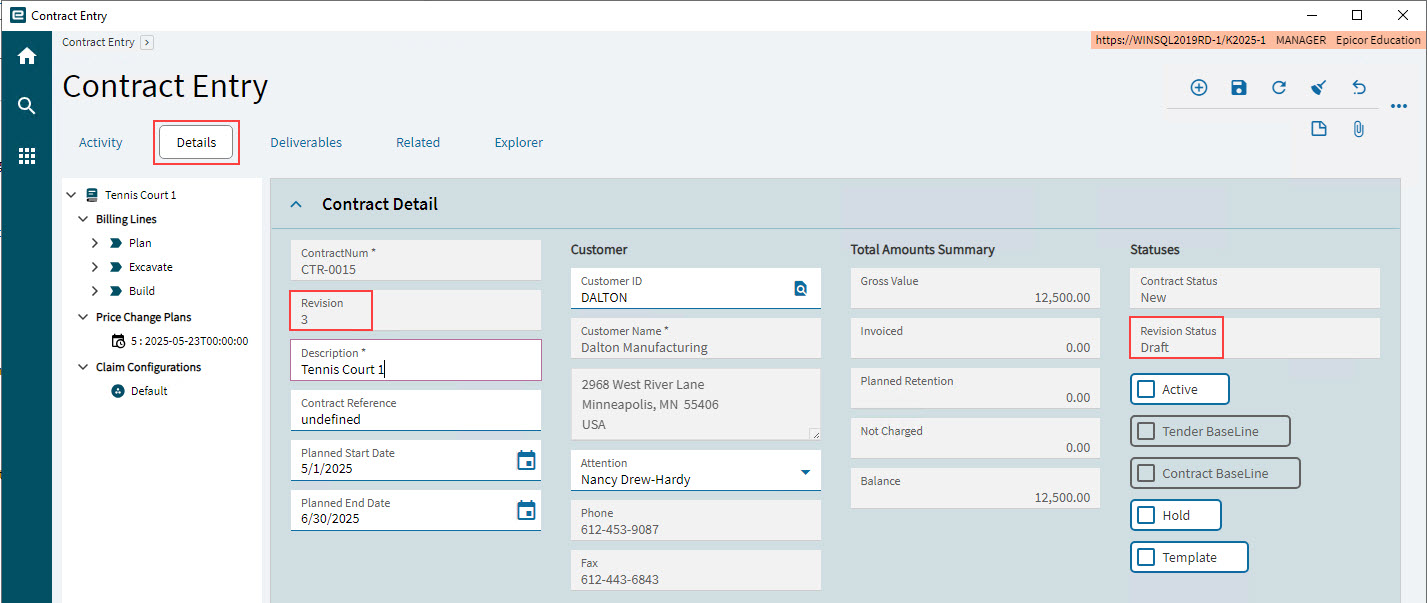
A new revision of the contract is created. The Revision number increments by one with each new revision, and the Revision Status is Draft. Note that the Contract Status has not changed.
Activating a Revision
This action sets the Revision Status to Active. If there is a prior contract revision with the Active status, this will get a new Revision Status of Obsolete.
To activate the current revision of a contract:
-
Select Activate Revision from the Overflow
menu.
Changing the Contract Status
The contract status shows the stage of the current revision of a contract (see Contract Status).
To change the contract status, first ensure that the Revision Status is Active. Next:
-
Select
 Change Contract Status from the Overflow menu.
 -
In the Change Contract Status slide-out panel:
-
Select the Next Status. The available options depend on the Current Status.
-
Date defaults to the current date and cannot be edited.
-
Optionally capture Notes.
-
Click Change Status.
-
Cancelling a Contract
Use the Cancel Contract operation to cancel the contract directly, as an alternative to selecting the Cancelled option in the Change Contract Status function.
-
Select
Cancel Contract from the Overflow menu. -
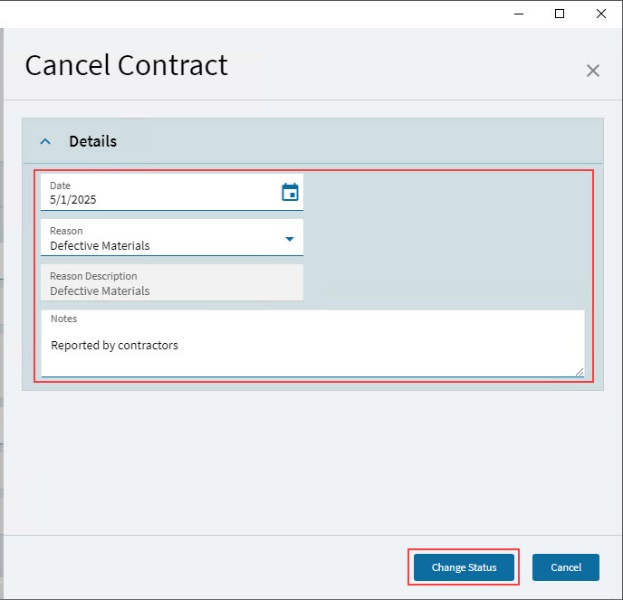
In the Cancel Contract slide-out panel:
-
Select a Date.
-
Select a Reason from the drop-down list. This populates the Reason Description.
-
Optionally capture Notes.
-
Click Change Status.
-
|
Duplicating a Contract
You can create an identical copy of the contract. For instructions, refer to Duplicating a Contract in Contract Entry.
Printing a Contract Report
To print the current contract:
-
Select
 Print Contract from the Overflow menu. This opens the Contract Report page, with the contract number pre-selected. See Contract Report.
Creating a Snapshot
If you want to track significant changes to the contract or the budget in the related project, you can create a snapshot. To see what has changed between the snapshot and a previous snapshot, open the contract in the Contract and Budget Change History report and select from the Change History Sets.
To create a snapshot of a contract:
-
Open the contract in Contract Entry.
-
Select
Create Snapshot from the Overflow menu. -
In the Create Snapshot slide-out panel:
-
Enter a Note that briefly describes the major changes.
-
Select OK.
The new snapshot is created.
-
| It is good practice to create a baseline snapshot for a new contract, to provide a comparison for any later changes. |
Fields from the different levels of the related project, as well as the contract, are stored in database tables, so that comparisons can be highlighted in the Contract and Budget Change History report. See Contract and Budget Change History.
Creating Snapshots Automatically
Snapshots can be triggered by various events, such as when a contract status is updated, or when a project budget is approved. See Configuration Details for the full list (in the section Automatic Contract Snapshot Triggers).
Snapshots created automatically have the trigger included in the Note. For example, “Auto generated – Contract Status” is the note for a snapshot triggered when the contract status is updated.
Creating a Project from a Contract
When you create a Project from a Contract, you are also linking the project to the contract. A contract can have multiple related (linked) projects, but only one can be created from the contract. This is the primary project.
-
Select
Create Project from Contract from the Overflow menu.The Create Project from Contract panel slides out.
-
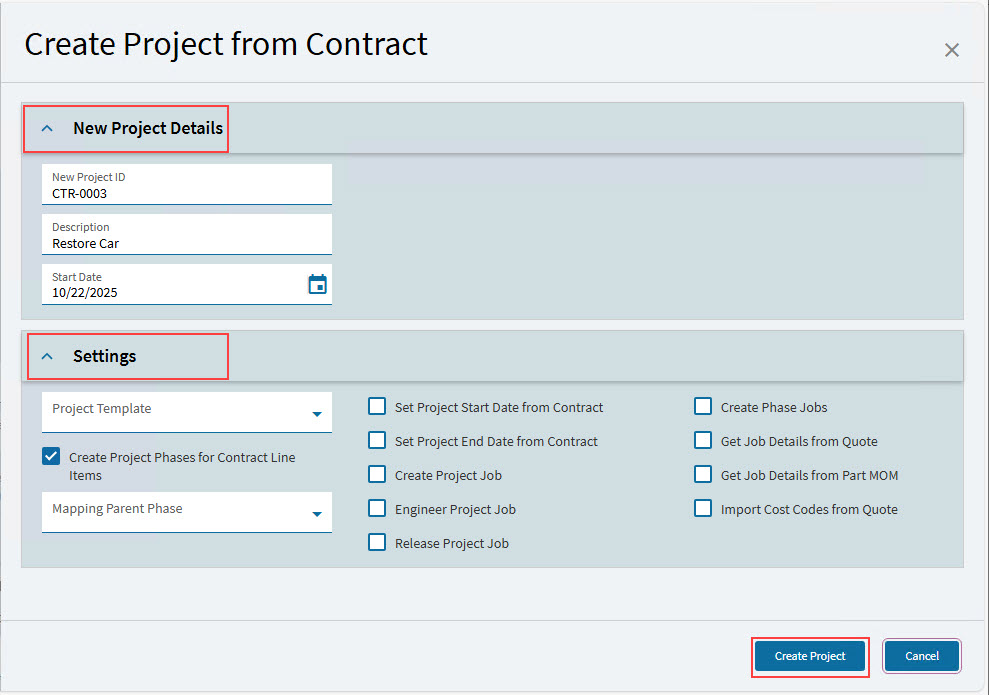
In the Create Project from Contract panel:
-
Enter a New Project ID (or keep the default, which is the contract’s ContractNum).
-
Enter a Description (or keep the default, which is the contract’s Description).
-
Select a new Start Date if different from the contract start date.
-
Select from the options in the Settings card.
- <column 1>
-
- Project Template
-
Optionally select a template for the project.
- Create Project Phases for Contract Line Items
-
If selected, then each contract line is added to the project as a WBS Phase and synced to the project and WBS Phase, unless a Project Template is selected, in which case the project template’s phases are created instead.
- Mapping Parent Phase
-
This is enabled if a Project Template is selected and is used for mapping Sales Order lines or Quote lines under the specified phase within the project template.
- <column 2>
-
- Set Project Start Date from Contract
-
Select to set the Project Start Date from the contract’s Planned Start Date.
- Set Project End Date from Contract
-
Select to set the Project End Date from the contract’s Planned End Date.
- Create Project Job
-
Automatically creates the project job.
- Engineer Project Job
-
Automatically selects Engineered for the project job.
- Release Project Job
-
Automatically releases the project job.
- <column 3>
-
- Create Phase Jobs
-
Creates a job for each phase of the project.
- Get Job Details from Quote
-
Gets the job details from the quote.
- Get Job Details from Part MOM
-
Gets job details from the part’s method of manufacturing.
- Import Cost Codes from Quote
-
Imports cost codes from the related quote.
-
Select Create Project.
-
Projects that are related to a contract are listed in the Linked Projects card on the Related page. Open the Related page, then expand the Linked Projects card to view related projects.
Syncing Contract Changes to the Project
If the contract has a Contract Type, then changes to the contract Description, Start Date and End Date are synced to the project according to the selections defined for the contract type, and the current status of the contract. Likewise, changes to line and line item descriptions, as well as any new lines or line items are controlled in this way. See Contract Maintenance to Project Sync.
If there is no Contract Type for the contract, you can sync contract line item changes using the Sync to Project button.
Creating a Quote from a Contract
You can create a Quote from a Contract.
| A contract should have the New or Tendered status for quote synchronization to take place. |
-
To create a quote from a contract, select Create Quote from Contract from the Overflow
menu.The conditions are set out in the Create Linked CRM / Sales Quote Confirmation slide-out.
This process will create a new CRM / Sales Quote and update the mapping for this item and any child contract components inheriting the mapping configuration setup from this item. If an existing quote mapping configuration is in place, the mapping will be overwritten but the original quote and quote lines and value may persist depending on other mapping configuration factors. Please review and manually update or close the existing quote after this process is completed if needed. Continue with creation? -
If you agree to continue, click OK.
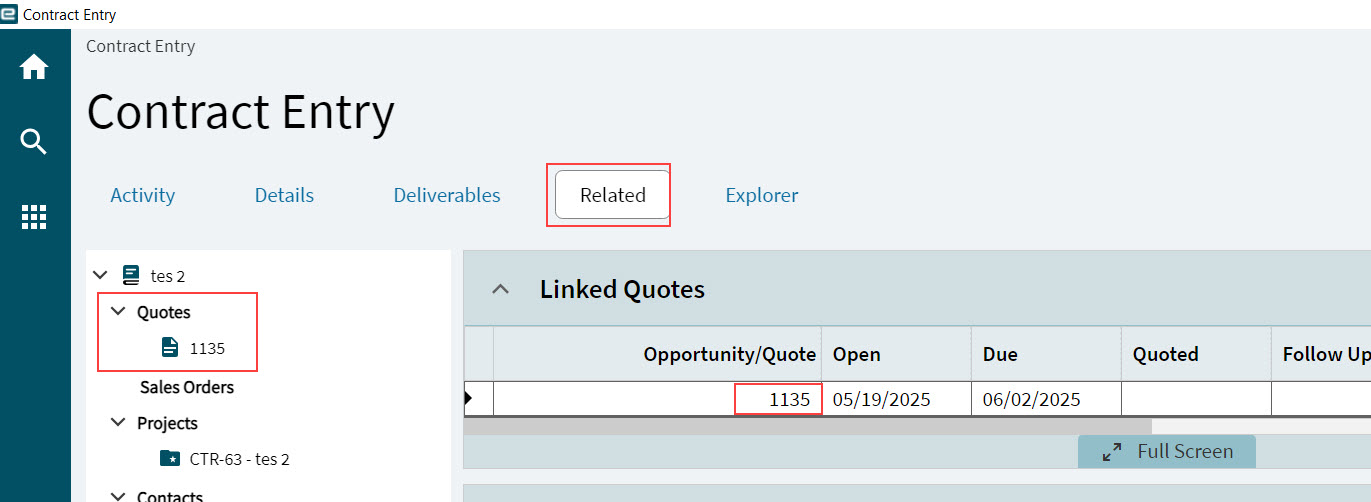
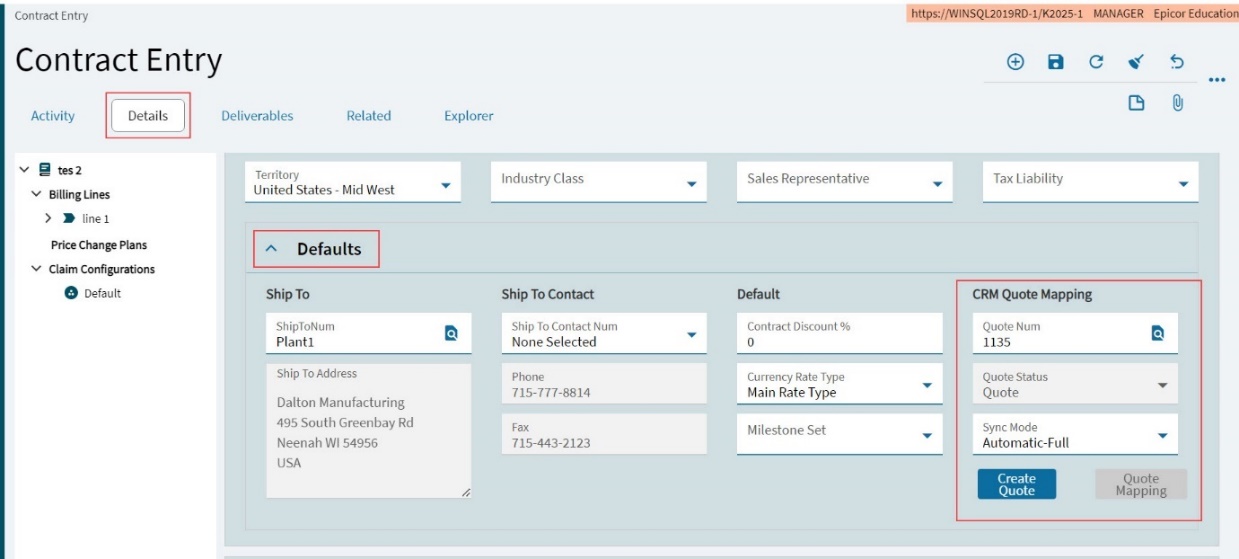
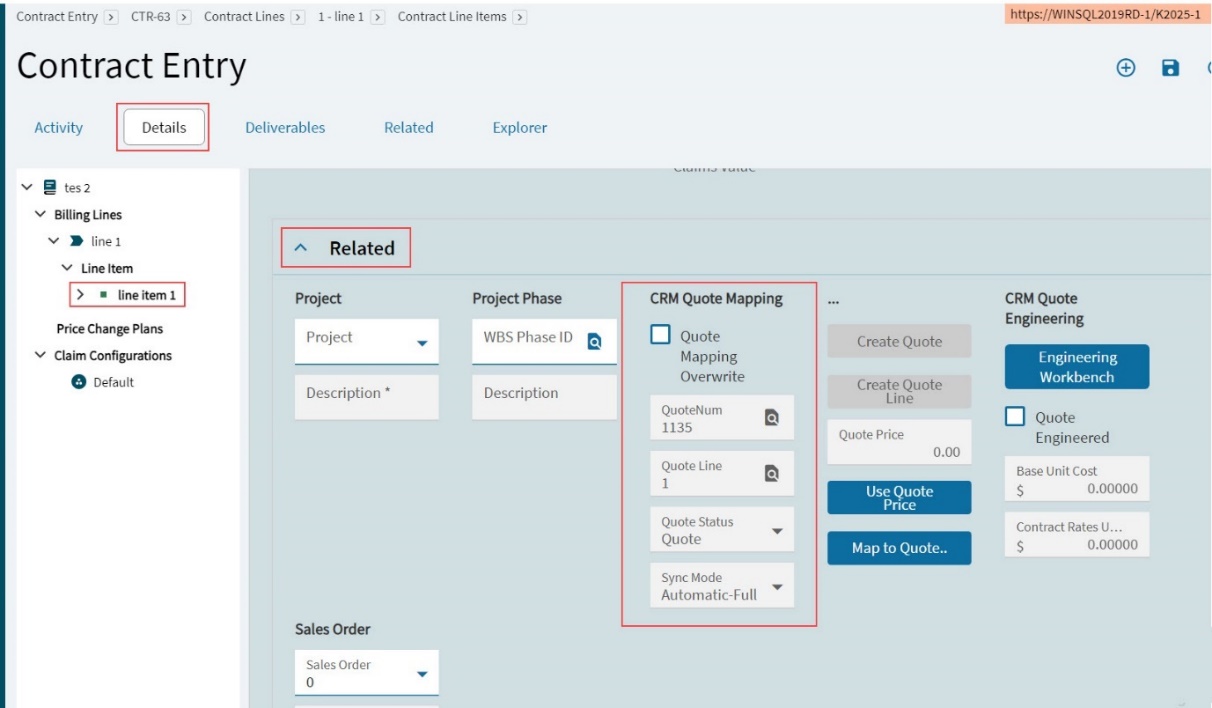
The Quote is created, synchronized to the contract, and appears in the Linked Quotes card on the Related page and in the CRM Quote Mapping in the Defaults card on the Details page.
-
Review and manually update any previously existing quote mapped to the contract.
Linked Quotes
Details of the new quote appear on the Related page, on the Linked Quotes card.
The linked quote details appear in the CRM Quote Mapping on the Defaults card on the Details page.
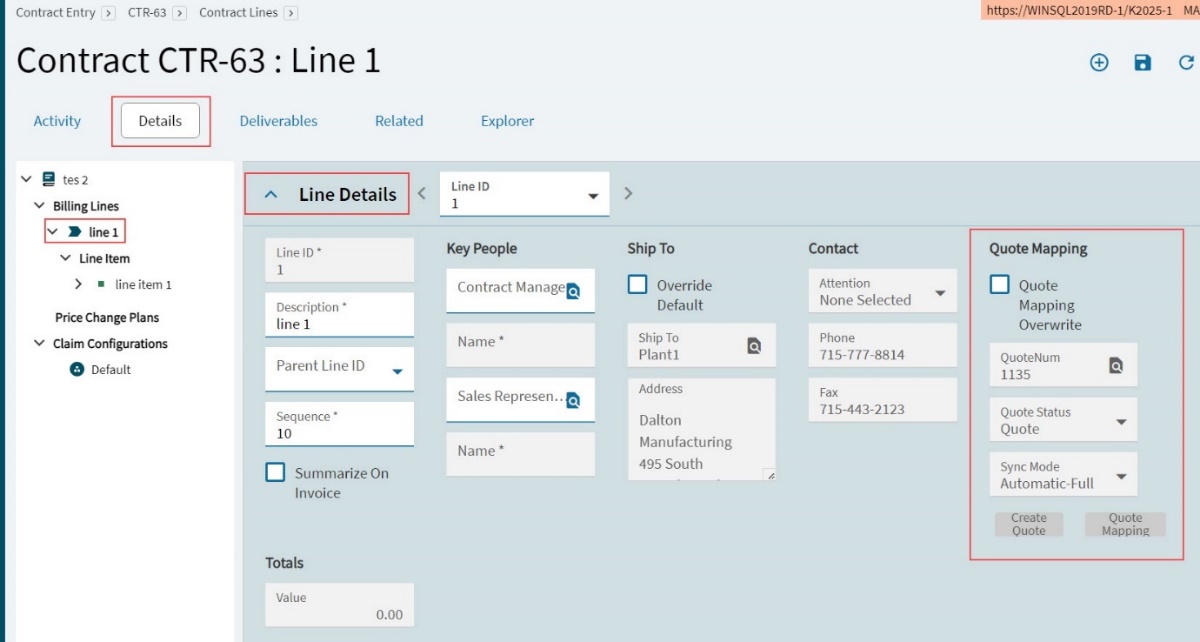
You can also see the Quote Mapping section on the contract Line Details card
On the line item’s Related card, there is a CRM Quote Mapping section
Viewing the Quote
To view the new quote, right-click on the Opportunity/Quote number on the Related page, or right-click on the Quote Num on the Line Details page for a line item. Select APM Quote Entry. See APM Quote Entry.
The new Quote has a line corresponding to each Contract Line Item. The Quote line’s Description is the Contract Line’s Description, and its Unit Price is equal to the Contract Line’s Value (in the Totals section).
| You can delete the quote in APM Quote Entry. The quote will be removed from the contract. |
Quote Mapping Overwrite
You can overwrite quote mapping at the header level, line level, or line item level.
At the header level, create quote from contract, as described above in section Creating a Quote from a Contract.
Navigate to the line. In the Quote Mapping section on the Line Details card:
-
Select a line on the Navigation Tree.
-
In the Quote Mapping section on the Line Details card:
Select Quote Mapping Overwrite to create a new quote or map the existing quote. This enables the other fields in this section.
To create a new quote:
-
Search for and select a new Quote Num.
-
Optionally select a different Sync Mode from the drop-down.
-
Click Create Quote.
-
In the confirmation slide-out, click OK.
The new quote is created for the line.
-
If necessary, review and manually update the existing quote line after this process is completed.
To map the quote:
-
Select Manual from the Sync Mode drop-down list.
-
Click Quote Mapping.
The mapped quote line is updated.
-
Adding a Sales Order to a Contract
You can add a Sales Order to a Contract as a reference, with mapping to individual contract line items, or you can use the Sales Order to add contract lines and contract line items.
| The order does not need to be Open to be used. |
To add a Sales Order:
-
Select Add Sales Order from the Overflow
menu. -
In the Search screen, search for and select a Sales Order. Note that only Sales Orders for the Contract Customer appear in the Sales Order Search screen.
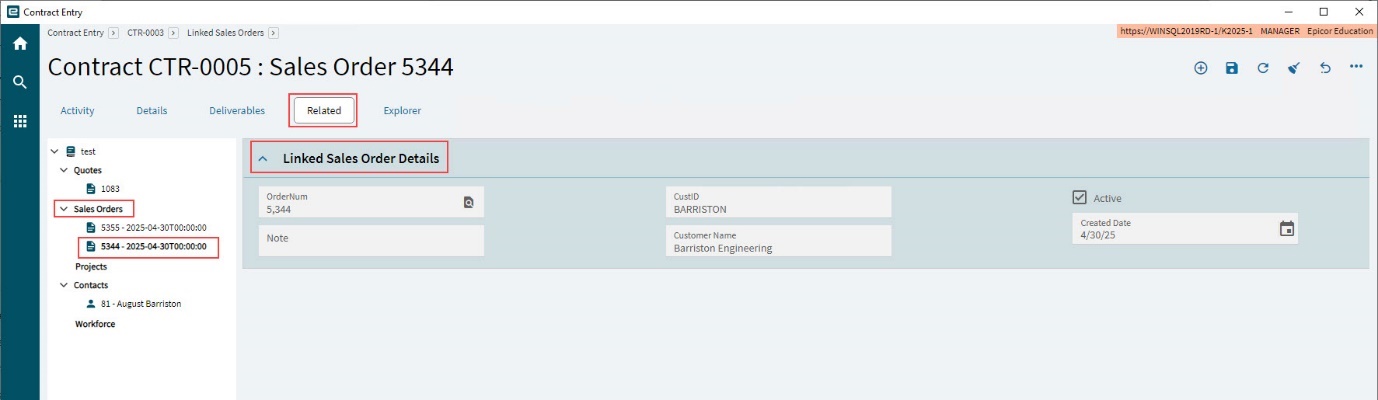
The selected Sales Order appears on the Linked Sales Order Details card on the Related page.
-
Select the Sales Order on the Navigation Tree, under the Sales Orders node, to display the sales order details on the Linked Sales Order Details card.
-
Continue to add as many Sales Orders as required.
You can now create Contract Lines and Line Items from the sales orders (see Creating Contract Lines and Line Items from Sales Order).
Creating Contract Lines and Line Items from Sales Order
Before you can add contract lines and contract line items from a Sales Order, you need to add the Sales Order to the Contract (see Adding a Sales Order to a Contract).
Each contract line item will be given the Progress billing type. Ensure that a Milestone Set is defined in the Contract Defaults (see Updating Defaults), as this is required for the new contract line items.
-
Select Create Contract Line and Line Items from Sales Order Lines from the Overflow
menu. -
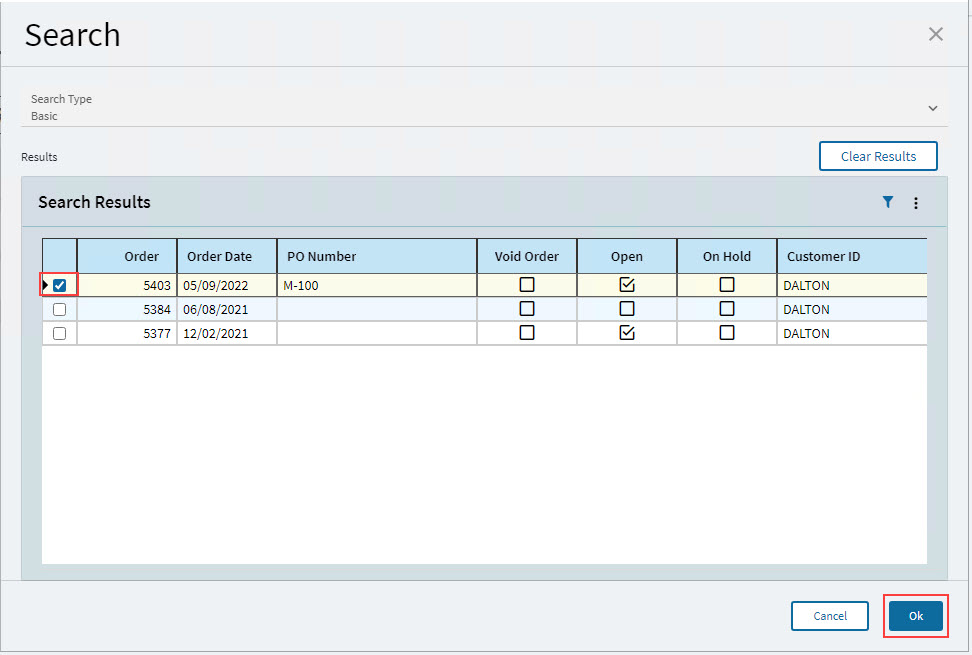
In the Search slide-out panel, search for and select a Sales Order to use, from the list of related Sales Orders, then click OK.
| A Sales Order cannot be used to create contract lines and line items if it has already been used for this, and the following message appears if you try this: "The Sales Order Line is already associated with another Contract Line Item". |
A new Contract Line (Billing Line) is created, with the Sales Order number as its Description. Each Line from the Sales Order is added as a Contract Line Item under the new Contract Line.
The Contract Line Items fields are as follows:
| Description |
[Sales Order No] Line [Sales Order Line No] |
| Billing Type |
Progress (this field cannot be edited) |
| Milestone Set |
The Milestone Set from the Contract Defaults (this field cannot be edited) |
| Tax Liability |
Defaults from the Contract Defaults |
| Claim Configuration |
Defaults to the Default Claim Configuration |
| Part |
The Part/Rev from the Sales Order Line |
| Quantity |
The Order Quantity from the Sales Order Line |
| Base Unit Value |
The Unit Price from the Sales Order Line |
| UOM |
The UOM from the Sales Order Line |
| Discount % and Discounted Value |
The Discount % and Value from the Sales Order Line |
| Retention Planned |
The Claim Configuration’s Default Retention %. |
You can edit the new contract line item, if required (see Progress Billing Type).
Adding a Project to a Contract
You can add multiple projects to a contract. See also: Creating a Project from Contract.
-
Select Add Project from the Overflow
menu. -
In the Search slide-out panel, search for and select a project. Click OK.
The selected project is added to the contract, and appears on the Linked Projects card, on the Related page.
Adding a Quote to a Contract
Adding a quote to a contract brings in the quote lines as new contract lines and contract line items. There is no mapping between the contract and the quote. Also, the quote does not appear in the related page.
|
You can add multiple quotes to a contract. You can also add quotes to a contract that is already linked to a quote. The quote may also be for a different customer. |
-
Select Add Quote to Contract from the Overflow
menu. -
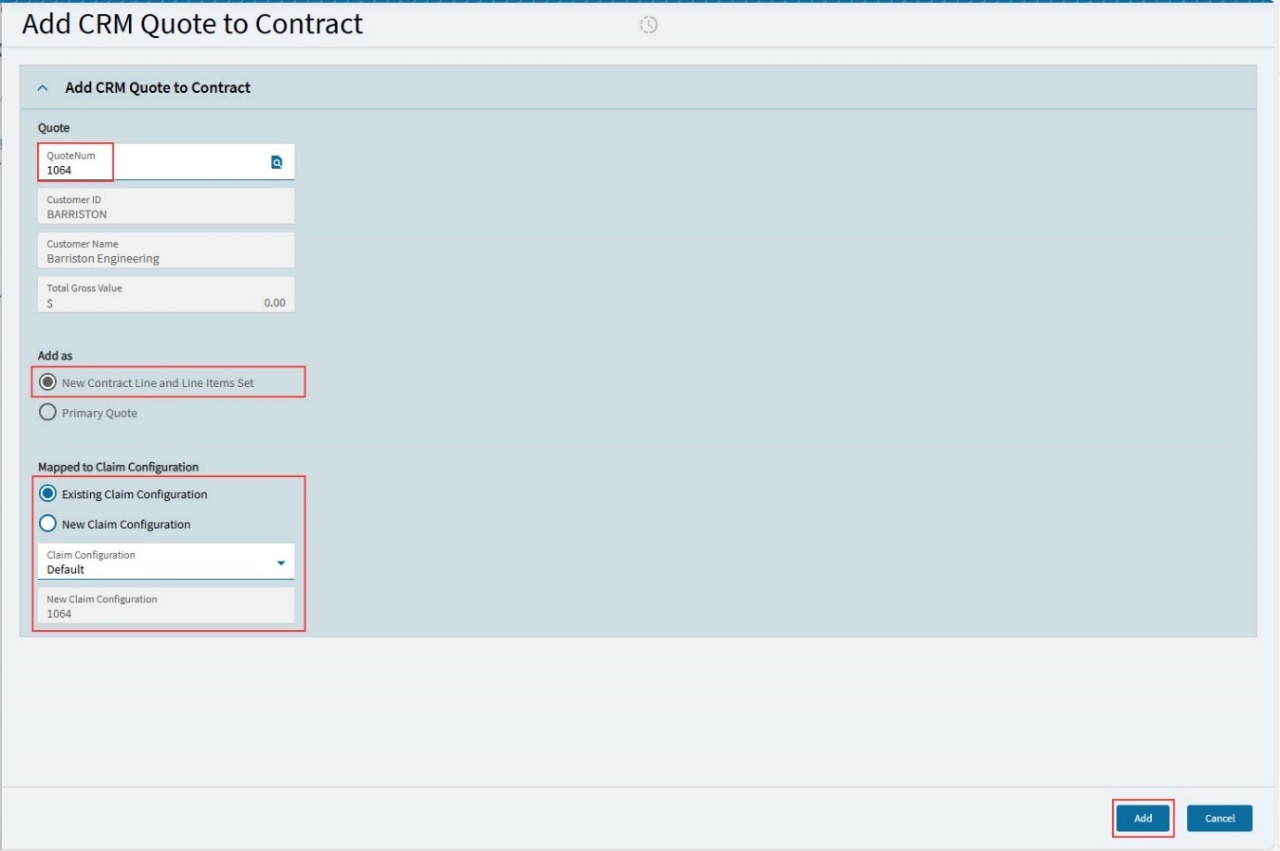
In the Add CRM Quote to Contract slide-out pane, search for and select a Quote from the Quote Num search box.
-
Check this is the correct Quote Num by referring to the Customer ID, Name, and the Total Gross Value. Update the Quote Num if necessary.
-
The Add as selection is set to New Contract Line and Line Items Set. This brings in each quote line as a new contract line, with quote lines added as line items.
-
For Mapped to Claim Configuration either:
-
Select Existing Claim Configuration and then select one of the contract’s claim configurations OR
-
Select New Claim Configuration.
-
-
-
Click Add.
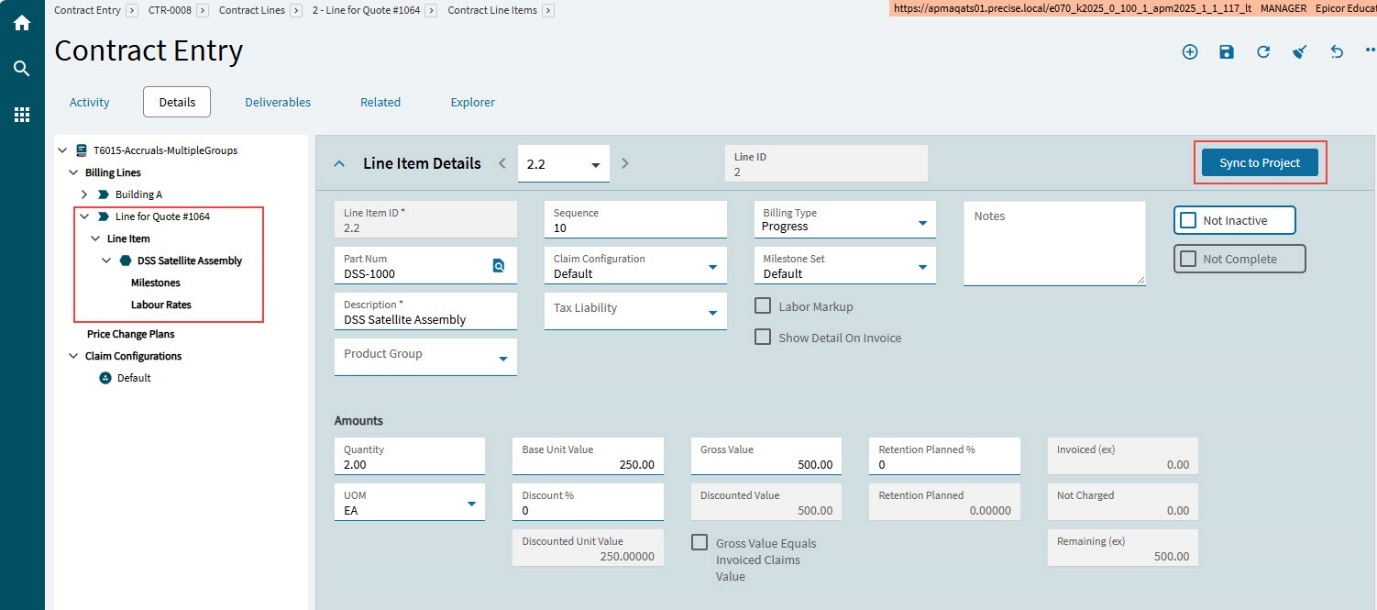
A single contract line and single contract line item are added to the contract for each line of the quote, as follows:
Quote Line |
Contract Line [The next contract line number for the contract] |
Contract Line Item The same as the line number |
|
Part/Rev |
is copied to |
Part |
|
Description |
is copied to |
Line for Quote # [quote number] |
Description |
Order Quantity |
is copied to |
Quantity |
|
Unit Price and UOM |
is copied to |
Base Unit Value & UOM |
|
Discount % |
is copied to |
Discount % |
The Billing Type will always be Progress, and the Milestone Set will be the Milestone Set from the Defaults sheet.
| If the quote is closed, the quote lines will not be added. |
-
For the new contract lines, click Sync to Project if you want to add these to the linked Project. See Sync to Project.
Mapping Activities to Project
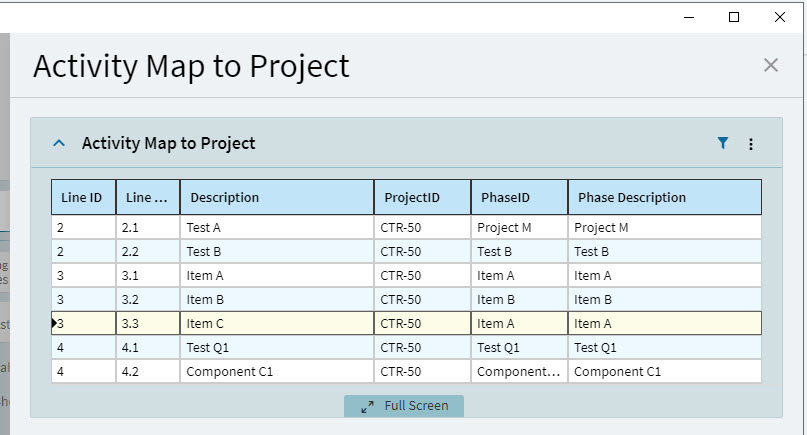
Use this function to manually map activities in the current Contract to a Project.
-
Select
Map Activities to Project from the Overflow menu.The current activity mapping for all contract line items is displayed in the Activity Map to Project dialog.
-
To change a Line Item’s mapping:
-
Select a Project from the ProjectID drop-down.
-
Select a Phase from the PhaseID drop-down.
-
When all the re-mapping is done, click OK.
-
|
Releasing Contract Retentions
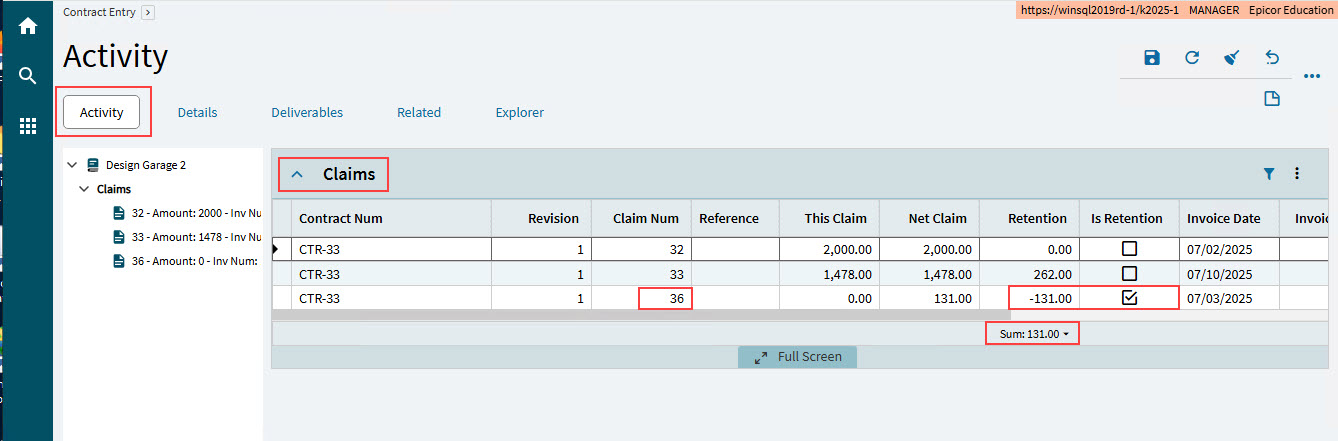
Contract Claim Retention amounts are displayed in the Activity page in Contract Entry.
Contract Claims will have a retention value if this was set up in the Contract Claim.
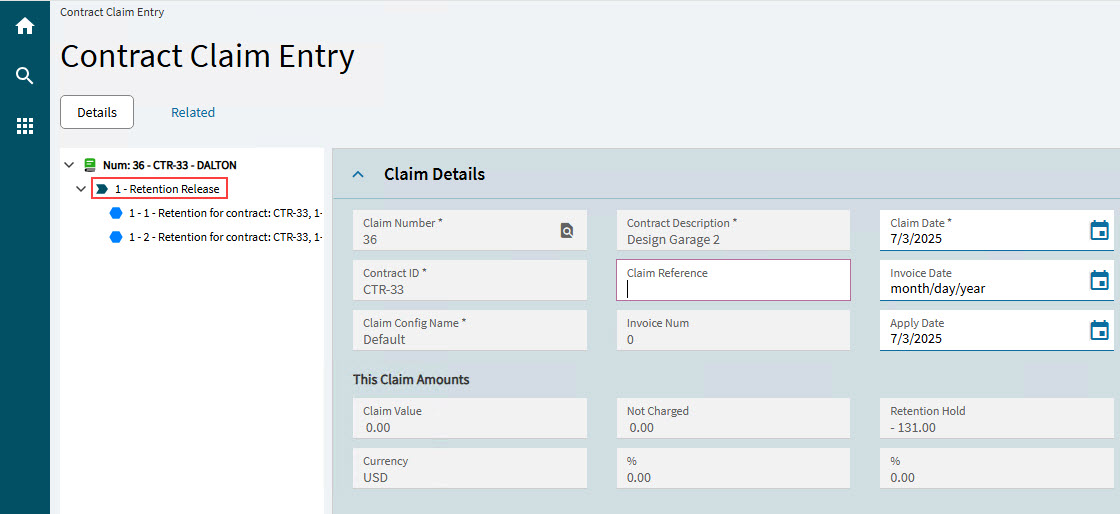
The retention value appears in each claim line, on the Claims card. Retentions, such as Claim Num 36 in the example below, appear as a negative value.
The Sum of the Retention Values is the total that can be released.
| You can only release contract retentions if there are no existing open claims for a selected contract and claim configuration combination. |
To release contract retentions:
-
Open Contract Entry and select a contract.
-
Select
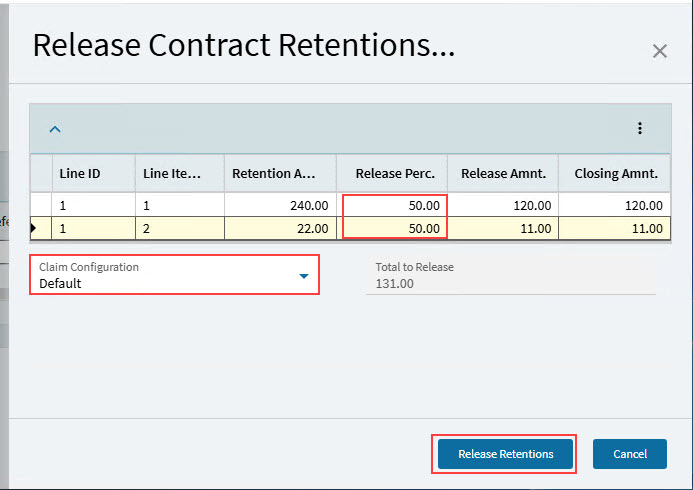
Release Contract Retentions … from the Overflow menu.The Release Contract Retentions panel slides open.
-
In Release Contract Retentions:
-
Select a Claim Configuration. The contract lines for the selected Claim Configuration appear in the grid, where there is a Retention Amount.
-
Update the Release Perc or Release Amnt if releasing less than the total or keep the default amount which is equal to the full Retention Amount. The Closing Amnt is updated. The Total to Release is updated. This is the amount that will be released.
-
Select Release Retentions.
-
A new contract claim is created, and the Contract Claim screen displays, with the new Claim Num.
The contract claim has a line called Retention Release, with line item details for each retention release.
-
Process the Contract Claim Entry (see Processing Contract Claims and Retentions).
After processing the Contract Claim, refresh Contract Entry to see the new released Retention. Note how the Retention amount has decreased, while the Net Claim amount has increased.
-
You can continue to release contract retentions in this manner, until the Retention total is zero.
Deliverable Update Process
If you have a deliverable with a linked quote, you can bring in the quote data to create an estimate for that deliverable.
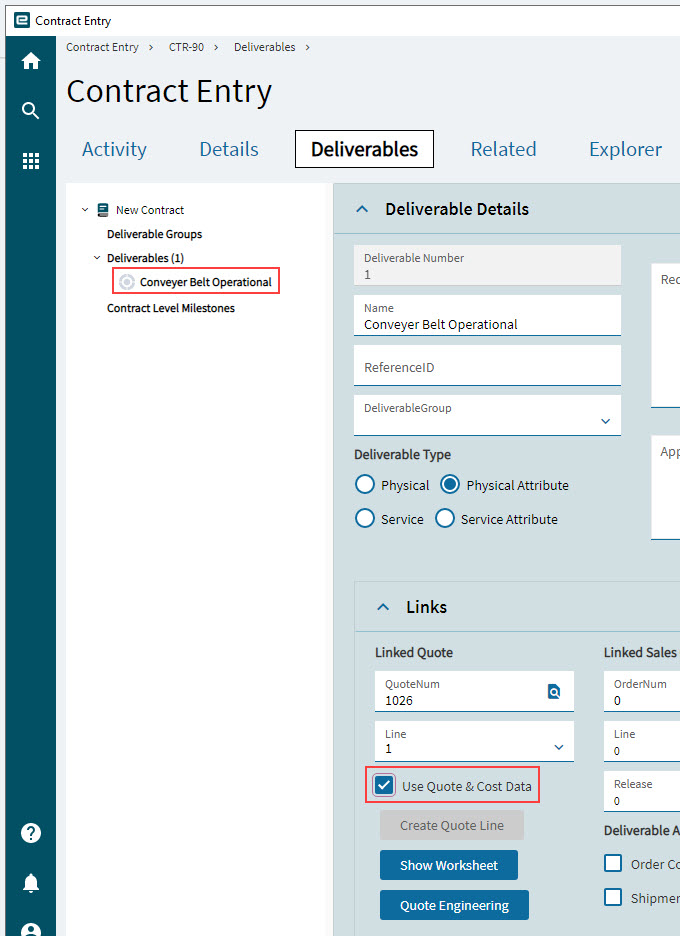
-
Ensure that your deliverable has a Linked Quote with a QuoteNum and Line selected, and that the Use Cost & Quote Date check box is selected. See Linking to Source Records.
-
Select
Deliverable Update Process from the Overflow menu. -
Select Yes on the confirmation slide-out panel.
The Deliverable Update Process goes through each deliverable item in the contract, inserting links to source records and inserting estimates, wherever there is a linked quote.
-
Refresh the contract to bring in the quote values.
-
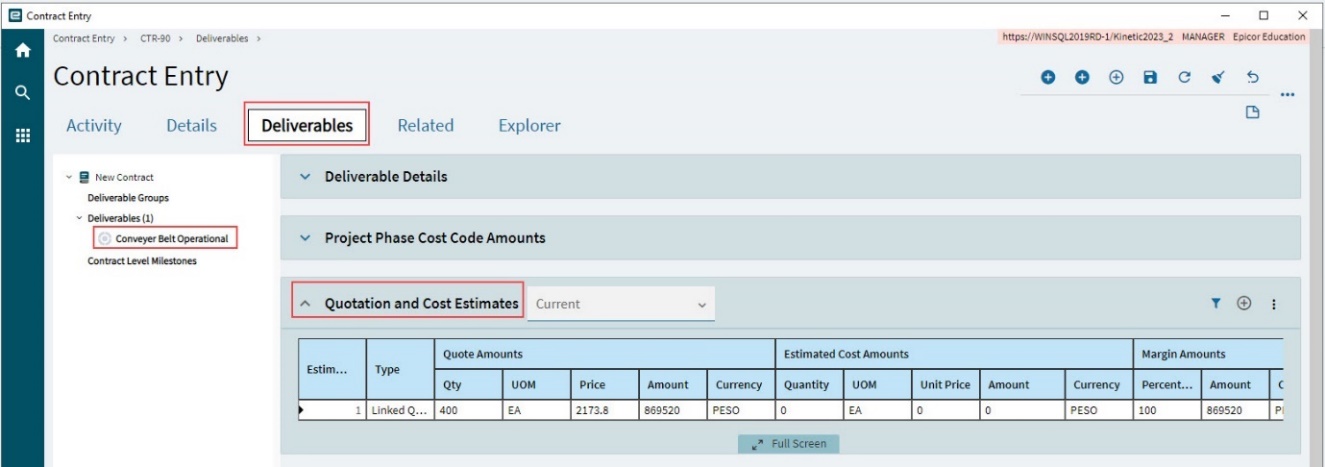
Still on the Deliverables page, with the deliverable selected on the Navigation Tree, scroll down to the Quotation and Cost Estimates card, and expand it.
The new quote estimate appears in the grid.
Inserting and Updating Estimates
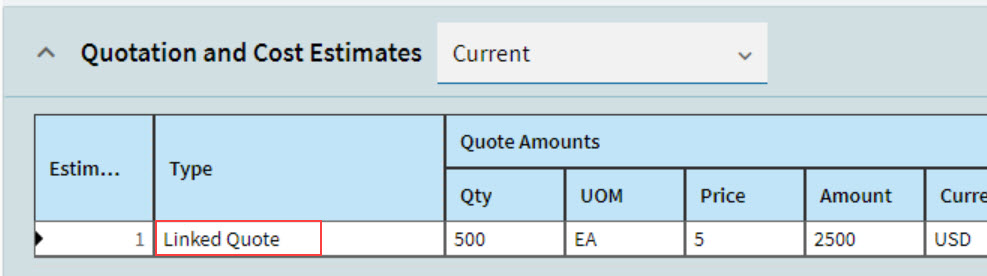
If the Use Quote and Cost Data is selected for a Linked Quote, a new Estimate for that Deliverable Item is inserted automatically by the Deliverable Update Process, and populated with the linked quote’s Quote Amounts, Estimated Cost Amounts, and Margin Amounts. The estimate Type is Linked Quote.
|
| You can also insert manual estimates or update existing estimates. See Adding Quotation and Cost Estimates. |